Data Processing
Introduction
A typical machine learning (ML) workflow consists of three stages: preprocessing, training, and serving. During preprocessing, data cleaning and data transformations are performed. During the training stage, one or more models are trained. These models are in turn made available to the target audience in the serving stage. The data generated during serving can be fed back to the ML pipeline to help improve model accuracy, keep the model relevant and up to date as old training data might become irrelevant. The increasing amount of data available as input for ML workflows increases the need for efficient processing of data. Therefore it would be useful to learn how to integrate Apache Spark into Kubeflow on vSphere ML workflow.
Note
Details and screenshots on how to create pipelines from YAML file and how to create experiments and runs are included in ML Pipelines.
Using more powerful machines to process large amount of data is expensive and sometimes not possible. Hence, the available solution today is distributed computing. Apache Spark is a distributed computation framework. It is used widely for data-intensive processing tasks. It is a multi-language engine for executing data engineering, data science, and ML on single-node machines or clusters. It supports multiple powerful features such as streaming data, SQL analytics, data science at scale and ML.
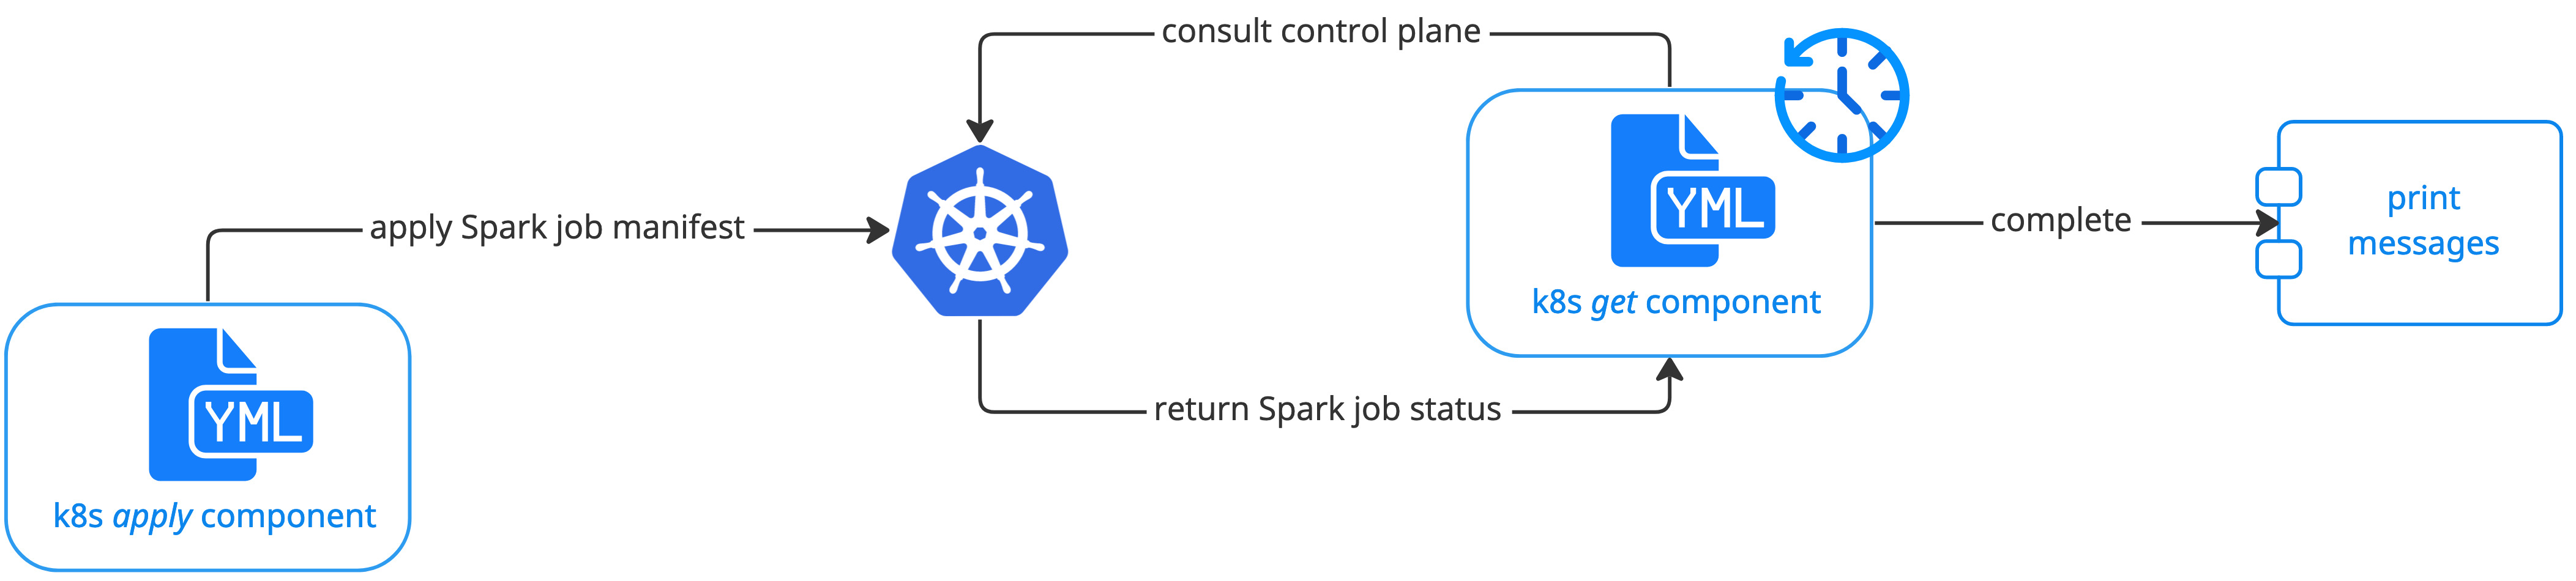
In this section, we walk you through an example to show how to integrate Spark into Kubeflow on vSphere ML workflow. The following diagram demonstrates the overall workflow of the example, which can also be a general workflow of ML pipeline that uses Spark job.
Prerequisites
Make sure the following prerequisites are fulfilled before starting:
Get familiar with ML Pipelines
Install
helmCLI following official documentations
Get Started
Install Spark operator
Run the following commands in your terminal to install Spark operator on your Kubernetes cluster.
helm repo add spark-operator https://googlecloudplatform.github.io/spark-on-k8s-operator

kubectl config view --raw > ~/.kube/config

helm install my-release spark-operator/spark-operator --namespace kubeflow
To confirm your Spark operator is on, run kubectl get pods -n kubeflow, and you see pods with name like
spark-operator-0 in “Running” status.
Create Spark Service Account and add permissions
In this example, you create a service account called spark-sa to run the ML pipeline with Spark job.
First create the YAML file for the service account. In your VM, create the following YAML file:
apiVersion: v1
kind: ServiceAccount
metadata:
  name: spark-sa
  namespace: admin
---
apiVersion: rbac.authorization.k8s.io/v1
kind: Role
metadata:
  namespace: kubeflow
  name: spark-role
rules:
- apiGroups: [""]
  resources: ["pods", "services", "configmaps", "pods/log"]
  verbs: ["create", "get", "watch", "list", "post", "delete", "patch"]
- apiGroups: ["sparkoperator.k8s.io"]
  resources: ["sparkapplications"]
  verbs: ["create", "get", "watch", "list", "post", "delete", "patch"]
---
apiVersion: rbac.authorization.k8s.io/v1
kind: RoleBinding
metadata:
  name: spark-role-binding
  namespace: kubeflow
subjects:
- kind: ServiceAccount
  name: spark-sa
  namespace: kubeflow
roleRef:
  kind: Role
  name: spark-role
  apiGroup: rbac.authorization.k8s.io
Note
In this example, you create the service account under admin namespace. You may change it based on your own situation
and need.
You then apply the YAML file to create the spark-sa service account using the following command:
kubectl apply -f <create_service_account_yaml_file>
Create the pipeline with a Spark job
Now, it’s time to start concreate coding work to create a pipeline with a Spark job.
The main challage here is to orchestrate a Spark job from Kubeflow on vSphere and submit it to the cluster. You overcome it by using pipeline components for kubernetes.
As shown in the workflow diagram in Introduction, you create a k8s apply component to load the Spark job manifest file and perform kubectl apply to submit it to the
cluster. In this way, a sparkapplication resource is created in the cluster. You also need to create a k8s get component to periodically poll the control plane to get the status of the Spark job.
And once the job is in “COMPLETED” state, the pipeline moves to the next step.
On your Kubeflow on vSphere dashboard UI, navigate to Notebooks page, and connect to a proper Notebook Server. Run the following Python codes in a notebook (.ipynb file).
1. Import packages and define global variables
In the notebook, first import packages and define global variables needed for this example.
import json
import time
import yaml

import kfp.components as comp
import kfp.dsl as dsl

SPARK_COMPLETED_STATE = "COMPLETED"
SPARK_APPLICATION_KIND = "sparkapplications"
2. Define Spark job application
In this example, you create a simple Spark job that calculates an approximate value of Pi (π). Below is the YAML file.
You name it as spark-job-python.yaml and put it under the same path with your notebook.
apiVersion: "sparkoperator.k8s.io/v1beta2"
kind: SparkApplication
metadata:
  name: pyspark-pi-{epoch}
  namespace: admin
spec:
  type: Python
  pythonVersion: "3"
  mode: cluster
  image: "gcr.io/spark-operator/spark-py:v3.1.1"
  imagePullPolicy: Always
  mainApplicationFile: local:///opt/spark/examples/src/main/python/pi.py
  sparkVersion: "3.1.1"
  restartPolicy:
    type: OnFailure
    onFailureRetries: 3
    onFailureRetryInterval: 10
    onSubmissionFailureRetries: 5
    onSubmissionFailureRetryInterval: 20
  driver:
    cores: 1
    coreLimit: "1200m"
    memory: "512m"
    labels:
      version: 3.1.1
    serviceAccount: spark-sa
  executor:
    cores: 1
    instances: 1
    memory: "512m"
    labels:
      version: 3.1.1
You then define the following function to get the Spark job definition in the notebook. It reads the Spark Operator job manifest file and returns the corresponding dictionary and add some randomness in the job name.
Note
If you name your Spark job definition YAML file differently, remember to change the file name spark-job-python.yaml to your own.
def get_spark_job_definition():
    # Read manifest file
    with open("spark-job-python.yaml", "r") as stream:
        spark_job_manifest = yaml.safe_load(stream)

    # Add epoch time in the job name
    epoch = int(time.time())
    spark_job_manifest["metadata"]["name"] = spark_job_manifest["metadata"]["name"].format(epoch=epoch)

    return spark_job_manifest
3. Apply the Spark job manifest file to create the job
As explained in Introduction, the next step is to use k8s apply component to load the Spark job manifest file
to create the corresponding sparkapplication resource in the cluster.
Define the k8s apply component using the following YAML file. Name it as k8s-apply-component.yaml and put it under the same path with your notebook.
name: Apply Kubernetes object
inputs:
  - {name: Object, type: JsonObject}
outputs:
  - {name: Name, type: String}
  - {name: Kind, type: String}
  - {name: Object, type: JsonObject}
metadata:
  annotations:
    author: Alexey Volkov <alexey.volkov@ark-kun.com>
implementation:
  container:
    image: bitnami/kubectl:1.17.17
    command:
      - bash
      - -exc
      - |
        object_path=$0
        output_name_path=$1
        output_kind_path=$2
        output_object_path=$3
        mkdir -p "$(dirname "$output_name_path")"
        mkdir -p "$(dirname "$output_kind_path")"
        mkdir -p "$(dirname "$output_object_path")"
        kubectl apply -f "$object_path" --output=json > "$output_object_path"
        < "$output_object_path" jq '.metadata.name' --raw-output > "$output_name_path"
        < "$output_object_path" jq '.kind' --raw-output > "$output_kind_path"
      - {inputPath: Object}
      - {outputPath: Name}
      - {outputPath: Kind}
      - {outputPath: Object}
You use this file in the defining pipeline step later.
4. Monitor the Spark job status
As mentioned in Introduction, after the apply operation, the execution engine has to wait for the job to complete
before moving on to the next pipeline step. You define a k8s get component to periodically get the application’s state
and it iterats until the job is in “COMPLETED” state.
The iteration is done using recursion and the dsl.Condition instruction, and you use @graph_component decorator
to indicate the recursive execution of the function.
The k8s get component is defined using following YAML file. Name it as k8s-get-component.yaml and put it under the same path with your notebook.
name: Get Kubernetes object
inputs:
  - {name: Name, type: String}
  - {name: Kind, type: String}
outputs:
  - {name: Name, type: String}
  - {name: ApplicationState, type: String}
  - {name: Object, type: JsonObject}
metadata:
  annotations:
    author: Alexey Volkov <alexey.volkov@ark-kun.com>
implementation:
  container:
    image: bitnami/kubectl:1.17.17
    command:
      - bash
      - -exc
      - |
        object_name=$0
        object_type=$1
        output_name_path=$2
        output_state_path=$3
        output_object_path=$4
        mkdir -p "$(dirname "$output_name_path")"
        mkdir -p "$(dirname "$output_state_path")"
        mkdir -p "$(dirname "$output_object_path")"
        kubectl get "$object_type" "$object_name" --output=json > "$output_object_path"
        < "$output_object_path" jq '.metadata.name' --raw-output > "$output_name_path"
        < "$output_object_path" jq '.status.applicationState.state' --raw-output > "$output_state_path"
      - {inputValue: Name}
      - {inputValue: Kind}
      - {outputPath: Name}
      - {outputPath: ApplicationState}
      - {outputPath: Object}
The above get component executions are defined in the following function in the notebook.
Note
If you name your get component YAML file differently, remember to change the file name k8s-get-component.yaml to your own.
@dsl.graph_component
def graph_component_spark_app_status(input_application_name):
    k8s_get_op = comp.load_component_from_file("k8s-get-component.yaml")
    check_spark_application_status_op = k8s_get_op(
        name=input_application_name,
        kind=SPARK_APPLICATION_KIND
    )
    # Remove cache
    check_spark_application_status_op.execution_options.caching_strategy.max_cache_staleness = "P0D"

    time.sleep(5)
    with dsl.Condition(check_spark_application_status_op.outputs["applicationstate"] != SPARK_COMPLETED_STATE):
        graph_component_spark_app_status(check_spark_application_status_op.outputs["name"])
Once the Spark application is completed, the execution moves on to next pipeline steps.
5. Define print messages function
Before defining your pipeline, define the following function to print messages in the notebook.
def print_op(msg):
    return dsl.ContainerOp(
        name="Print message.",
        image="alpine:3.6",
        command=["echo", msg],
    )
6. Define the pipeline
You now define your pipeline using above functions in the notebook.
Note
If you name your apply component YAML file differently, remember to change the file name k8s-apply-component.yaml to your own.
@dsl.pipeline(
    name="Spark Operator job pipeline",
    description="Spark Operator job pipeline"
)

def spark_job_pipeline():

    # Load spark job manifest
    spark_job_definition = get_spark_job_definition()

    # Load the kubernetes apply component
    k8s_apply_op = comp.load_component_from_file("k8s-apply-component.yaml")

    # Execute the apply command
    spark_job_op = k8s_apply_op(object=json.dumps(spark_job_definition))

    # Fetch spark job name
    spark_job_name = spark_job_op.outputs["name"]

    # Remove cache for the apply operator
    spark_job_op.execution_options.caching_strategy.max_cache_staleness = "P0D"

    spark_application_status_op = graph_component_spark_app_status(spark_job_op.outputs["name"])
    spark_application_status_op.after(spark_job_op)

    print_message = print_op(f"Job {spark_job_name} is completed.")
    print_message.after(spark_application_status_op)
    print_message.execution_options.caching_strategy.max_cache_staleness = "P0D"
7. Compile the pipeline
Finally, compile the pipeline using the following codes in the notebook:
if __name__ == "__main__":
    # Compile the pipeline
    import kfp.compiler as compiler
    import logging
    logging.basicConfig(level=logging.INFO)
    pipeline_func = spark_job_pipeline
    pipeline_filename = pipeline_func.__name__ + ".yaml"
    compiler.Compiler().compile(pipeline_func, pipeline_filename)
    logging.info(f"Generated pipeline file: {pipeline_filename}.")
Create, execute, and inspect the pipeline
After executing the compiling pipeline function (i.e., the main function in Create the pipeline with a Spark job), you see the YAML file of your pipeline generated in the corresponding directory.
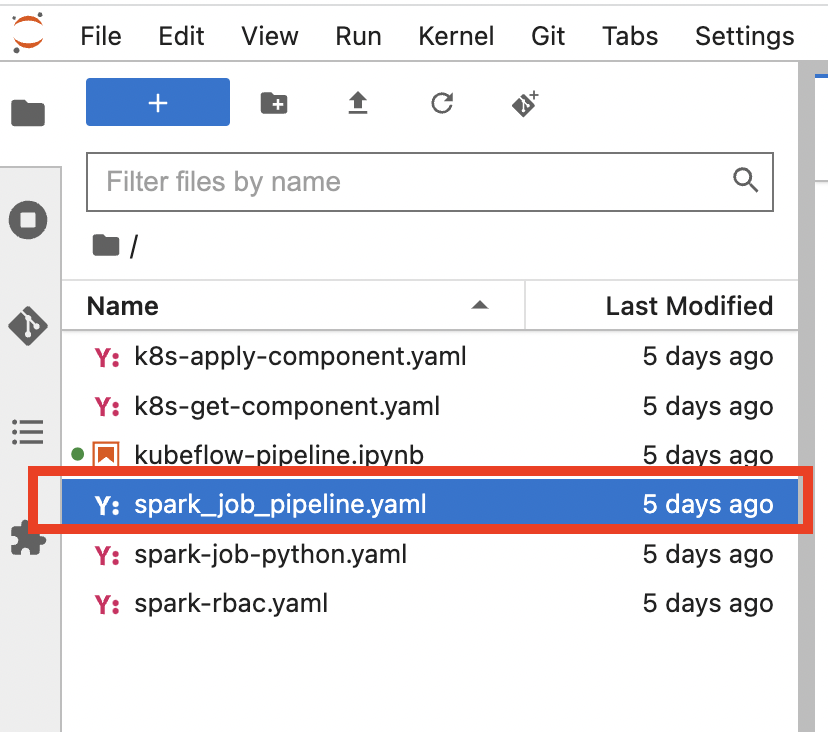
Download the YAML file and create the pipeline using it.
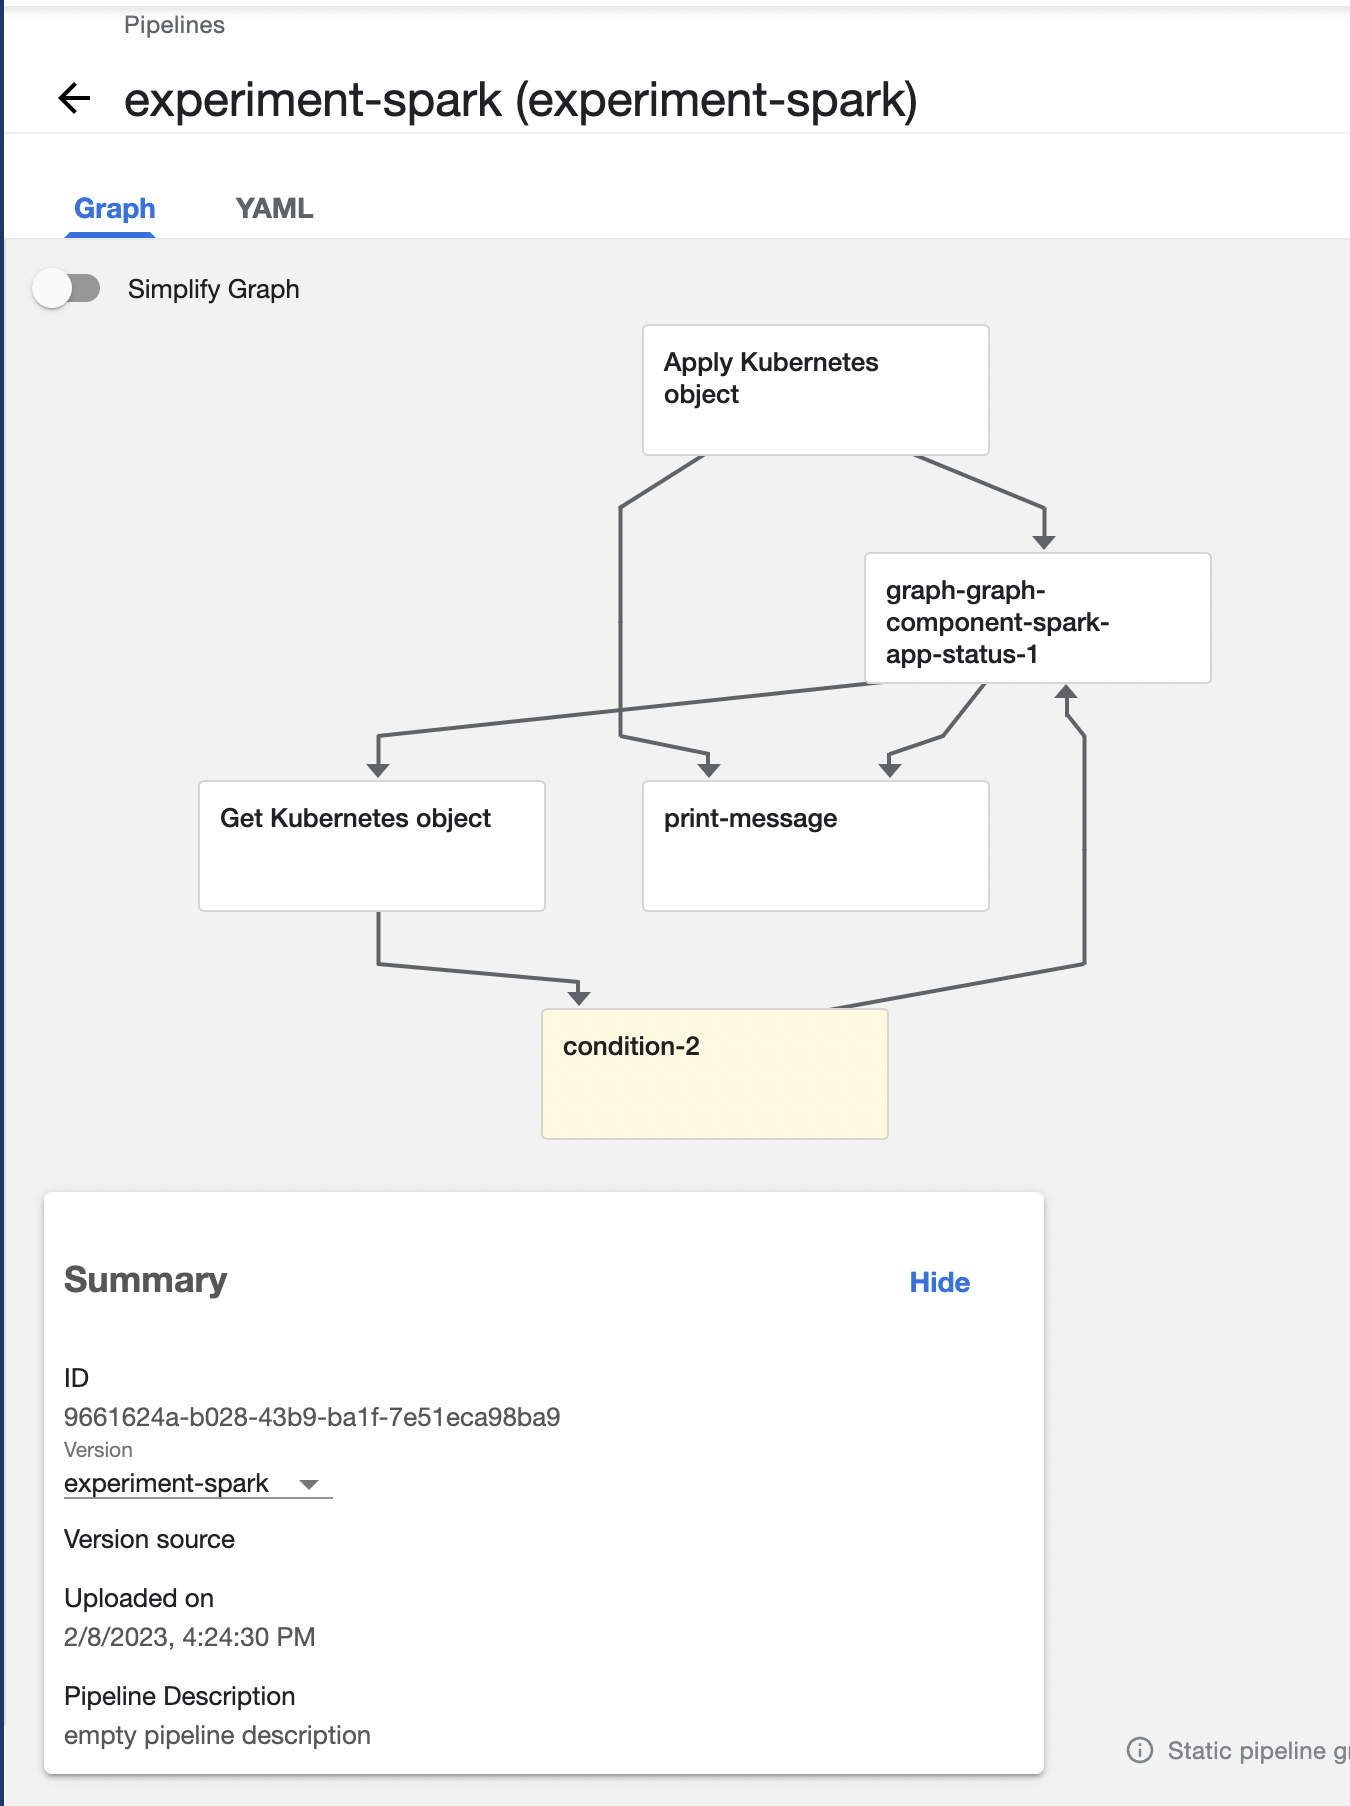
The pipeline looks like the following:
Create an experiment for this pipeline, and then create a run. Remember to set the Service Account as spark-sa.
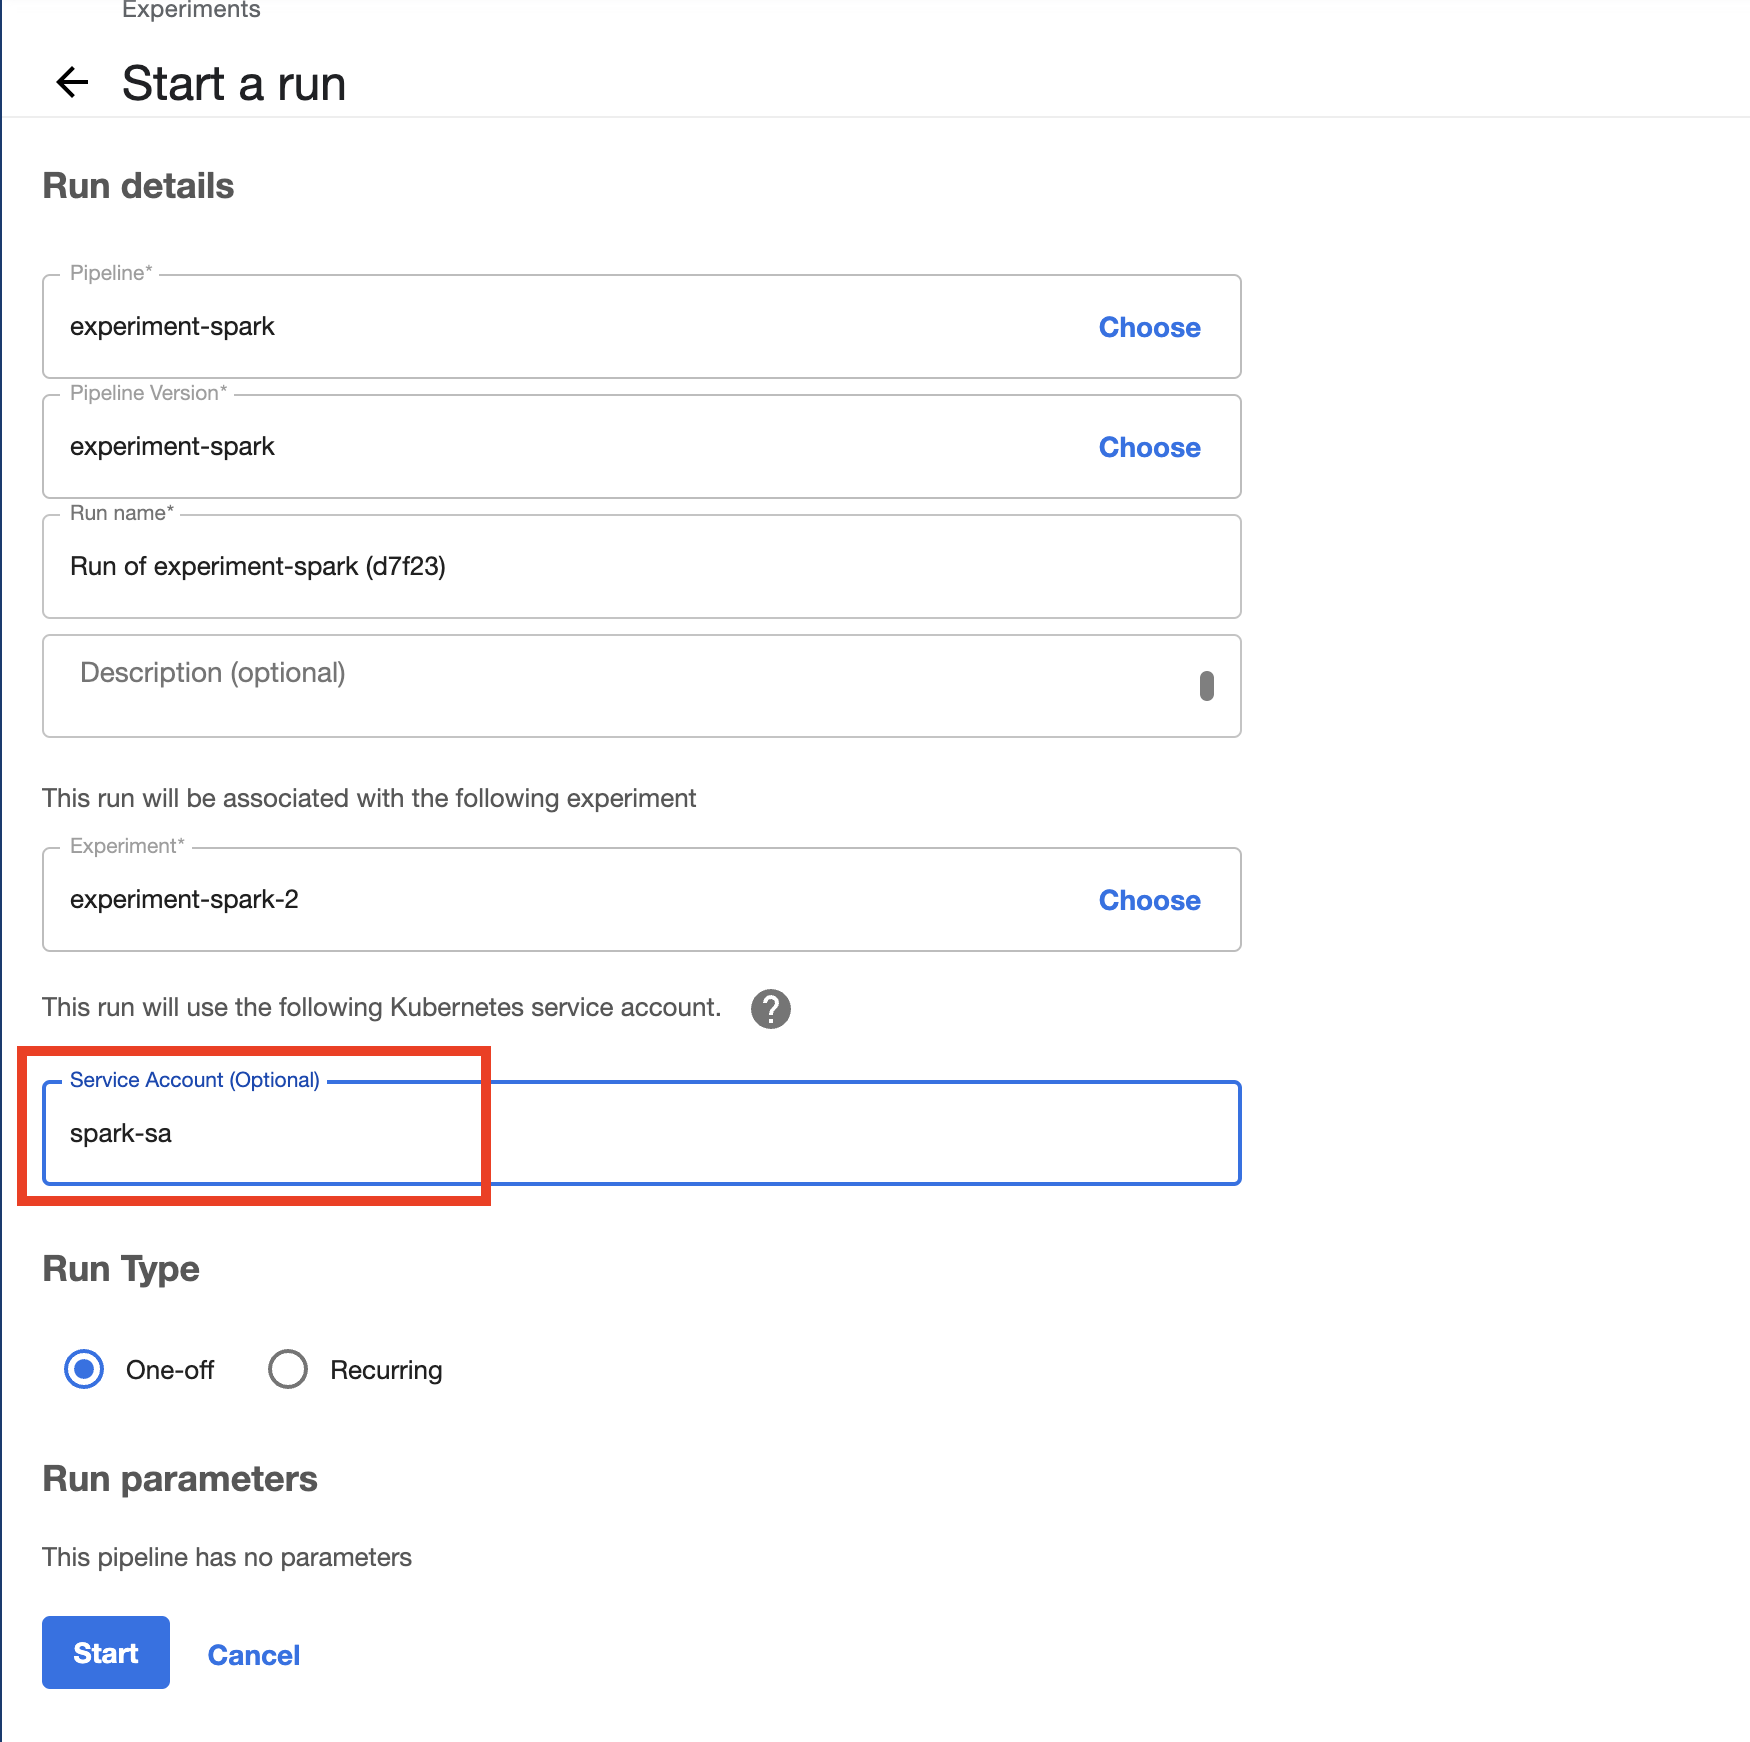
Start the pipeline run, and wait for the pipeline to finish. A successful pipeline run looks like below:
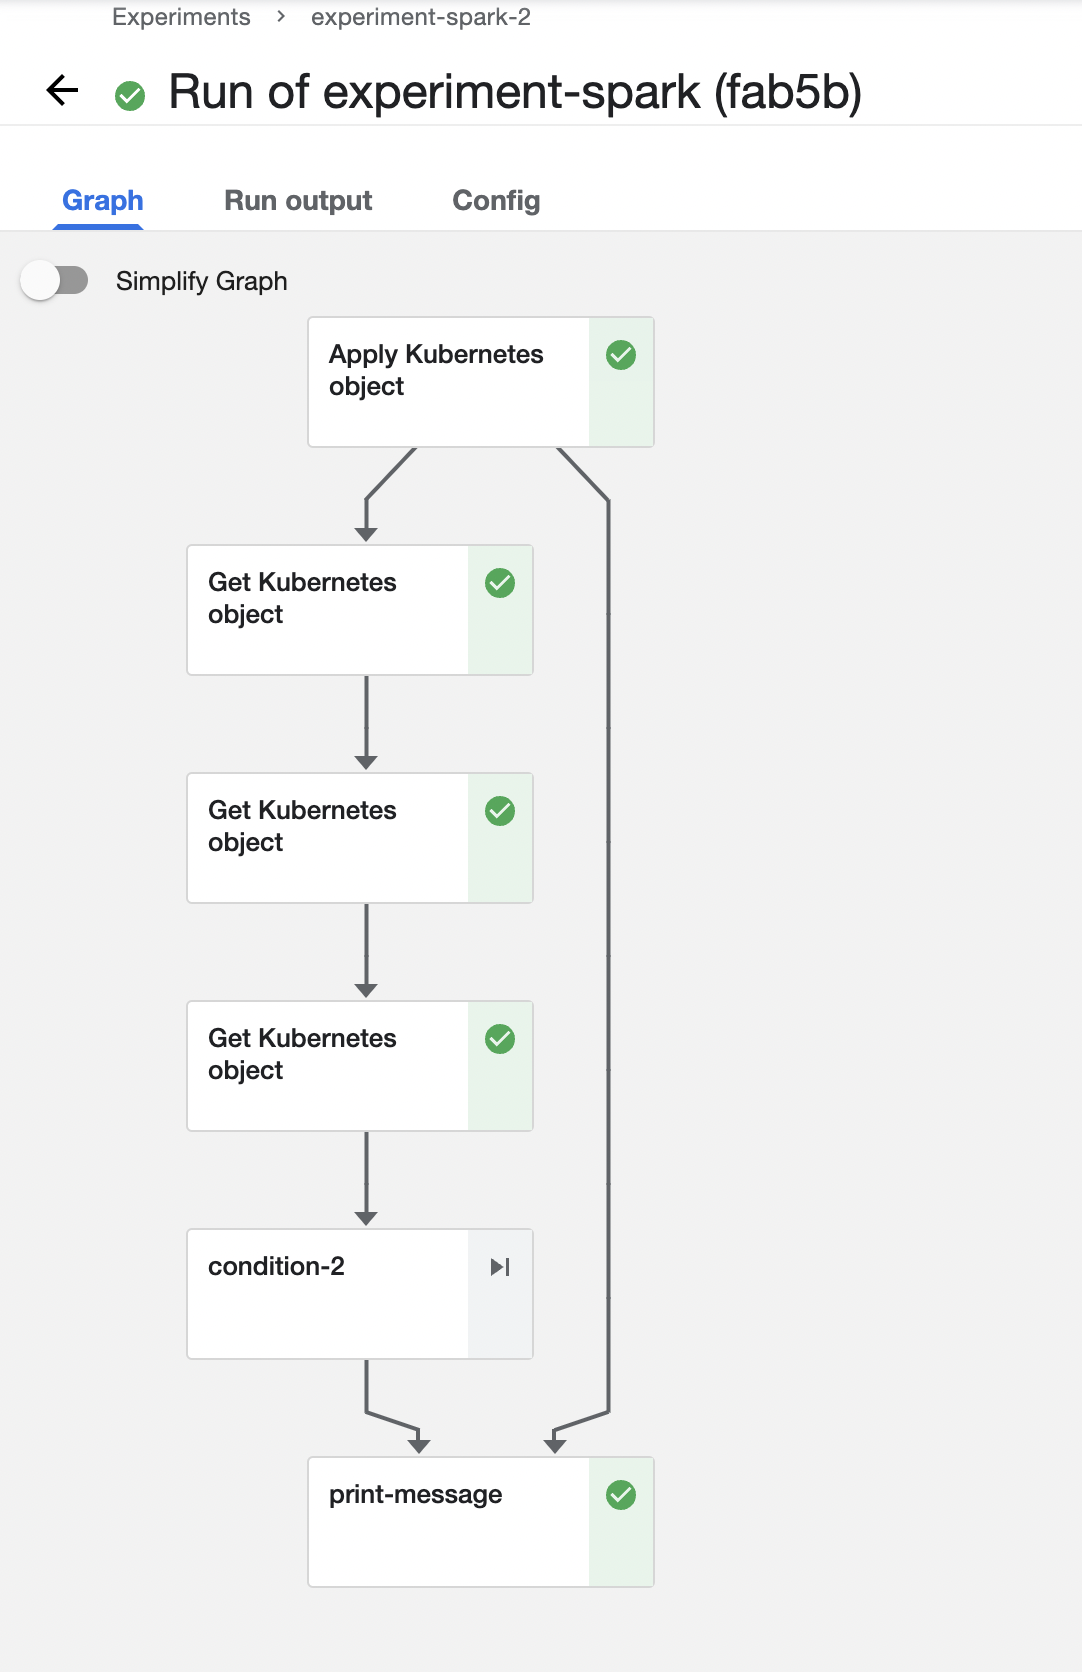
Feel free to click on each pipeline step to see the running details of the component.