CSE Server Management
Overview
This page contains procedures to install and manage Container Service
Extension (CSE) on vCloud Director (VCD). Users who perform these procedures
are termed as Cloud Administrators, they must have at least the role of
CSE Service Role (if the role is not present then the user need to have
sysadmin access) and a solid understanding of VCD server management.
Procedures on this page make regular use of vcd-cli commands to perform administrative operations. Please refer to the vcd-cli documentation if necessary to familiarize yourself with vcd-cli.
Server Setup
Installing CSE Server
CSE Server should be installed by the Cloud Administrator on a new VM or one
of the existing servers that are part of VCD installation. This CSE VM is
the CSE appliance.
The CSE appliance requires network access to the VCD cell, vCenter(s), and AMQP server. It does not require access to the network(s) that powers the org VDC where the Kubernetes templates will be created nor the tenant network(s) that powers that org VDC where the clusters will be deployed. Please find more details on the VCD prerequisites for CSE installation here.
The CSE software should be installed on the CSE appliance as described here.
Next, CSE server setup should be invoked via the cse install command.
The example below shows a typical invocation.
cse install -c config.yaml --ssh-key ~/.ssh/id_rsa.pub
Please find more details on how to generate sample config file and populate it correctly, here.
The following diagram illustrates installation steps visually.
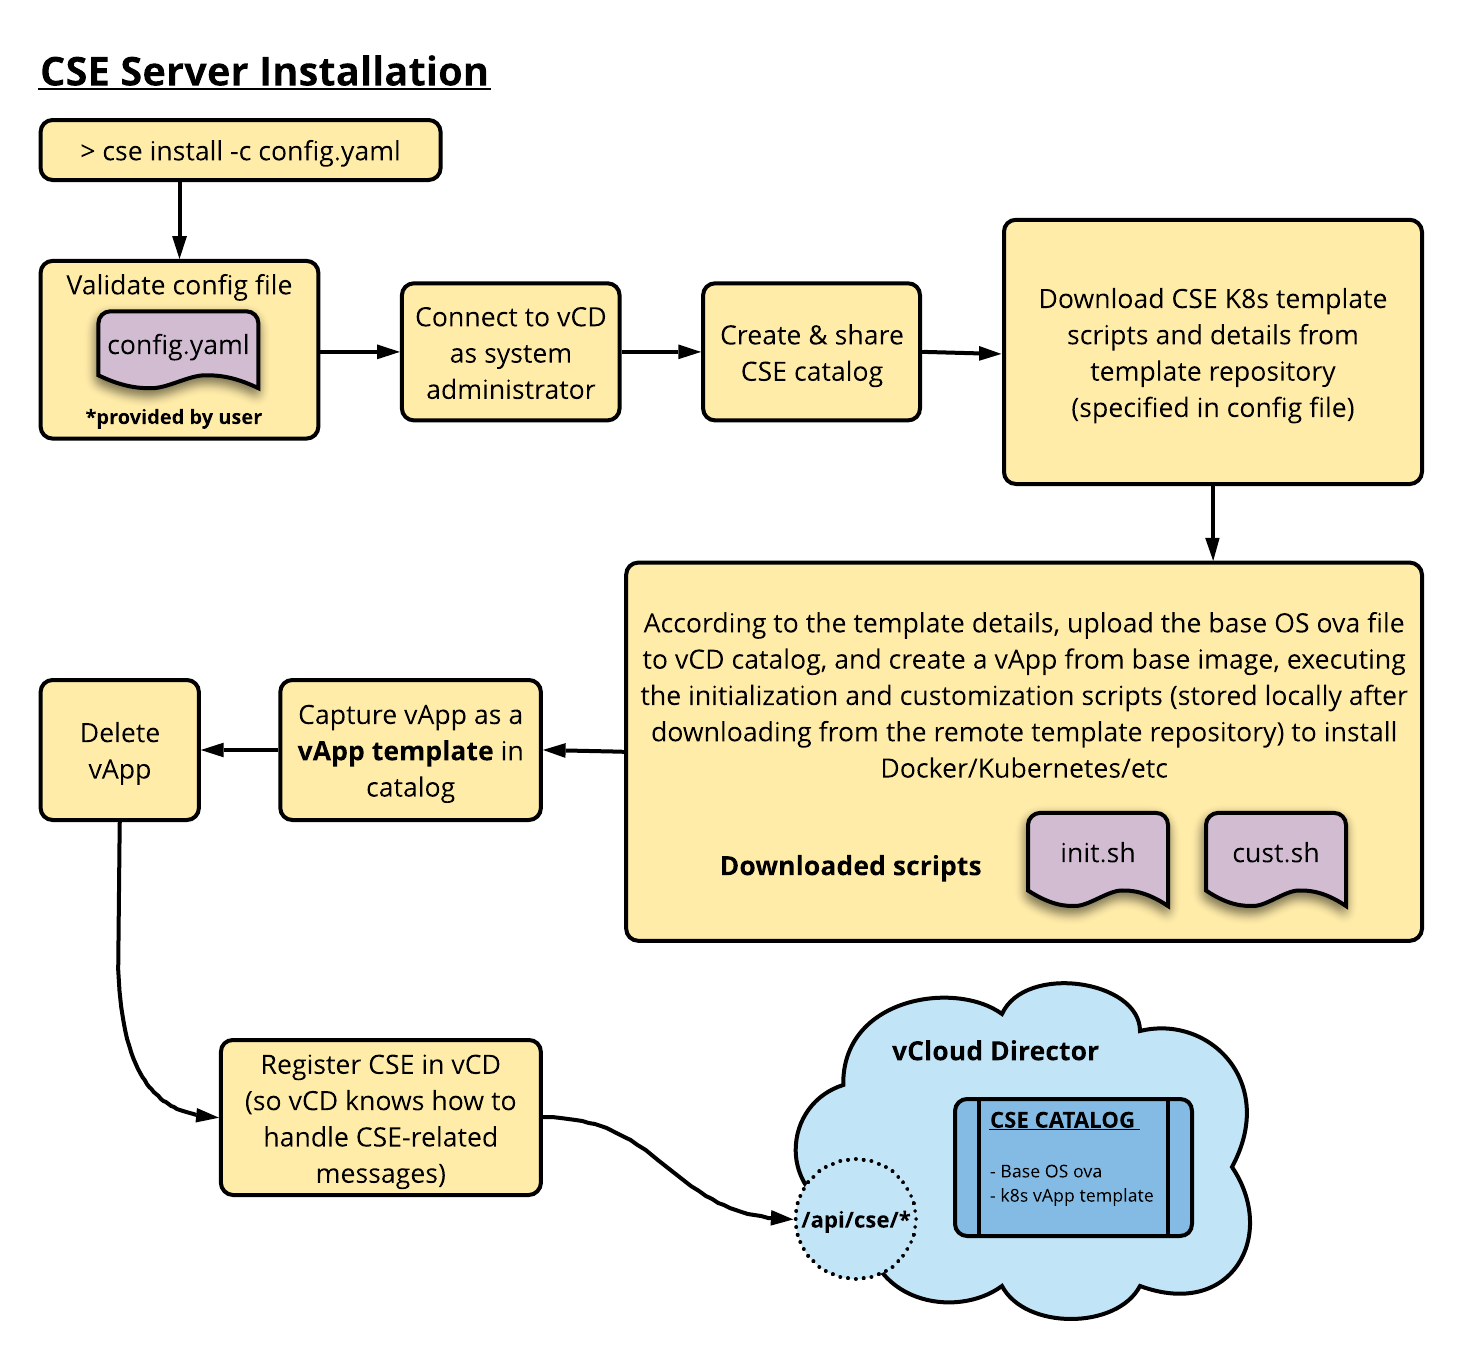 When CSE 3.0 is connected to Cloud Director 10.2, CSE installation command
cse install -c config.yaml does two additional steps than what has been mentioned in the above diagram.
- Prepares the environment for Providers to be able to perform organization virtual datacenter enablement for native clusters. Refer how to enable ovdc(s) for native deployments for more details on how CSE3.0 leverages placement policies to restrict k8 deployments on organizational virtual datacenters (ovdcs).
- Registers defined entity schema for native clusters. As a side effect,
cse:native cluster entitlementright bundle gets created in the Cloud Director and all native cluster operations are guarded by these rights. Invoke below API to get a detailed view of native defined entity schema -https://<vcd-ip>/cloudapi/1.0.0/entityTypes/urn:vcloud:type:cse:nativeCluster:1.0.0
The cse install command supports the following options:
| Option | Short | Argument(s) | Description | Default Value |
|---|---|---|---|---|
| --config | -c | path to config file | Filepath of CSE config file to use for installation | config.yaml |
| --pks-config-file | -p | path to Enterprise PKS config file | Filepath of Enterprise PKS config file to use for installation | - |
| --retain-temp-vapp | -d | n/a | Retain the temporary vApp after the template has been captured –ssh-key option is required if this flag is used | False |
| --skip-config-decryption | -s | n/a | Skips decrypting the configuration file and pks configuration file, and assumes them to be plain text | - |
| --skip-template-creation | -t | n/a | Skips creating CSE k8s template during installation | False |
| --ssh-key | -k | path to public ssh key file | ssh-key file to use for VM access (root password ssh access is disabled for security reasons) | - |
To monitor the vApp customization process, we can ssh into the temporary vApp.
In the temporary vApp, the output of the customization script is captured in
/tmp/FILENAME.out as well as /tmp/FILENAME.err:
# print out file contents as it's being written to
tail -f /tmp/FILENAME.out
tail -f /tmp/FILENAME.err
CSE 3.0 Upgrade Command
CSE 3.0 has been architecturally redesigned to leverage the latest features of
Cloud Director 10.2 like Defined entity framework and placement policies. The new
command cse upgrade has been introduced in CSE 3.0 to make the old
environment fully forward compatible with the latest technologies used in
CSE 3.0. Any previous version of CSE can be directly upgraded to CSE 3.0 using
cse upgrade command.
The command cse upgrade must be run to ensure the environment is forward
compatible with CSE 3.0. The below steps will be performed during the upgrade.
- Delete old compute policies in the environment: untag old templates with existing compute policies, unpublish existing compute policies from the organization virtual data center(s), delete the old compute policies. Note that this clean-up is done only on CSE-created compute policies.
- Prepare the environment to be able to perform organization virtual datacenter enablement for native clusters.
- Auto-install templates of the latest revision unless specified otherwise.
- Identify existing organization virtual datacenter(s) with existing clusters and publish appropriate placement policies on the same.
- Make pre-existing clusters forward compatible.
Validate CSE Installation
To validate that CSE server has been installed correctly, use the command
cse check.
cse check config.yaml --check-install
The validity and integrity of just the CSE config file can be checked using the following command.
cse check config.yaml
cse check config.yaml --pks-config-file pks.yaml
The cse check command supports the following options:
| Option | Short | Argument(s) | Description | Default |
|---|---|---|---|---|
| --check-install | -i | n/a | Check CSE installation on VCD | False |
| --pks-config-file | -p | path to Enterprise PKS config file | Enterprise PKS config file to validate along with CSE config file | - |
| --skip-config-decryption | -s | n/a | Skips decrypting the configuration file and PKS configuration file, and assumes them to be plain text | - |
Validate that CSE has been registered with VCD as an extension, via vcd-cli:
# login as cloud administrator
vcd login vcd.serviceprovider.com system <administrator user name> --password <password> -w -i

# list extensions
vcd system extension list

# get details of CSE extension
vcd system extension info cse
Setting the API Extension Timeout
The API extension timeout is the duration (in seconds) that VCD waits for a response from the CSE server extension. The default value is 10 seconds, which may be too short for some environments. To alter the timeout value, follow the steps below.
Configure the API extension timeout on the VCD cell:
cd /opt/vmware/vcloud-director/bin
./cell-management-tool manage-config -n extensibility.timeout -l
./cell-management-tool manage-config -n extensibility.timeout -v 20
Manual CSE API Registration
If there is a need to re-register the CSE API extension for any reason, the following command can be used. It might be required to delete the extension first for this command to work.
vcd system extension create cse cse cse vcdext '/api/cse, /api/cse/.*, /api/cse/.*/.*'
Sharing CSE catalog with non admin tenant users
CSE installation creates a catalog to store all the Kubernetes templates that are later
used to deploy Kubernetes clusters. This catalog is by default shared with all
users across all organizations who has the right Catalog: View Published Catalogs.
Users with Organization Administrator role, already has this right baked into their role.
However if users who are not organization administrator want to access this catalog
(cluster creation requires access to this catalog), they need to be assigned a role
that has the above mentioned right. The following set of commands can be used to
achieve the desired outcome.
# login as system/cloud administrator
vcd login vcd.serviceprovider.com system administrator --password passw0rd -w -i

# switch over to the tenant organization
vcd org use myorg

# add the right to the role of the user in question
vcd role add-right <role name> 'Catalog: View Published Catalogs'

# built-in roles can't be edited and needs to be cloned first
vcd role clone <built role e.g. "vApp Author"> 'New Role'
vcd role add-right 'New Role' 'Catalog: View Published Catalogs'

# Assign this new role to the user in question via VCD UI or
# create a new user in the organization with the new role
vcd user create <new user name> <password> 'New Role' --enabled
Server Operation
The CSE Server uses threads to process requests. The number of AMQP
listener threads can be configured in the config file using the listeners
property in the service section. The default value is 10.
Running CSE Server Manually
To start the server manually, run the command shown below.
# Run server in foreground.
cse run --config config.yaml

# Run server in background
nohup cse run --config config.yaml > nohup.out 2>&1 &
Refer to Log bundles to see server-side logs
Running CSE Server as a Service
A sample systemd unit is provided by CSE. Here are instructions for
installation.
- Copy file
cse.servicefrom CSE installation location and move it to/etc/systemd/system/cse.service. - Copy
cse.shto /home/vmware.
Once installed you can start the CSE service daemon using systemctl start cse.
To enable, disable, and stop the CSE service remotely, use CSE client.
# hook CSE unit into relevant places to automatically do things
# depending on what's specified in the unit file
$ vcd cse system enable

# start CSE service now
$ systemctl start cse

# stop processing new requests, and finish processing existing requests
# disables CSE service
$ vcd cse system disable
property    value
----------  ----------------------
message     CSE has been disabled.

# wait until all active threads have finished, then exits CSE service
$ vcd cse system stop -y
property    value
----------  ------------------------------
message     CSE graceful shutdown started.
If the CSE Server is disabled, users will get the following message when executing any CSE command:
$ vcd cse cluster list
Usage: vcd cse cluster list

Error: CSE service is disabled. Contact the System Administrator.
To keep the service running after logout on Photon OS, check
/etc/systemd/logind.conf and set KillUserProcesses to no
[Login]
KillUserProcesses=no
Monitoring CSE
Cloud Administrators can monitor CSE service status via CSE client:
$ vcd cse system info
property              value
--------------------  ------------------------------------------------------
all_threads           11
config_file           config_2_6_0.yaml
consumer_threads      10
description           Container Service Extension for VMware vCloud Director
product               CSE
python                3.7.4
requests_in_progress  0
status                Running
version               2.6.0
Server Upgrade and Removal
Upgrading CSE Server Software
- Gracefully stop CSE Server.
- Reinstall
container-service-extensionfrom PyPI:pip3 install --user --upgrade container-service-extension
- Check the release notes for version compatibility.
- Use
cse samplecommand to generate a new sample config file and fill in the relevant values from the previous config file. - If the previously generated templates are no longer supported by the new version,
delete the old templates (from VCD UI / vcd-cli) and generate new ones via
cse install -c myconfig.yaml(or)cse upgradeCheck here for available templates.
- Run
cse upgradecommand to make the environment forward compatible. Refer CSE 3.0 upgrade command - If CSE is being run as a service, start the new version of the service with
systemctl start cse.
Uninstalling CSE Server
- Gracefully stop CSE Server
- As Cloud Administrator, unregister CSE from VCD:
vcd system extension delete cse
- Review VCD AMQP settings. Generally no modifications are necessary in AMQP.
vcd system amqp info
- (Optional) Delete Kubernetes templates and the CSE catalog from VCD.
Useful Commands
cse ... commands are used by cloud administrators to:
- Install CSE Server
- Upgrade CSE Server to make older environments forward compatible with CSE version > 3.0
- Create/Update templates
- Run CSE Server manually
vcd cse ... commands are used by cloud administrators to:
- Monitor status of CSE Server and clusters
- Operate CSE as a service
- Enable a given organization vdc for either Native or Enterprise PKS deployments.
The following show useful sample commands.
# Use '-h' option to see help page and options for any cse command.
cse -h
cse install --config config.yaml -h
cse upgrade --config config.yaml -h
cse check config.yaml -h
cse run --config config.yaml -h

# Show all available vcd cse commands.
vcd cse -h

# Login to VCD to use vcd-cli commands.
vcd login <VCD HOSTNAME> system <USERNAME> -iwp <PASSWORD>

# Let SAMPLE_ORG_NAME be active org for this session.
vcd org use SAMPLE_ORG_NAME

# Let SAMPLE_VDC_NAME be active vdc for this session.
vcd vdc use SAMPLE_VDC_NAME

# Enable organization vdc for Native
vcd cse ovdc enable SAMPLE_VDC_NAME

# Enable organization vdc for TKGI (Ent-PKS)
vcd cse pks ovdc enable SAMPLE_VDC_NAME