NFS Node Management
Overview
CSE can automatically add NFS nodes to the Kubernetes configuration when creating a new cluster. Cluster administrators can use the NFS node(s) to implement static persistent volumes, which in turn enable deployment of stateful applications.
This page describes NFS node management and provides a tutorial example of setting up a persistent volume resource on NFS. The presentation assumes a basic understanding of Kubernetes storage as well as NFS administration. See the linked articles for more information if needed.
Persistent Volume Types
Static persistent volumes are pre-provisioned by the cluster administrator. They carry the details of the real storage which is available for use by cluster users. They exist in the Kubernetes API and are available for consumption. Users can allocate a static persistent volume by creating a persistent volume claim that requires the same or less storage. CSE supports static volumes hosted on NFS.
Dynamic persistent volumes are not pre-provisioned by the cluster administrator. When none of the static persistent volumes match a user’s persistent volume claim, the cluster may try to dynamically provision a volume for the PVC. CSE does not currently support dynamic persistent volumes.
NFS Volume Architecture
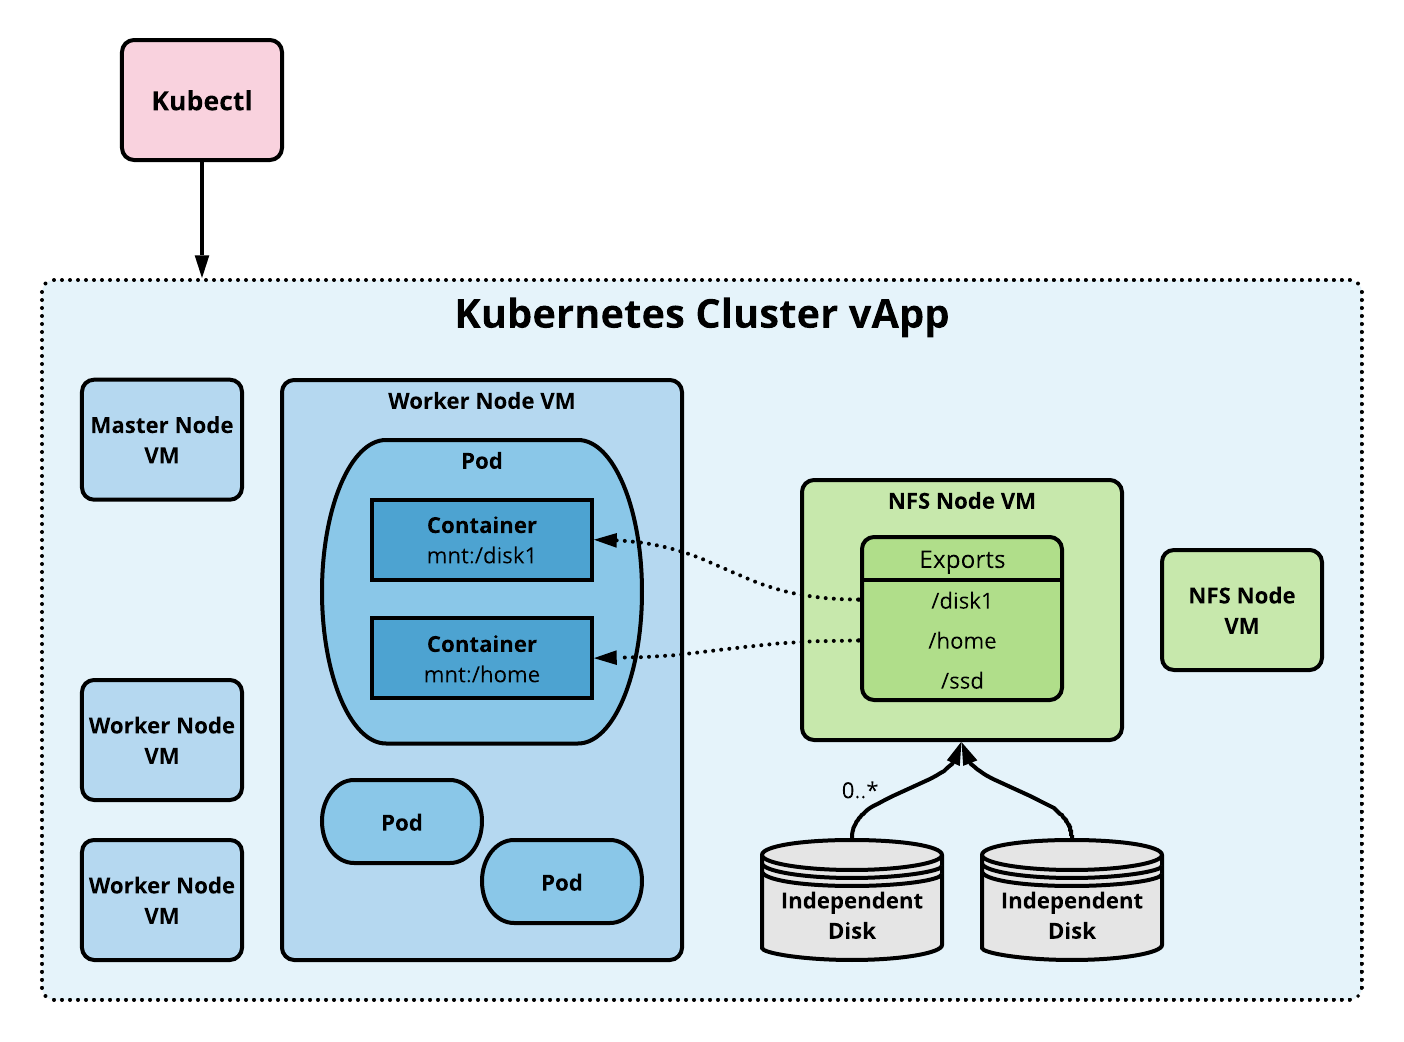
An NFS volume allows an existing NFS (Network File System) share to be mounted into one or more pods. When the pod(s) are removed, the contents of the NFS volume are preserved and the volume is merely unmounted. This means that an NFS volume can be pre-populated with data, and that data can be “handed off” between pods. NFS can be mounted by multiple writers simultaneously.
To use NFS volumes we need to have our own NFS server running with the shares exported. CSE provides commands to add pre-configured NFS server(s) to any given cluster. The following diagram shows the implementation architecture.
Storage Tutorial
The following sections illustrate how to manage NFS persistent volumes starting with setting up a cluster with an NFS node, granting a persistent storage claim to an application, checking health, and cleaning up.
Creating a Cluster with an Attached NFS node
NFS administration starts with cluster creation, where we can
provision an NFS node. Let’s create an Ubuntu based cluster using
the vcd cse cluster create command shown below. The --enable-nfs
option signals that CSE should include an NFS node. The --ssh-key
option ensures nodes are provisioned with the user’s SSH key. The
SSH key is necessary to login to the NFS host and set up shares.
# Login.
vcd login cse.acme.com devops imanadmin  --password='T0pS3cr3t'
# Create cluster with 2 worker nodes and NFS server node.
vcd cse cluster create mycluster --nodes 2 \
 --network mynetwork -t ubuntu-16.04_k8-1.13_weave-2.3.0 -r 1 --enable-nfs \
 --ssh-key ~/.ssh/id_rsa.pub
This operation will take several minutes while the CSE extension builds the Kubernetes vApp.
You can also add a node to an existing cluster using a command like the following.
# Add an NFS server (node of type NFS).
vcd cse node create mycluster --nodes 1 --network mynetwork \
  -t ubuntu-16.04_k8-1.13_weave-2.3.0 -r 1 --type nfsd
Setting up NFS Shares
The next step is to create NFS shares that can be allocated via persistent volume resources. First, we need to add an independent disk to the NFS node to create a file system that we can export.
# List the VMs in the vApp to find the NFS node. Look for a VM name that
# starts with 'nfsd-', e.g., 'nfsd-ljsn'. Note the VM name and IP address.
vcd vapp info mycluster
# Create a 100Gb independent disk and attach to the NFS VM.
vcd disk create nfs-shares-1 100g --description 'Kubernetes NFS shares'
vcd vapp attach mycluster nfsd-ljsn nfs-shares-1
Next, ssh into the NFS host itself.
ssh root@10.150.200.22
... (root prompt appears) ...
Partition and format the new disk. On Ubuntu the disk will show up as /dev/sdb. The procedure below is an example; feel free to use other methods depending on your taste in Linux administration.
root@nfsd-ljsn:~# parted /dev/sdb
(parted) mklabel gpt
Warning: The existing disk label on /dev/sdb will be destroyed and all data on
this disk will be lost. Do you want to continue?
Yes/No? yes
(parted) unit GB
(parted) mkpart primary 0 100
(parted) print
Model: VMware Virtual disk (scsi)
Disk /dev/sdb: 100GB
Sector size (logical/physical): 512B/512B
Partition Table: gpt
Disk Flags:

Number  Start   End    Size   File system  Name     Flags
 1      0.00GB  100GB  100GB               primary

(parted) quit
root@nfsd-ljsn:~# mkfs -t ext4 /dev/sdb1
Creating filesystem with 24413696 4k blocks and 6111232 inodes
Filesystem UUID: 8622c0f5-4044-4ebf-95a5-0372256b34f0
Superblock backups stored on blocks:
	32768, 98304, 163840, 229376, 294912, 819200, 884736, 1605632, 2654208,
	4096000, 7962624, 11239424, 20480000, 23887872

Allocating group tables: done
Writing inode tables: done
Creating journal (32768 blocks): done
Writing superblocks and filesystem accounting information: done
Create a mount point, add the new partition to your list of file systems, and mount it.
mkdir /export
echo '/dev/sdb1  /export   ext4  defaults   0 0' >> /etc/fstab
mount -a
At this point you should have a working file system under /export. The last step is to create directories and share them via NFS.
cd /export
mkdir vol1 vol2 vol3 vol4 vol5
vi /etc/exports
...Add following at end of file...
/export/vol1 *(rw,sync,no_root_squash,no_subtree_check)
/export/vol2 *(rw,sync,no_root_squash,no_subtree_check)
/export/vol3 *(rw,sync,no_root_squash,no_subtree_check)
/export/vol4 *(rw,sync,no_root_squash,no_subtree_check)
/export/vol5 *(rw,sync,no_root_squash,no_subtree_check)
...Save and quit
exportfs -r
Our work to prepare the file system shares is complete. You can logout from the NFS node.
Using Kubernetes Persistent Volumes
To use the shares we must create persistent volume resources. To start with let’s grab the kubeconfig so we can access the new Kubernetes cluster.
vcd cse cluster config mycluster > mycluster.cfg
export KUBECONFIG=$PWD/mycluster.cfg
Create a persistent volume resource for the share on /export/vol1. The path name should match the export name or you will get failures when Kubernetes tries to mount the NFS share to a pod.
cat <<EOF | kubectl apply -f -
apiVersion: v1
kind: PersistentVolume
metadata:
  name: nfs-vol1
spec:
  capacity:
    storage: 10Gi
  accessModes:
    - ReadWriteMany
  nfs:
    # Same IP as the NFS host we ssh'ed to earlier.
    server: 10.150.200.22
    path: "/export/vol1"
EOF
Next create a persistent volume claim that matches the persistent volume size.
cat <<EOF | kubectl apply -f -
apiVersion: v1
kind: PersistentVolumeClaim
metadata:
  name: nfs-pvc
spec:
  accessModes:
    - ReadWriteMany
  storageClassName: ""
  resources:
    requests:
      storage: 10Gi
EOF
We now launch an application that uses the persistent volume claim. This example runs busybox in a couple of pods that write to the shared storage.
cat <<EOF | kubectl apply -f -
apiVersion: v1
kind: ReplicationController
metadata:
  name: nfs-busybox
spec:
  replicas: 2
  selector:
    name: nfs-busybox
  template:
    metadata:
      labels:
        name: nfs-busybox
    spec:
      containers:
      - image: busybox
        command:
          - sh
          - -c
          - 'while true; do date > /mnt/index.html; hostname >> /mnt/index.html; sleep $(($RANDOM % 5 + 5)); done'
        imagePullPolicy: IfNotPresent
        name: busybox
        volumeMounts:
          # name must match the volume name below
          - name: nfs
            mountPath: "/mnt"
      volumes:
        - name: nfs
          persistentVolumeClaim:
            claimName: nfs-pvc
EOF
Checking Health
We can check the state of the deployed application and its storage. First let’s ensure all resources are in good health.
kubectl get pv
kubectl get pvc
kubectl get rc
kubectl get pods
We can now look at the state of the storage using the handy
kubectl exec command to run a command on one of the pods. (Substitute
the correct pod name from your kubectl get pods output.)
$ kubectl exec -it nfs-busybox-gcnht cat /mnt/index.html
Fri Dec 28 00:16:08 UTC 2018
nfs-busybox-gcnht
If you run the previous command multiple times you will see the date and host change as pods write to the index.html file.
Cleaning Up
To complete the tutorial, clean up Kubernetes resources as follows.
kubectl delete rc/nfs-busybox
kubectl delete pvc/nfs-pvc
kubectl delete pv/nfs-vol1
FAQ
- What is the difference between a persistent volume (PV) and persistent
volume claim (PVC)?
- A persistent volume is ready-to-use storage space created by the cluster admin. CSE currently only supports static persistent volumes. A persistent volume claim is the storage requirement specified by the user. Kubernetes dynamically binds/unbinds the PVC to PV at runtime. Learn more here
- How are NFS exports mounted to containers?
- Once a persistent volume backed by NFS is created by the cluster admin, Kubernetes mounts the specified NFS export to pod(s) and hence the containers they run.
- What happens to storage when a Kubernetes application terminates?
- Kubernetes returns the persistent volume and its claim to the pool. The data from the application remains on the volume. It can be cleaned up manually by logging into the NFS node VM and deleting files.