Installation Guide
The Photon OS Installation Guide provides information about how administrators can install Photon OS.
Product version: 5.0
This documentation applies to all 5.0.x releases.
Intended Audiences
This information is intended for Photon OS administrators who install and set up Photon OS.
1 - Downloading Photon OS
Detailed instructions for obtaining Photon OS 5.0 are located at: https://github.com/vmware/photon/wiki/Downloading-Photon-OS
Photon OS is available in the following pre-packaged, binary formats:
| |
|---|
| Format | Description |
![]() | |
| ISO Image | Contains everything needed to install the minimal or full installation of Photon OS or the Real-Time flavor of Photon OS. The bootable ISO has a manual installer or can be used with PXE/kickstart environments for automated installations. |
| OVA | Pre-installed minimal environment, customized for VMware hypervisor environments. These customizations include a highly sanitized and optimized kernel to give improved boot and runtime performance for containers and Linux applications. Since an OVA is a complete virtual machine definition, we’ve made available a Photon OS OVA that has virtual hardware version 13 arm64, version 13, and version 11; this will allow for compatibility with several versions of VMware platforms or allow for the latest and greatest virtual hardware enhancements. |
| Amazon AMI | Pre-packaged and tested version of Photon OS with Amazon AMI and Amazon AMI arm64 packages made ready to deploy in your Amazon EC2 cloud environment. Previously, we’d published documentation on how to create an Amazon compatible instance, but, now we’ve done the work for you. |
| Google GCE Image | Pre-packaged and tested Google GCE image that is ready to deploy in your Google Compute Engine Environment, with all modifications and package requirements for running Photon OS in GCE. |
| Azure VHD | Pre-packaged and tested Azure HD image that is ready to deploy in your Microsoft Azure Cloud, with all modifications and package requirements for running Photon OS in Azure. |
| Raspberry Pi Image | Pre-packaged and tested Raspberry Pi Image on ARM64 architecture. |
2 - Upgrading Photon OS 4.0 system to Photon OS 5.0
You can upgrade the existing Photon OS 4.0 systems to Photon OS 5.0, and take advantage of the functionality enhancements in Photon OS 5.0. For details, see What’s New in Photon OS 5.0.
The photon-upgrade package provides a seamless upgrade for Photon OS. To use the package, you need to perform the following steps:
- Install the
photon-upgrade package on the Photon OS 4.0 system. - Run the following script:
/bin/photon-upgrade.sh
- Follow the interactions with that script.
Please note that the script also supports a non-interactive invocation using the --assume-yes option. The --help option of the photon-upgrade.sh script provides online help.
The photon-upgrade.sh script updates packages to the latest available versions in Photon OS 5.0. Also, the upgrade retains your 4.0 customizations in your new Photon OS 5.0 system.
Note: If your 4.0 VM is a full install, then you will have a 5.0 VM that represents a full install (all packages and dependencies). Upgrading a minimal installation takes less time due to fewer packages.
For each Photon OS 4.0 VM that you want to upgrade, complete the following steps:
Back up all existing settings and data for the Photon 4.0 VM.
Stop any services (for example, docker) that are currently running in the VM.
Install photon-upgrade package
# tdnf -y install photon-upgrade
Run the upgrade script
# photon-upgrade.sh --upgrade-os
Answer y to reboot the VM. The upgrade script powers down the Photon OS 4.0 VM and powers it on as a Photon OS 5.0 VM.
After the upgrade, before you deploy into production, test all previous functionality to ensure that everything works as expected.
3 - Building Images
You can build an ISO from the source code and other images for Photon OS. This section describes how to build the ISO, build other images, use the cached toolchain and RPMS, and cached sources. You can use this method as an alternative to downloading a pre-built version.
For information on how to install and build a package on Photon OS from the package’s source RPM, see the Photon OS Administration Guide.
3.1 - Folder Layout
The structure of the directories on GitHub that contain the source code for Photon OS is as follows:
photon/
├── Makefile
├── README
├── Dockerfile
├── Vagrantfile
├── PUBLISHRPMS_SPECS        # RPM SPEC files
├── SPECS                    # RPM SPEC files
├── common                   # Build, packaging config
├── docs                     # Documentation
├── build.py                 # Package builder
├── config.json              # Package builder
├── support                  # Build scripts
└── tools
3.2 - Build Prerequisites
Before you build the ISO, verify that you have the performed the following tasks:
Installed a build operating system running the 64-bit version of Ubuntu 14.04 or later version.
Downloaded and installed the following packages for Ubuntu:
bison
gawk
g++
createrepo
python-aptdaemon
genisoimage
texinfo
python-requests
libfuse-dev
libssl-dev
uuid-dev
libreadline-dev
kpartx
git
bc
Downloaded and installed the following packages for Photon OS:
“rsync”
“docker-18.09.9”
“docker-py3”
“python3-pyOpenSSL”
“python3-six”
“python3-pip”
“cdrkit”
“createrepo_c”
“dosfstools”
“openssl-devel”
“python3-curses”
“zlib-devel”
“util-linux-devel”
Installed Docker
Downloaded the source code from the Photon OS repository on GitHub into $HOME/workspaces/photon.
3.3 - Build an ISO from the Source Code for Photon OS
You can build an ISO from the source code for Photon OS. This section describes how to build the ISO, use the cached toolchain and RPMS, and cached sources. You can use this method as an alternative to downloading a pre-built version.
For information on how to install and build a package on Photon OS from the package’s source RPM, see the Photon OS Administration Guide.
3.3.1 - Building the ISO
Perform the following steps to install the packages on Ubuntu:
Install the packages:
sudo apt-get -y install bison gawk g++ createrepo python-aptdaemon genisoimage texinfo python-requests libfuse-dev libssl-dev uuid-dev libreadline-dev kpartx git bc
Get Docker:
wget -qO- https://get.docker.com/ | sh
Install pip and docker 2.3.0
sudo apt install python3-pip
pip3 install docker==2.3.0
If you encounter an error for LOCALE when you run these commands, then export the following variables in the terminal:
export LC_ALL="en_US.UTF-8"
export LC_CTYPE="en_US.UTF-8"
The default configuration parameters are available in config.json. If you want to customize them, then the configuration information is available at the following location:
[https://github.com/vmware/photon/blob/dev/photon-build-config.txt](https://github.com/vmware/photon/blob/dev/photon-build-config.txt)
Clone`the Photon project:
git clone https://github.com/vmware/photon.git
cd $HOME/workspaces/photon
Make ISO as follows:
sudo make iso
Make Minimal ISO as follows:
sudo make minimal-iso
Make Real-Time ISO as follows:
sudo make rt-iso
Result
This command first builds all RPMs corresponding to the SPEC files in your Photon repository and then builds a bootable ISO containing those RPMs.
The RPMs thus built are stored under stage/RPMS/ directory within the repository, using the following directory hierarchy:
$HOME/workspaces/photon/stage/:
├──RPMS/:
    ├──noarch/*.noarch.rpm    [Architecture-independent RPMs]
    ├──x86_64/*.x86_64.rpm    [RPMs built for the x86-64 architecture]
    ├──aarch64/*.aarch64.rpm  [RPMs built for the aarch64 (ARM64) architecture]
The ISO is created at $HOME/workspaces/photon/stage/photon.iso.
3.4 - Build Other Images for Photon OS
This section describes how to build the cloud images, OVA, and RPM.
For information on how to install and build a package on Photon OS from the package’s source RPM, see the Photon OS Administration Guide.
3.4.1 - Building Cloud Images
Perform the following steps to build the cloud images on Ubuntu:
Install the packages:
sudo apt-get -y install bison gawk g++ createrepo python-aptdaemon genisoimage texinfo python-requests libfuse-dev libssl-dev uuid-dev libreadline-dev kpartx git bc
Get Docker:
wget -qO- https://get.docker.com/ | sh
Install pip
sudo apt install python3-pip
pip3 install git+https://github.com/vmware/photon-os-installer.git
git clone https://github.com/vmware/photon.git
If you encounter an error for LOCALE when you run these commands, then export the following variables in the terminal:
`export LC_ALL="en_US.UTF-8"`
export LC_CTYPE="en_US.UTF-8"
Clone`the Photon project:
git clone https://github.com/vmware/photon.git
cd $HOME/workspaces/photon
Make the cloud image for AMI.
sudo make image IMG_NAME=ami
Make the cloud image for Azure.
sudo make image IMG_NAME=azure
Make the cloud image for GCE.
sudo make image IMG_NAME=gce
Result
This command first builds all RPMs corresponding to the SPEC files in your Photon repository and then builds a bootable ISO containing those RPMs.
The RPMs thus built are stored under stage/RPMS/ directory within the repository, using the following directory hierarchy:
$HOME/workspaces/photon/stage/:
├──RPMS/:
    ├──noarch/*.noarch.rpm    [Architecture-independent RPMs]
    ├──x86_64/*.x86_64.rpm    [RPMs built for the x86-64 architecture]
    ├──aarch64/*.aarch64.rpm  [RPMs built for the aarch64 (ARM64) architecture]
The cloud image is created at `$HOME/workspaces/photon.
3.4.2 - Building OVA image
Perform the following steps to build OVA on Ubuntu:
Install the packages:
sudo apt-get -y install bison gawk g++ createrepo python-aptdaemon genisoimage texinfo python-requests libfuse-dev libssl-dev uuid-dev libreadline-dev kpartx git bc
Get Docker:
wget -qO- https://get.docker.com/ | sh
Install pip
sudo apt install python3-pip
pip3 install git+https://github.com/vmware/photon-os-installer.git
git clone https://github.com/vmware/photon.git


If you encounter an error for LOCALE when you run these commands, then export the following variables in the terminal:


    export LC_ALL="en_US.UTF-8"
`export LC_CTYPE="en_US.UTF-8"`
Clone the Photon project:
git clone https://github.com/vmware/photon.git
cd $HOME/workspaces/photon
Download latest VDDK from below link:
https://my.vmware.com/web/vmware/downloads/details?downloadGroup=VDDK670&productId=742
Search for VMware-ovftool in the same site and install it.
For example:
ovftool downloaded file:
VMware-ovftool-4.3.0-13981069-lin.x86_64.bundle
Add exec permission and run it as sudo:
$ chmod +x VMware-ovftool-4.3.0-13981069-lin.x86_64.bundle && sudo ./VMware-ovftool-4.3.0-13981069-lin.x86_64.bundle --eulas-agreed --required
For VDDK, if the downloaded file is VMware-vix-disklib-6.7.0-8173251.x86_64.tar.gz, untar the downloaded tarball:
$ tar xf VMware-vix-disklib-6.7.0-8173251.x86_64.tar.gz
Navigate to extracted directory.
Move the header files to /usr/include
$ sudo mv include/*.h /usr/include
Move the shared libs to /usr/lib/vmware
$ sudo mkdir -p /usr/lib/vmware && sudo mv lib64/* /usr/lib/vmware && sudo rm /usr/lib/vmware/libstdc++.so*
Export /usr/lib/vmware library path(only for current session). Do this step every time you try to build an ova image.
$ export LD_LIBRARY_PATH=/usr/lib/vmware
Navigate to your intended Photon source repository and run the following command.
`sudo make image IMG_NAME=ova`
Make the image for OVA UEFI
sudo make image IMG_NAME=ova_uefi
Result
This command first builds all RPMs corresponding to the SPEC files in your Photon repository and then builds a bootable ISO containing those RPMs.
The RPMs thus built are stored under stage/RPMS/ directory within the repository, using the following directory hierarchy:
$HOME/workspaces/photon/stage/:
├──RPMS/:
    ├──noarch/*.noarch.rpm    [Architecture-independent RPMs]
    ├──x86_64/*.x86_64.rpm    [RPMs built for the x86-64 architecture]
    ├──aarch64/*.aarch64.rpm  [RPMs built for the aarch64 (ARM64) architecture]
The cloud image is created at `$HOME/workspaces/photon.
3.5 - Use the Cached Toolchain and RPMS
When the necessary RPMs are available under the stage/RPMS/ directory, the commands that you use to create any Photon artifact such as, ISO or OVA will reuse those RPMs to create the specified image.
If you already have the Photon RPMs available elsewhere, and not under stage/RPMS/ in the Photon repository, you can build Photon artifacts using those cached RPMs by setting the PHOTON_CACHE_PATH variable to point to the directory containing those RPMs.
For example, if your RPMs are located under $HOME/photon-cache/, then use the following command to build an ISO:
sudo make iso PHOTON_CACHE_PATH=$HOME/photon-cache
The $HOME/photon-cache/ directory should follow the same structure as the stage/RPMS/ directory:
photon-cache/:
├──RPMS/:
    ├──noarch/*.noarch.rpm
    ├──x86_64/*.x86_64.rpm
    ├──aarch64/*.aarch64.rpm
3.6 - Use Cached Sources
To use the cached sources, run the following command:
mkdir $HOME/photon-sources
sudo make iso PHOTON_SOURCES_PATH=$HOME/photon-sources
The directory format of PHOTON_SOURCES_PATH is as follows:
photon-sources/
├──src1.tar.gz
├──src2.tar.gz
└──...
3.7 - View Build Logs
You can view build logs at the following location:
$HOME/workspaces/photon/stage/LOGS
3.8 - Build a Custom ISO from the Source Code of Photon OS Installer
The custom-iso tool allows you to build images as per your requirements.
Overview
Prerequisite
Preparing for Custom Image Generation
Generating a Custom Image
Overview
You can use the custom-iso tool to create images such as a custom ISO, Initrd, and RPM-OSTree. To generate an image, you must provide the necessary inputs in the form of arguments. The custom-iso tool creates images based on the inputs you provide.
You can use the following functions to generate the required images:
build-initrd generates a custom Initrd image
build-initrd generates a custom ISO image.
build-rpm-ostree-iso generates a custom RPM-OSTree ISO.
As an input to the tool, you must provide the list of all the necessary packages for the custom ISO in a JSON file. The tool only uses the minimal list of packages and their dependencies that you specify.
You can customize the following files and configurations:
- List of packages to install
- Kickstart file
- Boot command line
- Repo to download the packages
- Installer
initrd package list - Custom ostree tar archive
Note that when you use the Custom ISO builder to build the ISO and the Installer initrd, the ISO and initrd files are generated with the following naming conventions:
Prerequisite
To generate a custom ISO, ensure that you provide the following required parameters:
- List of custom packages in JSON format
- Photon Release Version
- Generating Function: For example,
build-iso, build-initrd, and build-rpm-ostree-iso - Path to OSTree tar archive (required only if function is set to
build-rpm-ostree-iso)
Note: You must provide the additional repository if you want to include a package that the Photon OS official repository does not provide.
You can also provide the following optional parameters:
- Custom Kickstart file
- Additional repositories
- Boot command line parameters
- Custom
Initrd package list file - Artifact path
Preparing for Custom Image Generation
Install the following prerequisite packages:
- python3-pip
- git
- tar
- createrepo_c
- binutils
- dosfstools
- cdrkit
- docker
i. To install the specified packages on Photon OS, use the following command:
tdnf install -y python3-pip git tar createrepo_c binutils dosfstools cdrkit
Run following command to install photon-os-installer python library:
pip3 install git+https://github.com/vmware/photon-os-installer.git
Enable the following services before you build the custom iso/initrd: docker
i. To enable the docker service and log in to the docker account, use the following command:
systemctl start docker.service;
docker login # To avoid docker pull rate limit
Create the file containing the custom package list.
The following list shows some of the sample custom package files:
Package list json format-
{
"packages": <list-of-pkgs>,
"packages_x86_64": <x86-specific-pkgs>,
"packages_aarch64": <aarch64-specific-pkgs>
}
For more details, refer to the following link: https://github.com/vmware/photon-os-installer/blob/master./ks_config.md#packages-optional-if-packagelist_file-set
Note: packages_x86_64 and packages_aarch64 are optional keys. The packages_minimal.json file is a sample file. You can create your own JSON file with the list of custom packages that you want, and provide the directory path for the file in the command to generate the iso/initrd.
Generating a Custom Image
You can use the respective commands to generate the custom images for the following use cases.
Using Package List
Command:
photon-iso-builder -v <photon-release-version> -p <path/to/custom-package-list-json>
Example:
photon-iso-builder -v 5.0 -p /root/packages_custom.json
Note: you can skip the --function invocation because photon-iso-builder sets the default function to build-iso.
Using Package List and Additional Repository
photon-iso-builder -v <photon-release-version> -p <path/to/custom-package-list-json> [-r <path/to/custom-repo-list>]
Example:
photon-iso-builder -v 5.0 -p /root/packages_custom.json -r local.repo -r local2.repo
Note: In order to create your own custom repository, see the following page: Adding a New Repository
Using Custom Kickstart File
Command:
photon-iso-builder -v <photon-release-version> -p <path/to/custom-package-list-json> -k <path-to-kickstart>
Example:
photon-iso-builder -v 5.0 -p /root/packages_custom.json -k /root/custom_kickstart.json
To create a custom kickstart configuration file, see the follow page: Kickstart Configuration
Note: If the Kickstart file is provided while creating the custom ISO, boot command line parameter is not edited to install the ISO through kickstart.
To boot the ISO through the provided kickstart file, you need to create the custom ISO file using the following format:
photon-iso-builder -v <photon-release-version> -p <path/to/custom-package-list-json> -f build-iso -k <path-to-kickstart> -b "ks=cdrom:/isolinux/<kickstart-file-base-name>"
Example:
photon-iso-builder -v 5.0 -p /root/packages_custom.json -k /root/custom_kickstart.json -b "ks=cdrom:/isolinux/custom_kickstart.json"
Using Extra Boot Command Line Parameters
Command:
photon-iso-builder -v <photon-release-version> -p <path/to/custom-package-list-json> -f build-iso -b <extra-boot-parameter>
Example:
photon-iso-builder -v 5.0 -p /root/packages_custom.json -b "ks=http://10.197.102.86:8000/sample_ks.cfg insecure_installation=1"
Using Default Installation as RPM-OStree
Before you generate the custom image using default installation as RPM-OStree, you need to generate ostree tar archive. Perform the following steps to generate the ostree tar archive:
Generate the ostree repo tree as directed here: Creating a Server
Create tarball of the repo tree:
Command:
tar -czf </path/to/>ostree-repo.tar.gz -C </path/to/repotree>/repo
Example: repo tree resides inside the following directory my-repo like /root/my-repo/repo
tar -zcf /root/ostree-repo.tar.gz -C /root/my-repo/repo .
Once the tar archive is generated, generate the custom image.
To generate the custom image using default installation as RPM-OStree, execute the following command:
photon-iso-builder -v <photon-release-version> -o <path/to/ostree-tar-archive> -f build-rpm-ostree-iso
Example:
photon-iso-builder -v 5.0 -o /root/ostree-repo.tar.gz -f build-rpm-ostree-iso
Note: You can either provide a local path or a URL for the ostree tar archive. Custom package list json is not required for this case.
Using Custom Artifact Path
Command:
photon-iso-builder -v <photon-release-version> -p <path/to/custom-package-list-json> -a <custom-artifact-path>
Note: Custom artifact path parameter takes parent directory path as the input in which the artifact is placed.
As per the user input, artifact is placed under /root/custom/path in the following example:
photon-iso-builder -v 5.0 -p /root/packages_custom.json -a /root/custom/path
Custom Initrd
Command:
photon-iso-builder -v <photon-release-version> -c <path/to/custom-initrd-pkg-list-file> -f build-initrd
Example:
photon-iso-builder -v 5.0 -c /root/packages_custom_initrd.json -f build-initrd
The default initrd package list file is located in the following directory: https://github.com/vmware/photon/blob/master/common/data/packages_installer_initrd.json
Generating custom ISO through source code:
The following command demonstrate how to generate a custome ISO through the source code:
git clone https://github.com/vmware/photon-os-installer.git
cd photon-os-installer/photon_installer
./isoBuilder -v 5.0 -p packages_minimal.json
4 - Building Package or Kernel Modules Using a Script
You can use a script to build a single Photon OS package without the need to setup a complete Photon build workspace. You just need a .spec specification file and the source files. You can place the source files and the specification files in the same folder, or provide a URL for the source file location, and then run the build_spec.sh script.
The script performs the following steps:
- Creates sandbox using docker
- Installs build tools and
.spec build requirements from the Photon OS repository - Runs
rpmbuild
Result: You have a native Photon OS RPM package.
The build-spec.sh script is located in the photon/tools/scripts/ folder.
Prerequisites
Before you run the build-spec.sh script, perform the following steps:
- Ensure you have any Linux OS with a docker daemon running.
- Place the source and RPM
.spec files in the same folder or provide a URL for the source files.
Procedure
Run the script. Provide the RPM .spec file name, including absolute or relative path, as an argument:
./photon/tools/scripts/build_spec.sh <path-to-rpm_spec_file.spec> [$STAGEDIR]
You can specify the staging directory ($STAGEDIR) where you want to store the generated RPM files and build logs. If you do not specify a staging directory, the generated output files are stored in the directory that contains the spec file.
The following topics show examples to build packages based on various use cases.
4.1 - Hello World Kernel Module
This example shows how to build a package that provides a hello world kernel module. To build the package, you need to run the script with hello-world.spec as an argument, where hello-world.spec is the RPM specification file.
You can find the source file at the following location:
https://github.com/vmware/photon/tree/<BRANCH>/tools/examples/build_spec/kernel_module_example/hello-world.tar.gz
To generate the output in the spec-file folder, run the following command:
./photon/tools/scripts/build_spec.sh ./photon/tools/examples/build_spec/kernel_module_example/hello-world.spec
The following are the contents of the hello-world.spec file:
%define linux_esx_ver 6.1.10

Summary:        Hello World Linux module
Name:           hello-world
Version:        1.0
Release:        1%{?dist}
License:        GPLv2
Group:          System Environment/Kernel
Vendor:         VMware, Inc.
Distribution:   Photon
Source0:        hello-world.tar.gz
BuildRequires:  linux-esx-devel = %{linux_esx_ver}
BuildRequires:  kmod
Requires:       linux-esx = %{linux_esx_ver}

%description
Example of building linux module for Photon OS

%prep
%autosetup -n hello-world

%build
make -C `echo /usr/src/linux-headers-%{linux_esx_ver}*` M=`pwd` VERBOSE=1 modules %{?_smp_mflags}

%install
make -C `echo /usr/src/linux-headers-%{linux_esx_ver}*` M=`pwd` INSTALL_MOD_PATH=%{buildroot} modules_install %{?_smp_mflags}
# fix permissins to generate non empty debuginfo
find %{buildroot}/lib/modules -name '*.ko' -print0 | xargs -0 chmod u+x

%ldconfig_scriptlets

%post
/sbin/depmod -a

%files
%defattr(-,root,root)
/lib/modules/*
Build Logs
The following logs indicate the steps that the script performs internally:
0. Build Script Version: 1.1
1. Create sandbox
        Use local build template image OK
2. Prepare build environment
        Create source folder OK
        Copy sources from ./photon/tools/examples/build_spec/kernel_module_example OK
        install createrepo OK
        createrepo  OK
        Create local repo in sandbox OK
        makecache OK
3. Build Binary and Source Package
        Run rpmbuild OK
        Delete SOURCES OK
4. Destroy sandbox
        Stop container OK
        Remove container OK
Build completed. RPMS are in './photon/tools/examples/build_spec/kernel_module_example/stage' folder
Verification
You can verify the generated output with the following commands:
- Command to install the RPM:
rpm -ivh ./photon/tools/examples/build_spec/kernel_module_example/stage/RPMS/x86_64/hello-world-1.0-1.ph5.x86_64.rpm
- Command to install the kernel module:
modprobe hello-world
- Command to verify the installed kernel module:
dmesg | grep "Hello World"
4.2 - Hello World Binary
This example shows how to build a package that provides a hello world binary. To build the package, you need to run the script with hello-world-user1.spec as an argument, where hello-world-user1.spec is the RPM specification file.
You can find the source file at the following location:
https://github.com/vmware/photon/tree/<BRANCH>/tools/examples/build_spec/user_package_example/hello-world-user1.tar.gz
To generate the output in a staging directory, run the following command:
./photon/tools/scripts/build_spec.sh ./photon/tools/examples/build_spec/user_package_example/hello-world-user1.spec $STAGEDIR
The following are the contents of the hello-world-user1.spec file:
% Summary:      Hello World User Package
Name:           hello-world-user1
Version:        1.0
Release:        1%{?dist}
License:        GPLv2
Group:          System Environment/Kernel
Vendor:         VMware, Inc.
Distribution:   Photon
Source0:        hello-world-user1.tar.gz

%description
Example of building User Package for Photon OS

%prep
%autosetup -n hello-world-user1

%build
make %{?_smp_mflags}

%install
make %{?_smp_mflags} install DESTDIR=%{buildroot}

%ldconfig_scriptlets

%files
%defattr(-,root,root)
/usr/bin/*
Build Logs
The following logs indicate the steps that the script performs internally:
0. Build Script Version: 1.1
1. Create sandbox
        Use local build template image OK
2. Prepare build environment
        Create source folder OK
        Copy sources from ./photon/tools/examples/build_spec/user_package_example OK
        install createrepo OK
        createrepo  OK
        Create local repo in sandbox OK
        makecache OK
        Install build requirements OK
3. Build Binary and Source Package
        Run rpmbuild OK
        Delete SOURCES OK
4. Destroy sandbox
        Stop container OK
        Remove container OK
Build completed. RPMS are in '$STAGEDIR' folder
Verification
You can verify the generated output with the following commands:
- Command to install the RPM:
rpm -ivh $STAGEDIR/RPMS/x86_64/hello-world-user-1.0-1.ph5.x86_64.rpm
- Command to verify the installed user package (execute the installed binary of the user package):
root@photon-aab77099dca0root [ ~ ]# /usr/bin/hello-world-user
     Hello World
4.3 - Manage a Dependent package
This example shows how to build a dependent package. To build the package, you need to run the script with hello-world-user.spec as an argument, where hello-world-user.spec depends on the RPM build from hello-world-user1.spec (hello-world-user -> hello-world-user1)
You can find the source file at the following location:
https://github.com/vmware/photon/tree/<BRANCH>/tools/examples/build_spec/user_package_example/hello-world-user.tar.gz
To generate the output in a staging directory, run the following command:
./photon/tools/scripts/build_spec.sh ./photon/tools/examples/build_spec/user_package_example/hello-world-user.spec $STAGEDIR
The following are the contents of the hello-world-user.spec file:
Summary:        Hello World User Package
Name:           hello-world-user
Version:        1.0
Release:        1%{?dist}
License:        GPLv2
Group:          System Environment/Kernel
Vendor:         VMware, Inc.
Distribution:   Photon
Source0:        hello-world-user.tar.gz
BuildRequires:  hello-world-user1
BuildRequires:  git
Requires:       hello-world-user1

%description
Example of building User Package for Photon OS

%prep
%autosetup -n hello-world-user

%build
make %{?_smp_mflags}

%install
pwd
make %{?_smp_mflags} install DESTDIR=%{buildroot}

%ldconfig_scriptlets

%files
%defattr(-,root,root)
/usr/bin/*
Build Logs
The following logs indicate the steps that the script performs internally:
0. Build Script Version: 1.1
1. Create sandbox
        Use local build template image OK
2. Prepare build environment
        Create source folder OK
        Copy sources from ./photon/tools/examples/build_spec/user_package_example OK
        install createrepo OK
        createrepo  OK
        Create local repo in sandbox OK
        makecache OK
        Install build requirements OK
3. Build Binary and Source Package
        Run rpmbuild OK
        Delete SOURCES OK
4. Destroy sandbox
        Stop container OK
        Remove container OK
Build completed. RPMS are in '$STAGEDIR' folder.
4.4 - Include a patch file
This example shows how to build a package with a patch file. To build the package, you need to run the script with python-M2Crypto.spec as an argument, where python-M2Crypto.spec is the RPM specification file.
You can find the patch file at the following location:
https://github.com/vmware/photon/tree/<BRANCH>/tools/examples/build_spec/user_package_example/0001-openssl-3.0.0-support.patch
To generate the output in the spec-file folder, run the following command:
./photon/tools/scripts/build_spec.sh ./photon/tools/examples/build_spec/user_package_example/python-M2Crypto.spec
The following are the contents of the python-M2Crypto.spec file:
Name:           python3-M2Crypto
Version:        0.36.0
Release:        1%{?dist}
Summary:        Crypto and SSL toolkit for Python
Group:          Development/Languages/Python
License:        MIT
URL:            https://pypi.python.org/pypi/M2Crypto/0.26.0
Source0:        https://pypi.python.org/packages/11/29/0b075f51c38df4649a24ecff9ead1ffc57b164710821048e3d997f1363b9/M2Crypto-%{version}.tar.gz
Vendor:         VMware, Inc.
Distribution:   Photon

BuildRequires:  openssl
BuildRequires:  openssl-devel
BuildRequires:  python3-devel
BuildRequires:  python3-setuptools
BuildRequires:  python3-typing
BuildRequires:  swig
BuildRequires:  python3-xml
Requires:       python3-typing
Requires:       python3
Requires:       openssl
Patch0:         0001-openssl-3.0.0-support.patch

%description
M2Crypto is a crypto and SSL toolkit for Python featuring the following:

RSA, DSA, DH, HMACs, message digests, symmetric ciphers (including
AES). SSL functionality to implement clients and servers. HTTPS
extensions to Python's httplib, urllib, and xmlrpclib. Unforgeable
HMAC'ing AuthCookies for web session management. FTP/TLS client and
server. S/MIME. ZServerSSL: A HTTPS server for Zope. ZSmime: An S/MIME
messenger for Zope.

%prep
# Using autosetup is not feasible
%setup -q -n M2Crypto-%{version}
%patch0 -p1

%build
CFLAGS="%{optflags}" python3 setup.py build --openssl=/usr/include --bundledlls

%install
rm -rf %{buildroot}
python3 setup.py install --prefix=%{_prefix} --root=%{buildroot}

%files
%defattr(-,root,root)
%{python3_sitelib}/*
Build Logs
The following logs indicate the steps that the script performs internally:
0. Build Script Version: 1.1
1. Create sandbox
        Use local build template image OK
2. Prepare build environment
        Create source folder OK
        Copy sources from ./photon/tools/examples/build_spec/user_package_example OK
        Download M2Crypto-0.36.0.tar.gz OK
        install createrepo OK
        createrepo  OK
        Create local repo in sandbox OK
        makecache OK
        Install build requirements OK
3. Build Binary and Source Package
        Run rpmbuild OK
        Delete SOURCES OK
4. Destroy sandbox
        Stop container OK
        Remove container OK
Build completed. RPMS are in './photon/tools/examples/build_spec/user_package_example/stage' folder
4.5 - Refer an External Source
This example shows how to build a package that downloads the source files from an external website like GitHub. To build the package, you need to run the script with libdrm.spec as an argument, where libdrm.spec is the RPM specification file.
./photon/tools/scripts/build_spec.sh ./photon/tools/examples/build_spec/user_package_example/libdrm.spec
The following are the contents of the libdrm.spec file:
Summary:        user space library for accessing the DRM.
Name:           libdrm
Version:        2.4.110
Release:        1%{?dist}
License:        MIT
URL:            http://dri.freedesktop.org/
Group:          System Environment/Libraries
Vendor:         VMware, Inc.
Distribution:   Photon

Source0:        https://dri.freedesktop.org/libdrm/%{name}-%{version}.tar.xz

BuildRequires:  meson
BuildRequires:  libpciaccess-devel
Requires:       libpciaccess
Provides:       pkgconfig(libdrm)

%description
libdrm provides a user space library for accessing the DRM, direct rendering manager, on operating systems that support the ioctl interface. libdrm is a low-level library, typically used by graphics drivers such as the Mesa DRI drivers, the X drivers, libva and similar projects.

%package        devel
Summary:        Header and development files
Requires:       %{name} = %{version}-%{release}

%description    devel
libdrm provides a user space library for accessing the DRM, direct rendering manager, on operating systems that support the ioctl interface. libdrm is a low-level library, typically used by graphics drivers such as the Mesa DRI drivers, the X drivers, libva and similar projects.

%prep
%autosetup -p1

%build
CONFIGURE_OPTS=(
        -Dintel=false
        -Dradeon=false
        -Damdgpu=true
        -Dnouveau=false
        -Dvmwgfx=false
        -Dlibkms=false
)

%meson "${CONFIGURE_OPTS[@]}"
meson --prefix=%{_prefix} build

%install
DESTDIR=%{buildroot}/ ninja -C build install

%ldconfig_scriptlets

%files
%defattr(-,root,root)
%{_libdir}/lib*
%{_datadir}/libdrm/*

%files devel
%defattr(-,root,root)
%{_includedir}/*
%{_libdir}/pkgconfig*
Build Logs
The following logs indicate the steps that the script performs internally:
0. Build Script Version: 1.1
1. Create sandbox
        Use local build template image OK
2. Prepare build environment
        Create source folder OK
        Copy sources from ./photon/tools/examples/build_spec/user_package_example OK
        Download libdrm-2.4.110.tar.xz OK
        install createrepo OK
        createrepo  OK
        Create local repo in sandbox OK
        makecache OK
        Install build requirements OK
3. Build Binary and Source Package
        Run rpmbuild OK
        Delete SOURCES OK
4. Destroy sandbox
        Stop container OK
        Remove container OK
Build completed. RPMS are in './photon/tools/examples/build_spec/user_package_example/stage' folder
5 - Running Photon OS on vSphere
You can use Photon OS as a virtual machine within VMware vSphere. You can download Photon OS, as an OVA or ISO file, and install the Photon OS distribution on vSphere. After you install Photon OS, you can deploy a containerized application in Docker with a single command.
Note: If you want to upgrade an existing Photon 1.0 VM, see the Upgrade to Photon OS 5.0 section.
5.1 - Prerequisites for Running Photon OS on vSphere
Resource requirements and recommendations vary depending on several factors, including the host environment (for example, VMware vSphere and VMware Fusion), the distribution file used (ISO or OVA), and the selected installation settings (for example, full or basic installation).
Before you use Photon OS within VMware vSphere, perform the following prerequisite tasks:
Verify that you have the following resources:
| Resource | Description |
| VMware vSphere installed | VMware web client (v6.5) for ESXi hosts (recommended) Note: vSphere 6 and vSphere 5.5 (these clients provide limited support; Not all features are available). |
| Memory | ESXi host with 2GB of free RAM (recommended) |
| Storage | Minimal Photon install: ESXi host with at least 512MB of free space (minimum); Full Photon install: ESXi host with at least 4GB of free space (minimum); 16GB is recommended; 16GB recommended. |
| Distribution File | Photon OS ISO or OVA file downloaded from [https://packages.vmware.com/photon/](https://packages.vmware.com/photon/). |
Note: The setup instructions in this guide use VMware vSphere 6 and the vSphere web client.
Decide whether to use the OVA or ISO distribution to set up Photon OS.
- OVA import : Because of the nature of an OVA, you’re getting a pre-installed version of Photon OS. You can choose the hardware version you want (OVA with hardware version 13 or 11). The OVA benefits from a simple import process and some kernel tuning for VMware environments. However, because it’s a pre-installed version, the set of packages that are installed are predetermined. Any additional packages that you need can be installed using tdnf.
- ISO install : The ISO, on the other hand, allows for a more complete installation or automated installation via kickstart.
To get Photon OS up and running quickly, use the OVA.
Download Photon OS. Go to the following URL and download the latest release of Photon OS:
https://packages.vmware.com/photon/
For instructions, see https://github.com/vmware/photon/wiki/Downloading-Photon-OS.
Note: For ISO installation, you must upload to a datashare that is attached to the ESXi host, or mount the file share where the ISO resides as a data store.
5.2 - Importing the OVA for Photon OS
Using the OVA is a fast and easy way to create a Photon OS VM on VMware vSphere.
After you have downloaded the OVA, log in to your vSphere environment and perform the following steps:
Start the Import Process
From the Actions pull-down menu, choose Create/Register VM.
In the Select creation type window, choose Deploy a virtual machine from an OVF or OVA file.

Choose Next.
Select the OVA File
Enter a name for the virtual machine, and select the OVA file.

Choose Next.
Specify the Target Datastore
From the Select storage screen, select the target datastore for your VM.

Choose Next.
Accept the License Agreement
Read through the Photon OS License Agreement, and then choose I Agree.

Choose Next.
Select Deployment Options
Photon OS is provisioned with a maximum disk size. By default, Photon OS uses only the portion of disk space that it needs, usually much less that the entire disk size ( Thin client). If you want to pre-allocate the entire disk size (reserving it entirely for Photon OS instead), select Thick instead.

Choose Next.
Verify Deployment Settings

Click Finish. vSphere uploads and validates your OVA. Depending on bandwidth, this operation might take a while.
When finished, vShield powers up a new VM based on your selections.
Change Login Settings

After the VM is booted, open the command window. vSphere prompts you to log in.
Note: Because of limitations within OVA support on vSphere, it was necessary to specify a default password for the OVA option. However, all Photon OS instances that are created by importing the OVA require an immediate password change upon login. The default account credentials are:
 - Username: ``root``
 - Password: ``changeme``
After you provide these credentials, vSphere prompts you to create a new password and type it a second time to verify it.
Note: For security, Photon OS forbids common dictionary words for the root password.
Once logged in, you will see the shell prompt.

Once complete, proceed to Deploying a Containerized Application in Photon OS.
Export the VM as a Template (Optional)
Consider converting this imported VM into a template (from the Actions menu, choose Export ) so that you have a master Photon OS instance that can be combined with vSphere Guest Customization to enable rapid provisioning of Photon OS instances.
5.3 - Installing the ISO Image for Photon OS
After you download the Photon OS ISO image into a folder of your choice, complete the following steps.
Upload the ISO Image
Upload the ISO image to a datastore that is attached to the host on which you’ll create the Photon OS virtual machine.
Create a new VM
Log in to your vSphere environment. In the Virtual Machines window, choose Create/Register VM.
On the Select creation type screen, select Create a new virtual machine.
Choose Next.
Configure VM Settings
Specify a VM name.

Specify a guest operating system.
- For Compatibility, select ESXi 6.7.
- For Guest OS family, select Linux.
- For Guest OS version, select VMware Photon OS (64-bit).

Choose Next.
Select the Target Datastore
Select the datastore where you want to store the VM.

Click Next.
Customize VM Settings
Customize the virtual machine settings.

For CD/DVD Drive 1, click the drop-down and select Datastore ISO file.
In the Datastore browser, select the ISO that you want to import.
Change other settings as applicable.
- The recommended virtual hardware settings for your Photon VM are heavily dependent upon the container load you intend to run within Photon OS – more containers or more intensive containers will require you to adjust these settings for your application load. VMware suggests 2 vCPU, 1024MB memory, 20GB hard disk. Any unwanted devices should be removed. Be sure to mount the Photon OS ISO on the CD/DVD Drive and put a check in the box next to, Connect At Power On.
- If you want to configure a secure boot for the Photon OS VM you created, choose the VM Options tab, expand Boot Options, and select EFI from the firmware drop-down. An EFI boot ensures that the ISO content is signed by VMware and that the entire stack is secure.
Choose Next.
Verify VM Settings
The installer displays a summary of your selected settings.

Click Finish. vSphere creates the VM.
Power on the VM
Select the VM and power it on.

When you see the Photon Installer boot menu, press Enter on your keyboard to start installing.
Accept the License Agreement
Read the License Agreement and press the Enter key to accept.

Configure the Partition
The installer detects one disk, which should be the 16GB volume configured as part of the virtual machine creation. Choose Auto to have the installer automatically allocate the partition, or choose Custom if you want to configure individual partitions, and then press the Enter key.

Note: If you choose Custom, the installer displays the following screen.

For each custom partition, choose Create New and specify the following information:

Size - Preallocated size of this partition, in MB.
Type - One of the following options:
- ext3 - ext3 file system
- ext4 - ext4 file system
- swap - swap partition
Mountpoint - Mount point for this partition.
Choose OK and press the Enter key. When you are done defining custom partitions, choose Next and press the Enter key.
The installer prompts you to confirm that you want to erase the entire disk.

Choose Yes and press the Enter key.
Select an Installation Option
After partitioning the disk, the installer prompts you to select an installation option.

Each install option provides a different run-time environment, depending on your requirements.
| Option | Description |
| Photon Minimal | Photon Minimum is a very lightweight version of the container host runtime that is best suited for for devices that have limited compute and memory capabilities. There is sufficient packaging and functionality to allow most common operations around modifying existing containers, as well as being a highly performant and full-featured runtime. |
| Photon Developer | Photon Developer includes several additional packages to enhance the authoring and packaging of containerized applications and/or system customization. Use Photon Developer for developing and packaging the application that will be run as a container, as well as authoring the container, itself. For testing and validation purposes, Photon Developer includes all components necessary to run containers. |
| Photon OSTree Host | This installation profile creates a Photon OS instance that will source its packages from a central rpm-ostree server and continue to have the library and state of packages managed by the definition that is maintained on the central rpm-ostree server. |
| Photon Real Time | This profile is available only for the x86_64 architecture. |
Note: The option you choose determines the disk and memory resources required for your installation.
Select the option you want and press the Enter key.
The Network Configuration screen appears, select one of the four options to configure your network.

Choose Configure network automatically and select Next to configure the network automatically.
To configure network automatically with the DHCP hostname, select Configure network automatically with a DHCP hostname and select Next. Enter the DHCP Hostname and select Next.

To configure the network manually, select Configure Network manually. In the window that appears, enter the IP Address, Netmask, Gateway and Nameserver and select OK.

If your network interface is directly connected to the VLAN trunk port, choose YES on the Configure the network screen. Enter the VLAN ID and select Next.
 .
.
Select the Linux Kernel
Select a Linux kernel to install.

- Hypervisor optimized means that any components that are not needed for running under a VMware hypervisor have been removed for faster boot times.
- Generic means that all components are included.
Choose Next and press the Enter key.
Specify the Hostname
The installer prompts you for a hostname and suggest a randomly generated, unique hostname that you can change if you want.

Press the Enter key.
Specify the System root Password
The installer prompts you to enter the system root password.
Note: Photon OS will not permit commonly used dictionary words to be set as a root password.

Type a password and press the Enter key.
The installer prompts you to confirm your root password by typing it a second time.

Note: If you have trouble with unintentional repeated characters in the Remote Console, follow VMware KB 196 ( http://kb.vmware.com/kb/196) for a setting to apply to the virtual machine.
Press the Enter key. The installer proceeds to install the software. Installation times will vary based on the system hardware and installation options you selected. Most installations complete in less than one minute.
Reboot the VM and Log In
Once finished, the installer displays a confirmation message (which includes how long it took to install Photon OS) and prompts you to press a key on your keyboard to boot the new VM.

As the initial boot process begins, the installer displays the Photon splash screen, and then a login prompt.
At the login prompt, type root as the username and provide the password chosen during the installation.

You can now use your container runtime environment and deploy a containerized application.
6 - Running Photon OS on Fusion
You can use Photon OS as a virtual machine within VMware Fusion. You can download Photon OS, as an OVA or ISO file, and install the Photon OS distribution on Fusion. After you install Photon OS, you can deploy a containerized application in Docker with a single command.
Note: If you want to upgrade an existing Photon 1.0 VM, refer to the instructions in the Upgrading to Photon OS 5.0 section.
6.1 - Prerequisites for Running Photon OS on Fusion
Resource requirements and recommendations vary depending on several factors, including the host environment (for example, VMware Fusion and VMware vSphere), the distribution file used (ISO or OVA), and the selected installation settings (for example, full or basic installation).
Before you use Photon OS within Fusion, perform the following prerequisite tasks:
Verify that you have the following resources:
| Resource | Description |
| VMware Fusion | VMware Fusion (v7.0 or higher) must be installed. The latest version (v12) is recommended. |
| Memory | 2GB of free RAM (recommended) |
| Storage | Minimal Photon install : 512MB of free space (minimum); Full Photon install : 4GB of free space (minimum); 8GB recommended. |
| Distribution File | Photon OS ISO or OVA file downloaded from [https://packages.vmware.com/photon/](https://packages.vmware.com/photon/). |
Note: The setup instructions in this guide use VMware Fusion Professional version 8.5.8, as per the following screenshot.

Decide whether to use the OVA or ISO distribution to set up Photon OS.
- OVA import : Because of the nature of an OVA, you’re getting a pre-installed version of Photon OS. You can choose the hardware version you want (OVA with hardware version 13 or 11). The OVA benefits from a simple import process and some kernel tuning for VMware environments. However, because it’s a pre-installed version, the set of packages that are installed are predetermined. Any additional packages that you need can be installed using tdnf.
- ISO install : The ISO, on the other hand, allows for a more complete installation or automated installation via kickstart.
To get Photon OS up and running quickly, use the OVA.
Download Photon OS. Go to the following URL and download the latest release of Photon OS:
https://packages.vmware.com/photon/
For instructions, see Downloading Photon OS.
6.2 - Importing the OVA for Photon OS
Using the OVA is a fast and easy way to create a Photon OS VM on Fusion.
After you have downloaded the Photon OS OVA image (OVA with Hardware Version 15) into a folder of your choice, open VMware Fusion and perform the following steps:
Start the Import Process
From the File menu, choose Import …. Fusion prompts you to choose an existing virtual machine.

Choose the Choose File … button to locate and select the Photon OS OVA, then choose Continue.

Specify the Name and Storage Location
Provide the name and storage location for your Photon OS VM, then choose Save.

Review the Photon OS License Agreement, then choose Accept to start the import process.

Configure VM Settings
After the OVA is imported, Fusion displays a confirmation that the import has completed and a summary of the settings for your Photon OS VM. The following screen shot is an example (your settings may vary).

Important: Choose Customize Settings to change the operating system (as recognized by the hypervisor) for the newly imported VM.

Choose General.
Click the selection box next to OS, select Linux , and then select VMware Photon 64-bit.

Close the settings window. Fusion prompts you to verify that you want to change the operating system.

Click Change. Your Photon OS VM is ready to power on.
Power on the VM
Power on the Photon OS VM. Fusion may ask you whether you want to upgrade this VM.

How you respond depends on which hardware version (15 or 20) that you want to use. Upgrade if you need to use devices supported only in hardware version 20. Don’t upgrade if you want to be compatible with older tools that are supported in hardware version 15.
Update Login Credentials
After the VM is booted, Fusion prompts you to log in.
Note : Because of limitations within OVA support on Fusion, it was necessary to specify a default password for the OVA option. However, all Photon OS instances that are created by importing the OVA will require an immediate password change upon login. The default account credentials are:
- Username:
root - Password:
changeme
After you provide these credentials, Fusion prompts you to create a new password and type it a second time to verify it. For security, Photon OS forbids common dictionary words for the root password. Once logged in, you will see the shell prompt.
Once complete, proceed to Deploying a Containerized Application in Photon OS.
6.3 - Installing the ISO Image for Photon OS
After you have downloaded the latest Photon OS ISO image into a folder of your choice, open VMware Fusion.
Start the Installation Process
From the File menu, choose New.

From the Select the Installation Method dialog, select Install from disc or image, and then choose Continue.

Select the ISO Image
Drag a disc image onto the window or choose Use another disc or disc image…, choose the ISO file you want, and then choose Continue.

Select the Operating System
On the Choose Operating System dialog, select Linux in the left-hand column and VMware Photon 64-bit in the right-hand column.

Choose Continue.
Select the Virtual Disk (Optional)
If you are using a Fusion version that is older than Fusion 8, you might see the following dialog.

If you see this dialog, unless you’re installing into an existing machine, choose Create a new virtual disk from the Choose a Virtual Disk dialog, and then choose Continue.
Note: Fusion v8 and later automatically defaults to creating a new 8GB disk and formats it automatically. If you want to use an existing disk, or if you want to pre-allocate all 8GB, go into VM Settings, choose Add Device, and choose either New Hard Disk or Existing Hard Disk. Expand Advanced options and configure whether you want to pre-allocate disk space (disabled by default) or split into multiple files (enabled by default).
Configure VM Settings
Important: Before you finish creating the Photon OS Virtual Machine, we strongly recommend that you customize the virtual machine and remove any unwanted devices that are not needed for a container run-time environment.

To remove unnecessary devices, choose Customize Settings.
First, choose a name for your Virtual Machine, along with the folder into which you create the Virtual Machine (or accept the default folder).

Choose Save. The virtual machine will be created. The Settings screen allows you to customize virtual hardware for the new virtual machine. If it does not automatically appear, open Settings from the Virtual Machine menu bar.

You can remove (recommended) the following components that are not used by Photon OS:
- Select Display and ensure that the Accelerate 3D Graphics option is unchecked (it should be unchecked, by default). Select Show All to return to the VM Settings.
- Select CD/DVD (IDE) and ensure that the Connect CD/DVD Drive box is checked (it should be checked by default). Select Show All to return to the VM Settings.
- Select Sound Card, un-check the Connect Sound Card Option, and click Remove Sound Card. Choose Remove to confirm your action. Select Show All to return to the VM Settings.
- Select USB & Bluetooth and uncheck the Share Bluetooth devices with Linux setting. Select Show All to return to the VM Settings.
- Select Printer and press the Remove Printer Port button in the bottom left hand corner. Choose Remove to confirm your action. Select Show All to return to the VM Settings.
- Select Camera and press the Remove Camera button in the bottom left hand corner. Choose Remove to confirm your action. Select Show All to return to the VM Settings.
- Select Advanced and ensure that the Pass Power Status to VM option is unchecked (it should be unchecked, by default). Select Show All, but do not close the VM Settings window.
By default, Photon OS is configured with a disk size of 8GB. However, Photon OS uses only the portion of disk space it needs, usually much less that the entire disk size. If you want to pre-allocate the entire disk size (reserving it entirely for Photon OS instead), select Hard Disk, expand Advanced options, and check Pre-allocate disk space (by default, it is unchecked). Select Show All to return to the VM Settings.
Configure a Secure Boot (Optional)
Note: If you want to configure a secure boot for the Photon OS VM you created, edit its .vmx file and add the following line:
firmware = “efi”
The EFI boot ensures that the ISO content is signed by VMware and that the entire stack is secure.
After you have made the customizations you want, close the Virtual Machine Settings window. You are now ready to boot and begin the installation process.
Power On the VM
Return to the Fusion main menu, select the Photon OS Virtual Machine, and click Start Up (you can also choose Start Up from the Virtual Machine menu).
Fusion powers on the host and starts the installation. Within a few seconds, Fusion displays the Photon OS installer boot menu.
Press the Enter key on your keyboard to start installing.
Read the License Agreement and press the Enter key to accept.
Configure the Partition
The Installer will detect one disk, which should be the 8GB volume configured as part of the virtual machine creation.
Choose Auto to have the installer automatically allocate the partition, or choose Custom if you want to configure individual partitions, and then press the Enter key.
Note: If you choose Custom, the installer displays the following screen.
For each custom partition, choose Create New and specify the following information:
Size - Preallocated size of this partition, in MB.
Type - One of the following options:
- ext3 - ext3 file system
- ext4 - ext4 file system
- swap - swap partition
Mountpoint - Mount point for this partition.
Choose OK and press the Enter key. When you are done defining custom partitions, choose Next and press the Enter key.
The installer prompts you to confirm that you want to erase the entire disk.
Choose Yes and press the Enter key to accept and proceed with the installation.
Select an Installation Option
After partitioning, the installer prompts you to select one of three installation options:
Each install option provides a different run-time environment. Select the option that best meets your requirements.
![]() Option Option | Description |
| Photon Minimal | Photon Minimum is a very lightweight version of the container host runtime that is best suited for container management and hosting. There is sufficient packaging and functionality to allow most common operations around modifying existing containers, as well as being a highly performant and full-featured runtime. |
| Photon Full | Photon Full includes several additional packages to enhance the authoring and packaging of containerized applications and/or system customization. For simply running containers, Photon Full will be overkill. Use Photon Full for developing and packaging the application that will be run as a container, as well as authoring the container, itself. For testing and validation purposes, Photon Full will include all components necessary to run containers. |
| Photon OSTree Server | This installation profile will create the server instance that will host the filesystem tree and managed definitions for rpm-ostree managed hosts created with the "Photon OSTree Host" installation profile. Most environments should need only one Photon OSTree Server instance to manage the state of the Photon OSTree Hosts. Use Photon OSTree Server when you are establishing a new repository and management node for Photon OS hosts. |
Note: The option you choose determines the disk and memory resources required for your installation.
Select the option you want and press the Enter key.
The Network Configuration screen appears, select one of the four options to configure your network.

Choose Configure network automatically and select Next to configure the network automatically.
To configure network automatically with the DHCP hostname, select Configure network automatically with a DHCP hostname and select Next. Enter the DHCP Hostname and select Next.
To configure the network manually, select Configure Network manually. In the window that appears, enter the IP Address, Netmask, Gateway and Nameserver and select OK.
If your network interface is directly connected to the VLAN trunk port, choose YES on the Configure the network screen. Enter the VLAN ID and select Next.
.
Select the Linux Kernel
The installer prompts you to select the Linux kernel to install:
- Hypervisor optimized means that any components that are not needed for running under a VMware hypervisor have been removed for faster boot times.
- Generic means that all components are included.
Specify the Hostname
The installer prompts you for a hostname and suggest a randomly generated, unique hostname that you can change if you want.
Press the Enter key.
Specify the System root Password
Note: Photon OS will not permit commonly used dictionary words to be set as a root password.
The installer prompts you to enter the system root password. Type the password, and then press the Enter key.
Confirm the root password by typing it a second time.
Press the Enter key. The installer proceeds to install the software. Installation times will vary based on the system hardware and installation options you selected. Most installations complete in less than one minute.
Once finished, the installer displays a confirmation message (which includes how long it took to install Photon OS) and prompts you to press a key on your keyboard to boot the new VM.
Reboot the VM and Log In
Press any key on the keyboard and the virtual machine will reboot into Photon OS.
As the initial boot process begins, the installer displays the Photon splash screen, and then a login prompt.
At the login prompt, enter root as the username and provide the password chosen during the installation.
You can now use your container runtime environment and deploy a containerized application.
7 - Running Photon OS on Workstation
You can use Photon OS as a virtual machine within VMware Workstation. You can download Photon OS, as an OVA or ISO file, and install the Photon OS distribution on vSphere. After you install Photon OS, you can deploy a containerized application in Docker with a single command.
Note: If you want to upgrade an existing Photon 1.0 VM, refer to the instructions in the Upgrading to Photon OS 5.0 section.
7.1 - Prerequisites for Running Photon OS on Workstation
Before you use Photon OS within Workstation, perform the following prerequisite tasks:
Verify that you have the following resources:
| Resource | Description |
| VMware Workstation | VMware Workstation must be installed (Workstation 10 or higher). The latest version is recommended. |
| Memory | 2GB of free RAM (recommended) |
| Storage | Minimal Photon install: 512MB of free space (minimum); Full Photon install: 4GB of free space (minimum); 8GB is recommended. |
| Distribution File | Photon OS ISO or OVA file downloaded from VMware (https://packages.vmware.com/photon/5.0/GA/). |
Resource requirements and recommendations vary depending on several factors, including the host environment (for example, VMware Workstation and VMware vSphere), the distribution file used (ISO or OVA), and the selected installation settings (for example, full or basic installation).
Note: The setup instructions in this guide use VMware Workstation Professional version 12.5.7.

Decide whether to use the OVA or ISO distribution to set up Photon OS.
OVA import : Because of the nature of an OVA, you’re getting a pre-installed version of Photon OS. You can choose the hardware version you want (OVA with hardware version 13 or 11). The OVA benefits from a simple import process and some kernel tuning for VMware environments. However, because it’s a pre-installed version, the set of packages that are installed are predetermined. Any additional packages that you need can be installed using tdnf.
ISO install : The ISO, on the other hand, allows for a more complete installation or automated installation via kickstart.
To get Photon OS up and running quickly, use the OVA.
Download Photon OS. Go to the following URL and download the latest release of Photon OS:
https://packages.vmware.com/photon/5.0/GA/
For instructions, see Downloading Photon OS.
7.2 - Importing the OVA for Photon OS
Using the OVA is the easiest way to create a Photon OS VM on VMware Workstation.
After you have downloaded the the OVA file (OVA with Hardware Version 11), perform the following steps:
Start the Import Process
- Double-click it to start the import process, or
- Start VMware Workstation and, from the File menu, choose Open.

Specify the Name and Storage Location
Change the name and storage location, if you want.

Choose Import.

Review the License Agreement and choose Accept.
Configure VM Settings
Once the OVA is imported, Workstation displays a summary of the settings for your Photon OS VM.

Choose Edit virtual machine settings. Workstation displays the Virtual Machine settings. You can either accept the defaults or change settings as needed.

Select the Options tab.

Under Guest operating system, select Linux.
For Version, click the list and select VMWare Photon 64-bit.

Note: If you want to configure a secure boot for the Photon OS VM, select Advanced and select (check) Boot with EFI instead of BIOS. The EFI boot ensures that the ISO content is signed by VMware and that the entire stack is secure.

Choose OK.
Power on the VM
From the tab, choose Power on this virtual machine.
After the splash screen, Workstation will prompt you to log in.
Update Login Credentials
Note : Because of limitations within OVA support on Workstation, it was necessary to specify a default password for the OVA option. However, all Photon OS instances that are created by importing the OVA will require an immediate password change upon login. The default account credentials are:
- Username:
root - Password:
changeme
After you provide these credentials, Workstation prompts you to create a new password and type it a second time to verify it. For security, Photon OS forbids common dictionary words for the root password. Once logged in, you will see the shell prompt.
Once complete, proceed to Deploying a Containerized Application in Photon OS.
7.3 - Installing the ISO Image for Photon OS
After you have downloaded the latest Photon OS ISO image into a folder of your choice, open VMware Workstation.
Start the Installation Process
From the File menu, choose New Virtual Machine to create a new virtual machine.

Select Typical or Custom, and then choose Next. These instructions refer to a Typical installation.

Select the ISO Image
Select Installer disc image file (iso), choose Browse and select the Photon OS ISO file.

Select the Operating System
Choose Next. Select the Guest operating system.
For the Guest operating system, select Linux.
Click the Version dropdown and select VMware Photon 64-bit from the list.

Specify the VM Name and Location
Choose Next. Specify a virtual machine name and location.

Specify Disk Options
Choose Next. Specify the maximum disk size and whether you want to split the virtual disk into multiple files or store it as a single file.

Configure VM Settings
Choose Next. Workstation displays a summary of your selections.

Important : Before you finish creating the Photon OS Virtual Machine, we strongly recommend that you customize the virtual machine and remove any unwanted devices that are not needed for a container run-time environment. To remove unnecessary devices, choose Customize hardware.

Consider removing the following components, which are not used by Photon OS:
- Select Sound Card, un-tick the Connect at power on option. Confirm your action and choose Close to return to the VM Settings by .
- Select USB Controller and ensure that the Share Bluetooth devices with the virtual machine setting is unchecked (it should be unchecked, by default) and then choose Close.
- Select Display and ensure that the Accelerate 3D Graphics option is unchecked (it should be unchecked, by default) and then choose Close.
- At this stage we have now made all the necessary customizations and you are ready to select the Photon OS ISO image to boot and begin the installation process.
- Choose Finish.
In Workstation, choose Edit virtual machine settings, select CD/DVD (IDE), and verify that Connect at power on is selected.

Configure a Secure Boot (Optional)
Note: If you want to configure a secure boot for the Photon OS VM, in Workstation, choose Edit virtual machine settings, select Options, choose Advanced, and select Boot with EFI instead of BIOS.

The EFI boot ensures that the ISO content is signed by VMware and that the entire stack is secure.
Choose OK.

Power On the VM
Choose Power on this virtual machine.
When you see the Photon Installer boot menu, press Enter on your keyboard to start installing.
Review the license agreement.
Choose Accept and press Enter.
Configure the Partition
The installer will detect one disk, which should be the 8GB volume configured as part of the virtual machine creation. Choose Auto to have the installer automatically allocate the partition, or choose Custom if you want to configure individual partitions, and then press the Enter key.
Note: If you choose Custom, the installer displays the following screen.
For each custom partition, choose Create New and specify the following information:
Size - Preallocated size of this partition, in MB.
Type - One of the following options:
- ext3 - ext3 file system
- ext4 - ext4 file system
- swap - swap partition
Mountpoint - Mount point for this partition.
Choose OK and press the Enter key. When you are done defining custom partitions, choose Next and press the Enter key.
The installer prompts you to confirm that you want to erase the entire disk. Choose Yes and press the Enter key.
Select an Installation Option
After partitioning the disk, the installer will prompt you to select an installation option.
Each installation option provides a different run-time environment, depending on your requirements.
| Option | Description |
| Photon Minimal | Photon Minimum is a very lightweight version of the container host runtime that is best suited for container management and hosting. There is sufficient packaging and functionality to allow most common operations around modifying existing containers, as well as being a highly performant and full-featured runtime. |
| Photon Full | Photon Full includes several additional packages to enhance the authoring and packaging of containerized applications and/or system customization. For simply running containers, Photon Full will be overkill. Use Photon Full for developing and packaging the application that will be run as a container, as well as authoring the container, itself. For testing and validation purposes, Photon Full will include all components necessary to run containers. |
| Photon OSTree Server | This installation profile will create the server instance that will host the filesystem tree and managed definitions for rpm-ostree managed hosts created with the "Photon OSTree Host" installation profile. Most environments should need only one Photon OSTree Server instance to manage the state of the Photon OSTree Hosts. Use Photon OSTree Server when you are establishing a new repository and management node for Photon OS hosts. |
Note: The option you choose determines the disk and memory resources required for your installation.
Select the option you want and press the Enter key.
The Network Configuration screen appears, select one of the four options to configure your network.

Choose Configure network automatically and select Next to configure the network automatically.
To configure network automatically with the DHCP hostname, select Configure network automatically with a DHCP hostname and select Next. Enter the DHCP Hostname and select Next.
To configure the network manually, select Configure Network manually. In the window that appears, enter the IP Address, Netmask, Gateway and Nameserver and select OK.
If your network interface is directly connected to the VLAN trunk port, choose YES on the Configure the network screen. Enter the VLAN ID and select Next.
.
Select the Linux Kernel
Select a Linux kernel to install.
- Hypervisor optimized means that any components that are not needed for running under a VMware hypervisor have been removed for faster boot times.
- Generic means that all components are included.
Choose Next and press the Enter key.
Specify the Hostname
The installer prompts you for a hostname and suggest a randomly generated, unique hostname that you can change if you want.
Press the Enter key.
Specify the System root Password
Note : Photon OS will not permit commonly used dictionary words to be set as a root password.
The installer prompts you to enter the system root password. Type the password and press the Enter key.
The installer prompts you to confirm the root password by typing it a second time.
Press the Enter key. The installer proceeds to install the software. Installation times will vary based on the system hardware and installation options you selected. Most installations complete in less than one minute.
Reboot the VM and Log In
Once finished, the installer displays a confirmation message (which includes how long it took to install Photon OS) and prompts you to press a key on your keyboard to boot the new VM.
Press any key on the keyboard and the virtual machine will reboot into Photon OS.
As the initial boot process begins, the installer displays the Photon splash screen, and then a login prompt.
At the login prompt, type root as the username and provide the password chosen during the installation.
You can now use your container runtime environment and deploy a containerized application.
8 - Running Photon OS on Amazon Elastic Cloud Compute
You can set up Photon OS on Amazon Web Services Elastic Cloud Compute (EC2), customize it with cloud-init, connect to it with SSH.
After you set up Photon OS, you can run a containerized application.
8.1 - Prerequisites for Running Photon OS on AWS EC2
Before you use Photon OS with Amazon Elastic Cloud Compute(AWS EC2), perform the following prerequisite tasks:
Verify that you have the following resources:
- AWS account. Working with EC2 requires an Amazon account for AWS with valid payment information. Keep in mind that, if you try the examples in this document, you will be charged by Amazon. See Setting Up with Amazon EC2.
- Amazon tools. The following examples also assume that you have installed and configured the Amazon AWS CLI and the EC2 CLI and AMI tools, including ec2-ami-tools.
For more information, see Installing the AWS Command Line Interface, Setting Up the Amazon EC2 Command Line Interface Tools on Linux, and Configuring AWS Command-Line Interface. Also see Setting Up the AMI Tools.
The procedure in this section uses an Ubuntu 14.04 workstation to generate the keys and certificates that AWS requires.
Download the Photon OS image for Amazon.
VMware packages Photon OS as a cloud-ready Amazon machine image (AMI) that you can download for free from https://packages.vmware.com/photon/.
Download the Photon OS AMI and save it on your workstation. For more information, see Downloading Photon OS.
Note: The AMI version of Photon is a virtual appliance with the information and packages that Amazon needs to launch an instance of Photon in the cloud. To build the AMI version, VMware starts with the minimal version of Photon OS and adds the sudo and tar packages to it.
8.2 - Set Up Photon OS on EC2
To run Photon OS on EC2, you must use cloud-init with an EC2 data source. The cloud-init service configures the cloud instance of a Linux image. An instance is a virtual server in the Amazon cloud.
The examples in this section show how to generate SSH and RSA keys for your Photon instance, upload the Photon OS .ami image to the Amazon cloud, and configure it with cloud-init. In the examples, replace information with your own paths, account details, or other information from Amazon.
Perform the following steps to set up Photon OS on EC2
Create a key pair.
Generate SSH keys on, for instance, an Ubuntu workstation:
ssh-keygen -f ~/.ssh/mykeypair
The command generates a public key in the file with a .pub extension and a private key in a file with no extension. Keep the private key file and remember the name of your key pair. The name is the file name of the two files without an extension. You will need the name later to connect to the Photon instance.
Change the mode bits of the public key pair file to protect its security. In the command, include the path to the file if you need to.
chmod 600 mykeypair.pub
Change the mode bits on your private key pair file so that only you can view it:
chmod 400 mykeypair
To import your public key pair file, but not your private key pair file, connect to the EC2 console at https://console.aws.amazon.com/ec2/ and select the region for the key pair. A key pair works only in one region, and the instance of Photon OS that will be uploaded later must be in the same region as the key pair. Select key pairs under Network & Security, and then import the public key pair file that you generated earlier.
For more information, see Importing Your Own Key Pair to Amazon EC2.
Generate a certificate.
When you bundle up an image for EC2, Amazon requires an RSA user signing certificate. You create the certificate by using openssl to first generate a private RSA key and then to generate the RSA certificate that references the private RSA key. Amazon uses the pairing of the private key and the user signing certificate for handshake verification.
On Ubuntu 14.04 or another workstation that includes openssl, run the following command to generate a private key. If you change the name of the key, keep in mind that you will need to include the name of the key in the next command, which generates the certificate.
openssl genrsa 2048 > myprivatersakey.pem
Make a note of your private key as you will need it again later.
Run the following command to generate the certificate. The command prompts you to provide more information, but because you are generating a user signing certificate, not a server certificate, you can just type Enter for each prompt to leave all the fields blank.
openssl req -new -x509 -nodes -sha256 -days 365 -key myprivatersakey.pem -outform PEM -out certificate.pem
For more information, see the Create a Private Key and the Create the User Signing Certificate sections of Setting Up the AMI Tools.
Upload to AWS the certificate value from the certificate.pem file that you created in the previous command. Go to the Identity and Access Management console at https://console.aws.amazon.com/iam/, navigate to the name of your user, open the Security Credentials section, click Manage Signing Certificates, and then click Upload Signing Certificate. Open certificate.pem in a text editor, copy and paste the contents of the file into the Certificate Body field, and then click Upload Signing Certificate.
For more information, see the Upload the User Signing Certificate section of Setting Up the AMI Tools.
Create a security group.
Create a security group and set it to allow SSH, HTTP, and HTTPS connections over ports 22, 80, and 443, respectively.
Connect to the EC2 command-line interface and run the following commands:
 aws ec2 create-security-group --group-name photon-sg --description "My Photon security group"
 {
     "GroupId": "sg-d027efb4"
 }
 aws ec2 authorize-security-group-ingress --group-name photon-sg --protocol tcp --port 22 --cidr 0.0.0.0/0
Make a note of the GroupId that is returned by EC2 as you will need it again later.
By using 0.0.0.0/0 for SSH ingress on Port 22, you open the port to all IP addresses–which is not a security best practice but a convenience for the examples in this article. For a production instance or other instances that are anything more than temporary machines, you must authorize only a specific IP address or range of addresses. For more information, see Authorizing Inbound Traffic for Linux Instances.
Repeat the command to allow incoming traffic on Port 80 and on Port 443:
 aws ec2 authorize-security-group-ingress --group-name photon-sg --protocol tcp --port 80 --cidr 0.0.0.0/0

 aws ec2 authorize-security-group-ingress --group-name photon-sg --protocol tcp --port 443 --cidr 0.0.0.0/0
Check your update:
aws ec2 describe-security-groups --group-names photon-sg
Extract the tarball.
Make a directory to store the image and then extract the Photon OS image from its archive by running the following tar command. If required, change the file name to match the version you have.
 mkdir bundled
 tar -zxvf ./photon-ami.tar.gz
Bundle the image.
Run the ec2-bundle-image command to create an instance store-backed Linux AMI from the Photon OS image that you extracted in the previous step. The result of the ec2-bundle-image command is a manifest that describes the machine in an XML file.
The command uses the certificate path to your PEM-encoded RSA public key certificate file, the path to your PEM-encoded RSA private key file, your EC2 user account ID; the correct architecture for Photon OS, the path to the Photon OS AMI image extracted from its tar file, and the bundled directory from the previous step.
Replace the values of the certificate path, the private key, and the user account with your own values.
$ ec2-bundle-image --cert certificate.pem --privatekey myprivatersakey.pem --user <EC2 account id> --arch x86_64 --image photon-ami.raw --destination ./bundled/
Put the bundle in a bucket.
Make an S3 bucket, replacing <bucket-name> with the name that you want. The command creates the bucket in the region specified in your Amazon configuration file, which should be the same region in which you are using your key pair file:
$ aws s3 mb s3://<bucket-name>
Upload the bundle to the Amazon S3 cloud. The following command includes the path to the XML file containing the manifest for the Photon OS machine created during the previous step, though you might have to change the file name to match the version you have. The manifest file is typically located in the same directory as the bundle.
The command also includes the name of the Amazon S3 bucket in which the bundle is to be stored; your AWS access key ID; and your AWS secret access key.
$ ec2-upload-bundle --manifest ./bundled/photon-ami.manifest.xml --bucket <bucket-name> --access-key <Account Access Key> --secret-key <Account Secret key>
Register the Image
Run the following command to register the image. The command includes a name for the AMI, its architecture, and its virtualization type. The virtualization type for Photon OS is hvm.
$ ec2-register <bucket-name>/photon-ami.manifest.xml --name photon-ami --architecture x86_64 --virtualization-type hvm
Once the image is registered, you can launch as many new instances as you require.
Run an instance of the image with Cloud-Init.
In the below command, the user-data-file option instructs cloud-init to import the cloud-config data in user-data.txt.
Before you run the command, change directories to the directory containing the mykeypair file and add the path to the user-data.txt.
$ ec2-run-instances <ami-ID> --instance-type m3.medium -g photon-sg --key mykeypair --user-data-file user-data.txt
The command also includes the ID of the AMI, which you can obtain by running ec2-describe-images. Replace the instance type of m3.medium and the name of key pair with your own values to be able to connect to the instance.
The following are the contents of the user-data.txt file that cloud-init applies to the machine the first time it boots up in the cloud.
 #cloud-config
 hostname: photon-on-01
 groups:
 - cloud-admins
 - cloud-users
 users:
 - default
 - name: photonadmin
    gecos: photon test admin user
    primary-group: cloud-admins
    groups: cloud-users
    lock-passwd: false
    passwd: vmware
 - name: photonuser
    gecos: photon test user
    primary-group: cloud-users
    groups: users
    passwd: vmware
 packages:
 - vim
Get the IP address of your image.
Run the following command to check on the state of the instance that you launched:
$ ec2-describe-instances
Obtain the external IP address of the instance by running the following query:
$ aws ec2 describe-instances --instance-ids <instance-id> --query 'Reservations[*].Instances[*].PublicIpAddress' --output=text
Optionally, check the cloud-init output log file on EC2 at /var/log/cloud-init-output.log to see how EC2 handles the settings in the cloud-init data file.
For more information on using cloud-init user data on EC2, see Running Commands on Your Linux Instance at Launch.
8.3 - Deploy a Containerized Application in Photon OS
Connect to the Photon instance by using SSH and to launch a web server by running it in Docker.
Connect with SSH
Connect to the instance over SSH by specifying the private key (.pem) file and the user name for the Photon machine, which is root:
ssh -i ~/.ssh/mykeypair root@<public-ip-address-of-instance>
For complete instructions, see Connecting to Your Linux Instance Using SSH.
Run Docker
On the minimal version of Photon OS, the docker engine is enabled and running by default, which you can see by running the following command:
systemctl status docker
Start the web server
Note: Please make sure that the proper security policies have been enabled on the Amazon AWS side to enable traffic to port 80 on the VM.
Since Docker is running, you can run an application in a container–for example, the Nginx Web Server. This example uses the popular open source web server Nginx. The Nginx application has a customized VMware package that the Docker engine can download directly from the Docker Hub.
To pull Nginx from its Docker Hub and start it, run the following command:
docker run -p 80:80 vmwarecna/nginx
The Nginx web server should be bound to the public DNS value for the instance of Photon OS, that is, the same address with which you connected over SSH.
Test the web server
On your local workstation, open a web browser and go to the the public address of the Photon OS instance running Docker. The following screen should appear, showing that the web server is active:

Stop the Docker container by typing Ctrl+c in the SSH console through which you are connected to EC2.
You can now run other containerized applications from the Docker Hub or your own containerized application on Photon OS in the Amazon cloud.
8.4 - Launch the Web Server with Cloud-Init
To eliminate the manual effort of running Docker, you can add docker run and its arguments to the cloud-init user data file by using runcmd:
#cloud-config
hostname: photon-on-01
groups:
- cloud-admins
- cloud-users
users:
- default
- name: photonadmin
   gecos: photon test admin user
   primary-group: cloud-admins
   groups: cloud-users
   lock-passwd: false
   passwd: vmware
- name: photonuser
   gecos: photon test user
   primary-group: cloud-users
   groups: users
   passwd: vmware
packages:
- vim
runcmd:
- docker run -p 80:80 vmwarecna/nginx
To try this addition, run another instance with the new cloud-init data source and then get the public IP address of the instance to check that the Nginx web server is running.
8.5 - Terminate the AMI Instance
Because Amazon charges you while the instance is running, you must shut it down when you have finished using it.
- Get the ID of the AMI so you can terminate it:
$ ec2-describe-instances
- Terminate the Photon OS instance by running the following command:
$ ec2-terminate-instances <instance-id>
Replace the placeholder with the ID that the ec2-describe-images command returned. If you ran a second instance of Photon OS with the cloud-init file that runs docker, terminate that instance as well.
9 - Running Photon OS on Microsoft Azure
You can use Photon OS as a run-time environment for Linux containers on Microsoft Azure. You can set up and run the cloud-ready version of Photon OS as an instance of a virtual machine in the Azure cloud. Once Photon OS is running, you can deploy a containerized application in Docker.
Note: These instructions apply to Photon OS 2.0 and 3.0. There is no Photon OS 1.0 distribution image for Microsoft Azure.
9.1 - Prerequisites for Running Photon OS on Azure
Before you use Photon OS with Microsoft Azure, perform the following prerequisite tasks:
Verify that you have a Microsoft Azure account. To create an account, see https://azure.microsoft.com
Install the latest version of Azure CLI. See Install Azure CLI and Get started with Azure CLI .
Verify that that you have a pair of SSH public and private keys.
Download and extract the Photon OS VHD file.
VMware packages Photon OS as an Azure-ready virtual hard disk (VHD file) that you can download for free from the VMware Photon Packages site. This VHD file is a virtual appliance with the information and packages that Azure needs to launch an instance of Photon in the cloud. After you have downloaded the distribution archive, extract the VHD file from it. You will later need to upload this VHD file to Azure, where it will be stored in an Azure storage account. For more information, see Downloading Photon OS.
9.2 - Set Up Azure Storage and Uploading the VHD
You can use either the Azure Portal or the Azure CLI to set up your Azure storage space, upload the Photon OS VHD file, and create the Photon OS VM.
Setting Up Using the Azure Portal
You can use the Azure portal to set up Photon OS in the Azure cloud. The following instructions are brief. Refer to the Azure documentation for details.
- Log in to the Azure portal at http://portal.azure.com.
- Create a resource group. In the toolbar, choose Resource Groups, click +Add , fill in the resource group fields, and choose Create.
- Create a storage account. In the toolbar, choose Storage Accounts, click +Add , fill in the storage account fields (and the resource group you just created), and choose Create.
- Select the storage account.
- Scroll down the storage account control bar, click Containers (below BLOB SERVICE), click +Container , fill in the container fields, and choose Create.
- Select the container you just created.
- Click Upload and upload the Photon OS VHD image file to this container.
- Once the VHD file is uploaded, refer to the Azure documentation for instructions on how to create and manage your Photon OS VM.
Setting Up Using the Azure CLI
You can use the Azure CLI to set up Photon OS.
Note: Except where overridden with parameter values, these commands create objects with default settings.
Create a resource group.
From the Azure CLI, create a resource group.
az group create \
 --name <your_resource_group> \
 --location westus
Create a storage account
Create a storage account associated with this resource group.
az storage account create \
    --resource-group <your_resource_group> \
    --location westus \
    --name <your_account_name> \
    --kind Storage \
    --sku Standard_LRS
List the Keys for the Storage Account
Retrieve the keys associated with your newly created storage account.
az storage account keys list \
    --resource-group <your_resource_group> \
    --account-name <your_account_name>
Create the Storage Container
Create a storage container associated with your newly created storage account.
Note: The sample create.sh script, described below, does this for you programmatically.
az storage container create \
    --account-name <your_account_name> \
    --name <your_container_name>
Verify Your Setup in the Azure Portal
- Log into the Azure portal using your account credentials.
- From the left toolbar, click Storage Accounts. You should see your storage accounts.
- Select the storage account.
- Scroll down the storage account control bar and click Containers (below BLOB SERVICE). You should see the container you created.
Upload the Photon OS Distribution to Your Storage Container
The Photon OS distribution for Azure is 16GB. You can download it locally or to a mounted, shared location.
az storage blob upload \
    --account-name <your_account_name> \
    --account-key <your_account_key> \
    --container-name <your_container_name> \
    --type page \
    --file <vhd_path> \
    --name <vm_name>.vhd
Example Setup Script
You can use the following script (create.sh) to upload your VHD file programmatically and create the VM. Before you run it, specify the following settings:
- resource_group name
- account_name
- account_key (public or private)
- container_name
- public_key_file
- vhd_path and and vm_name of the Photon OS VHD distribution file
The following script returns the complete IP address of the newly created VM.
#!/bin/bash
vhd_path=$1
vm_name=$2
export PATH=$PATH:/root/azure_new/bin/az
echo PATH=$PATH
resource_group=""
account_name=""
account_key=""
container_name="mydisks"
url="https://${account_name}.blob.core.windows.net/${container_name}/${vm_name}.vhd"
public_key_file="/root/azure_new/jenkins.pub"
echo "########################"
echo "#   Create container   #"
echo "########################"
/root/azure_new/bin/az storage container create --account-name ${account_name} --name ${container_name}
echo "##################"
echo "#   Upload vhd   #"
echo "##################"
/root/azure_new/bin/az storage blob upload --account-name ${account_name} \
    --account-key ${account_key} \
    --container-name ${container_name} \
    --type page \
    --file ${vhd_path} \
    --name ${vm_name}.vhd
echo "##################"
echo "#   Create vm    #"
echo "##################"
echo "az vm create --resource-group ${resource_group} --location westus --name ${vm_name} --storage-account ${account_name} --os-type linux --admin-username michellew --ssh-key-value ${public_key_file} --image ${url} --use-unmanaged-disk ... ..."
/root/azure_new/bin/az vm create --resource-group ${resource_group} --location westus --name ${vm_name} --storage-account ${account_name} --os-type linux --admin-username michellew --ssh-key-value ${public_key_file} --image ${url} --use-unmanaged-disk
9.3 - Remove Photon OS From Azure
You can use the following delete.sh script to programmatically and silently remove the VM instance, VHD file, and container.
Consider deleting idle VMs so that you are not charged when not in use.
Before you run it, specify the following settings:
- resource_group name (from step 1, above)
- account_name (from step 2, above)
- account_key (public or private) (from step 3, above)
- container_name (from step 4, above)
- public_key_file
- vm_name of the Photon OS VHD distribution file
delete.sh
#!/bin/bash
vm_name=$1
resource_group=""
account_name=""
account_key=""
container_name="mydisks"
url="https://${account_name}.blob.core.windows.net/${container_name}/${vm_name}.vhd"
public_key_file="/root/azure_new/jenkins.pub"
exit_code=0
echo "##################"
echo "#   Delete vm    #"
echo "##################"
echo "az vm list  --resource-group ${resource_group} ... ..."
/root/azure_new/bin/az vm list  --resource-group ${resource_group}
echo "az vm delete --resource-group ${resource_group} --name ${vm_name} --yes ... ..."
/root/azure_new/bin/az vm delete --resource-group ${resource_group} --name ${vm_name} --yes
if [$? -ne 0];then
   exit_code=1
fi
echo "az vm list  --resource-group ${resource_group} ... ..."
/root/azure_new/bin/az vm list  --resource-group ${resource_group}
echo "##############$####"
echo "#   Delete vhd    #"
echo "###############$###"
echo "az storage blob list --account-name ${account_name} --container-name ${container_name} ... ..."
/root/azure_new/bin/az storage blob list --account-name ${account_name} --container-name ${container_name}
echo "az storage blob delete --account-name ${account_name} --container-name ${container_name} --name ${vm_name}.vhd ... ..."
/root/azure_new/bin/az storage blob delete --account-name ${account_name} --container-name ${container_name} --name ${vm_name}.vhd
if [$? -ne 0];then
   exit_code=1
fi
echo "az storage blob list --account-name ${account_name} --container-name ${container_name} ... ..."
/root/azure_new/bin/az storage blob list --account-name ${account_name} --container-name ${container_name}
echo "########################"
echo "#   Delete container   #"
echo "########################"
/root/azure_new/bin/az storage container delete --account-name ${account_name} --name ${container_name}
/root/azure_new/bin/az storage container delete --account-name ${account_name} --name vhds
exit ${exit_code}
You can now proceed to Deploying a Containerized Application in Photon OS.
10 - Running Photon OS on Google Compute Engine
You can use Photon OS as a virtual machine on Google Compute Engine (GCE). You can download Photon OS, as an OVA or ISO file, and install the Photon OS distribution on vSphere. After you install Photon OS, you can deploy a containerized application in Docker with a single command.
10.1 - Prerequisites for Running Photon OS on GCE
Before you use Photon OS within GCE, verify that you have the following resources:
- Google Compute Engine account
- GCE tools
- Photon OS Image
Google Compute Engine Account
Working with GCE requires a Google Compute Engine account with valid payment information. Keep in mind that, if you try the examples in this document, you will be charged by Google. The GCE-ready version of Photon OS is free to use.
GCE is a service that lets you run virtual machines on Google’s infrastructure. You can customize the virtual machine as much as you want, and you can even install your own custom operating system image. Or, you can adopt one of the public images provided by Google. For any operating system to work with GCE, it must match Google’s infrastructure needs. Google provides tools that VM instances require to work correctly on GCE:
- Google startup scripts: You can provide some startup script to configure your instances at startup.
- Google Daemon: Google Daemon creates new accounts and configures ssh to accept public keys using the metadata server.
- Google Cloud SDK: Command line tools to manage your images, instances and other objects on GCE.
Perform the following tasks to make Photon OS work on GCE:
- Install Google Compute Engine Image packages
- Install Google Cloud SDK
- Change GPT partition table to MBR
- Update the Grub config for new MBR and serial console output
- Update ssh configuration
- Delete ssh host keys
- Set the time zone to UTC
- Use the Google NTP server
- Delete the hostname file.
- Add Google hosts /etc/hosts
- Set MTU to 1460. SSH will not work without it.
- Create
/etc/ssh/sshd_not_to_be_run with just the contents “GOOGLE\n”.
For more information see Importing Boot Disk Images to Compute Engine.
For information about upgrading the Photon OS Linux kernel see Upgrading the Kernel Version Requires Grub Changes for AWS and GCE Images
Photon OS Image
VMware recommends that administrators use the Photon OS image for Google Compute Engine (GCE) to create Photon OS instances on GCE. Photon OS bundles the Google startup scripts, daemon, and cloud SDK into a GCE-ready image that has been modified to meet the configuration requirements of GCE. You can download the Photon OS image for GCE from the following URL:
https://packages.vmware.com/photon/5.0/GA/gce/
For instructions, see Downloading Photon OS.
Optionally you can customize Photon OS to work with GCE.
Creating Photon image for GCE
Perform the following tasks:
Prepare Photon Disk
- Install Photon Minimal on Fusion/Workstation and install some required packages.
mount /dev/cdrom /media/cdrom
tdnf install python2-libs ntp sudo wget tar which gptfdisk sed findutils grep gzip -y
Convert GPT to MBR and update Grub
Photon installer installs GPT partition table by default but GCE only accepts an MBR (msdos) type partition table. So, you must convert GPT to MBR and update grub. Use the following commands to update the grub:
# Change partition table to MBR from GPT
sgdisk -m 1:2 /dev/sda
grub2-install /dev/sda

# Enable serial console on grub for GCE.
cat << EOF >> /etc/default/grub
GRUB_CMDLINE_LINUX="console=ttyS0,38400n8"
GRUB_TERMINAL=serial
GRUB_SERIAL_COMMAND="serial --speed=38400 --unit=0 --word=8 --parity=no --stop=1"
EOF

# Create new grub.cfg based on the settings in /etc/default/grub
grub2-mkconfig -o /boot/grub2/grub.cfg
Install Google Cloud SDK and GCE Packages
tdnf install -y google-compute-engine google-compute-engine-services
cp /usr/lib/systemd/system/google* /lib/systemd/system/
cd /lib/systemd/system/multi-user.target.wants/

# Create links in multi-user.target to auto-start these scripts and services.
for i in ../google*; do  ln -s $i `basename $i`; done

cd /tmp/; wget https://dl.google.com/dl/cloudsdk/release/google-cloud-sdk.tar.gz
tar -xf google-cloud-sdk.tar.gz
cd google-cloud-sdk
./install.sh
Update /etc/hosts file with GCE values as follows:
echo "169.254.169.254 metadata.google.internal metadata" >> /etc/hosts
Remove all servers from ntp.conf and add Google’s ntp server.
sed -i -e "/server/d" /etc/ntp.conf
cat /etc/ntp.conf
echo "server 169.254.169.254" >> /etc/ntp.conf
# Create ntpd.service to auto starting ntp server.
cat << EOF >> /lib/systemd/system/ntpd.service
[Unit]
Description=Network Time Service
After=network.target nss-lookup.target

[Service]
Type=forking
PrivateTmp=true
ExecStart=/usr/sbin/ntpd -g -u ntp:ntp
Restart=always

[Install]
WantedBy=multi-user.target
EOF

# Add link in multi-user.target.wants to auto start this service.
cd /lib/systemd/system/multi-user.target.wants/
ln -s ../ntpd.service ntpd.service
Set UTC timezone
ln -sf /usr/share/zoneinfo/UTC /etc/localtime
Update /etc/resolv.conf
echo "nameserver 8.8.8.8" >> /etc/resolv.conf
Remove ssh host keys and add script to regenerate them at boot time.
rm /etc/ssh/ssh_host_*
# Depending on the installation, you may need to purge the following keys
rm /etc/ssh/ssh_host_rsa_key*
rm /etc/ssh/ssh_host_dsa_key*
rm /etc/ssh/ssh_host_ecdsa_key*

sed -i -e "/exit 0/d" /etc/rc.local
echo "[ -f /etc/ssh/ssh_host_key ] && echo 'Keys found.' || ssh-keygen -A" >> /etc/rc.local
echo "exit 0" >> /etc/rc.local
printf "GOOGLE\n" > /etc/ssh/sshd_not_to_be_run

# Edit sshd_config and ssh_config as per instructions on [this link](https://cloud.google.com/compute./tutorials/building-images).
Change MTU to 1460 for network interface.
 # Create a startup service in systemd that will change MTU and then exit

cat << EOF >> /lib/systemd/system/eth0.service
[Unit]
Description=Network interface initialization
After=local-fs.target network-online.target network.target
Wants=local-fs.target network-online.target network.target

[Service]
ExecStart=/bin/ifconfig eth0 mtu 1460 up
Type=oneshot

[Install]
WantedBy=multi-user.target
EOF
# Make this service auto-start at boot.
cd /lib/systemd/system/multi-user.target.wants/
ln -s ../eth0.service eth0.service
Pack and upload to GCE.
Shut down the Photon VM and copy its disk to THE tmp folder.
# You will need to install Google Cloud SDK on host machine to upload the image and play with GCE.

cp Virtual\ Machines.localized/photon.vmwarevm/Virtual\ Disk.vmdk /tmp/disk.vmdk
cd /tmp
# GCE needs disk to be named as disk.raw with raw format.
qemu-img convert -f vmdk -O raw disk.vmdk disk.raw

# ONLY GNU tar will work to create acceptable tar.gz file for GCE. MAC's default tar is BSDTar which will not work.
# On Mac OS X ensure that you have gtar "GNU Tar" installed. exmaple: gtar -Szcf photon.tar.gz disk.raw

gtar -Szcf photon.tar.gz disk.raw

# Upload
gsutil cp photon.tar.gz gs://photon-bucket

# Create image
gcloud compute --project "<project name>" images create "photon-beta-vYYYYMMDD" --description "Photon Beta" --source-uri https://storage.googleapis.com/photon-bucket/photon032315.tar.gz

# Create instance on GCE of photon image
gcloud compute --project "photon" instances create "photon" --zone "us-central1-f" --machine-type "n1-standard-1" --network "default" --maintenance-policy "MIGRATE" --scopes "https://www.googleapis.com/auth/devstorage.read_only" "https://www.googleapis.com/auth/logging.write" --image "https://www.googleapis.com/compute/v1/projects/photon/global/images/photon" --boot-disk-type "pd-standard" --boot-disk-device-name "photon"
10.2 - Installing Photon OS on Google Compute Engine
You can use either the Google Cloud Platform or the gcloud CLI to upload the Photon OS GCE tar file to the bucket, and create the Image & Photon OS VM instance.
After you download the Photon OS image for GCE, log into GCE and install Photon OS.
Perform the following steps:
Create a New Bucket
Create a new bucket to store your Photon OS image for GCE.

Upload the Photon OS Image
While viewing the bucket that created, click the Upload files button, navigate to your Photon OS image and click the Choose button.
When the upload finishes, you can see the Photon OS compressed image in the file list for the bucket that you created.

Create a New Image
To create a new image, click on Images in the Compute category in the left panel and then click on the New Image button.
Enter a name for the image in the Name field and change the Source to Cloud Storage file using the pull-down menu. Then, in the Cloud Storage file field, enter the bucket name and filename as the path to the Photon OS image for GCE. In this example, where the bucket was named photon_storage, the path is as follows:
`photon_storage/photon-gce-2.0-tar.gz`
The new image form autopopulates the gs:// file path prefix.*
Click the Create button to create your image. You must be able to see the Images catalog and your Photon OS image at the top of the list.
Create a New Instance
To create an instance, check the box next to the Photon OS image and click the Create Instance button.
On the Create a new instance form, provide a name for this instance, confirm the zone into which this instance is to be deployed and, before clicking Create, check the Allow HTTP traffic and Allow HTTPS traffic options.
Note: The firewall rules in this example are optional. You can configure the ports according to your requirements.

When the instance is created you will be returned to your list of VM instances. If you click on the instance, the status page for the instance will allow you to SSH into your Photon OS environment using the SSH button at the top of the panel.
At this point, your instance is running and you are ready to start the Docker engine and run a container workload. For more information, see Deploying a Containerized Application in Photon OS.
Setting Up Using the gcloud CLI
Example Setup Script:
You can use the following script (create.sh) to upload your tar file programmatically to the bucket and create the VM.
#!/bin/bash
timestamp=$(date +%s)
export PATH=$PATH:/root/gce/google-cloud-sdk/bin
# get branch name in order to determine the machine type.
GCE_VM_NAME=$2
branch=`echo ${GCE_VM_NAME} | cut -d '-' -f 1`
DIR="$( cd "$( dirname "${BASH_SOURCE[0]}" )" && pwd )"
GCE_USERNAME=<gce_username>
GCE_BUCKET=<gs://bucket-name>
if [ $# -lt 2 ]
then
echo "Usage is: create.sh <path_to_gce_image.tar.gz> <vm_name> [(optional) <user-data-file-path>]";
exit;
fi
echo "Uploading gce tar.gz to gce bucket...."
/root/gce/google-cloud-sdk/bin/gsutil cp ${1} $GCE_BUCKET/photon-gce-${timestamp}.tar.gz
if [ ! "$?" -eq 0 ]; then
echo "Failed: couldn't upload to gce bucket"
exit 1
fi
echo "GCE tar.gz uploaded successfully, proceeding with image creation"
gcloud compute images create ${2}-image --source-uri $GCE_BUCKET/photon-gce-${timestamp}.tar.gz
if [ ! "$?" -eq 0 ]; then
echo "Failed: couldn't create image successfully"
exit 1
fi
echo "GCE image created successfully. Proceeding with instance creation"
if [[ ( "${branch}" != "one" ) && ( "${branch}" != "two" ) ]];then
machine_type="n1-standard-1"
else
machine_type="n1-standard-2"
fi
echo branch=$branch
echo machine_type=$machine_type
if [ $# -gt 2 ]
then
gcloud compute instances create ${2} --machine-type ${machine_type} --image ${2}-image --metadata-from-file=user-data=${3}
else
gcloud compute instances create ${2} --machine-type ${machine_type} --image ${2}-image
fi
if [ ! "$?" -eq 0 ]; then
echo "Failed: couldn't create instance successfully"
exit 1
fi
echo "Photon Instance created successfully on GCE"
externalip="$(gcloud compute instances list ${2} --format='value(networkInterfaces[].accessConfigs[].natIP)')"
echo $externalip
GCE_VM_IP=$externalip
echo GCE_VM_IP=$GCE_VM_IP
11 - Running Photon OS on Raspberry Pi
You can use Photon OS as a virtual machine on Raspberry Pi (RPi). You can download Photon OS and install the Photon OS distribution on vSphere.
11.1 - Prerequisites for Running Photon OS on Raspberry Pi
Before you use Photon OS within RPi, perform the following prerequisite tasks:
Verify that you have the following resources:
| Resource | Description |
| Raspberry Pi 3 | Raspberry Pi 3 Model B or Model B+ board. This will serve as the target of the installation. |
| Raspberry Pi 4 | Raspberry Pi 4 Model B or Model B+ board. This will serve as the target of the installation. |
| Host computer | A computer equipped with the following: 1. An SD card reader. 2. Software utilities to flash an image onto an SD-card (details and instructions provided below). |
| Distribution File | Photon OS RPi image downloaded from URL
Note: Photon OS RPi image is available only from Photon 3.0 onwards. |
Download Photon OS.
To install Photon OS on a Raspberry Pi, you must download the Photon OS RPi image, which is distributed as a compressed raw disk image with the file extension .raw.xz.
Note: You cannot use the Photon ISO to install on RPi.
Go to the following URL and download the latest release of Photon OS image for RPi: https://packages.vmware.com/photon/5.0/GA/rpi/rpi.tar.xz.
For instructions, see Downloading Photon OS.
11.2 - Installing Photon OS on Raspberry Pi
You can get Photon OS up and running on an RPi board, by flashing the Photon RPi image onto the board’s SD card.
Flash Photon OS on Raspberry Pi
After you have downloaded the Photon RPi image with the file extension *.raw.xz, decompress the file to *.raw and then you can choose one of the methods below to flash it onto the RPi SD card.
- Flash Photon to RPi using Etcher
- Flash Photon to RPi using Linux CLI
Flash Photon to RPi using Etcher
- Install Etcher https://etcher.io/, which is a utility to flash SD cards attached to your host computer.
- Plug the RPi SD card into your host computer’s SD card reader.
- Perform the following steps on the Etcher GUI: Select image -> Select drive -> Flash, by selecting the Photon OS RPi as image and the RPi SD card as drive.
Flash Photon to RPi using Linux CLI
If you have Linux running on your host computer, install the xz package, which provides the xz compression utility and related tools, from your distribution package manager.
Plug the RPi’s SD card into your host computer’s SD card reader.
Identify the device file under /dev that refers to the RPi SD card. For example, /dev/sdc. This file path is used to flash the Photon image onto the RPi in the next step.
Note: Make sure that you are flashing to the device file that refers to your RPi3 SD card. Running the below command with an incorrect device file will overwrite that device without warning and might result in a corrupted disk. The device file ‘/dev/sdc` is an example and might not be the device file in your case.
Run the following command to flash Photon onto the RPi SD card:
xzcat <photon-rpi4-image.raw.xz> | sudo dd of=/dev/sdc bs=4M conv=fsync
Boot Photon OS on Raspberry Pi
After you flash Photon OS successfully onto the RPi SD card, eject the card from your host computer and plug it back into the RPi board.
When you power on Raspberry Pi , it boots with Photon OS.
After the splash screen, Photon OS prompts you to log in.
Update login credentials
The Photon OS RPi image is configured with a default password. However, all Photon OS instances that are created using this image will require an immediate password change upon login. The default account credentials are:
- Username:
root - Password:
changeme
After you provide these credentials, Photon OS prompts you to create a new password and type it a second time to verify it. Photon OS does not allow common dictionary words for the root password. When you are logged in, you will see the shell prompt.
You can now run tdnf list to view all the ARM packages that you can install on Photon OS.
11.3 - Enabling Raspberry Pi Interfaces using Device Tree
Photon OS RPI images from Photon OS has Device Tree Overlay support. And these images have compiled Overlays to enable/disable Rpi Interface. Perform the following:
SPI Interface:
Execute following commands to enable SPI Interface:
mkdir /sys/kernel/config/device-tree/overlays/

cat /boot/efi/overlays/rpi-enable-spi0.dtbo > /sys/kernel/config/device-tree/overlays/spi/dtbo
Audio Interface:
Execute following commands to enable Audio Interface:
mkdir  /sys/kernel/config/device-tree/overlays/audio

cat /boot/efi/overlays/rpi-enable-audio.dtbo >  /sys/kernel/config/device-tree/overlays/audio/dtbo
Note: Ensure that the linux-drivers-sound rpm is installed.
I2C Interface:
Execute following command to enable I2C Interface:
modprobe i2c-dev
#Customizing Device Tree Overlay
Photon OS also provides Device Tree Compilers (i.e. dtc), to compile Customised Device Tree Overlays. Execute following command to install dtc on Photon OS:
tdnf install dtc
Execute following command to compile the overlay:
dtc -@ -O dtb -o my_overlay_dt.dtbo my_overlay_dt.dts
For more information about format of Device Tree Overlay, see
https://www.kernel.org/doc/Documentation/devicetree/overlay-notes.txt
12 - Deploying a Containerized Application in Photon OS
Now that you have your container runtime environment up and running, you can easily deploy a containerized application. For this example, you will deploy the popular open source Web Server Nginx. The Nginx application has a customized VMware package that is published as a dockerfile and can be downloaded, directly, through the Docker module from the Docker Hub.
Run Docker
To run Docker from the command prompt, enter the following command, which initializes the docker engine:
systemctl start docker
To ensure Docker daemon service runs on every subsequent VM reboot, enter the following command:
systemctl enable docker
Run the Nginx Web Server
Now the Docker daemon service is running, it is a simple task to “pull” and start the Nginx Web Server container from Docker Hub. To do this, type the following command:
docker run -d -p 80:80 vmwarecna/nginx
This pulls the Nginx Web Server files and appropriate dependent container filesystem layers required for this containerized application to run.
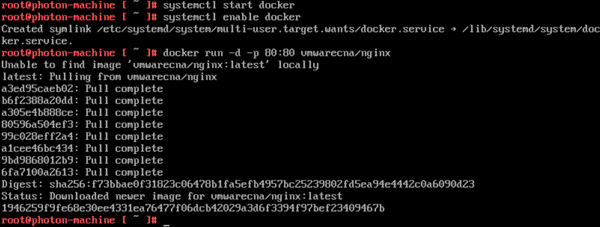
After the docker run process completes, you return to the command prompt. You now have a fully active website up and running in a container!
Test the Web Server
To test that your Web Server is active, run the ifconfig command to get the IP address of the Photon OS Virtual Machine.
The output displays a list of adapters that are connected to the virtual machine. Typically, the web server daemon will be bound on eth0.
Start a browser on your host machine and enter the IP address of your Photon OS Virtual Machine. You should see a screen similar to the following example as confirmation that your web server is active.
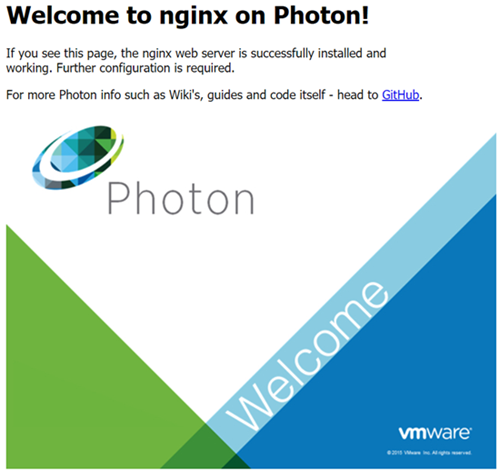
You can now run any other containerized application from Docker Hub or your own containerized application within Photon OS.
13 - Compatible Cloud Images
The Vmware Photon Packages website contains the following cloud-ready images of Photon OS:
GCE - Google Compute Engine
AMI - Amazon Machine Image
OVA
Because the cloud-ready images of Photon OS are built to be compatible with their corresponding cloud platform or format, you typically do not need to build a cloud image, you can just go to the VMware Packages repo and download the image for the platform that you are working on.
If, however, you want to build your own cloud image, perhaps because you seek to customize the code, see the next section on how to build cloud images.
How to build cloud images
sudo make cloud-image IMG_NAME=image-name

image-name: gce/ami/azure/ova
The output of the build process produces the following file formats:
GCE - A tar file consisting of disk.raw as the raw disk file
AMI - A raw disk file
OVA - An ova file (vmdk + ovf)
If you want, you can build all the cloud images by running the following command:
sudo make cloud-image-all
How to create running instances in the cloud
The following sections contain some high-level instructions on how to create instances of Photon OS in the Google Compute Engine (GCE) and Amazon Elastic Cloud Compute (EC2). For more information, see the Amazon or Google cloud documentation.
GCE
The tar file can be uploaded to Google’s cloud storage and an instance can be created after creating an image from the tar file. You will need the Google Cloud SDK on your host machine to upload the image and create instances.
####Install Google cloud SDK on host machine
curl https://sdk.cloud.google.com | bash
####Upload the tar file
gsutil cp photon-gce.tar.gz gs://bucket-name
####Create image
gcloud compute --project project-id images create image-name --description description --source-uri https://storage.googleapis.com/bucket-name/photon-gce.tar.gz
####Create instance of GCE
gcloud compute --project project-id instances create instance-name --zone "us-central1-f" --machine-type "n1-standard-1" other-options
(You can also create instances from the Google developer console.)
For more information, see Running a Photon OS Machine on GCE.
AWS EC2
Install the AWS CLI and EC2 CLI tools.
####Bundle the image
ec2-bundle-image -c cert.pem -k private-key.pem -u $AWS_USER_ID --arch x86_64 --image photon-ami.raw --destination directory-name
####Upload the bundle
ec2-upload-bundle --manifest directory-name/photon-ami.raw.manifest.xml --bucket bucket-name --access-key $AWS_ACCESS_KEY --secret-key $AWS_SECRET_KEY
####Register the AMI
ec2-register bucket-name/photon-ami.raw.manifest.xml --name name --architecture x86_64 --virtualization-type hvm
You can now launch instances using the AWS console.
For more information, see Customizing a Photon OS Machine on EC2.
###OVA
The OVA image uses an optimized version of the 4.4.8 Linux kernel. Two ova files are generated from the build: photon-ova.ova, which is the full version of Photon OS, and photon-custom.ova, which is the minimal version of Photon OS. The password for photon-ova.ova should be changed using guest customization options when you upload it to VMware vCenter. Photon-custom.ova comes with the default password set to changeme; you must change it the first time you log in.
OVA Prerequisites
VDDK 6.0
To utilize the VDDK libraries the following procedure may be used, this extracts the libraries and temporarily exports them to the LD_LIBRARY_PATH for the current session. (tested on Ubuntu 1404 & 1604) If you wish to make this permanent and system-wide then you may want to create a config file in /etc/ld.so.conf.d/.
tar -zxf VMware-vix-disklib-6.0.2-3566099.x86_64.tar.gz
cp -r vmware-vix-disklib-distrib/include/* /usr/include/
mkdir /usr/lib/vmware
cp -a ~/vmware-vix-disklib-distrib/lib64/* /usr/lib/vmware/
rm /usr/lib/vmware/libstdc++.so.6
export LD_LIBRARY_PATH=/usr/lib/vmware
OVFTOOL
OVF Tool should be downloaded and installed on the host.
sh VMware-ovftool-4.1.0-2459827-lin.x86_64.bundle --eulas-agreed --required