The network service, which is enabled by default, starts when the system boots.
This the multi-page printable view of this section. Click here to print.
Managing the Network Configuration
- 1: Commands to Manage Network Service
- 2: Using the Network Configuration Manager
- 3: Use 'ip' and 'ss' Commands
- 4: Configuring Network Interfaces
- 5: Setting a Static IP Address
- 6: Turning Off DHCP
- 7: Adding a DNS Server
- 8: Setting Up Networking for Multiple NICs
- 9: Clearing the Machine ID of a Cloned Instance for DHCP
- 10: Using Predictable Network Interface Names
- 11: Inspecting the Status of Network Links with 'networkctl'
- 12: Turning On Network Debugging
- 13: Installing packages for 'tcpdump' and 'netcat'
- 14: Mounting a Network File System
- 15: Configuring a Secondary Network Interface using Cloud-Network
- 16: Using Network Event Broker
- 17: Configuring a Network Using Network Configuration Manager
1 - Commands to Manage Network Service
You manage the network service by using systemd commands, such as systemd-networkd, systemd-resolvd, and networkctl.
To check the status of the network service, run the following command:
systemctl status systemd-networkd
Output
	* systemd-networkd.service - Network Service
	   Loaded: loaded (/usr/lib/systemd/system/systemd-networkd.service; enabled; vendor preset: enabled)
	   Active: active (running) since Fri 2016-04-29 15:08:51 UTC; 6 days ago
	     Docs: man:systemd-networkd.service(8)
	 Main PID: 291 (systemd-network)
	   Status: "Processing requests..."
	   CGroup: /system.slice/systemd-networkd.service
	           `-291 /lib/systemd/systemd-networkd
Because Photon OS relies on systemd to manage services, you must use the systemd suite of commands and not the deprecated init.d commands or other deprecated commands to manage networking.
2 - Using the Network Configuration Manager
The network-config-manager nmctl allows to configure and introspect the state of the network links as seen by systemd-networkd. nmctl can be used to query and configure links for Address, Routes, Gateways and also hostname, DNS, NTP or Domain. nmctl uses sd-bus, libudev APIs to interact with systemd, systemd-networkd, systemd-resolved, systemd-hostnamed, and systemd-timesyncd via dbus. nmctl uses networkd verbs to explain output. nmctl can generate configurations for required network links from YAML description. It also understands kernel command line specified in dracut network configuration format and can generate systemd-networkd configuration while the system boots and will persist between reboots.
Note: See systemd.network for more information.
nmctl is used to configure:
- Static IPv4 and IPv6 Address, Routes, Gateway
- DHCP type (IPv4/IPv6), DHCP4 Client Identifier, UseMTU/UseDNS/UseDomains/UseNTP/UseRoutes. LLDP, Link Local Addressing, IPv4LLRoute, LLMNR
- DNS, Domains and NTP
- Link MAC, MTU
- Create netdevs, vlan, vxlan, bridge, bond, veth, macvlan/macvtap, ipvlap/ipvtap, veth, tunnels(ipip, sit, gre, sit, vti), wireguard
- Hostname
- Can delete and view nftables table, chains and rules.
You can use nmctl to generate network configurations from the following:
YAML file:
nmctlcan generate configurations for required network links from YAML description. Configuration written to disk under/etc/systemd/networkwill persist between reboots. Whennetwork-config-manager-yaml-generator.serviceis enabled it reads YAML files from/etc/network-config-manager/yamland generatessystemd-networkdconfiguration files.nmctluses similar format as defined by different YAML format.nmctlcan generate WPA Supplicant configuration from YAML file. When a YAML file with wifi configuration is found, it generates a configuration file found in/etc/network-config-manager/wpa_supplicant_photon_os.confwhich is understood bywpa_supplicant.Dracut kernel command line network configuration: nmctl understands kernel command line specified in dracut’s network configuration format and can generate systemd-networkd’s configuration while the system boots and will persist between reboots.
Network
       ip={dhcp|on|any|dhcp6|auto6}
           dhcp|on|any: get ip from dhcp server from all links. If root=dhcp, loop
           sequentially through all links (eth0, eth1, ...) and use the first with a valid
           DHCP root-path.

           auto6: IPv6 autoconfiguration

           dhcp6: IPv6 DHCP

       ip=<link>:{dhcp|on|any|dhcp6|auto6}
           dhcp|on|any|dhcp6: get ip from dhcp server on a specific link

           auto6: do IPv6 autoconfiguration

           This parameter can be specified multiple times.

       ip=<client-IP>:[ <server-id>]:<gateway-IP>:<netmask>:<client_hostname>:<link>:{none|off}
           explicit network configuration.

       ifname=<link>:<MAC>
           Assign network device name <link> (ie eth0) to the NIC with MAC <MAC>. Note
           letters in the MAC-address must be lowercase!  Note: If you use this option you must
           specify an ifname= argument for all links used in ip= or fcoe= arguments.  This
           parameter can be specified multiple times.

       nameserver=<IP>[nameserver=<IP> ...]
           specify nameserver(s) to use

      cat /proc/cmdline
       BOOT_IMAGE=/boot/vmlinuz-4.19.52-2.ph3-esx root=PARTUUID=ebf01b6d-7e9c-4345-93f4-122f44eb2726
       init=/lib/systemd/systemd rcupdate.rcu_expedited=1 rw systemd.show_status=0 quiet noreplace-smp
       cpu_init_udelay=0 net.ifnames=0 plymouth.enable=0 systemd.legacy_systemd_cgroup_controller=yes
       ip=dhcp
network-config-manager-generator.service is a oneshot type systemd service unit which runs while the system boots. It parses the kernel command line and generates networkd config in /etc/systemd/network:
systemctl enable network-config-manager-generator.service
It creates symlink /etc/systemd/system/network.target.wants/network-config-manager-generator.service → /usr/lib/systemd/system/network-config-manager-generator.service.
3 - Use 'ip' and 'ss' Commands
Use the ip and ss commands to view a list of network interfaces and information for IP addresses.
Although the ifconfig command and the netstat command work on Photon OS, VMware recommends that you use the ip or ss commands. The ipconfig and netstat commands are deprecated.
For example, to display a list of network interfaces, run the ss command instead of netstat. To display information for IP addresses, run the ip addr command instead of ifconfig -a.
Examples are as follows:
USE THIS IPROUTE COMMAND 	INSTEAD OF THIS NET-TOOL COMMAND
ip addr 					ifconfig -a
ss 							netstat
ip route 					route
ip maddr 					netstat -g
ip link set eth0 up 		ifconfig eth0 up
ip -s neigh					arp -v
ip link set eth0 mtu 9000	ifconfig eth0 mtu 9000
Using the ip route version of a command instead of the net-tools version often provides more complete and accurate information on Photon OS. Examples are as follows:
ip neigh
198.51.100.2 dev eth0 lladdr 00:50:56:e2:02:0f STALE
198.51.100.254 dev eth0 lladdr 00:50:56:e7:13:d9 STALE
198.51.100.1 dev eth0 lladdr 00:50:56:c0:00:08 DELAY

arp -a
? (198.51.100.2) at 00:50:56:e2:02:0f [ether] on eth0
? (198.51.100.254) at 00:50:56:e7:13:d9 [ether] on eth0
? (198.51.100.1) at 00:50:56:c0:00:08 [ether] on eth0
4 - Configuring Network Interfaces
Network configuration files for systemd-networkd reside in /etc/systemd/network and /usr/lib/systemd/network. Example:
root@photon-rc [ ~ ]# ls /etc/systemd/network/
99-dhcp-en.network
By default, when Photon OS starts, it creates a DHCP network configuration file, or rule, which appears in /etc/systemd/network, the highest priority directory for network configuration files with the lowest priority filename:
cat /etc/systemd/network/99-dhcp-en.network
[Match]
Name=e*

[Network]
DHCP=yes
Network configuration files can also appear in the system network directory, /usr/lib/systemd/network, as the results of the following search illustrate:
root@photon-rc [ ~ ]# updatedb
root@photon-rc [ ~ ]# locate systemd/network
/etc/systemd/network
/etc/systemd/network/99-dhcp-en.network
/usr/lib/systemd/network
/usr/lib/systemd/network/80-container-host0.network
/usr/lib/systemd/network/80-container-ve.network
/usr/lib/systemd/network/99-default.link
root@photon-rc [ ~ ]#
In the above search, the /usr/lib/systemd/network directory contains several network configuration files. Photon OS applies the configuration files in lexicographical order specified by the file names without regard for the network configuration directory in which the file resides unless the file name is the same. Photon OS processes files with identical names by giving precedence to files in the /etc directory over the other directory. Thus, the settings in /etc/systemd/network override those in /usr/lib/systemd/network. Once Photon OS matches an interface in a file, Photon OS ignores the interface if it appears in files processed later in the lexicographical order.
Each .network file contains a matching rule and a configuration that Photon OS applies when a device matches the rule. Set the matching rule and the configuration as sections containing vertical sets of key-value pairs according to the information in systemd network configuration.
To configure Photon OS to handle a networking use case, such as setting a static IP address or adding a name server, create a configuration file with a .network extension and place it in the /etc/systemd/network directory.
After you create a network configuration file with a .network extension, you must run the chmod command to set the new file’s mode bits to 644.
Example:
chown systemd-network:systemd-network 10-static-en.network
For Photon OS to apply the new configuration, you must restart the systemd-networkd service by running the following command:
systemctl restart systemd-networkd
For information about network configuration files, their processing order, and their matching rules, sections, and keys, see https://www.freedesktop.org/software/systemd/man/systemd.network.html.
For information about creating virtual network device files (.netdev), see https://www.freedesktop.org/software/systemd/man/systemd.netdev.html.
5 - Setting a Static IP Address
Before you set a static IP address, obtain the name of your Ethernet link by running the following command:
networkctl
IDX LINK             TYPE               OPERATIONAL SETUP
	1 lo               loopback           carrier     unmanaged
	2 eth0             ether              routable    configured
In the results of the command, you can see the name of an Ethernet link, eth0.
To create a network configuration file that systemd-networkd uses to establish a static IP address for the eth0 network interface, execute the following command as root:
cat > /etc/systemd/network/10-static-en.network << "EOF"

[Match]
Name=eth0

[Network]
Address=198.51.0.2/24
Gateway=198.51.0.1
EOF
Change the new file’s mode bits by running the chmod command:
chmod 644 10-static-en.network
Apply the configuration by running either the first or the second step:
systemctl restart systemd-networkdnetworkctl reloadnetworkctl reconfigure *interface_name/index_number*
Note: The advantage of using reload and reconfigure is that the settings of other interfaces are not disturbed and only the settings of the specific interface are reloaded and reconfigured.
For more information, see the man page for systemd-networkd: man systemd.network
6 - Turning Off DHCP
By default, when Photon OS first starts, it creates a DHCP network configuration file or rule, which appears in /etc/systemd/network, the highest priority directory for network configuration files with the lowest priority filename:
cat /etc/systemd/network/99-dhcp-en.network
[Match]
Name=e*

[Network]
DHCP=yes
To turn off DHCP for all Ethernet interfaces, change the value of DHCP from yes to no, save the changes, and then restart the systemd-networkd service:
systemctl restart systemd-networkd
Or you can reload and reconfigure the settings:
networkctl reload
networkctl reconfigure <interface_name>/<index_number>`
Note:
The advantage of using reload and reconfigure is that the settings of other interfaces are not disturbed and only the settings of the specific interface are reloaded and reconfigured.
If you create a configuration file with a higher priority filename (e.g. 10-static-en.network), it is not necessary but still recommended to turn off DHCP.
You can also check the status of a specific interface:
networkctl status <interface_name>/<index_number>
(eth0 is an example)
❯ networkctl status eth0
● 2: eth0
                     Link File: /usr/lib/systemd/network/99-default.link
                  Network File: /etc/systemd/network/50-dhcp-en.network
                         State: routable (configured)
                  Online state: online
                          Type: ether
                          Path: pci-0000:0b:00.0
                        Driver: vmxnet3
                        Vendor: VMware
                         Model: VMXNET3 Ethernet Controller
             Alternative Names: eno1
                                enp11s0
                                ens192
              Hardware Address: 00:50:56:ba:43:98 (VMware, Inc.)
                           MTU: 1500 (min: 60, max: 9000)
                         QDisc: fq_codel
  IPv6 Address Generation Mode: eui64
      Number of Queues (Tx/Rx): 1/1
              Auto negotiation: no
                         Speed: 10Gbps
                        Duplex: full
                          Port: tp
                       Address: 192.168.1.8/24 (DHCPv4 via 192.168.1.1)
                                fe80::250:56ff:feba:4398
                       Gateway: 192.168.1.1
                           DNS: 192.168.1.1
                                192.168.1.2
                                192.168.1.3
                           NTP: 192.168.1.1
                                192.168.1.2
                                192.168.1.3
                                192.168.1.4
             Activation Policy: up
           Required For Online: yes
               DHCP4 Client ID: IAID:0xb6220feb/DUID

May 04 10:37:14 photon systemd-networkd[625]: eth0: found matching network '/etc/systemd/network/50-dhcp-en.network', based on potentially unpredictable interface name.
May 04 10:37:14 photon systemd-networkd[625]: eth0: Configuring with /etc/systemd/network/50-dhcp-en.network.
May 04 10:37:14 photon systemd-networkd[625]: eth0: Link UP
May 04 10:37:14 photon systemd-networkd[625]: eth0: Gained carrier
May 04 10:37:14 photon systemd-networkd[625]: eth0: found matching network '/etc/systemd/network/50-dhcp-en.network', based on potentially unpredictable interface name.
7 - Adding a DNS Server
Photon OS uses systemd-resolved to resolve domain names, IP addresses, and network names for local applications. The systemd-resolved daemon automatically creates and maintains the /etc/resolv.conf file, into which systemd-resolved places the IP address of the DNS server. You must not modify the /etc/resolv.conf file.
Note: If you want to implement a local resolver like bind instead of systemd-resolved, stop the systemd-resolved service and disable it.
If you open the default /etc/resolv.conf file after you deploy Photon OS, it looks like this:
root@photon-rc [ ~ ]# cat /etc/resolv.conf
# This file is managed by systemd-resolved(8). Do not edit.
#
# Third party programs must not access this file directly, but
# only through the symlink at /etc/resolv.conf. To manage
# resolv.conf(5) in a different way, replace the symlink by a
# static file or a different symlink.

nameserver 198.51.100.2
To add a DNS server, insert a DNS key into the Network section of the static network configuration file, for example, /etc/systemd/network/10-eth0-static.network and set it to the IP address of your DNS server:
[Match]
Name=e*

[Network]
Address=198.51.0.2/24
Gateway=198.51.0.1
DNS=198.51.0.1
Note: To apply the changes made to /etc/systemd/network/*.network files, perform the following:
Restart
systemd-networkdandsystemd-resolvedservices by running the following commands:systemctl restart systemd-networkdsystemctl restart systemd-resolved
Or you can reload and reconfigure the settings by running the following commands:
networkctl reloadnetworkctl reconfigure *interface_name/index_number*
Note: The advantage of using reload and reconfigure is that the settings of other interfaces are not disturbed and only the settings of the specific interface are reloaded and reconfigured.
If your machine is working with DHCP, you can add a DNS server by modifying the /etc/systemd/resolved.conf--a method.
For more information, see https://www.freedesktop.org/software/systemd/man/resolved.conf.html.
You can optionally activate the local DNS stub resolver of systemd-resolved by adding dns and resolve to the /etc/nsswitch.conf file. To do so, make a backup copy of the /etc/nsswitch.conf file and then execute the following command as root:
sed -i 's/^hosts.*$/hosts: files resolve dns/' /etc/nsswitch.conf
For more information about the systemd-resolved service, see https://www.freedesktop.org/software/systemd/man/systemd-resolved.service.html.
8 - Setting Up Networking for Multiple NICs
If your machine contains multiple NICs, it is recommend that you create a .network configuration file for each network interface. The following scenario demonstrates how to set one wired network interface to use a static IP address and another wired network interface to use a dynamic IP address obtained through DHCP.
Note: The following configurations are examples and you must change the IP addresses and other information to match your network and requirements.
First, create the .network file for the static Ethernet connection in /etc/systemd/network. A best practice is to match the exact name of the network interface, which is eth0 in this example. This example file also includes a DNS server for the static IP address. As a result, the configuration sets the UseDNS key to false in the DHCP column so that Photon OS ignores the DHCP server for DNS for this interface.
cat > /etc/systemd/network/10-eth0-static-en.network << "EOF"
[Match]
Name=eth0

[Network]
Address=10.137.20.11/19
Gateway=10.137.23.253
DNS=10.132.71.1

[DHCP]
UseDNS=false
EOF
Second, create the .network file for the second network interface, which is eth1 in this example. This configuration file sets the eth1 interface to an IP address from DHCP and sets DHCP as the source for DNS lookups. Setting the DHCP key to yes acquires an IP address for IPv4 and IPv6. To acquire an IP address for IPv4 only, set the DHCP key to ipv4.
cat > /etc/systemd/network/50-eth1-dhcp-en.network << "EOF"

[Match]
Name=eth1

[Network]
DHCP=yes

[DHCP]
UseDNS=true
EOF
How to configure two gateways for two different NIC ?
This is an IP routing policy feature of kernel and is supported by systemd-networkd. You have to add two routes. One is for the subnet so that the IP address can find its gateway. The other route is for specifying the default gateway for that interface. Finally, we add policy route rules for that IP address that we want to use that table. This will not only ensure that the IP address you are trying to communicate with on that one interface can respond properly, but it will also ensure that you do not route information between subnets.
[Match]
Name=eth2

[Network]
Address=192.168.60.70/24
DHCP=no

[Route]
PreferredSource=192.168.60.70
Destination=192.168.60.0/24
Table=10


[Route]
Gateway=192.168.60.1
Table=10

[RoutingPolicyRule]
Table=10
To=192.168.60.70/24

[RoutingPolicyRule]
Table=10
From=192.168.60.70/24
8.1 - Combining DHCP and Static IP Addresses with IPv4 and IPv6
You can combine DHCP and static IP addresses with both IPv4 and IPv6.
Examples
The following example shows how to use DHCP to allocate both IPv4 and IPv6 addresses:
[Network]
DHCP=yes
The following example shows how to use DHCP to allocate only IPv4 addresses:
[Network]
DHCP=ipv4
The following example shows how to use DHCP to allocate only IPv6 addresses:
[Network]
DHCP=ipv6
The following example shows how to use DHCP for IPv4 addresses and static IP addresses for IPv6 addresses:
[Network]
DHCP=ipv4
Address=fd00::1/48
Gateway=fd00::252
The following example shows how to use DHCP for IPv6 addresses and static IP addresses for IPv4:
[Network]
DHCP=ipv6
Address=10.10.10.1/24
Gateway=10.10.10.253
The following example shows how to use static IP addresses for both IPv4 and IPv6:
[Network]
DHCP=ipv6
Address=10.10.10.1/24
Gateway=10.10.10.253
Address=fd00::1/48
Gateway=fd00::252
9 - Clearing the Machine ID of a Cloned Instance for DHCP
Photon OS uses the contents of /etc/machine-id to determine the DHCP unique identifier (duid) that is used for DHCP requests. If you use a Photon OS instance as the base system for cloning, to create additional Photon OS instances, you must clear the machine-id with this command:
echo -n > /etc/machine-id
When the value is cleared, machine-id can be regenerated by calling systemd-machine-id-setup.
systemd-machine-id-setup
This command initializes the machine ID stored in /etc/machine-id during installation. For more information on this command, see https://www.freedesktop.org/software/systemd/man/systemd-machine-id-setup.html.
10 - Using Predictable Network Interface Names
When you run Photon OS on a virtual machine or a bare-metal machine, the Ethernet network interface name might shift from one device to another if you add or remove a card and reboot the machine. For example, a device named eth2 might become eth1 after you remove a NIC and restart the machine.
You can prevent interface names from reordering by turning on predictable network interface names. The naming schemes that Photon OS uses can then assign fixed, predictable names to network interfaces even after you add or remove cards or other firmware and the restart the system.
When you enable predictable network interface names, you can use one of the following options to assign persistent names to network interfaces:
- Apply the
slotname policy to set the name of networking devices in theensformat with a statically assigned PCI slot number. - Apply the
macname policy to set the name of networking devices in theenxformat a unique MAC address. - Apply the
pathname policy to set the name of networking devices in theenpXsYformat derived from a device connector’s physical location.
Though Photon OS supports the onboard name policy to set the name of networking devices from index numbers given by the firmware in the eno format, the policy might result in nonpersistent names.
The option to choose depends on your use case and your unique networking requirements. For example, when you clone virtual machines and require the MAC addresses to be different from one another but the interface name to be the same, consider using ens to keep the slot the same after system reboots.
Alternatively, if the cloning function supports enx, you can use it to set a MAC address which persists after reboots.
Perform the following steps to turn on predictable network interface names:
- Make a backup copy of the following file in case you need to restore it later:
cp /boot/grub/grub.cfg /boot/grub/grub.cfg.original
- To turn on predictable network interface names, edit
/boot/grub/grub.cfgto remove the following string:
net.ifnames=0Item
The string appears near the bottom of the file in the menuentry section:
menuentry "Photon" {
    linux "/boot/"$photon_linux root=$rootpartition net.ifnames=0 $photon_cmdline
    if [ "$photon_initrd" ]; then
        initrd "/boot/"$photon_initrd
    fi
}
# End /boot/grub2/grub.cfg
Edit out net.ifnames=0, but make no other changes to the file, and then save it.
- Specify the types of policies that you want to use for predictable interface names by modifying the
NamePolicyoption in/lib/systemd/network/99-default.link. The file contents are as follows:
cat /lib/systemd/network/99-default.link
[Link]
NamePolicy=kernel database
MACAddressPolicy=persistent
To use the ens or enx option, the slot policy or the mac policy can be added to the space-separated list of policies that follow the NamePolicy option in the default link file, /lib/systemd/network/99-default.link. The order of the policies matters. Photon OS applies the policy listed first before proceeding to the next policy if the first one fails.
For example:
/lib/systemd/network/99-default.link
    [Link]
    NamePolicy=slot mac kernel database
    MACAddressPolicy=persistent
With the name policy specified in the above example, you might still have an Ethernet-style interface name if the two previous policies, slot and mac, fail.
For information on setting name policies, see systemd.link–network device configuration.
11 - Inspecting the Status of Network Links with 'networkctl'
You can inspect information about network connections by using the networkctl command. This can help you configure networking services and troubleshoot networking problems.
You can progressively add options and arguments to the networkctl command to move from general information about network connections to specific information about a network connection.
networkctl Command Without Options
Run the networkctl command without options to default to the list command:
networkctl
IDX LINK             TYPE               OPERATIONAL  SETUP
  1 lo               loopback           carrier      unmanaged
  2 eth0             ether              routable     configured
  3 docker0          ether              routable     unmanaged
  11 vethb0aa7a6     ether              degraded     unmanaged
  4 links listed.
’networkctl status’ Command
Run networkctl with the status command to display the following information:
root@photon-rc [ ~ ]# > networkctl status
   State: routable
  Address: 10.197.103.56 on eno1
           172.17.0.1 on docker0
           fe80::20c:29ff:fe44:f92c on eno1
  Gateway: 10.197.103.253 (Cisco Systems, Inc) on eno1
      DNS: 10.142.7.1
           10.132.7.1
           10.166.17.90
      NTP: 10.128.152.81
           10.166.1.120
           10.188.26.119
           10.84.55.42
You can see that there are active network links with IP addresses for not only the Ethernet connection but also a Docker container.
’networkctl status’ Command With Network Link Option
You can add a network link, such as the Ethernet connection, as the argument of the status command to show specific information about the link:
	root@photon-rc [ ~ ]# networkctl status ens33
	* 2: ens33
	         Link File: /usr/lib/systemd/network/99-default.link
                  Network File: /usr/lib/systemd/network/10-eth.network
                          Type: ether
                         State: routable (configured)
             Alternative Names: enp2s1
                          Path: pci-0000:02:01.0
                        Driver: e1000
                        Vendor: Intel Corporation
                         Model: 82545EM Gigabit Ethernet Controller (Copper) (PRO/1000 MT Single Port Adapter)
                    HW Address: 00:0c:29:5f:d1:39 (VMware, Inc.)
                           MTU: 1500 (min: 46, max: 16110)
                         QDisc: fq_codel
  IPv6 Address Generation Mode: eui64
          Queue Length (Tx/Rx): 1/1
              Auto negotiation: yes
                         Speed: 1Gbps
                        Duplex: full
                          Port: tp
                       Address: 172.16.85.225 (DHCP4 via 172.16.85.254)
                                fe80::20c:29ff:fe5f:d139
                       Gateway: 172.16.85.2 (VMware, Inc.)
                           DNS: 172.16.85.2
               DHCP4 Client ID: IAID:0x2b9434c1/DUID
             DHCP6 Client DUID: DUID-EN/Vendor:0000ab11d258482fc7eee6510000
Feb 26 10:19:44 photon systemd-networkd[650]: ens33: Link UP
Feb 26 10:19:44 photon systemd-networkd[650]: ens33: Gained carrier
Feb 26 10:19:45 photon systemd-networkd[650]: ens33: DHCPv4 address 172.16.85.225/24 via 172.16.85.2
Feb 26 10:19:46 photon systemd-networkd[650]: ens33: Gained IPv6LL
’networkctl status’ Command With Docker Option
You can add a Docker container as the argument of the status command to show specific information about the container:
networkctl status docker0
	* 3: docker0
	       Link File: /usr/lib/systemd/network/99-default.link
	    Network File: n/a
	            Type: ether
	           State: routable (unmanaged)
	          Driver: bridge
	      HW Address: 02:42:f0:f7:bd:81
	             MTU: 1500
	         Address: 172.17.0.1
	                  fe80::42:f0ff:fef7:bd81
In the example above, the state of the Docker container is unmanaged because Docker handles managing the networking for the containers without using systemd-resolved or systemd-networkd. Docker manages the container connection by using its bridge drive.
For more information about networkctl commands and options, see https://www.freedesktop.org/software/systemd/man/networkctl.html.
12 - Turning On Network Debugging
You can set systemd-networkd to work in debug mode so that you can analyze log files with debugging information to help troubleshoot networking problems.
You can turn on network debugging by adding a drop-in file in /etc/systemd to customize the default systemd configuration in /usr/lib/systemd.
Procedure
Run the following command as root to create a directory with the name
systemd-networkd.service.d, including the.dextension:systemctl edit systemd-networkd.serviceAdd following configuration in the file
override.confto establish asystemddrop-in unit with a debugging configuration for the network service:[Service] Environment=SYSTEMD_LOG_LEVEL=debugReload the
systemctldaemon and restart thesystemd-networkdservice for the changes to take effect:systemctl daemon-reload systemctl restart systemd-networkdVerify your changes:
systemd-delta --type=extendedView the log files by running this command:
journalctl -u systemd-networkdAfter debugging the network connections, turn debugging off by deleting the drop-in file:
rm /etc/systemd/system/systemd-networkd.service.d/10-loglevel-debug.conf
13 - Installing packages for 'tcpdump' and 'netcat'
Photon OS includes the following networking tools:
tcpdump. A networking tool that captures and analyzes packets on a network interface.
tcpdumpis not available with the minimal version of Photon OS but available in the repository. The minimal version includes theiproute2tools by default.You can install
tcpdumpand its accompanying packagelibpcap, a C/C++ library for capturing network traffic, by usingtdnf:
tdnf install tcpdump
- netcat. A tool to send data over network connections with TCP or UDP. This tool is not included in either the minimal or the full version of Photon OS. But since
netcatfurnishes powerful options for analyzing, troubleshooting, and debugging network connections, you might want to install it. To install `netcat’, run the following command:
tdnf install netcat
14 - Mounting a Network File System
To mount a network file system, Photon OS requires nfs-utils. The nfs-utils package contains the daemon, userspace server, and client tools for the kernel Network File System (NFS). The tools include mount.nfs, umount.nfs, and showmount.
The nfs-utils package is installed by default in the full version of Photon OS but not in the minimal version. To install nfs-utils in the minimal version, run the following command as root:
tdnf install nfs-utils
For instructions on how to use nfs-utils to share files over a network, see Photon OS nfs-utils.
15 - Configuring a Secondary Network Interface using Cloud-Network
When you add a secondary network interface to a linux instance in the cloud environment, you need to configure the network parameters for the secondary interface in the linux instance. The configuration ensures that you do not face any routing issues while using the secondary network interface. Configuring the secondary network interface involves several manual processes that include configuring a new routing table, setting up rules in the routing table and so on.
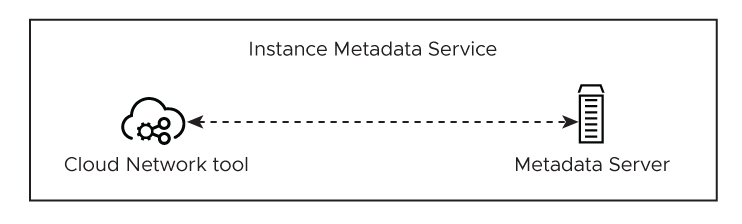
cloud-network automates the whole manual process of configuring the secondary network interface. It configures the network parameters required for any network interfaces that you create or add to the linux instance. In a cloud environment, instances are set to public IPs and private IPs. If you add more than one private IP for the secondary network interface, the IP other than the one provided by DHCP cannot be fetched and configured for your virtual machine. The cloud-network project is designed to adapt the cloud-network environments such as Azure, GCP, and Amazon EC2. cloud-network fetches the metadata from the metadata server endpoint, parses the metadata, and then assigns IPs and routes. When cloud-network is installed, it automatically configures network interfaces in the cloud frameworks. It detects the available interfaces using netlink. Additionally, for all the interfaces, including the primary one, it looks for any secondary IP addresses from the metadata server endpoint and configures them on the interface, if any.
A local RESTful JSON server runs on the address 127.0.0.1:5209 and the instance metadata is saved on per link basis in the following directory: /run/cloud-network.
The network parameters in the cloud framework are checked periodically for any changes, and in case of a change, the interface is reconfigured accordingly.
The image below illustrates the communication of cloud-network and the instance metadata server:
Use Case: Making a secondary network interface work in a cloud instance.
This functionality is scattered across different scripts/tools that are cloud provider dependent. cloud-network provides a cloud-agnostic mechanism to retrieve the metadata like network parameters, and configure the interfaces. This means that there is no need to manually edit and update the configuration when there are changes in the network parameters. cloud-network automatically configures the interfaces since it has the metadata information.
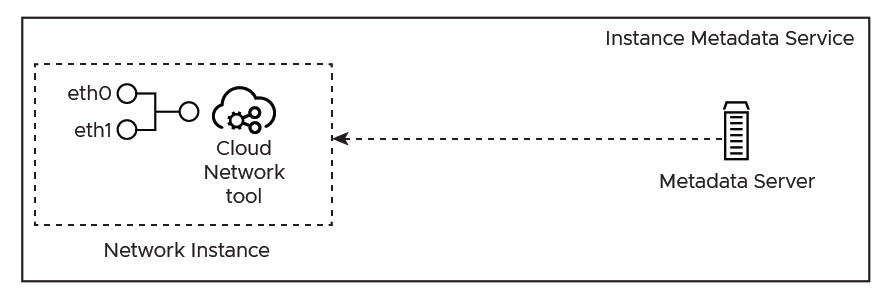
The image below illustrates how cloud-network fetches the network parameters to configure the secondary network interface (eth1) in a cloud instance:
Installing Cloud Network Setup
Type the following command to install cloud network in your system:
tdnf install cloud-network-setup
Configuration
To manage the configuration, use the configuration file named cloud-network.toml located in the following directory: /etc/cloud-network/
[System] Section
You can set values for the following keys in the [System] section:
LogLevel=
Specifies the log level. The key takes one of the following values: Trace, Debug, Info, Warning, Error, Fatal and Panic.
Default is info.
LogFormat=
Specifies the log format. The key takes one of the following values:
text or JSON. Takes one of text or json, Default is text.
RefreshTimer=
Specifies the time interval. The time interval indicates the amount of time taken to retrieve the data from the metadata endpoint.
[Network] Section
You can set values for the following keys in the [Network] section:
Listen=
Specifies the IP address and the port that the local REST API server listens. You can specify the IP address and the port in the following format ip:port. Defaults is 127.0.0.1:5209.
Supplementary=
A whitespace-separated list of interfaces matching the device name. Specifies the interfaces you want to configure with a default gateway and routing policy rules for each IP address including the primary IP address. No default value is set for this key.
Note When there are multiple interfaces, the secondary interface becomes unreachable. When you set a value for Supplementary= key, the default route and routing policy rules are automatically configured.
The following example shows a sample configuration of the key values in the cloud-network.toml file:
> cat /etc/cloud-network/cloud-network.toml
[System]
RefreshTimer="300s"
LogLevel="info"
LogFormat="text"

[Network]
Listen="127.0.0.1:5209"
Supplementary="eth0"
After you set the configuration, use the sudo systemctl status cloud-network command to check the network status of the cloud-network service.
Following example shows the command output of the sudo systemctl status cloud-network command:
❯ > sudo systemctl status cloud-network
● cloud-network.service - Configures network in cloud enviroment
     Loaded: loaded (/usr/lib/systemd/system/cloud-network.service; disabled; vendor preset: enabled)
     Active: active (running) since Mon 2021-05-31 22:54:50 UTC; 3min 31s ago
   Main PID: 19754 (cloud-network)
      Tasks: 5 (limit: 4400)
     Memory: 8.7M
     CGroup: /system.slice/cloud-network.service
             └─19754 /usr/bin/cloud-network

May 31 22:54:50 zeus-final-2 systemd[1]: Started Configures network in cloud enviroment.
cnctl
Use the cnctl CLI tool to view the metadata that is retrieved from the endpoint metadata server.
The Following examples show the output of the cnctl status command for the network and system:
❯ cnctl status system
    Cloud provider: aws
             AmiID: ami-005f15863xxxxxxxx
          Location: 0
BlockDeviceMapping: Ami:xvda Root:/dev/xvda
          Hostname: Zeus.us-west-2.compute.internal
    PublicHostname: Zeuspublic.us-west-2.compute.amazonaws.com
     LocalHostname: Zeus.us-west-2.compute.internal
    InstanceAction: none
    InstanceID: i-0c8c1test
 InstanceLifeCycle: on-demand
      InstanceType: t4g.micro
         Placement: AvailabilityZone:us-west-2d AvailabilityZoneID:usw2-az4 Region:us-west-2
           Profile: default-hvm
       Mac Address: 0e:c5:3f:c5:33:a5
         LocalIpv4: 192.31.63.114
        PublicIpv4: 02:42:8d:4c:0c:cf
   Services Domain: amazonaws.com
Services Partition: aws
❯ cnctl status network
            Name: ens33
     MAC Address: 00:0c:29:5f:d1:39
       Public IP: 104.42.20.194
      Private IP: 10.0.0.4/24 10.0.0.6/24 10.0.0.7/24
          Subnet: 10.0.0.0
16 - Using Network Event Broker
network-event-broker is a daemon that configures network and executes scripts on network events such as systemd-networkd’s DBus events, dhclient lease gains, and so on.
network-event-broker also detects the following events:
- An IP address is added/removed/modified
- A link is added or removed
In the /etc/network-event-broker directory, network-event-broker creates the link state directories such as carrier.d, configured.d, degraded.d, no-carrier.d, routable.d and manager state directory such as manager.d . You can also keep the executable scripts in these directories.
Use Case: Running command when a new address is acquired via DHCP.
systemd-networkd:systemd-networkd’s scripts are executed when the daemon receives the relevant event fromsystemd-networkd.May 14 17:08:13 Zeus cat[273185]: OperationalState="routable" May 14 17:08:13 Zeus cat[273185]: LINK=ens33dhclient: Fordhclient, scripts are executed in theroutable.ddirectory whendhclientmodifies the/var/lib/dhclient/dhclient.leasesfile and lease information is passed to the scripts as environmental arguments.
Environment variables such as LINK, LINKINDEX= and DHCP lease information DHCP_LEASE= are passed to the scripts.
Configuration
To manage the network-event-broker configuration, use the configuration file named network-broker.toml located in the following directory: /etc/network-broker/
[System] section
You can set values for the following keys in the [System] section:
LogLevel=
Specifies the log level. The key takes one of the following values: info, warn, error, debug and fatal. Default is info.
Generator=
Specifies the network event generator source. The key takes one of the following values: systemd-networkd or dhclient. Default is systemd-networkd.
[Network] section
You can set values for the following keys in the [Network] section:
Links=
A whitespace-separated list of links whose events should be monitored. No default value is set for this key.
RoutingPolicyRules=
A whitespace-separated list of links for which you want to configure the routing policy rules per address. When you set this configuration, network-event-broker automatically adds the to and from routing policy rules in another routing table (ROUTE_TABLE_BASE = 9999 + ifindex). When these addresses are removed, the routing policy rules are dropped. No default value is set for this key.
UseDNS=
Specifies whether you want to send the DNS server details to systemd-resolved. The key takes one of the following values: true, false. When set to true, the DNS server details are sent to systemd-resolved via DBus. This is applicable only to the DHClient. Default is false.
UseDomain=
Specifies whether you want to send the DNS domain details to systemd-resolved. The key takes one of the following values: true, false. When set to true, the DNS domain details are sent to systemd-resolved via DBus. This is applicable only to the DHClient. Default is false.
UseHostname=
Specifies whether you want to send the host name to systemd-hostnamed. The key takes one of the following values: true, false. When set to true, the host name is sent to systemd-hostnamed via DBus. This is applicable only to the DHClient. Default is false.
The following example shows a sample configuration of the key values in the network-broker.toml file:
❯ sudo cat /etc/network-broker/network-broker.toml
[System]
LogLevel="debug"
Generator="dhclient"

[Network]
Links="ens33 ens37"
RoutingPolicyRules="ens33 ens37"
UseDNS="true"
UseDomain="true"
17 - Configuring a Network Using Network Configuration Manager
You can use network-configuration-manager to configure a network in Photon OS. The YAML-based configuration system in network-config-manager makes the network configuration easy and simple.
The following sections in the document demonstrate the configuration of a network in Photon OS using network-config-manager.
You can find the YAML network configuration files at the following location:
/etc/network-config-manager/yaml/
When you install network-configuration-manager, it generates the network-config-manager configuration file for systemd-networkd named 99-dhcp.yaml.example.
Perform the following steps to configure static or dynamic IP addressing in Photon OS:
- To find the name of the active network interfaces that you want to configure, execute the following command:
❯ ip a
1: lo: <LOOPBACK,UP,LOWER_UP> mtu 65536 qdisc noqueue state UNKNOWN group default qlen 1000
    link/loopback 00:00:00:00:00:00 brd 00:00:00:00:00:00
    inet 127.0.0.1/8 scope host lo
       valid_lft forever preferred_lft forever
    inet6 ::1/128 scope host
       valid_lft forever preferred_lft forever
2: eth0: <BROADCAST,MULTICAST,UP,LOWER_UP> mtu 1500 qdisc fq_codel state UP group default qlen 1000
    link/ether 00:0c:29:5f:d1:39 brd ff:ff:ff:ff:ff:ff
    altname enp2s1
    inet 192.168.1.4/24 metric 1024 brd 192.168.1.255 scope global dynamic ens33
       valid_lft 82465sec preferred_lft 82465sec
    inet6 fe80::20c:29ff:fe5f:d139/64 scope link
       valid_lft forever preferred_lft forever
Note the name of the interface that you want to configure using network-config-manager.
To find the network-configuration-manager default configuration file, execute the following command:
❯ ls /etc/network-config-manager/yamlTo view the content of the network-config-manager network configuration file, execute the following command:
❯ cat /etc/network-config-manager/yaml/*.yamlOpen the configuration file in an editor.
For example, if you use vim editor, execute the following command to open the configuration file in an editor:❯ sudo vim /etc/network-config-manager/yaml/99-dhcp.yamlUse the following syntax to update the configuration file as per your networking needs:
network:
Version: 2
Renderer: networkd
ethernets:
   device:
      dhcp4: yes/no
      nameservers:
         addresses: [NAMESERVER, NAMESERVER, ...]
      addresses: [IPADDRESS/PREFIX]
       routes:
      - to: DESTINATION
        via: GATEWAY
Note that for static IP addressing, add the IP address, Gateway, and DNS details. For dynamic IP addressing, you need not add these details as it is fetched from the DHCP server.
The following table describes the properties used in the syntax to update the configuration file.
Properties Description device: | Name of the interface. dhcp4: | yes or no depending upon dynamic or static IP addressing addresses: | IP address of the device in prefix notation. routes: to: destination via: | gateway IP address to connect to an outside network nameservers: | Address of DNS name servers
Note: It is recommended that you use spaces for indentation instead of tabs in the YAML configuration file. If you use a tab instead of spaces for indentation, you might encounter errors.
Configuring static IP address in Photon OS
To manually configure an IP address, use the previously mentioned file syntax in this topic, and add the IP address, Gateway, and DNS server details.
The following is a sample configuration for the static IP addressing:
network:
    ethernets:
        eth0:
            dhcp4: false
            addresses: [192.168.1.202/24]
            nameservers:
              addresses: [8.8.8.8,8.8.4.4,192.168.1.1]
            routes:
            - to: 172.16.0.0/24
              via: 192.168.1.100
Configure Dynamic IP address in Photon OS
To get the IP address from the DHCP server, use the previously mentioned file syntax in this topic. You need not add the IP address, Gateway, and DNS server details here.
The following is a sample configuration for the dynamic IP addressing:
network:
  version: 2
  renderer: networkd
  ethernets:
    eth0:
      dhcp4: true
After configuring the IP address, you need to apply the new configuration. Execute the following command as sudo to apply the configuration:
$ sudo nmctl apply
To verify that the configurations are successfully applied, execute the following command and verify the IP address:
❯ nmctl status eth0
                       Flags: UP BROADCAST RUNNING NOARP LOWERUP
                        Kind: dummy
                        Type: ether
                      Driver: dummy
                   Link File: /usr/lib/systemd/network/99-default.link
                Network File: /etc/systemd/network/10-eth0.network
                       State: routable (configured)
               Address State: routable
          IPv4 Address State: routable
          IPv6 Address State: degraded
                Online State: online
         Required for Online: yes
           Activation Policy: up
                  HW Address: 56:d3:b9:4f:03:38 ((null))
                         MTU: 1500 (min: 0 max: 0)
                       QDISC: noqueue
              Queues (Tx/Rx): 1/1
             Tx Queue Length: 1000
IPv6 Address Generation Mode: eui64
                GSO Max Size: 65536 GSO Max Segments: 65535
                     Address: fe80::54d3:b9ff:fe4f:338/64
                              192.168.1.202/24
                     Gateway: 192.168.1.100
                         DNS: 8.8.4.4 192.168.1.1 8.8.8.8
           DHCP6 Client DUID: DUID-EN/Vendor:0000ab11d258482fc7eee6510000
To see the routes, execute the following command:
❯ ip r show dev eth0
172.16.0.0/24 via 192.168.1.100 proto static