Photon OS Documentation v3.0
For the latest version, check out the Photon OS 4.0 Docs
The Photon OS Documentation provides information about how to install, configure, and use VMware Photon OS™.

Product version: 3.0
This documentation applies to all 3.0.x releases.
Intended Audiences
This information is intended for Photon OS administrators and developers:
1 - Quick Start Links
If you want to start using Photon OS straight away, see the following topics:
2 - Overview
Overview of Photon OS provides an introduction to Photon OS, its versions, and distinguishing features.
Product version: 3.0
This documentation applies to all 3.0.x releases.
Intended Audiences
This information is intended for Photon OS administrators who install and set up Photon OS.
2.1 - Introduction to Photon OS
Photon OS, is an open-source minimalist Linux operating system from VMware that is optimized for cloud computing platforms, VMware vSphere deployments, and applications native to the cloud.
Photon OS is a Linux container host optimized for vSphere and cloud-computing platforms such as Amazon Elastic Compute and Google Compute Engine. As a lightweight and extensible operating system, Photon OS works with the most common container formats, including Docker, Rocket, and Garden. Photon OS includes a yum-compatible, package-based lifecycle management system called tdnf.
When used with development tools and environments such as VMware Fusion, VMware Workstation, and production runtime environments (vSphere, vCloud Air), Photon OS lets you seamlessly migrate container-based applications from development to production. With a small footprint and fast boot and run times, Photon OS is optimized for cloud computing and cloud applications.
2.2 - Flavours
Photon OS consists of a minimal version and a full version.
The minimal version of Photon OS is lightweight container host runtime environment that is suited to managing and hosting containers. The minimal version contains just enough packaging and functionality to manage and modify containers while remaining a fast runtime environment. The minimal version is ready to work with appliances.
The Developer version of Photon OS includes additional packages to help you customize the system and create containerized applications. For running containers, the developer version is excessive. The devloper version helps you create, develop, test, and package an application that runs a container.
2.3 - What is New in Photon OS 3.0
Photon OS 3.0 Rev2 introduces RPM Ostree Install, Trusted Platform Module Support (TPM), installer improvements, PMD role management Improvements and critical updates to OSS packages including linux kernel, systemd and glibc. This topic summarizes what’s new and different in Photon OS 3.0 Rev2.
Features
Installer Updates
- Deployment using RPM OStree.
- Network configuration support using the installer.
- LVM support for root partition.
- Trusted Platform Module Support (TPM).
- Ability to run installer from multiple media such as USB, CDROM, kickstart etc. on to a wider range of storage devices.
Package and Binary Maintenance
- Cloud-ready images for rapid deployment on Microsoft Azure (new), Google Compute Engine (GCE), Amazon Elastic Compute Cloud (EC2), and VMware products (vSphere, Fusion, and Workstation)
- Critical updates to the following base OS packages:
- Linux kernel 4.19
- Glibc 2.28
- systemd 239
- Python3 3.7
- Openjdk : 1.8.0.232, 1.11.0.28 and 1.10.0.23
- Openssl : 1.0.2t and 1.1.1d
- Cloud-init: 19.1
- Up-to-date versions for most packages available in the repository.
- Ability to support multiple versions of the same package (For example, go-1.9, go-1.10, go-1.11 and go-1.13).
- Support for new packages including Ostree, tpm2-tss, tpm2-tools, tpm2-abrmd and so on.
##Notes
Openjdk 1.10 is end of life and is being shipped to serve the sole purpose of build dependency. There will no future updates - Updates to security or otherwise will be done to the openjdk10 package.
Known Issues
- The OVA does not deploy on Workstation 14 but works on later and earlier versions.
- Not all packages in the x86-64 repo are available for ARM64. Notable ones include mysql, mariadb and dotnet libraries.
3 - Installation Guide
The Photon OS Installation Guide provides information about how administrators can install Photon OS.
Product version: 3.0
This documentation applies to all 3.0.x releases.
Intended Audiences
This information is intended for Photon OS administrators who install and set up Photon OS.
3.1 - Downloading Photon OS
You download Photon OS from https://github.com/vmware/photon/wiki/Downloading-Photon-OS
Photon OS is available in the following pre-packaged, binary formats.
| |
|---|
| Format | Description |
| ISO Image | Contains everything needed to install either the minimal or full installation of Photon OS. The bootable ISO has a manual installer or can be used with PXE/kickstart environments for automated installations. |
| OVA | Pre-installed minimal environment, customized for VMware hypervisor environments. These customizations include a highly sanitized and optimized kernel to give improved boot and runtime performance for containers and Linux applications. Since an OVA is a complete virtual machine definition, we’ve made available a Photon OS OVA that has virtual hardware version 11; this will allow for compatibility with several versions of VMware platforms or allow for the latest and greatest virtual hardware enhancements. |
| Amazon AMI | Pre-packaged and tested version of Photon OS made ready to deploy in your Amazon EC2 cloud environment. Previously, we’d published documentation on how to create an Amazon compatible instance, but, now we’ve done the work for you. |
| Google GCE Image | Pre-packaged and tested Google GCE image that is ready to deploy in your Google Compute Engine Environment, with all modifications and package requirements for running Photon OS in GCE. |
| Azure VHD | Pre-packaged and tested Azure HD image that is ready to deploy in your Microsoft Azure Cloud, with all modifications and package requirements for running Photon OS in Azure. |
3.2 - Upgrading to Photon OS 3.0
You can upgrade your existing Photon OS 2.0 VMs to take advantage of the functionality enhancements in Photon OS 3.0. For details, see What’s New in Photon OS 3.0.
Photon OS 3.0 provides a seamless upgrade for Photon OS 2.0 implementations. You simply download an upgrade package, run a script, and reboot the VM. The upgrade script will update your packages and retain your 2.0 customizations in your new OS 3.0 VM.
Note: If your 2.0 VM is a full install, then you will have a 3.0 VM that represents a full install (all packages and dependencies). Upgrading a minimal installation takes less time due to fewer packages.
For each Photon OS 2.0 VM that you want to upgrade, complete the following steps:
Back up all existing settings and data for the Photon OS 2.0 VM.
Stop any services (for example, docker) that are currently running in the VM.
Install photon-upgrade package
# tdnf -y install photon-upgrade
Run the upgrade script
# photon-upgrade.sh
Answer Y to reboot the VM. The upgrade script powers down the Photon OS 2.0 VM and powers it on as a Photon OS 3.0 VM.
After the upgrade, before you deploy into production, test all previous functionality to ensure that everything works as expected.
3.3 - Build an ISO from the Source Code for Photon OS
You can build an ISO from the source code for Photon OS. This section describes how to build the ISO, use the cached toolchain and RPMS, and cached sources. You can use this method as an alternative to downloading a pre-built version.
For information on how to install and build a package on Photon OS from the package’s source RPM, see the Photon OS Administration Guide.
3.3.1 - Folder Layout
The structure of the directories on GitHub that contain the source code for Photon OS is as follows:
photon/
├── Makefile
├── README
├── Dockerfile
├── Vagrantfile
├── SPECS        # RPM SPEC files
├── common       # Build, packaging config
├── docs         # Documentation
├── installer    # Installer used at runtime
├── support      # Build scripts
└── tools
3.3.2 - Build Prerequisites
Before you build the ISO, verify that you have the performed the following tasks:
Installed a build operating system running the 64-bit version of Ubuntu 14.04 or later version.
Downloaded and installed the following packages: bison, gawk, g++, createrepo, python-aptdaemon, genisoimage, texinfo, python-requests, libfuse-dev, libssl-dev, uuid-dev, libreadline-dev, kpartx, git, bc
Installed Docker
Downloaded the source code from the Photon OS repository on GitHub into $HOME/workspaces/photon.
3.3.3 - Building the ISO
Perform the following steps to install the packages on Ubuntu:
Install the packages:
sudo apt-get -y install bison gawk g++ createrepo python-aptdaemon genisoimage texinfo python-requests libfuse-dev libssl-dev uuid-dev libreadline-dev kpartx git bc
Get Docker:
wget -qO- https://get.docker.com/ | sh
Install pip and docker 2.3.0
sudo apt install python3-pip
pip3 install docker==2.3.0
If you encounter an error for LOCALE when you run these commands, then export the following variables in the terminal:
export LC_ALL="en_US.UTF-8"
export LC_CTYPE="en_US.UTF-8"
Make the ISO. The example below assumes that you checked out the workspace under $HOME/workspaces/photon:
cd $HOME/workspaces/photon
sudo make iso
Result
This command first builds all RPMs corresponding to the SPEC files in your Photon repository and then builds a bootable ISO containing those RPMs.
The RPMs thus built are stored under stage/RPMS/ directory within the repository, using the following directory hierarchy:
$HOME/workspaces/photon/stage/:
├──RPMS/:
    ├──noarch/*.noarch.rpm    [Architecture-independent RPMs]
    ├──x86_64/*.x86_64.rpm    [RPMs built for the x86-64 architecture]
    ├──aarch64/*.aarch64.rpm  [RPMs built for the aarch64 (ARM64) architecture]
The ISO is created at $HOME/workspaces/photon/stage/photon.iso.
3.3.4 - Use the Cached Toolchain and RPMS
When the necessary RPMs are available under the stage/RPMS/ directory, the commands that you use to create any Photon artifact such as, ISO or OVA will reuse those RPMs to create the specified image.
If you already have the Photon RPMs available elsewhere, and not under stage/RPMS/ in the Photon repository, you can build Photon artifacts using those cached RPMs by setting the PHOTON_CACHE_PATH variable to point to the directory containing those RPMs.
For example, if your RPMs are located under $HOME/photon-cache/, then use the following command to build an ISO:
sudo make iso PHOTON_CACHE_PATH=$HOME/photon-cache
The $HOME/photon-cache/ directory should follow the same structure as the stage/RPMS/ directory:
photon-cache/:
├──RPMS/:
    ├──noarch/*.noarch.rpm
    ├──x86_64/*.x86_64.rpm
    ├──aarch64/*.aarch64.rpm
3.3.5 - Use Cached Sources
To use the cached sources, run the following command:
mkdir $HOME/photon-sources
sudo make iso PHOTON_SOURCES_PATH=$HOME/photon-sources
The directory format of PHOTON_SOURCES_PATH is as follows:
photon-sources/
├──src1.tar.gz
├──src2.tar.gz
└──...
3.3.6 - View Build Logs
You can view package build logs and image build logs at the following location:
$HOME/workspaces/photon/stage/LOGS
3.4 - Building Package or Kernel Modules Using a Script
You can use a script to build a single Photon OS package without rebuilding all Photon OS packages. You just need a .spec specification file and sources. You place the sources and the specification files in the same folder and run the build_spec.sh script. The script performs the following steps:
- Creates sandbox using docker.
- Installs build tools and
.spec build requirements from the Photon OS repository. - Runs
rpmbuild.
Result: You have a native Photon OS RPM package.
The build-spec.sh script is located in the photon/tools/scripts/ folder.
Prerequisites
Before you run the build-spec.sh script, perform the following steps:
- Ensure you have any Linux OS with docker daemon running.
- Place the source and RPM
.spec files in the same folder, that is, $WORKDIR.
Procedure
Run the script. Provide the RPM .spec file name, including absolute or relative path, as argument:
./photon/tools/scripts/build_spec.sh <$WORKDIR/rpm_spec_file.spec>
The RPMs and full build logs are generated in the $WORKDIR/stage folder.
Example
The following example runs the script with simple-module.spec as argument, where simple-module.spec is the specification file:
./photon/tools/scripts/build_spec.sh ~/photon/tools/examples/build_spec/simple-module.spec
The following are the contents of the simple-module.spec file:
Summary:        Simple Linux module
Name:           simple-module
Version:        4.18.9
Release:        5%{?dist}
License:    	GPLv2
Group:        	System Environment/Kernel
Vendor:         VMware, Inc.
Distribution: 	Photon
Source0:        module_example.tar.xz
BuildRequires:  linux-devel = 4.18.9
BuildRequires:  kmod
Requires:       linux = 4.18.9

%description
Example of building linux module for Photon OS

%prep
%setup -q -n module_example

%build
make -C `echo /usr/src/linux-headers-4.18.9*` M=`pwd` VERBOSE=1 modules %{?_smp_mflags}

%install
make -C `echo /usr/src/linux-headers-4.18.9*` M=`pwd` INSTALL_MOD_PATH=%{buildroot} modules_install
# fix permissins to generate non empty debuginfo
find %{buildroot}/lib/modules -name '*.ko' -print0 | xargs -0 chmod u+x

%post
/sbin/depmod -a

%files
%defattr(-,root,root)
/lib/modules/*
Build Logs
The followiing logs indicate the steps that the script performs internally:
1. Create sandbox
	Use local build template image OK
2. Prepare build environment
	Create source folder OK
	Copy sources from <HOME>/photon/tools/examples/build_spec/simple-module OK
	Install build requirements OK
3. Build
	Run rpmbuild OK
4. Get binaries
	Copy RPMS OK
	Copy SRPMS OK
5. Destroy sandbox
	Stop container OK
	Remove container OK

Build completed. RPMS are in '<HOME>/photon/tools/examples/build_spec/simple-module/stage' folder
3.5 - Running Photon OS on vSphere
You can use Photon OS as a virtual machine within VMware vSphere. You can download Photon OS, as an OVA or ISO file, and install the Photon OS distribution on vSphere. After you install Photon OS, you can deploy a containerized application in Docker with a single command.
Note: If you want to upgrade an existing Photon 1.0 VM, see Upgrading to Photon OS 3.0.
3.5.1 - Prerequisites for Running Photon OS on vSphere
Resource requirements and recommendations vary depending on several factors, including the host environment (for example, VMware vSphere and VMware Fusion), the distribution file used (ISO or OVA), and the selected installation settings (for example, full or basic installation).
Before you use Photon OS within VMware vSphere, perform the following prerequisite tasks:
Verify that you have the following resources:
| Resource | Description |
| VMware vSphere installed | VMware web client (v6.5) for ESXi hosts (recommended) Note: vSphere 6 and vSphere 5.5 (these clients provide limited support; Not all features are available). |
| Memory | ESXi host with 2GB of free RAM (recommended) |
| Storage | Minimal Photon install: ESXi host with at least 512MB of free space (minimum); Full Photon install: ESXi host with at least 4GB of free space (minimum); 16GB is recommended; 16GB recommended. |
| Distribution File | Photon OS ISO or OVA file downloaded from bintray (https://bintray.com/vmware/photon/). |
Note: The setup instructions in this guide use VMware vSphere 6 and the vSphere web client.
Decide whether to use the OVA or ISO distribution to set up Photon OS.
- OVA import : Because of the nature of an OVA, you’re getting a pre-installed version of Photon OS. You can choose the hardware version you want (OVA with hardware version 13 or 11). The OVA benefits from a simple import process and some kernel tuning for VMware environments. However, because it’s a pre-installed version, the set of packages that are installed are predetermined. Any additional packages that you need can be installed using tdnf.
- ISO install : The ISO, on the other hand, allows for a more complete installation or automated installation via kickstart.
To get Photon OS up and running quickly, use the OVA.
Download Photon OS. Go to the following Bintray URL and download the latest release of Photon OS:
https://bintray.com/vmware/photon/
For instructions, see Downloading Photon OS.
Note: For ISO installation, you must upload to a datashare that is attached to the ESXi host, or mount the file share where the ISO resides as a data store.
3.5.2 - Importing the OVA for Photon OS 3.0
Using the OVA is a fast and easy way to create a Photon OS VM on VMware vSphere.
After you have downloaded the OVA, log in to your vSphere environment and perform the following steps:
Start the Import Process
From the Actions pull-down menu, choose Create/Register VM.

In the Select creation type window, choose Deploy a virtual machine from an OVF or OVA file.

Choose Next.
Select the OVA File
Enter a name for the virtual machine, and select the OVA file.

Choose Next.
Specify the Target Datastore
From the Select storage screen, select the target datastore for your VM.

Choose Next.
Accept the License Agreement
Read through the Photon OS License Agreement, and then choose I Agree.

Choose Next.
Select Deployment Options
Photon OS is provisioned with a maximum disk size. By default, Photon OS uses only the portion of disk space that it needs, usually much less that the entire disk size ( Thin client). If you want to pre-allocate the entire disk size (reserving it entirely for Photon OS instead), select Thick instead.

Choose Next.
Verify Deployment Settings

Click Finish. vSphere uploads and validates your OVA. Depending on bandwidth, this operation might take a while.
When finished, vShield powers up a new VM based on your selections.
Change Login Settings

After the VM is booted, open the command window. vSphere prompts you to log in.
Note: Because of limitations within OVA support on vSphere, it was necessary to specify a default password for the OVA option. However, all Photon OS instances that are created by importing the OVA require an immediate password change upon login. The default account credentials are:
 - Username: ``root``
 - Password: ``changeme``
After you provide these credentials, vSphere prompts you to create a new password and type it a second time to verify it.
Note: For security, Photon OS forbids common dictionary words for the root password.
Once logged in, you will see the shell prompt.

Once complete, proceed to Deploying a Containerized Application in Photon OS.
Export the VM as a Template (Optional)
Consider converting this imported VM into a template (from the Actions menu, choose Export ) so that you have a master Photon OS instance that can be combined with vSphere Guest Customization to enable rapid provisioning of Photon OS instances.
3.5.3 - Installing the ISO Image for Photon OS 3.0
After you download the Photon OS ISO image into a folder of your choice, complete the following steps.
Upload the ISO Image
Upload the ISO image to a datastore that is attached to the host on which you’ll create the Photon OS virtual machine.
Create a new VM
Log in to your vSphere environment. In the Virtual Machines window, choose Create/Register VM.
On the Select creation type screen, select Create a new virtual machine.

Choose Next.
Configure VM Settings
Specify a VM name.

Specify a guest operating system.
- For Compatibility, select ESXi 6.7.
- For Guest OS family, select Linux.
- For Guest OS version, select VMware Photon OS (64-bit).

Choose Next.
Select the Target Datastore
Select the datastore where you want to store the VM.

Click Next.
Customize VM Settings
Customize the virtual machine settings.

For CD/DVD Drive 1, click the drop-down and select Datastore ISO file.
In the Datastore browser, select the ISO that you want to import.
Change other settings as applicable.
- The recommended virtual hardware settings for your Photon VM are heavily dependent upon the container load you intend to run within Photon OS – more containers or more intensive containers will require you to adjust these settings for your application load. VMware suggests 2 vCPU, 1024MB memory, 20GB hard disk. Any unwanted devices should be removed. Be sure to mount the Photon OS ISO on the CD/DVD Drive and put a check in the box next to, Connect At Power On.
- If you want to configure a secure boot for the Photon OS VM you created, choose the VM Options tab, expand Boot Options, and select EFI from the firmware drop-down. An EFI boot ensures that the ISO content is signed by VMware and that the entire stack is secure.
Choose Next.
Verify VM Settings
The installer displays a summary of your selected settings.

Click Finish. vSphere creates the VM.
Power on the VM
Select the VM and power it on.

When you see the Photon Installer boot menu, press Enter on your keyboard to start installing.
Accept the License Agreement
Read the License Agreement and press the Enter key to accept.

Configure the Partition
The installer detects one disk, which should be the 16GB volume configured as part of the virtual machine creation. Choose Auto to have the installer automatically allocate the partition, or choose Custom if you want to configure individual partitions, and then press the Enter key.

Note: If you choose Custom, the installer displays the following screen.

For each custom partition, choose Create New and specify the following information:

Size - Preallocated size of this partition, in MB.
Type - One of the following options:
- ext3 - ext3 file system
- ext4 - ext4 file system
- swap - swap partition
Mountpoint - Mount point for this partition.
Choose OK and press the Enter key. When you are done defining custom partitions, choose Next and press the Enter key.
The installer prompts you to confirm that you want to erase the entire disk.

Choose Yes and press the Enter key.
Select an Installation Option
After partitioning the disk, the installer prompts you to select an installation option.

Each install option provides a different run-time environment, depending on your requirements.
| Option | Description |
| Photon Minimal | Photon Minimum is a very lightweight version of the container host runtime that is best suited for for devices that have limited compute and memory capabilities. There is sufficient packaging and functionality to allow most common operations around modifying existing containers, as well as being a highly performant and full-featured runtime. |
| Photon Developer | Photon Developer includes several additional packages to enhance the authoring and packaging of containerized applications and/or system customization. Use Photon Developer for developing and packaging the application that will be run as a container, as well as authoring the container, itself. For testing and validation purposes, Photon Developer includes all components necessary to run containers. |
| Photon Edge | Photon Edge includes packages relevant to an edge gateway device. |
Note: The option you choose determines the disk and memory resources required for your installation.
Select the option you want and press the Enter key.
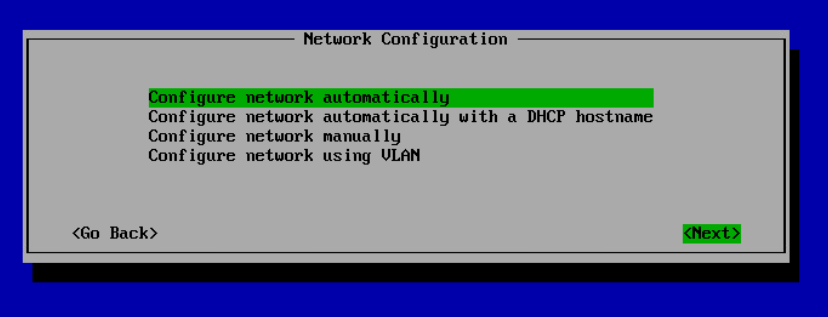
The Network Configuration screen appears, select one of the four options to configure your network.

Choose Configure network automatically and select Next to configure the network automatically.
To configure network automatically with the DHCP hostname, select Configure network automatically with a DHCP hostname and select Next. Enter the DHCP Hostname and select Next.

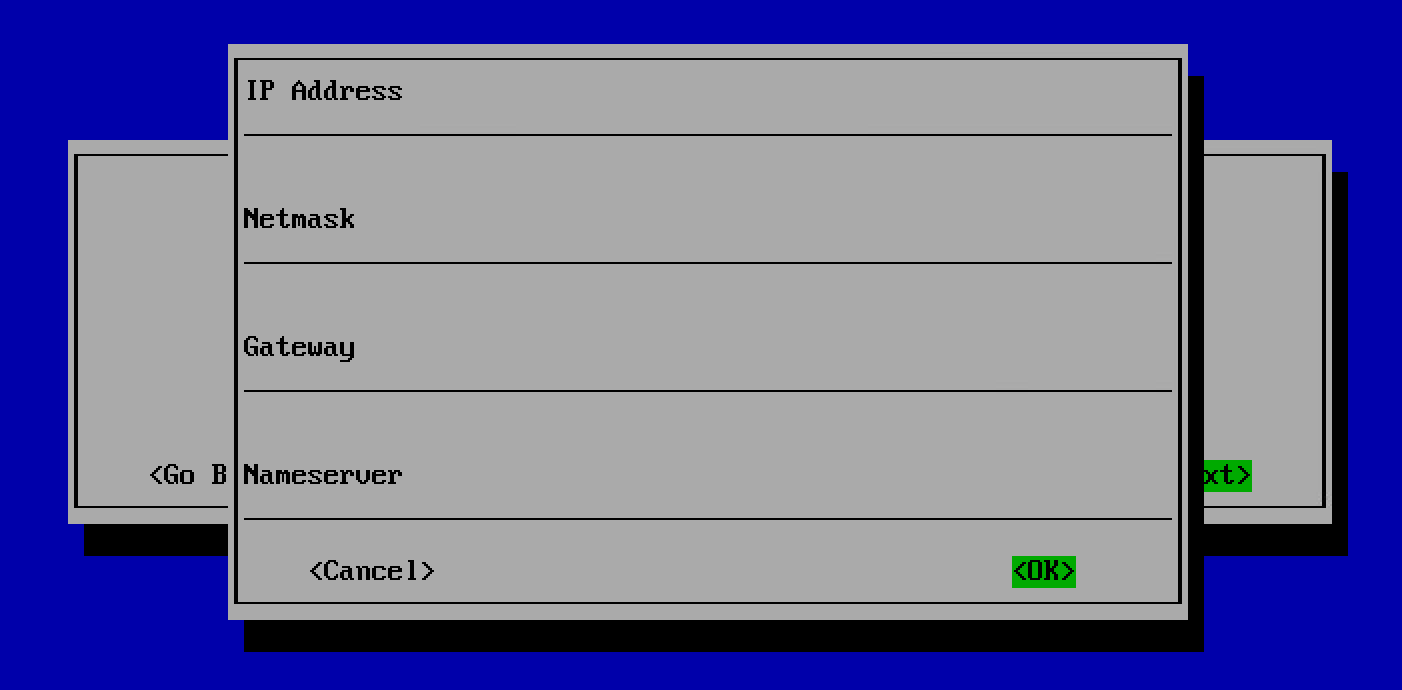
To configure the network manually, select Configure Network manually. In the window that appears, enter the IP Address, Netmask, Gateway and Nameserver and select OK.

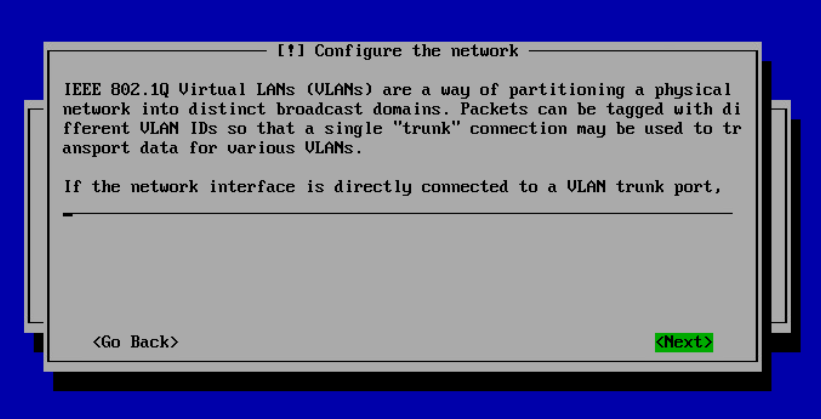
If your network interface is directly connected to the VLAN trunk port, choose YES on the Configure the network screen. Enter the VLAN ID and select Next.
 .
.
Select the Linux Kernel
Select a Linux kernel to install.

- Hypervisor optimized means that any components that are not needed for running under a VMware hypervisor have been removed for faster boot times.
- Generic means that all components are included.
Choose Next and press the Enter key.
Specify the Hostname
The installer prompts you for a hostname and suggest a randomly generated, unique hostname that you can change if you want.

Press the Enter key.
Specify the System root Password
The installer prompts you to enter the system root password.
Note: Photon OS will not permit commonly used dictionary words to be set as a root password.

Type a password and press the Enter key.
The installer prompts you to confirm your root password by typing it a second time.

Note: If you have trouble with unintentional repeated characters in the Remote Console, follow VMware KB 196 ( http://kb.vmware.com/kb/196) for a setting to apply to the virtual machine.
Press the Enter key. The installer proceeds to install the software. Installation times will vary based on the system hardware and installation options you selected. Most installations complete in less than one minute.
Reboot the VM and Log In
Once finished, the installer displays a confirmation message (which includes how long it took to install Photon OS) and prompts you to press a key on your keyboard to boot the new VM.

As the initial boot process begins, the installer displays the Photon splash screen, and then a login prompt.

At the login prompt, type root as the username and provide the password chosen during the installation.

You can now use your container runtime environment and deploy a containerized application.
3.6 - Running Photon OS on Fusion
You can use Photon OS as a virtual machine within VMware Fusion. You can download Photon OS, as an OVA or ISO file, and install the Photon OS distribution on Fusion. After you install Photon OS, you can deploy a containerized application in Docker with a single command.
Note: If you want to upgrade an existing Photon 1.0 VM, refer to the instructions in Upgrading to Photon OS 3.0.
3.6.1 - Prerequisites for Running Photon OS on Fusion
Resource requirements and recommendations vary depending on several factors, including the host environment (for example, VMware Fusion and VMware vSphere), the distribution file used (ISO or OVA), and the selected installation settings (for example, full or basic installation).
Before you use Photon OS within Fusion, perform the following prerequisite tasks:
Verify that you have the following resources:
| Resource | Description |
| VMware Fusion | VMware Fusion (v7.0 or higher) must be installed. The latest version is recommended. |
| Memory | 2GB of free RAM (recommended) |
| Storage | Minimal Photon install : 512MB of free space (minimum); Full Photon install : 4GB of free space (minimum); 8GB recommended. |
| Distribution File | Photon OS ISO or OVA file downloaded from Packages URL (https://packages.vmware.com/photon/). |
Note: The setup instructions in this guide use VMware Fusion Professional version 8.5.8, as per the following screenshot.

Decide whether to use the OVA or ISO distribution to set up Photon OS.
- OVA import : Because of the nature of an OVA, you’re getting a pre-installed version of Photon OS. You can choose the hardware version you want (OVA with hardware version 13 or 11). The OVA benefits from a simple import process and some kernel tuning for VMware environments. However, because it’s a pre-installed version, the set of packages that are installed are predetermined. Any additional packages that you need can be installed using tdnf.
- ISO install : The ISO, on the other hand, allows for a more complete installation or automated installation via kickstart.
To get Photon OS up and running quickly, use the OVA.
Download Photon OS. Go to the following Bintray URL and download the latest release of Photon OS:
https://packages.vmware.com/photon/
For instructions, see Downloading Photon OS.
3.6.2 - Importing the OVA for Photon OS 3.0
Using the OVA is a fast and easy way to create a Photon OS VM on Fusion.
After you have downloaded the Photon OS OVA image (OVA with Hardware Version 11) into a folder of your choice, open VMware Fusion and perform the following steps:
Start the Import Process
From the File menu, choose Import …. Fusion prompts you to choose an existing virtual machine.

Choose the Choose File … button to locate and select the Photon OS OVA, then choose Continue.

Specify the Name and Storage Location
Provide the name and storage location for your Photon OS VM, then choose Save.

Review the Photon OS License Agreement, then choose Accept to start the import process.

Configure VM Settings
After the OVA is imported, Fusion displays a confirmation that the import has completed and a summary of the settings for your Photon OS VM. The following screen shot is an example (your settings may vary).

Important: Choose Customize Settings to change the operating system (as recognized by the hypervisor) for the newly imported VM.

Choose General.
Click the selection box next to OS, select Linux , and then select VMware Photon 64-bit.

Close the settings window. Fusion prompts you to verify that you want to change the operating system.

Click Change. Your Photon OS VM is ready to power on.
Power on the VM
Power on the Photon OS VM. Fusion may ask you whether you want to upgrade this VM.

How you respond depends on which hardware version (13 or 11) that you want to use. Upgrade if you need to use devices supported only in hardware version 13. Don’t upgrade if you want to be compatible with older tools that are supported in hardware version 11.
Update Login Credentials

After the VM is booted, Fusion prompts you to log in.
Note : Because of limitations within OVA support on Fusion, it was necessary to specify a default password for the OVA option. However, all Photon OS instances that are created by importing the OVA will require an immediate password change upon login. The default account credentials are:
- Username:
root - Password:
changeme
After you provide these credentials, Fusion prompts you to create a new password and type it a second time to verify it. For security, Photon OS forbids common dictionary words for the root password. Once logged in, you will see the shell prompt.

Once complete, proceed to Deploying a Containerized Application in Photon OS.
3.6.3 - Installing the ISO Image for Photon OS 3.0
After you have downloaded the latest Photon OS ISO image into a folder of your choice, open VMware Fusion.
Start the Installation Process
From the File menu, choose New.

From the Select the Installation Method dialog, select Install from disc or image, and then choose Continue.

Select the ISO Image
Drag a disc image onto the window or choose Use another disc or disc image…, choose the ISO file you want, and then choose Continue.

Select the Operating System
On the Choose Operating System dialog, select Linux in the left-hand column and VMware Photon 64-bit in the right-hand column.

Choose Continue.
Select the Virtual Disk (Optional)
If you are using a Fusion version that is older than Fusion 8, you might see the following dialog.

If you see this dialog, unless you’re installing into an existing machine, choose Create a new virtual disk from the Choose a Virtual Disk dialog, and then choose Continue.
Note: Fusion v8 and later automatically defaults to creating a new 8GB disk and formats it automatically. If you want to use an existing disk, or if you want to pre-allocate all 8GB, go into VM Settings, choose Add Device, and choose either New Hard Disk or Existing Hard Disk. Expand Advanced options and configure whether you want to pre-allocate disk space (disabled by default) or split into multiple files (enabled by default).
Configure VM Settings
Important: Before you finish creating the Photon OS Virtual Machine, we strongly recommend that you customize the virtual machine and remove any unwanted devices that are not needed for a container run-time environment.

To remove unnecessary devices, choose Customize Settings.
First, choose a name for your Virtual Machine, along with the folder into which you create the Virtual Machine (or accept the default folder).

Choose Save. The virtual machine will be created. The Settings screen allows you to customize virtual hardware for the new virtual machine. If it does not automatically appear, open Settings from the Virtual Machine menu bar.

You can remove (recommended) the following components that are not used by Photon OS:
- Select Display and ensure that the Accelerate 3D Graphics option is unchecked (it should be unchecked, by default). Select Show All to return to the VM Settings.
- Select CD/DVD (IDE) and ensure that the Connect CD/DVD Drive box is checked (it should be checked by default). Select Show All to return to the VM Settings.
- Select Sound Card, un-check the Connect Sound Card Option, and click Remove Sound Card. Choose Remove to confirm your action. Select Show All to return to the VM Settings.
- Select USB & Bluetooth and uncheck the Share Bluetooth devices with Linux setting. Select Show All to return to the VM Settings.
- Select Printer and press the Remove Printer Port button in the bottom left hand corner. Choose Remove to confirm your action. Select Show All to return to the VM Settings.
- Select Camera and press the Remove Camera button in the bottom left hand corner. Choose Remove to confirm your action. Select Show All to return to the VM Settings.
- Select Advanced and ensure that the Pass Power Status to VM option is unchecked (it should be unchecked, by default). Select Show All, but do not close the VM Settings window.
By default, Photon OS is configured with a disk size of 8GB. However, Photon OS uses only the portion of disk space it needs, usually much less that the entire disk size. If you want to pre-allocate the entire disk size (reserving it entirely for Photon OS instead), select Hard Disk, expand Advanced options, and check Pre-allocate disk space (by default, it is unchecked). Select Show All to return to the VM Settings.
Configure a Secure Boot (Optional)
Note: If you want to configure a secure boot for the Photon OS VM you created, edit its .vmx file and add the following line:
firmware = “efi”
The EFI boot ensures that the ISO content is signed by VMware and that the entire stack is secure.
After you have made the customizations you want, close the Virtual Machine Settings window. You are now ready to boot and begin the installation process.
Power On the VM
Return to the Fusion main menu, select the Photon OS Virtual Machine, and click Start Up (you can also choose Start Up from the Virtual Machine menu).
Fusion powers on the host and starts the installation. Within a few seconds, Fusion displays the Photon OS installer boot menu.

Press the Enter key on your keyboard to start installing.

Read the License Agreement and press the Enter key to accept.
Configure the Partition
The Installer will detect one disk, which should be the 8GB volume configured as part of the virtual machine creation.

Choose Auto to have the installer automatically allocate the partition, or choose Custom if you want to configure individual partitions, and then press the Enter key.
Note: If you choose Custom, the installer displays the following screen.

For each custom partition, choose Create New and specify the following information:

Size - Preallocated size of this partition, in MB.
Type - One of the following options:
- ext3 - ext3 file system
- ext4 - ext4 file system
- swap - swap partition
Mountpoint - Mount point for this partition.
Choose OK and press the Enter key. When you are done defining custom partitions, choose Next and press the Enter key.
The installer prompts you to confirm that you want to erase the entire disk.

Choose Yes and press the Enter key to accept and proceed with the installation.
Select an Installation Option
After partitioning, the installer prompts you to select one of three installation options:

Each install option provides a different run-time environment. Select the option that best meets your requirements.
| Option | Description |
| Photon Minimal | Photon Minimum is a very lightweight version of the container host runtime that is best suited for container management and hosting. There is sufficient packaging and functionality to allow most common operations around modifying existing containers, as well as being a highly performant and full-featured runtime. |
| Photon Full | Photon Full includes several additional packages to enhance the authoring and packaging of containerized applications and/or system customization. For simply running containers, Photon Full will be overkill. Use Photon Full for developing and packaging the application that will be run as a container, as well as authoring the container, itself. For testing and validation purposes, Photon Full will include all components necessary to run containers. |
| Photon OSTree Server | This installation profile will create the server instance that will host the filesystem tree and managed definitions for rpm-ostree managed hosts created with the "Photon OSTree Host" installation profile. Most environments should need only one Photon OSTree Server instance to manage the state of the Photon OSTree Hosts. Use Photon OSTree Server when you are establishing a new repository and management node for Photon OS hosts. |
Note: The option you choose determines the disk and memory resources required for your installation.
Select the option you want and press the Enter key.
The Network Configuration screen appears, select one of the four options to configure your network.
Choose Configure network automatically and select Next to configure the network automatically.
To configure network automatically with the DHCP hostname, select Configure network automatically with a DHCP hostname and select Next. Enter the DHCP Hostname and select Next.

To configure the network manually, select Configure Network manually. In the window that appears, enter the IP Address, Netmask, Gateway and Nameserver and select OK.
If your network interface is directly connected to the VLAN trunk port, choose YES on the Configure the network screen. Enter the VLAN ID and select Next.
 .
.
Select the Linux Kernel
The installer prompts you to select the Linux kernel to install:

- Hypervisor optimized means that any components that are not needed for running under a VMware hypervisor have been removed for faster boot times.
- Generic means that all components are included.
Specify the Hostname
The installer prompts you for a hostname and suggest a randomly generated, unique hostname that you can change if you want.

Press the Enter key.
Specify the System root Password
Note: Photon OS will not permit commonly used dictionary words to be set as a root password.
The installer prompts you to enter the system root password. Type the password, and then press the Enter key.

Confirm the root password by typing it a second time.

Press the Enter key. The installer proceeds to install the software. Installation times will vary based on the system hardware and installation options you selected. Most installations complete in less than one minute.
Once finished, the installer displays a confirmation message (which includes how long it took to install Photon OS) and prompts you to press a key on your keyboard to boot the new VM.

Reboot the VM and Log In
Press any key on the keyboard and the virtual machine will reboot into Photon OS.

As the initial boot process begins, the installer displays the Photon splash screen, and then a login prompt.
At the login prompt, enter root as the username and provide the password chosen during the installation.

You can now use your container runtime environment and deploy a containerized application.
3.7 - Running Photon OS on Workstation
You can use Photon OS as a virtual machine within VMware Workstation. You can download Photon OS, as an OVA or ISO file, and install the Photon OS distribution on vSphere. After you install Photon OS, you can deploy a containerized application in Docker with a single command.
Note: If you want to upgrade an existing Photon 1.0 VM, refer to the instructions in Upgrading to Photon OS 3.0.
3.7.1 - Prerequisites for Running Photon OS on Workstation
Before you use Photon OS within Workstation, perform the following prerequisite tasks:
Verify that you have the following resources:
| Resource | Description |
| VMware Workstation | VMware Workstation must be installed (Workstation 10 or higher). The latest version is recommended. |
| Memory | 2GB of free RAM (recommended) |
| Storage | Minimal Photon install: 512MB of free space (minimum); Full Photon install: 4GB of free space (minimum); 8GB is recommended. |
| Distribution File | Photon OS ISO or OVA file downloaded from Packages URL (https://packages.vmware.com/photon/). |
Resource requirements and recommendations vary depending on several factors, including the host environment (for example, VMware Workstation and VMware vSphere), the distribution file used (ISO or OVA), and the selected installation settings (for example, full or basic installation).
Note: The setup instructions in this guide use VMware Workstation Professional version 12.5.7.

Decide whether to use the OVA or ISO distribution to set up Photon OS.
- OVA import : Because of the nature of an OVA, you’re getting a pre-installed version of Photon OS. You can choose the hardware version you want (OVA with hardware version 13 or 11). The OVA benefits from a simple import process and some kernel tuning for VMware environments. However, because it’s a pre-installed version, the set of packages that are installed are predetermined. Any additional packages that you need can be installed using tdnf.
- ISO install : The ISO, on the other hand, allows for a more complete installation or automated installation via kickstart.
To get Photon OS up and running quickly, use the OVA.
Download Photon OS. Go to the following Packages URL and download the latest release of Photon OS:
https://packages.vmware.com/photon/
For instructions, see Downloading Photon OS.
3.7.2 - Importing the OVA for Photon OS 3.0
Using the OVA is the easiest way to create a Photon OS VM on VMware Workstation.
After you have downloaded the the OVA file (OVA with Hardware Version 11), perform the following steps:
Start the Import Process
- Double-click it to start the import process, or
- Start VMware Workstation and, from the File menu, choose Open.

Specify the Name and Storage Location
Change the name and storage location, if you want.

Choose Import.

Review the License Agreement and choose Accept.
Configure VM Settings
Once the OVA is imported, Workstation displays a summary of the settings for your Photon OS VM.

Choose Edit virtual machine settings. Workstation displays the Virtual Machine settings. You can either accept the defaults or change settings as needed.

Select the Options tab.

Under Guest operating system, select Linux.
For Version, click the list and select VMWare Photon 64-bit.

Note: If you want to configure a secure boot for the Photon OS VM, select Advanced and select (check) Boot with EFI instead of BIOS. The EFI boot ensures that the ISO content is signed by VMware and that the entire stack is secure.

Choose OK.
Power on the VM
From the tab, choose Power on this virtual machine.

After the splash screen, Workstation will prompt you to log in.
Update Login Credentials
Note : Because of limitations within OVA support on Workstation, it was necessary to specify a default password for the OVA option. However, all Photon OS instances that are created by importing the OVA will require an immediate password change upon login. The default account credentials are:
- Username:
root - Password:
changeme
After you provide these credentials, Workstation prompts you to create a new password and type it a second time to verify it. For security, Photon OS forbids common dictionary words for the root password. Once logged in, you will see the shell prompt.

Once complete, proceed to Deploying a Containerized Application in Photon OS.
3.7.3 - Installing the ISO Image for Photon OS 3.0
After you have downloaded the latest Photon OS ISO image into a folder of your choice, open VMware Workstation.
Start the Installation Process
From the File menu, choose New Virtual Machine to create a new virtual machine.

Select Typical or Custom, and then choose Next. These instructions refer to a Typical installation.

Select the ISO Image
Select Installer disc image file (iso), choose Browse and select the Photon OS ISO file.

Select the Operating System
Choose Next. Select the Guest operating system.
For the Guest operating system, select Linux.
Click the Version dropdown and select VMware Photon 64-bit from the list.

Specify the VM Name and Location
Choose Next. Specify a virtual machine name and location.

Specify Disk Options
Choose Next. Specify the maximum disk size and whether you want to split the virtual disk into multiple files or store it as a single file.

Configure VM Settings
Choose Next. Workstation displays a summary of your selections.

Important : Before you finish creating the Photon OS Virtual Machine, we strongly recommend that you customize the virtual machine and remove any unwanted devices that are not needed for a container run-time environment. To remove unnecessary devices, choose Customize hardware.

Consider removing the following components, which are not used by Photon OS:
- Select Sound Card, un-tick the Connect at power on option. Confirm your action and choose Close to return to the VM Settings by .
- Select USB Controller and ensure that the Share Bluetooth devices with the virtual machine setting is unchecked (it should be unchecked, by default) and then choose Close.
- Select Display and ensure that the Accelerate 3D Graphics option is unchecked (it should be unchecked, by default) and then choose Close.
- At this stage we have now made all the necessary customizations and you are ready to select the Photon OS ISO image to boot and begin the installation process.
- Choose Finish.
In Workstation, choose Edit virtual machine settings, select CD/DVD (IDE), and verify that Connect at power on is selected.

Configure a Secure Boot (Optional)
Note: If you want to configure a secure boot for the Photon OS VM, in Workstation, choose Edit virtual machine settings, select Options, choose Advanced, and select Boot with EFI instead of BIOS.

The EFI boot ensures that the ISO content is signed by VMware and that the entire stack is secure.
Choose OK.

Power On the VM
Choose Power on this virtual machine.
When you see the Photon Installer boot menu, press Enter on your keyboard to start installing.

Review the license agreement.

Choose Accept and press Enter.
Configure the Partition
The installer will detect one disk, which should be the 8GB volume configured as part of the virtual machine creation. Choose Auto to have the installer automatically allocate the partition, or choose Custom if you want to configure individual partitions, and then press the Enter key.

Note: If you choose Custom, the installer displays the following screen.

For each custom partition, choose Create New and specify the following information:

Size - Preallocated size of this partition, in MB.
Type - One of the following options:
- ext3 - ext3 file system
- ext4 - ext4 file system
- swap - swap partition
Mountpoint - Mount point for this partition.
Choose OK and press the Enter key. When you are done defining custom partitions, choose Next and press the Enter key.
The installer prompts you to confirm that you want to erase the entire disk. Choose Yes and press the Enter key.

Select an Installation Option
After partitioning the disk, the installer will prompt you to select an installation option.

Each installation option provides a different run-time environment, depending on your requirements.
| Option | Description |
| Photon Minimal | Photon Minimum is a very lightweight version of the container host runtime that is best suited for container management and hosting. There is sufficient packaging and functionality to allow most common operations around modifying existing containers, as well as being a highly performant and full-featured runtime. |
| Photon Full | Photon Full includes several additional packages to enhance the authoring and packaging of containerized applications and/or system customization. For simply running containers, Photon Full will be overkill. Use Photon Full for developing and packaging the application that will be run as a container, as well as authoring the container, itself. For testing and validation purposes, Photon Full will include all components necessary to run containers. |
| Photon OSTree Server | This installation profile will create the server instance that will host the filesystem tree and managed definitions for rpm-ostree managed hosts created with the "Photon OSTree Host" installation profile. Most environments should need only one Photon OSTree Server instance to manage the state of the Photon OSTree Hosts. Use Photon OSTree Server when you are establishing a new repository and management node for Photon OS hosts. |
Note: The option you choose determines the disk and memory resources required for your installation.
Select the option you want and press the Enter key.
The Network Configuration screen appears, select one of the four options to configure your network.
Choose Configure network automatically and select Next to configure the network automatically.
To configure network automatically with the DHCP hostname, select Configure network automatically with a DHCP hostname and select Next. Enter the DHCP Hostname and select Next.
To configure the network manually, select Configure Network manually. In the window that appears, enter the IP Address, Netmask, Gateway and Nameserver and select OK.
If your network interface is directly connected to the VLAN trunk port, choose YES on the Configure the network screen. Enter the VLAN ID and select Next.
.
Select the Linux Kernel
Select a Linux kernel to install.

- Hypervisor optimized means that any components that are not needed for running under a VMware hypervisor have been removed for faster boot times.
- Generic means that all components are included.
Choose Next and press the Enter key.
Specify the Hostname
The installer prompts you for a hostname and suggest a randomly generated, unique hostname that you can change if you want.

Press the Enter key.
Specify the System root Password
Note : Photon OS will not permit commonly used dictionary words to be set as a root password.
The installer prompts you to enter the system root password. Type the password and press the Enter key.

The installer prompts you to confirm the root password by typing it a second time.

Press the Enter key. The installer proceeds to install the software. Installation times will vary based on the system hardware and installation options you selected. Most installations complete in less than one minute.
Reboot the VM and Log In
Once finished, the installer displays a confirmation message (which includes how long it took to install Photon OS) and prompts you to press a key on your keyboard to boot the new VM.

Press any key on the keyboard and the virtual machine will reboot into Photon OS.
As the initial boot process begins, the installer displays the Photon splash screen, and then a login prompt.

At the login prompt, type root as the username and provide the password chosen during the installation.

You can now use your container runtime environment and deploy a containerized application.
3.8 - Running Photon OS on Amazon Elastic Cloud Compute
You can set up Photon OS on Amazon Web Services Elastic Cloud Compute (EC2), customize it with cloud-init, connect to it with SSH.
After you set up Photon OS, you can run a containerized application.
3.8.1 - Prerequisites for Running Photon OS on AWS EC2
Before you use Photon OS with Amazon Elastic Cloud Compute(AWS EC2), perform the following prerequisite tasks:
Verify that you have the following resources:
- AWS account. Working with EC2 requires an Amazon account for AWS with valid payment information. Keep in mind that, if you try the examples in this document, you will be charged by Amazon. See Setting Up with Amazon EC2.
- Amazon tools. The following examples also assume that you have installed and configured the Amazon AWS CLI and the EC2 CLI and AMI tools, including ec2-ami-tools.
For more information, see Installing the AWS Command Line Interface, Setting Up the Amazon EC2 Command Line Interface Tools on Linux, and Configuring AWS Command-Line Interface. Also see Setting Up the AMI Tools.
The procedure in this section uses an Ubuntu 14.04 workstation to generate the keys and certificates that AWS requires.
Download the Photon OS image for Amazon.
VMware packages Photon OS as a cloud-ready Amazon machine image (AMI) that you can download for free. For more information, see Downloading Photon OS.
Download the Photon OS AMI and save it on your workstation.
Note: The AMI version of Photon is a virtual appliance with the information and packages that Amazon needs to launch an instance of Photon in the cloud. To build the AMI version, VMware starts with the minimal version of Photon OS and adds the sudo and tar packages to it.
3.8.2 - Set Up Photon OS on EC2
To run Photon OS on EC2, you must use cloud-init with an EC2 data source. The cloud-init service configures the cloud instance of a Linux image. An instance is a virtual server in the Amazon cloud.
The examples in this section show how to generate SSH and RSA keys for your Photon instance, upload the Photon OS .ami image to the Amazon cloud, and configure it with cloud-init. In the examples, replace information with your own paths, account details, or other information from Amazon.
Perform the following steps to set up Photon OS on EC2
Create a key pair.
Generate SSH keys on, for instance, an Ubuntu workstation:
ssh-keygen -f ~/.ssh/mykeypair
The command generates a public key in the file with a .pub extension and a private key in a file with no extension. Keep the private key file and remember the name of your key pair. The name is the file name of the two files without an extension. You will need the name later to connect to the Photon instance.
Change the mode bits of the public key pair file to protect its security. In the command, include the path to the file if you need to.
chmod 600 mykeypair.pub
Change the mode bits on your private key pair file so that only you can view it:
chmod 400 mykeypair
To import your public key pair file, but not your private key pair file, connect to the EC2 console at https://console.aws.amazon.com/ec2/ and select the region for the key pair. A key pair works only in one region, and the instance of Photon OS that will be uploaded later must be in the same region as the key pair. Select key pairs under Network & Security, and then import the public key pair file that you generated earlier.
For more information, see Importing Your Own Key Pair to Amazon EC2.
Generate a certificate.
When you bundle up an image for EC2, Amazon requires an RSA user signing certificate. You create the certificate by using openssl to first generate a private RSA key and then to generate the RSA certificate that references the private RSA key. Amazon uses the pairing of the private key and the user signing certificate for handshake verification.
On Ubuntu 14.04 or another workstation that includes openssl, run the following command to generate a private key. If you change the name of the key, keep in mind that you will need to include the name of the key in the next command, which generates the certificate.
openssl genrsa 2048 > myprivatersakey.pem
    Make a note of your private key as you will need it again later.

1. Run the following command to generate the certificate. The command prompts you to provide more information, but because you are generating a user signing certificate, not a server certificate, you can just type `Enter` for each prompt to leave all the fields blank.

    ```
openssl req -new -x509 -nodes -sha256 -days 365 -key myprivatersakey.pem -outform PEM -out certificate.pem
        For more information, see the Create a Private Key and the Create the User Signing Certificate sections of [Setting Up the AMI Tools](http://docs.aws.amazon.com/AWSEC2/latest/UserGuide/set-up-ami-tools.html#ami-upload-bundle).

     1. Upload to AWS the certificate value from the `certificate.pem` file that you created in the previous command. Go to the Identity and Access Management console at https://console.aws.amazon.com/iam/, navigate to the name of your user, open the `Security Credentials` section, click `Manage Signing Certificates`, and then click `Upload Signing Certificate`. Open `certificate.pem` in a text editor, copy and paste the contents of the file into the `Certificate Body` field, and then click `Upload Signing Certificate`.

    For more information, see the Upload the User Signing Certificate section of [Setting Up the AMI Tools](http://docs.aws.amazon.com/AWSEC2/latest/UserGuide/set-up-ami-tools.html#ami-upload-bundle).

1. Create a security group.

    Create a security group and set it to allow SSH, HTTP, and HTTPS connections over ports 22, 80, and 443, respectively.
    Connect to the EC2 command-line interface and run the following commands:

    	aws ec2 create-security-group --group-name photon-sg --description "My Photon security group"
    	{
    	    "GroupId": "sg-d027efb4"
    	}
    	aws ec2 authorize-security-group-ingress --group-name photon-sg --protocol tcp --port 22 --cidr 0.0.0.0/0

    Make a note of the `GroupId` that is returned by EC2 as you will need it again later.

    By using `0.0.0.0/0` for SSH ingress on Port 22, you open the port to all IP addresses--which is not a security best practice but a convenience for the examples in this article. For a production instance or other instances that are anything more than temporary machines, you must authorize only a specific IP address or range of addresses. For more information, see [Authorizing Inbound Traffic for Linux Instances](http://docs.aws.amazon.com/AWSEC2/latest/UserGuide/authorizing-access-to-an-instance.html).

    Repeat the command to allow incoming traffic on Port 80 and on Port 443:

    	aws ec2 authorize-security-group-ingress --group-name photon-sg --protocol tcp --port 80 --cidr 0.0.0.0/0

    	aws ec2 authorize-security-group-ingress --group-name photon-sg --protocol tcp --port 443 --cidr 0.0.0.0/0

    Check your update:

    	aws ec2 describe-security-groups --group-names photon-sg

1. Extract the tarball.

    Make a directory to store the image and then extract the Photon OS image from its archive by running the following `tar` command. If required, change the file name to match the version you have.

    	mkdir bundled
    	tar -zxvf ./photon-ami.tar.gz

1. Bundle the image.

    Run the `ec2-bundle-image` command to create an instance store-backed Linux AMI from the Photon OS image that you extracted in the previous step. The result of the `ec2-bundle-image` command is a manifest that describes the machine in an XML file.

    The command uses the certificate path to your PEM-encoded RSA public key certificate file, the path to your PEM-encoded RSA private key file, your EC2 user account ID; the correct architecture for Photon OS, the path to the Photon OS AMI image extracted from its tar file, and the `bundled` directory from the previous step.

    Replace the values of the certificate path, the private key, and the user account with your own values.

    	$ ec2-bundle-image --cert certificate.pem --privatekey myprivatersakey.pem --user <EC2 account id>  --arch x86_64 --image photon-ami.raw --destination ./bundled/

1. Put the bundle in a bucket.

    Make an S3 bucket, replacing `<bucket-name>` with the name that you want. The command creates the bucket in the region specified in your Amazon configuration file, which should be the same region in which you are using your key pair file:

    	$ aws s3 mb s3://<bucket-name>

    Upload the bundle to the Amazon S3 cloud. The following command includes the path to the XML file containing the manifest for the Photon OS machine created during the previous step, though you might have to change the file name to match the version you have. The manifest file is typically located in the same directory as the bundle.

    The command also includes the name of the Amazon S3 bucket in which the bundle is to be stored; your AWS access key ID; and your AWS secret access key.

    	$ ec2-upload-bundle --manifest ./bundled/photon-ami.manifest.xml --bucket <bucket-name> --access-key <Account Access Key> --secret-key <Account Secret key>

1. Register the Image

    Run the following command to register the image. The command includes a name for the AMI, its architecture, and its virtualization type. The virtualization type for Photon OS is `hvm`.

    	$ ec2-register <bucket-name>/photon-ami.manifest.xml --name photon-ami --architecture x86_64 --virtualization-type hvm

    Once the image is registered, you can launch as many new instances as you require.

1. Run an instance of the image with Cloud-Init.

    In the below command, the `user-data-file` option instructs cloud-init to import the cloud-config data in `user-data.txt`.

    Before you run the command, change directories to the directory containing the `mykeypair` file and add the path to the `user-data.txt`.

    	$ ec2-run-instances <ami-ID> --instance-type m3.medium -g photon-sg --key mykeypair --user-data-file user-data.txt

    The command also includes the ID of the AMI, which you can obtain by running `ec2-describe-images`. Replace the instance type of `m3.medium` and the name of key pair with your own values to be able to connect to the instance.

    The following are the contents of the `user-data.txt` file that `cloud-init` applies to the machine the first time it boots up in the cloud.

    	#cloud-config
    	hostname: photon-on-01
    	groups:
    	- cloud-admins
    	- cloud-users
    	users:
    	- default
    	- name: photonadmin
    	   gecos: photon test admin user
    	   primary-group: cloud-admins
    	   groups: cloud-users
    	   lock-passwd: false
    	   passwd: vmware
    	- name: photonuser
    	   gecos: photon test user
    	   primary-group: cloud-users
    	   groups: users
    	   passwd: vmware
    	packages:
    	- vim

1. Get the IP address of your image.

    Run the following command to check on the state of the instance that you launched:

    	$ ec2-describe-instances

    Obtain the external IP address of the instance by running the following query:

    	$ aws ec2 describe-instances --instance-ids <instance-id> --query 'Reservations[*].Instances[*].PublicIpAddress' --output=text

Optionally, check the cloud-init output log file on EC2 at `/var/log/cloud-init-output.log` to see how EC2 handles the settings in the cloud-init data file.

For more information on using cloud-init user data on EC2, see [Running Commands on Your Linux Instance at Launch](http://docs.aws.amazon.com/AWSEC2/latest/UserGuide/user-data.html).
3.8.3 - Deploy a Containerized Application in Photon OS
Connect to the Photon instance by using SSH and to launch a web server by running it in Docker.
Connect with SSH
Connect to the instance over SSH by specifying the private key (.pem) file and the user name for the Photon machine, which is root:
ssh -i ~/.ssh/mykeypair root@<public-ip-address-of-instance>
For complete instructions, see Connecting to Your Linux Instance Using SSH.
Run Docker
On the minimal version of Photon OS, the docker engine is enabled and running by default, which you can see by running the following command:
systemctl status docker
Start the web server
Note: Please make sure that the proper security policies have been enabled on the Amazon AWS side to enable traffic to port 80 on the VM.
Since Docker is running, you can run an application in a container–for example, the Nginx Web Server. This example uses the popular open source web server Nginx. The Nginx application has a customized VMware package that the Docker engine can download directly from the Docker Hub.
To pull Nginx from its Docker Hub and start it, run the following command:
docker run -p 80:80 vmwarecna/nginx
The Nginx web server should be bound to the public DNS value for the instance of Photon OS, that is, the same address with which you connected over SSH.
Test the web server
On your local workstation, open a web browser and go to the the public address of the Photon OS instance running Docker. The following screen should appear, showing that the web server is active:

Stop the Docker container by typing Ctrl+c in the SSH console through which you are connected to EC2.
You can now run other containerized applications from the Docker Hub or your own containerized application on Photon OS in the Amazon cloud.
3.8.4 - Launch the Web Server with Cloud-Init
To eliminate the manual effort of running Docker, you can add docker run and its arguments to the cloud-init user data file by using runcmd:
#cloud-config
hostname: photon-on-01
groups:
- cloud-admins
- cloud-users
users:
- default
- name: photonadmin
   gecos: photon test admin user
   primary-group: cloud-admins
   groups: cloud-users
   lock-passwd: false
   passwd: vmware
- name: photonuser
   gecos: photon test user
   primary-group: cloud-users
   groups: users
   passwd: vmware
packages:
- vim
runcmd:
- docker run -p 80:80 vmwarecna/nginx
To try this addition, run another instance with the new cloud-init data source and then get the public IP address of the instance to check that the Nginx web server is running.
3.8.5 - Terminate the AMI Instance
Because Amazon charges you while the instance is running, you must shut it down when you have finsihed using it.
- Get the ID of the AMI so you can terminate it:
$ ec2-describe-instances
- Terminate the Photon OS instance by running the following command:
$ ec2-terminate-instances <instance-id>
Replace the placeholder with the ID that the ec2-describe-images command returned. If you ran a second instance of Photon OS with the cloud-init file that runs docker, terminate that instance as well.
3.9 - Running Photon OS on Microsoft Azure
You can use Photon OS as a run-time environment for Linux containers on Microsoft Azure. You can set up and run the cloud-ready version of Photon OS as an instance of a virtual machine in the Azure cloud. Once Photon OS is running, you can deploy a containerized application in Docker.
Note: These instructions apply to Photon OS 2.0 and 3.0. There is no Photon OS 1.0 distribution image for Microsoft Azure.
3.9.1 - Prerequisites for Running Photon OS on Azure
Before you use Photon OS with Microsoft Azure, perform the following prerequisite tasks:
Verify that you have a Microsoft Azure account. To create an account, see https://azure.microsoft.com
Install the latest version of Azure CLI. See Install Azure CLI 2.x and Get started with Azure CLI 2.x.
Verify that that you have a pair of SSH public and private keys.
Download and extract the Photon OS VHD file.
VMware packages Photon OS as a cloud-ready virtual hard disk (VHD file) that you can download for free from Packages URL. This VHD file is a virtual appliance with the information and packages that Azure needs to launch an instance of Photon in the cloud. After you have downloaded the distribution archive, extract the VHD file from it. You will later need to upload this VHD file to Azure, where it will be stored in an Azure storage account. For more information, see Downloading Photon OS.
3.9.2 - Set Up Azure Storage and Uploading the VHD
You can use either the Azure Portal or the Azure CLI to set up your Azure storage space, upload the Photon OS VHD file, and create the Photon OS VM.
Setting Up Using the Azure Portal
You can use the Azure portal to set up Photon OS in the Azure cloud. The following instructions are brief. Refer to the Azure documentation for details.
- Log in to the Azure portal at http://portal.azure.com.
- Create a resource group. In the toolbar, choose Resource Groups, click +Add , fill in the resource group fields, and choose Create.
- Create a storage account. In the toolbar, choose Storage Accounts, click +Add , fill in the storage account fields (and the resource group you just created), and choose Create.
- Select the storage account.
- Scroll down the storage account control bar, click Containers (below BLOB SERVICE), click +Container , fill in the container fields, and choose Create.
- Select the container you just created.
- Click Upload and upload the Photon OS VHD image file to this container.
- Once the VHD file is uploaded, refer to the Azure documentation for instructions on how to create and manage your Photon OS VM.
Setting Up Using the Azure CLI
You can use the Azure CLI 2.x to set up Photon OS.
Note: Except where overridden with parameter values, these commands create objects with default settings.
Create a resource group.
From the Azure CLI, create a resource group.
az group create \
 --name <your_resource_group> \
 --location westus
Create a storage account
Create a storage account associated with this resource group.
az storage account create \
    --resource-group <your_resource_group> \
    --location westus \
    --name <your_account_name> \
    --kind Storage \
    --sku Standard_LRS
List the Keys for the Storage Account
Retrieve the keys associated with your newly created storage account.
az storage account keys list \
    --resource-group <your_resource_group> \
    --account-name <your_account_name>
Create the Storage Container
Create a storage container associated with your newly created storage account.
Note: The sample create.sh script, described below, does this for you programmatically.
az storage container create \
    --account-name <your_account_name> \
    --name <your_container_name>
Verify Your Setup in the Azure Portal
- Log into the Azure portal using your account credentials.
- From the left toolbar, click Storage Accounts. You should see your storage accounts.
- Select the storage account.
- Scroll down the storage account control bar and click Containers (below BLOB SERVICE). You should see the container you created.
Upload the Photon OS Distribution to Your Storage Container
The Photon OS distribution for Azure is 16GB. You can download it locally or to a mounted, shared location.
az storage blob upload \
    --account-name <your_account_name> \
    --account-key <your_account_key> \
    --container-name <your_container_name> \
    --type page \
    --file <vhd_path> \
    --name <vm_name>.vhd
Example Setup Script
You can use the following script (create.sh) to upload your VHD file programmatically and create the VM. Before you run it, specify the following settings:
- resource_group name
- account_name
- account_key (public or private)
- container_name
- public_key_file
- vhd_path and and vm_name of the Photon OS VHD distribution file
The following script returns the complete IP address of the newly created VM.
#!/bin/bash
vhd_path=$1
vm_name=$2
export PATH=$PATH:/root/azure_new/bin/az
echo PATH=$PATH
resource_group=""
account_name=""
account_key=""
container_name="mydisks"
url="https://${account_name}.blob.core.windows.net/${container_name}/${vm_name}.vhd"
public_key_file="/root/azure_new/jenkins.pub"
echo "########################"
echo "#   Create container   #"
echo "########################"
/root/azure_new/bin/az storage container create --account-name ${account_name} --name ${container_name}
echo "##################"
echo "#   Upload vhd   #"
echo "##################"
/root/azure_new/bin/az storage blob upload --account-name ${account_name} \
    --account-key ${account_key} \
    --container-name ${container_name} \
    --type page \
    --file ${vhd_path} \
    --name ${vm_name}.vhd
echo "##################"
echo "#   Create vm    #"
echo "##################"
echo "az vm create --resource-group ${resource_group} --location westus --name ${vm_name} --storage-account ${account_name} --os-type linux --admin-username michellew --ssh-key-value ${public_key_file} --image ${url} --use-unmanaged-disk ... ..."
/root/azure_new/bin/az vm create --resource-group ${resource_group} --location westus --name ${vm_name} --storage-account ${account_name} --os-type linux --admin-username michellew --ssh-key-value ${public_key_file} --image ${url} --use-unmanaged-disk
3.9.3 - Remove Photon OS From Azure
You can use the following delete.sh script to programmatically and silently remove the VM instance, VHD file, and container.
Consider deleting idle VMs so that you are not charged when not in use.
Before you run it, specify the following settings:
- resource_group name (from step 1, above)
- account_name (from step 2, above)
- account_key (public or private) (from step 3, above)
- container_name (from step 4, above)
- public_key_file
- vm_name of the Photon OS VHD distribution file
delete.sh
#!/bin/bash
vm_name=$1
resource_group=""
account_name=""
account_key=""
container_name="mydisks"
url="https://${account_name}.blob.core.windows.net/${container_name}/${vm_name}.vhd"
public_key_file="/root/azure_new/jenkins.pub"
exit_code=0
echo "##################"
echo "#   Delete vm    #"
echo "##################"
echo "az vm list  --resource-group ${resource_group} ... ..."
/root/azure_new/bin/az vm list  --resource-group ${resource_group}
echo "az vm delete --resource-group ${resource_group} --name ${vm_name} --yes ... ..."
/root/azure_new/bin/az vm delete --resource-group ${resource_group} --name ${vm_name} --yes
if [$? -ne 0];then
   exit_code=1
fi
echo "az vm list  --resource-group ${resource_group} ... ..."
/root/azure_new/bin/az vm list  --resource-group ${resource_group}
echo "##############$####"
echo "#   Delete vhd    #"
echo "###############$###"
echo "az storage blob list --account-name ${account_name} --container-name ${container_name} ... ..."
/root/azure_new/bin/az storage blob list --account-name ${account_name} --container-name ${container_name}
echo "az storage blob delete --account-name ${account_name} --container-name ${container_name} --name ${vm_name}.vhd ... ..."
/root/azure_new/bin/az storage blob delete --account-name ${account_name} --container-name ${container_name} --name ${vm_name}.vhd
if [$? -ne 0];then
   exit_code=1
fi
echo "az storage blob list --account-name ${account_name} --container-name ${container_name} ... ..."
/root/azure_new/bin/az storage blob list --account-name ${account_name} --container-name ${container_name}
echo "########################"
echo "#   Delete container   #"
echo "########################"
/root/azure_new/bin/az storage container delete --account-name ${account_name} --name ${container_name}
/root/azure_new/bin/az storage container delete --account-name ${account_name} --name vhds
exit ${exit_code}
You can now proceed to Deploying a Containerized Application in Photon OS.
3.10 - Running Photon OS on Google Compute Engine
You can use Photon OS as a virtual machine on Google Compute Engine (GCE). You can download Photon OS, as an OVA or ISO file, and install the Photon OS distribution on vSphere. After you install Photon OS, you can deploy a containerized application in Docker with a single command.
3.10.1 - Prerequisites for Running Photon OS on GCE
Before you use Photon OS within GCE, verify that you have the following resources:
- Google Compute Engine account
- GCE tools
- Photon OS Image
Google Compute Engine Account
Working with GCE requires a Google Compute Engine account with valid payment information. Keep in mind that, if you try the examples in this document, you will be charged by Google. The GCE-ready version of Photon OS is free to use.
GCE is a service that lets you run virtual machines on Google’s infrastructure. You can customize the virtual machine as much as you want, and you can even install your own custom operating system image. Or, you can adopt one of the public images provided by Google. For any operating system to work with GCE, it must match Google’s infrastructure needs. Google provides tools that VM instances require to work correctly on GCE:
- Google startup scripts: You can provide some startup script to configure your instances at startup.
- Google Daemon: Google Daemon creates new accounts and configures ssh to accept public keys using the metadata server.
- Google Cloud SDK: Command line tools to manage your images, instances and other objects on GCE.
Perform the following tasks to make Photon OS work on GCE:
- Install Google Compute Engine Image packages
- Install Google Cloud SDK
- Change GPT partition table to MBR
- Update the Grub config for new MBR and serial console output
- Update ssh configuration
- Delete ssh host keys
- Set the time zone to UTC
- Use the Google NTP server
- Delete the hostname file.
- Add Google hosts /etc/hosts
- Set MTU to 1460. SSH will not work without it.
- Create
/etc/ssh/sshd_not_to_be_run with just the contents “GOOGLE\n”.
For more information see Importing Boot Disk Images to Compute Engine.
For information about upgrading the Photon OS Linux kernel see Upgrading the Kernel Version Requires Grub Changes for AWS and GCE Images
Photon OS Image
VMware recommends that administrators use the Photon OS image for Google Compute Engine (GCE) to create Photon OS instances on GCE. Photon OS bundles the Google startup scripts, daemon, and cloud SDK into a GCE-ready image that has been modified to meet the configuration requirements of GCE. You can download the Photon OS image for GCE from the following URL:
https://packages.vmware.com/photon
For instructions, see Downloading Photon OS.
Optionally you can customize Photon OS to work with GCE.
Creating Photon image for GCE
Perform the following tasks:
Prepare Photon Disk
Install Photon Minimal on Fusion/Workstation and install some required packages.
mount /dev/cdrom /media/cdrom
tdnf install python2-libs ntp sudo wget tar which gptfdisk sed findutils grep gzip -y
Convert GPT to MBR and update the grub
 Photon installer installs GPT partition table by default but GCE only accepts an MBR (msdos) type partition table. So, you must convert GPT to MBR and update the grub. Use the following commands to update the grub:

      ```
    # Change partition table to MBR from GPT
    sgdisk -m 1:2 /dev/sda
    grub2-install /dev/sda

    # Enable serial console on grub for GCE.
    cat << EOF >> /etc/default/grub
    GRUB_CMDLINE_LINUX="console=ttyS0,38400n8"
    GRUB_TERMINAL=serial
    GRUB_SERIAL_COMMAND="serial --speed=38400 --unit=0 --word=8 --parity=no --stop=1"
    EOF

    # Create new grub.cfg based on the settings in /etc/default/grub
    grub2-mkconfig -o /boot/grub2/grub.cfg
      ```
Install Google Cloud SDK and GCE Packages
      tdnf install -y google-compute-engine google-compute-engine-services
      cp /usr/lib/systemd/system/google* /lib/systemd/system/
      cd /lib/systemd/system/multi-user.target.wants/

      # Create links in multi-user.target to auto-start these scripts and services.
      for i in ../google*; do  ln -s $i `basename $i`; done

      cd /tmp/; wget https://dl.google.com/dl/cloudsdk/release/google-cloud-sdk.tar.gz
      tar -xf google-cloud-sdk.tar.gz
      cd google-cloud-sdk
      ./install.sh
Update /etc/hosts file with GCE values as follows:
echo "169.254.169.254 metadata.google.internal metadata" >> /etc/hosts
Remove all servers from ntp.conf and add Google’s ntp server.
      sed -i -e "/server/d" /etc/ntp.conf
      cat /etc/ntp.conf
      echo "server 169.254.169.254" >> /etc/ntp.conf
      # Create ntpd.service to auto starting ntp server.
      cat << EOF >> /lib/systemd/system/ntpd.service
      [Unit]
      Description=Network Time Service
      After=network.target nss-lookup.target

      [Service]
      Type=forking
      PrivateTmp=true
      ExecStart=/usr/sbin/ntpd -g -u ntp:ntp
      Restart=always

      [Install]
      WantedBy=multi-user.target
      EOF

      # Add link in multi-user.target.wants to auto start this service.
      cd /lib/systemd/system/multi-user.target.wants/
      ln -s ../ntpd.service ntpd.service
Set UTC timezone
ln -sf /usr/share/zoneinfo/UTC /etc/localtime
Update /etc/resolv.conf
echo "nameserver 8.8.8.8" >> /etc/resolv.conf
Remove ssh host keys and add script to regenerate them at boot time.
      rm /etc/ssh/ssh_host_*
      # Depending on the installation, you may need to purge the following keys
      rm /etc/ssh/ssh_host_rsa_key*
      rm /etc/ssh/ssh_host_dsa_key*
      rm /etc/ssh/ssh_host_ecdsa_key*

      sed -i -e "/exit 0/d" /etc/rc.local
      echo "[ -f /etc/ssh/ssh_host_key ] && echo 'Keys found.' || ssh-keygen -A" >> /etc/rc.local
      echo "exit 0" >> /etc/rc.local
      printf "GOOGLE\n" > /etc/ssh/sshd_not_to_be_run

      # Edit sshd_config and ssh_config as per instructions on [this link](https://cloud.google.com/compute/docs/tutorials/building-images).
Change MTU to 1460 for network interface.
 # Create a startup service in systemd that will change MTU and exits
      cat << EOF >> /lib/systemd/system/eth0.service
      [Unit]
      Description=Network interface initialization
      After=local-fs.target network-online.target network.target
      Wants=local-fs.target network-online.target network.target

      [Service]
      ExecStart=/bin/ifconfig eth0 mtu 1460 up
      Type=oneshot

      [Install]
      WantedBy=multi-user.target
      EOF
      # Make this service auto-start at boot.
      cd /lib/systemd/system/multi-user.target.wants/
      ln -s ../eth0.service eth0.service
Pack and upload to GCE.
Shut down the Photon VM and copy its disk to THE tmp folder.
```
# You will need to install Google Cloud SDK on host machine to upload the image and play with GCE.
      cp Virtual\ Machines.localized/photon.vmwarevm/Virtual\ Disk.vmdk /tmp/disk.vmdk
      cd /tmp
      # GCE needs disk to be named as disk.raw with raw format.
      qemu-img convert -f vmdk -O raw disk.vmdk disk.raw

      # ONLY GNU tar will work to create acceptable tar.gz file for GCE. MAC's default tar is BSDTar which will not work.
      # On Mac OS X ensure that you have gtar "GNU Tar" installed. exmaple: gtar -Szcf photon.tar.gz disk.raw

      gtar -Szcf photon.tar.gz disk.raw

      # Upload
      gsutil cp photon.tar.gz gs://photon-bucket

      # Create image
      gcloud compute --project "<project name>" images create "photon-beta-vYYYYMMDD" --description "Photon Beta" --source-uri https://storage.googleapis.com/photon-bucket/photon032315.tar.gz

      # Create instance on GCE of photon image
      gcloud compute --project "photon" instances create "photon" --zone "us-central1-f" --machine-type "n1-standard-1" --network "default" --maintenance-policy "MIGRATE" --scopes "https://www.googleapis.com/auth/devstorage.read_only" "https://www.googleapis.com/auth/logging.write" --image "https://www.googleapis.com/compute/v1/projects/photon/global/images/photon" --boot-disk-type "pd-standard" --boot-disk-device-name "photon"

```
3.10.2 - Installing Photon OS on Google Compute Engine
After you download the Photon OS image for GCE, log into GCE and install Photon OS.
Perform the following steps:
Create a New Bucket
Create a new bucket to store your Photon OS image for GCE.

Upload the Photon OS Image
While viewing the bucket that created, click the Upload files button, navigate to your Photon OS image and click the Choose button.
When the upload finishes, you can see the Photon OS compressed image in the file list for the bucket that you created.

Create a New Image
To create a new image, click on Images in the Compute category in the left panel and then click on the New Image button.
Enter a name for the image in the Name field and change the Source to Cloud Storage file using the pull-down menu. Then, in the Cloud Storage file field, enter the bucket name and filename as the path to the Photon OS image for GCE. In this example, where the bucket was named photon_storage, the path is as follows:
`photon_storage/photon-gce-2.0-tar.gz`
The new image form autopopulates the gs:// file path prefix.*
Click the Create button to create your image. You must be able to see the Images catalog and your Photon OS image at the top of the list.
Create a New Instance
To create an instance, check the box next to the Photon OS image and click the Create Instance button.
On the Create a new instance form, provide a name for this instance, confirm the zone into which this instance is to be deployed and, before clicking Create, check the Allow HTTP traffic and Allow HTTPS traffic options.
Note: The firewall rules in this example are optional. You can configure the ports according to your requirements.

When the instance is created you will be returned to your list of VM instances. If you click on the instance, the status page for the instance will allow you to SSH into your Photon OS environment using the SSH button at the top of the panel.
At this point, your instance is running and you are ready to start the Docker engine and run a container workload. For more information, see Deploying a Containerized Application in Photon OS.
3.11 - Running Photon OS on Raspberry Pi 3
You can use Photon OS as a virtual machine on Raspberry Pi 3 (RPi3). You can download Photon OS and install the Photon OS distribution on vSphere.
3.11.1 - Prerequisites for Running Photon OS on Raspberry Pi 3
Before you use Photon OS within RPi3, perform the following prerequisite tasks:
Verify that you have the following resources:
| Resource | Description |
| Raspberry Pi 3 | Raspberry Pi 3 Model B or Model B+ board. This will serve as the target of the installation. |
| Host computer | A computer equipped with the following: 1. An SD card reader. 2. Software utilities to flash an image onto an SD-card (details and instructions provided below). |
| Distribution File | Photon OS RPi3 image downloaded from Packages URL
Note: Photon OS RPi image is available only from Photon 3.0 onwards. |
Download Photon OS.
To install Photon OS on a Raspberry Pi 3, you must download the Photon OS RPi3 image, which is distributed as a compressed raw disk image with the file extension .raw.xz.
Note: You cannot use the Photon ISO to install on RPi3.
Go to the following bintray URL and download the latest release of Photon OS image for RPi3: https://packages.vmware.com/photon/3.0/GA/rpi3.
For instructions, see Downloading Photon OS.
3.11.2 - Installing Photon OS on Raspberry Pi 3
You can get Photon OS up and running on an RPi3 board, by flashing the Photon RPi3 image onto the board’s SD card.
Flash Photon OS on Raspberry Pi 3
After you have downloaded the Photon RPi3 image with the file extension .raw.xz, you can choose one of the methods below to flash it onto the RPi3 SD card.
- Flash Photon to RPi3 using Etcher
- Flash Photon to RPi3 using Linux CLI
Flash Photon to RPi3 using Etcher
- Install Etcher https://etcher.io/, which is a utility to flash SD cards attached to your host computer.
- Plug the RPi3 SD card into your host computer’s SD card reader.
- Perform the following steps on the Etcher GUI: Select image -> Select drive -> Flash, by selecting the Photon OS RPi3 as image and the RPi3 SD card as drive.
Flash Photon to RPi3 using Linux CLI
If you have Linux running on your host computer, install the xz package, which provides the xz compression utility and related tools, from your distribution package manager.
Plug the RPi3’s SD card into your host computer’s SD card reader.
Identify the device file under /dev that refers to the RPi3 SD card. For example, /dev/sdc. This file path is used to flash the Photon image onto the RPi3 in the next step.
Note: Make sure that you are flashing to the device file that refers to your RPi3 SD card. Running the below command with an incorrect device file will overwrite that device without warning and might result in a corrupted disk. The device file ‘/dev/sdc` is an example and might not be the device file in your case.
Run the following command to flash Photon onto the RPi3 SD card:
xzcat <photon-rpi3-image.raw.xz> | sudo dd of=/dev/sdc bs=4M conv=fsync
Boot Photon OS on Raspberry Pi 3
After you flash Photon OS successfully onto the RPi3 SD card, eject the card from your host computer and plug it back into the RPi3 board.
When you power on the Raspberry Pi 3, it boots with Photon OS.
After the splash screen, Photon OS prompts you to log in.
Update login credentials
The Photon OS RPi3 image is configured with a default password. However, all Photon OS instances that are created using this image will require an immediate password change upon login. The default account credentials are:
- Username:
root - Password:
changeme
After you provide these credentials, Photon OS prompts you to create a new password and type it a second time to verify it. Photon OS does not allow common dictionary words for the root password. When you are logged in, you will see the shell prompt.
You can now run tdnf list to view all the ARM packages that you can install on Photon OS.
3.11.3 - Enabling Rpi3 Interfaces using Device Tree
Photon OS RPI3 images from Photon 3.0 rev2 has Device Tree Overlay support. And these images have compiled Overlays to enable/disable Rpi3 Interface. Perform the following:
SPI Interface:
Execute following commands to enable SPI Interface:
mkdir /sys/kernel/config/device-tree/overlays/
cat /boot/broadcom/overlays/bcm2837-rpi-enable-spi0.dtbo > /sys/kernel/config/device-tree/overlays/spi/dtbo
Audio Interface:
Execute following commands to enable Audio Interface:
mkdir  /sys/kernel/config/device-tree/overlays/audio
cat /boot/broadcom/overlays/bcm2837-rpi-enable-audio.dtbo >  /sys/kernel/config/device-tree/overlays/audio/dtbo
Note: Ensure that the linux-drivers-sound rpm is installed.
I2C Interface:
Execute following command to enable I2C Interface:
modprobe i2c-dev
#Customizing Device Tree Overlay
Photon OS also provides Device Tree Compilers (i.e. dtc), to compile Customised Device Tree Overlays. Execute following command to install dtc on Photon OS:
tdnf install dtc
Execute following command to compile the overlay:
dtc -@ -O dtb -o my_overlay_dt.dtbo my_overlay_dt.dts
For more information about format of Device Tree Overlay, see
https://www.kernel.org/doc/Documentation/devicetree/overlay-notes.txt
3.12 - Deploying a Containerized Application in Photon OS
Now that you have your container runtime environment up and running, you can easily deploy a containerized application. For this example, you will deploy the popular open source Web Server Nginx. The Nginx application has a customized VMware package that is published as a dockerfile and can be downloaded, directly, through the Docker module from the Docker Hub.
Run Docker
To run Docker from the command prompt, enter the following command, which initializes the docker engine:
systemctl start docker
To ensure Docker daemon service runs on every subsequent VM reboot, enter the following command:
systemctl enable docker
Run the Nginx Web Server
Now the Docker daemon service is running, it is a simple task to “pull” and start the Nginx Web Server container from Docker Hub. To do this, type the following command:
docker run -d -p 80:80 vmwarecna/nginx
This pulls the Nginx Web Server files and appropriate dependent container filesystem layers required for this containerized application to run.

After the docker run process completes, you return to the command prompt. You now have a fully active website up and running in a container!
Test the Web Server
To test that your Web Server is active, run the ifconfig command to get the IP address of the Photon OS Virtual Machine.

The output displays a list of adapters that are connected to the virtual machine. Typically, the web server daemon will be bound on eth0.
Start a browser on your host machine and enter the IP address of your Photon OS Virtual Machine. You should see a screen similar to the following example as confirmation that your web server is active.

You can now run any other containerized application from Docker Hub or your own containerized application within Photon OS.
3.13 - Compatible Cloud Images
The Packages URL contains the following cloud-ready images of Photon OS:
GCE - Google Compute Engine
AMI - Amazon Machine Image
OVA
Because the cloud-ready images of Photon OS are built to be compatible with their corresponding cloud platform or format, you typically do not need to build a cloud image–just go to Packages URL and download the image for the platform that you are working on.
If, however, you want to build your own cloud image, perhaps because you seek to customize the code, see the next section on how to build cloud images.
How to build cloud images
sudo make cloud-image IMG_NAME=image-name

image-name: gce/ami/azure/ova
The output of the build process produces the following file formats:
GCE - A tar file consisting of disk.raw as the raw disk file
AMI - A raw disk file
OVA - An ova file (vmdk + ovf)
If you want, you can build all the cloud images by running the following command:
sudo make cloud-image-all
How to create running instances in the cloud
The following sections contain some high-level instructions on how to create instances of Photon OS in the Google Compute Engine (GCE) and Amazon Elastic Cloud Compute (EC2). For more information, see the Amazon or Google cloud documentation.
GCE
The tar file can be uploaded to Google’s cloud storage and an instance can be created after creating an image from the tar file. You will need the Google Cloud SDK on your host machine to upload the image and create instances.
####Install Google cloud SDK on host machine
curl https://sdk.cloud.google.com | bash
####Upload the tar file
gsutil cp photon-gce.tar.gz gs://bucket-name
####Create image
gcloud compute --project project-id images create image-name --description description --source-uri https://storage.googleapis.com/bucket-name/photon-gce.tar.gz
####Create instance of GCE
gcloud compute --project project-id instances create instance-name --zone "us-central1-f" --machine-type "n1-standard-1" other-options
(You can also create instances from the Google developer console.)
For more information, see Running a Photon OS Machine on GCE.
AWS EC2
Install the AWS CLI and EC2 CLI tools.
####Bundle the image
ec2-bundle-image -c cert.pem -k private-key.pem -u $AWS_USER_ID --arch x86_64 --image photon-ami.raw --destination directory-name
####Upload the bundle
ec2-upload-bundle --manifest directory-name/photon-ami.raw.manifest.xml --bucket bucket-name --access-key $AWS_ACCESS_KEY --secret-key $AWS_SECRET_KEY
####Register the AMI
ec2-register bucket-name/photon-ami.raw.manifest.xml --name name --architecture x86_64 --virtualization-type hvm
You can now launch instances using the AWS console.
For more information, see Customizing a Photon OS Machine on EC2.
###OVA
The OVA image uses an optimized version of the 4.4.8 Linux kernel. Two ova files are generated from the build: photon-ova.ova, which is the full version of Photon OS, and photon-custom.ova, which is the minimal version of Photon OS. The password for photon-ova.ova should be changed using guest customization options when you upload it to VMware vCenter. Photon-custom.ova comes with the default password set to changeme; you must change it the first time you log in.
OVA Prerequisites
VDDK 6.0
To utilize the VDDK libraries the following procedure may be used, this extracts the libraries and temporarily exports them to the LD_LIBRARY_PATH for the current session. (tested on Ubuntu 1404 & 1604) If you wish to make this permenant and system-wide then you may want to create a config file in /etc/ld.so.conf.d/.
tar -zxf VMware-vix-disklib-6.0.2-3566099.x86_64.tar.gz
cp -r vmware-vix-disklib-distrib/include/* /usr/include/
mkdir /usr/lib/vmware
cp -a ~/vmware-vix-disklib-distrib/lib64/* /usr/lib/vmware/
rm /usr/lib/vmware/libstdc++.so.6
export LD_LIBRARY_PATH=/usr/lib/vmware
OVFTOOL
OVF Tool should be downloaded and installed on the host.
sh VMware-ovftool-4.1.0-2459827-lin.x86_64.bundle --eulas-agreed --required
3.14 - Installing Photon OS on Dell Gateways
You can isntall Photon OS on Dell Edge Gateways 500X and 300X.
Dell Edge Gateways are devices that aggregate, secure, analyze, and relay data from diverse sensors and equipment at the edge of the IOT network.
For more information about Dell Gateways, see Dell Edge Gateways for IOT
3.14.1 - Installing Photon OS on Dell Edge Gateway 300X
You can install Photon OS 3.0 on Dell Gateway 300X. You can download Photon OS as an ISO file and install it.
Prerequisites
- Verify that you have the following resources:
- Dell Edge Gateway 300x.
- USB pen drive. Format the pen drive with FAT32 with at least 8 GB of space.
- Download the Photon OS ISO image from Bintray.
Installing the ISO Image for Photon OS
Mount the ISO image.
For example, run the following command on macOS:
hdiutil mount photon-3.0-ec12f2c.iso
Use a similar command in other operating systems.
Copy the contents of the ISO image to a writable directory so that you can edit files.
For example, run the following commands on macOS.
mkdir -p /tmp/photonUsb
cp /Volumes/PHOTON_<timestamp>/* /tmp/photonUsb/
```

where, `/Volumes/PHOTON_<timestamp>` is the directory where the ISO is mounted with the command in the step above.
Edit the grub.cfg file to use the kickstart config file:
cd /tmp/photonUsb
Add the below parameters to the linux cmd line in boot/grub2/grub.cfg
linux /isolinux/vmlinuz root=/dev/ram0 loglevel=3 photon.media=UUID=$photondisk ks=cdrom:/isolinux/sample_ks.cfg console=ttyS0,115200n8
Edit the isolinux/sample_ks.cfg as follows:
- Change
"disk": "/dev/sda”, to "disk": "/dev/mmcblk0", - Change
"echo \"Hello World\" > /etc/postinstall" to "sed -i 's/PermitRootLogin no/PermitRootLogin yes/g' /etc/ssh/sshd_config"
Format the pen drive with FAT-32 and copy all the contents of /tmp/photonUsb to the pen drive.
Create a UsbInvocationScript.txt file in the root of the pen drive with below content:
usb_disable_secure_boot noreset;
usb_one_time_boot usb nolog;
1. Insert the pen drive in the Dell Gateway 300X and power on the gateway.

    Photon OS installs automatically.

1. After the installation is complete, insert a network cable into the ethernet port and find the IP address corresponding to the MAC address of the Dell Gateway 3000X ethernet port through the DHCP Server or a network analyzer. The MAC address is available on the Dell Gateway 3000X.

1. You can then use `ssh` to access the gateway with the above IP address.
3.14.2 - Installing Photon OS on Dell Edge Gateway 500X
You can install Photon OS 3.0 on Dell Gateway 500X. You can download Photon OS as an ISO file and install it.
Prerequisites
- Verify that you have the following resources:
- Dell Edge Gateway 500x.
- USB pen drive. Format the pen drive with FAT32 with at least 8 GB of space.
- Download the Photon OS ISO image from https://github.com/vmware/photon/wiki/Downloading-Photon-OS.
Installing the ISO Image for Photon OS
- Format the pen drive with FAT-32 and copy the ISO image to it.
- Insert the pen drive in the Dell Gateway 500X and power it on.
- From the boot options, select the pen drive option.
Result: Photon OS is installed on the Dell Gateway 500X.
3.15 - Installing and Using Lightwave on Photon OS
Project Lightwave is an open-sourced project that provides enterprise-grade identity and access management services, and can be used to solve key security, governance, and compliance challenges for a variety of use cases within the enterprise. Through integration between Photon OS and Project Lightwave, organizations can enforce security and governance on container workloads, for example, by ensuring only authorized containers are run on authorized hosts, by authorized users. For more details about Lightwave, see the project Lightwave page on GitHub.
Procedure
3.15.1 - Installing the Lightwave Server and Configuring It as a Domain Controller on a Photon Image
You can configure Lightwave server as domain controller on a Photon client. You install the Lightwave server first. After the server is installed, you configure a new domain.
Prerequisites
- Prepare a Photon OS client for the Lightwave server installation.
- Verify that the hostname of the client can be resolved.
- Verify that you have 500 MB free for the Lightwave server installation.
Procedure
Log in to your Photon OS client over SSH as an administrator.
Install the Lightwave server by running the following command.
# tdnf install lightwave -y
Configure the Lightwave server as domain controller by selecting a domain name and password for the administrator user.
The minimum required password complexity is 8 characters, one symbol, one upper case letter, and one lower case letter.
Optionally, if you want to access the domain controller over IP, configure the ip under the --ssl-subject-alt-name parameter.
# configure-lightwave-server --domain <your-domain> --password '<administrator-user-password>' --ssl-subject-alt-name <machine-ip-address>
Edit iptables rules to allow connections to and from the client.
The default Photon OS 3.0 firewall settings block all incoming, outgoing, and forwards so that you must reconfigure them.
# iptables -P INPUT ACCEPT
# iptables -P OUTPUT ACCEPT
# iptables -P FORWARD ACCEPT
In a browser, go to https://lightwave-server-FQDN to verify that you can log in to the newly created domain controller.
- On the Cascade Identity Services page, enter the domain that you configured and click Take me to Lightwave Admin.
- On the Welcome page, enter administrator@your-domain as user name and the password that you set during the domain controller configuration and click LOGIN.
3.15.2 - Installing the Lightwave Client on a Photon Image and Joining the Client to a Domain
After you have set up a Lightwave domain controller, you can join Photon clients to that domain. You install the Lightwave client first. After the client is installed, you join the client to the domain.
Prerequisites
- Prepare a Photon OS client for the Lightwave client installation.
- Verify that the hostname of the client can be resolved.
- Verify that you have 184 MB free for the Lightwave client installation.
Procedure
Log in to your Photon OS client over SSH.
Install the Lightwave client by running the following command.
# tdnf install lightwave-client -y
Edit the iptables firewall rules configuration file to allow connections on port 2020 as a default setting.
The default Photon OS 3.0 firewall settings block all incoming, outgoing, and forwards so that you must configure the rules.
- Open the iptables settings file.
# vi /etc/systemd/scripts/iptables
- Add allow information over tcp for port 2020 in the end of the file, save, and close the file.
iptables -A INPUT -p tcp -m tcp --dport 2020 -j ACCEPT
- Run the following command to allow the required connections without restarting the client.
# iptables -A INPUT -p tcp -m tcp --dport 2020 -j ACCEPT
Join the client to the domain by running the domainjoin.sh script and configuring the domain controller FQDN, domain, and the password for the administrator user.
# domainjoin.sh --domain-controller <lightwave-server-FQDN> --domain <your-domain> --password '<administrator-user-password>
In a browser, go to https://Lightwave-Server-FQDN to verify that the client appears under the tenants list for the domain.
3.15.3 - Installing the Photon Management Daemon on a Lightwave Client
After you have installed and configured a domain on Lightwave, and joined a client to the domain, you can install the Photon Management Daemon on that client so that you can remotely manage it.
Prerequisites
- Have an installed Lightwave server with configured domain controller on it.
- Have an installed Lightwave client that is joined to the domain.
- Verify that you have 100 MB free for the daemon installation on the client.
Procedure
Log in to a machine with installed Lightwave client over SSH as an administrator.
Install the Photon Management Daemon.
# tdnf install pmd -y
Start the Photon Management Daemon.
# systemctl start pmd
Verify that the daemon is in an active state.
# systemctl status pmd
(Optional) In a new console, use curl to verify that the Photon Management Daemon returns information.
Use the root credentials for the local client to authenticate against the daemon service.
# curl https://<lightwave-client-FQDN>:2081/v1/info -u root
(Optional) Create an administrative user for the Photon Management Daemon for your domain and assign it the domain administrator role.
- In a browser, go to https://lightwave-server-FQDN.
- On the Cascade Identity Services page, enter your domain name and click Take me to Lightwave Admin.
- On the Welcome page, enter administrative credentials for your domain and click Login.
- Click Users & Groups and click Add to create a new user.
- On the Add New User page, enter user name, at least one name, password, and click Save.
- Click the Groups tab, select the Administrators group, and click Membership to add the new user to the group.
- On the View Members page, select the user that you created, click Add Member, click Save, and click Cancel to return to the previous page.
3.15.4 - Remotely Upgrade a Single Photon OS Machine With Lightwave Client and Photon Management Daemon Installed
After you have a configured the Photon Management Daemon on a machine, you can remotely upgrade any installed package on that machine. You can use the root user credentials.
Upgrade process uses pmd-cli that is supported from both Lightwave and Photon Management Daemon. You can initiate the upgrade process from any machine that has Photon Management Daemon CLI installed.
Prerequisites
- Have an installed Lightwave server with configured domain controller on it.
- Have an installed Lightwave client that is joined to the domain.
- Have an installed Photon Management Daemon on the client.
- Have in installed Photon Management Daemon CLI (pmd-cli) on a machine from which you perform the updates.
Procedure
To initiate remote upgrade, log in to a machine that has Photon Management Daemon CLI installed over SSH.
Identify packages that can be upgraded on the client machine.
2. List the available updates for the machine.
`# pmd-cli --server-name <machine-IP-address> --user root pkg list updates`
Verify the currently installed version of a package, for example sed.
# # pmd-cli –server-name –user root pkg installed sed`
The installed version number shows as earlier than the one listed under the available updates.
Initiate the upgrade, in this example of the sed package, enter password, and wait for the command to complete.
# pmd-cli --server-name <machine-IP-address> --user root pkg update sed
(Optional) Verify that the client machine package was upgraded successfully.
Log in to the machine that was upgraded over SSH.
List the installed version of the sed package.
# pmd-cli --server-name <machine-IP-address> --user root pkg installed sed
3.15.5 - Remotely Upgrade Multiple Photon OS Machines With Lightwave Client and Photon Management Daemon Installed
After you have a configured the Photon Management Daemon (PMD) on multiple machines, you can remotely upgrade any installed package on these machines.
Upgrade process uses copenapi_cli that is supported from both Lightwave and Photon Management Daemon. You can initiate the upgrade process from any machine that has Photon Management Daemon installed.
Prerequisites
- Have an installed Lightwave server with configured domain controller on it.
- Have installed Lightwave clients that are joined to the domain.
- Have installed Photon Management Daemon on the clients.
Procedure
To initiate remote upgrade, log in to a Photon OS machine over SSH to install the Photon Management Daemon CLI.
# tdnf install pmd-cli
Edit the copenapi_cli spec files so that you can specify the machines you want to upgrade and credentials to be used.
Edit the .netrc file to specify machines to be upgraded and credentials for the PMD service.
# vi ~/.netrc
In the file, enter the IP addresses for the machines and administrative credentials, save and close the file.
# machine <IP-address> login <pmd-administrative-user> password <pmd-administrative user-password>
(Optional) Get the location of the restapispec.json file.
# cat ~/.copenapi
This command returns apispec=/root/restapispec.json as path for the spec file.
Edit the restapispec.json file to enter the IP address of the machine to be upgraded.
# vi /root/restapispec.json
Change the host value to the IP address or the hostname of the machine, leave the port number, and save and close the file.
"host":"<ip-address>:2081"
Initiate the upgrade, in this example of the sed package and wait for the command to complete.
Specify -k to force blind trust of certificates and -n to use the credentials from the .netrc file.
# copenapi_cli pkg update --packages sed -kn
(Optional) Verify that the package was upgraded successfully.
Log in to the machine that was upgraded over SSH.
List the installed version of the sed package.
# tdnf list installed sed
3.16 - Photon Management Daemon
The Photon Management Daemon (PMD) that ships with Photon OS 3.0 provides the remote management of a Photon instance via several APIs: a command line client (pmd-cli), a REST API, and a Python API. The PMD provides the ability to manage network interfaces, packages, firewalls, users, and user groups.
3.16.1 - Installing the pmd Package
The pmd package is included with your Photon OS 3.0 distribution. To make sure that you have the latest version, you can run:
# tdnf install pmd
# systemctl start pmd
3.16.2 - Available APIs
Photon OS includes the following APIs:
- PMD Rest API
- PMD Python API
- PMD C API
PMD REST API
The PMD REST API is an openapi 2.0 specification. Once the pmd package is installed, you can use a Swagger UI tool to browse the REST API specifications (/etc/pmd/restapispec.json).
You can also browse it using the copenapi_cli tool that comes with the pmd package:
# copenapi_cli --apispec /etc/pmd/restapispec.json
For more information about the copenapi_cli tool, refer to github.com/vmware/copenapi.
PMD Python API
Python3 is included with your Photon OS 3.0 distribution. PMD Python interfaces are available for python3 (pmd-python3) and python2 (pmd-python2). You can use tdnf to ensure that the latest version is installed:
# tdnf install pmd-python3
# systemctl start pmd
To navigate the help documentation for the pmd Python packages:
# python3
>>> import pmd
>>> net = pmd.server().net
>>> help(pmd)
To show help text for individual interfaces:
>>> help(pmd.server().net)
>>> help(pmd.server().pkg)
>>> help(pmd.server().firewall)
>>> help(pmd.server().user)
For details about the network commands, see also the Network Configuration Manager - Python API.
PMD C API
PMD C APIs are defined in the header files (pmd_fwmgmt.h, pmd_netmgr.h, pmd_pkgmgmt.h, pmd_usermgmt.h) that are stored in the following location:
[https://github.com/vmware/pmd/tree/master/include](https://github.com/vmware/pmd/tree/master/include)
For details about the network commands, see also the Network Configuration Manager - C API.
4 - Administration Guide
The Photon OS Administration Guide describes the fundamentals of administering Photon OS.
The Administration Guide covers the basics of managing packages, controlling services with systemd, setting up networking, initializing Photon OS with cloud-init, running Docker containers, and working with other technologies, such as Kubernetes.
Product version: 3.0
This documentation applies to all 3.0.x releases.
Intended Audiences
This information is intended for Photon OS administrators who install and set up Photon OS.
4.1 - Photon OS Packages
The design of Photon OS simplifies life-cycle management and improves the security of packages. Photon reduces the burden and complexity of managing clusters of Linux machines by providing curated package repositories and by securing packages with GPG signatures.
Photon OS is available in a variety of pre-built packages in binary formats.
4.1.1 - Examining the Packages in the SPECS Directory on Github
The SPECS directory of the GitHub website for Photon OS contains all the packages that can appear in Photon OS repositories. The following is the path to the SPECS directory :
https://github.com/vmware/photon/tree/master/SPECS
To see the version of a package, in the SPECS directory, click the name of the subdirectory of the package that you want to examine, and then click the .spec filename in the subdirectory.
For example, the version of OpenJDK, which contains the openjre package that installs the Java class library and the javac Java compiler appears as follows:
%define _use_internal_dependency_generator 0
Summary:	OpenJDK
Name:		openjdk
Version:	1.8.0.72
Release:	1%{?dist}
License:	GNU GPL
URL:		https://openjdk.java.net
Group:		Development/Tools
Vendor:		VMware, Inc.
Distribution:   Photon
AutoReqProv: 	no
Source0:	http://anduin.linuxfromscratch.org/files/BLFS/OpenJDK-%{version}/OpenJDK-%{version}-x86_64-bin.tar.xz
%define sha1 OpenJDK=0c705d7b13f4e22611d2da654209f469a6297f26
%description
The OpenJDK package installs java class library and javac java compiler.

%package	-n openjre
Summary:	Jave runtime environment
AutoReqProv: 	no
%description	-n openjre
It contains the libraries files for Java runtime environment
#%global __requires_exclude ^libgif.*$
#%filter_from_requires ^libgif.*$...
4.1.2 - Looking at the Differences Between the Minimal and the Full Version
The minimal version of Photon OS contains around 50 packages. As it is installed, the number of packages increases to nearly 100 to fulfill dependencies. The full version of Photon OS adds several hundred packages to those in the minimal version to deliver a more fully featured operating system.
You can view a list of the packages that appear in the minimal version by examining the following file:
https://github.com/vmware/photon/blob/master/common/data/packages_minimal.json
You can view a list of the packages that appear in the full version by examining the following file:
https://github.com/vmware/photon/blob/master/common/data/packages_full.json
If the minimal or the full version of Photon OS does not contain a package that you want, you can install it with tdnf, which appears in both the minimal and full versions of Photon OS by default. In the full version of Photon OS, you can also install packages by using yum.
One notable difference between the two versions of Photon OS pertains to OpenJDK, the package that contains not only the Java runtime environment (openjre) but also the Java compiler (javac). The OpenJDK package appears in the full but not the minimal version of Photon OS.
To add support for Java programs to the minimal version of Photon OS, install the Java packages and their dependencies by using the following command:
tdnf install openjdk
Installing:
openjre 	x86_64    1.8.0.92-1.ph1    95.09 M
openjdk 	x86_64    1.8.0.92-1.ph1    37.63 M
NOTE: openjdk and openjre are available as openjdk8 and openjre8 in Photon OS 3.0
For more information about tdnf, see Tiny DNF for Package Management
4.1.3 - The Root Account and the 'sudo' and 'su' Commands
The Photon OS Administration Guide assumes that you are logged in to Photon OS with the root account and running commands as root.
On the minimal version, you must install sudo with tdnf if you want to use it. As an alternative to installing sudo, to run commands that require root privileges you can switch users as needed with the su command.
4.1.4 - Examining Signed Packages
Photon OS signs its packages and repositories with GPG signatures to enhance security. The GPG signature uses keyed-hash authentication method codes, typically the SHA1 algorithm and an RSA Data Security, Inc. MD5 Message Digest Algorithm, to simultaneously verify the integrity of a package. A keyed-hash message authentication code combines a cryptographic hash function with a secret cryptographic key.
In Photon OS, GPG signature verification automatically takes place when you install or update a package with the default package manager, tdnf. The default setting in the tdnf configuration file for checking the GPG is set to 1 for true:
cat /etc/tdnf/tdnf.conf
[main]
gpgcheck=1
installonly_limit=3
clean_requirements_on_remove=true
repodir=/etc/yum.repos.d
cachedir=/var/cache/tdnf
On Photon OS, you can view the key with which VMware signs packages by running the following command:
rpm -qa gpg-pubkey*
The command returns the GPG public key:
gpg-pubkey-66fd4949-4803fe57
Once you have the name of the key, you can view information about the key with the rpm -qi command, as the following abridged output demonstrates:
rpm -qi gpg-pubkey-66fd4949-4803fe57
Name        : gpg-pubkey
Version     : 66fd4949
Release     : 4803fe57
Architecture: (none)
Install Date: Thu Jun 16 11:51:39 2016
Group       : Public Keys
Size        : 0
License     : pubkey
Signature   : (none)
Source RPM  : (none)
Build Date  : Tue Apr 15 01:01:11 2008
Build Host  : localhost
Relocations : (not relocatable)
Packager    : VMware, Inc. -- Linux Packaging Key -- <linux-packages@vmware.com>
Summary     : gpg(VMware, Inc. -- Linux Packaging Key -- <linux-packages@vmware.                        com>)
Description :
-----BEGIN PGP PUBLIC KEY BLOCK-----
Version: rpm-4.11.2 (NSS-3)
mI0ESAP+VwEEAMZylR8dOijUPNn3He3GdgM/kOXEhn3uQl+sRMNJUDm1qebi2D5b ...
If you have one of the RPMs from Photon OS on another Linux system, such as Ubuntu, you can use SHA and the RSA Data Security, Inc. MD5 Message Digest Algorithm for the package to verify that it has not been tampered with:
rpm -K /home/steve/workspace/photon/stage/SRPMS/kubernetes-1.1.8-4.ph1.src.rpm
/home/steve/workspace/photon/stage/SRPMS/kubernetes-1.1.8-4.ph1.src.rpm: sha1 md5 OK
You can view the SHA1 digest and the RSA Data Security, Inc. MD5 Message Digest Algorithm by running the following command:
rpm -Kv /home/steve/workspace/photon/stage/SRPMS/kubernetes-1.1.8-4.ph1.src.rpm
/home/steve/workspace/photon/stage/SRPMS/kubernetes-1.1.8-4.ph1.src.rpm:
Header SHA1 digest: OK (89b55443d4c9f67a61ae0c1ec9bf4ece2d6aa32b)
        MD5 digest: OK (51eee659a8730e25fd2a52aff9a6c2c2)
The above examples show that the Kubernetes package has not been tampered with.
4.1.5 - Photon OS Package Repositories
The default installation of Photon OS includes four yum-compatible repositories plus the repository on the Photon OS ISO when it is available in a CD-ROM drive:
ls /etc/yum.repos.d/
lightwave.repo
photon-extras.repo
photon-iso.repo
photon-updates.repo
photon.repo
The Photon ISO repository (photon-iso.repo) contains the installation packages for Photon OS. All the packages that Photon builds and publishes reside in the RPMs directory of the ISO when it is mounted. The RPMs directory contains metadata that lets it act as a yum repository. Mounting the ISO gives you all the packages corresponding to a Photon OS build. If, however, you built Photon OS yourself from the source code, the packages correspond only to your build, though they will typically be the latest. In contrast, the ISO that you obtain from the Bintray web site contains only the packages that are in the ISO at the point of publication. As a result, the packages may no longer match those on Bintray, which are updated regularly.
The main Photon OS repository (photon.repo) contains all the packages that are built from the ISO or from another source. This repository points to a static batch of packages and spec files at the point of a release.
The updates repository (photon-updates.repo) is irrelevant to a major release until after the release is installed. Thereafter, the updates repository holds the updated packages for that release. The repository points to updates for the installed version, such as a version of Kubernetes that supersedes the version installed during the major release.
The Photon extras repository (photon-extras.repo) holds Likewise Open, an open source authentication engine, and other VMware software that you can add to Photon OS for free. Photon OS supports but does not build the packages in the extras repository.
Similarly, the Lightwave repository (lightwave.repo) contains the packages that make up the VMware Lightwave security suite for cloud applications, including tools for identity management, access control, and certificate management.
4.1.6 - Building a Package from a Source RPM
This section describes how to install and build a package on the full version of Photon OS from the package’s source RPM. Obtain the source RPMs that Photon OS uses from the Packages location, https://packages.vmware.com/photon
Prerequisites
To build a package from its source RPM, or SRPM, Photon OS requires the following packages:
rpmbuild. This package is installed by default on the full version of Photon OS, so you should not have to install it.
gcc. This package is also installed by default on the full version of Photon OS, so you should not have to install it.
make, Cmake, automake, or another make package, depending on the package you are trying to install and build from its source RPM. Cmake is installed by default on Photon OS.
You can install other make packages by using tdnf or yum.
A local unprivileged user account other than the root account. You should build RPMs as an unprivileged user. Do not build a package as root because building an RPM with the root account might damage your system.
Take a snapshot of your virtual machine before building the package if you are building a package on a virtual machine running Photon OS in VMware vSphere, VMware Workstation, or VMware Fusion.
Procedure
VMware recommends that you install and build packages from their source RPMs on the full version of Photon OS. Do not use the minimal version to work with source RPMs.
Perfrom the following steps to install and build an example package- sed from its source RPM on Photon OS with an unprivileged account.
Check whether rpmbuild is installed by running the following command.
rpmbuild --version
If it is not installed, install it by running the following command as root.
tdnf install rpm-build
Create the directories for building RPMs under your local user account home directory and not under root.
mkdir -p ~/rpmbuild/{BUILD,RPMS,SOURCES,SPECS,SRPMS}
Create a .rpmmacros file under your home directory and override the default location of the RPM building tree with the new one. This command overwrites an existing .rpmmacros file. Before running the following command, make sure you do not already have a .rpmmacros file. If a .rpmmacros file exists, back it up under a new name in case you want to restore it later.
echo '%_topdir %(echo $HOME)/rpmbuild' > ~/.rpmmacros
Place the source RPM file that you want to install and build in the /tmp directory.
Install the source file, run the following command with your unprivileged user account, replacing the sed example source RPM with the name of the one that you want to install.
rpm -i /tmp/sed-4.2.2-2.ph1.src.rpm
The above command unpacks the source RPM and places its .spec file in your ~/rpmbuild/SPECS directory. In the next step, the rpmbuild tool uses the .spec file to build the RPM.
Build the RPM, run the following commands with your unprivileged user account. Replace the sed.spec example file with the name of the .spec file that you want to build.
cd ~/rpmbuild/SPECS
rpmbuild -ba sed.spec
If successful, the rpmbuild -ba command builds the RPM and generates an RPM package file in your ~/rpmbuild/RPMS/x86_64 directory. For example:
ls RPMS/x86_64/
sed-4.2.2-2.x86_64.rpm  sed-debuginfo-4.2.2-2.x86_64.rpm  sed-lang-4.2.2-2.x86_64.rpm
The rpmbuild command also generates a new SRPM file and saves it in your ~/rpmbuild/SRPMS directory. For example:
ls SRPMS/
sed-4.2.2-2.src.rpm
If the rpmbuild command is unsuccessful with an error that it cannot find a library, you must install the RPMs for the library that your source RPM depends on before you can successfully build your source RPM. Iterate through installing the libraries that your source RPM relies on until you can successfully build it.
To install the RPM, run the following command with your unprivileged user account.
rpm -i RPMS/x86_64/sed-4.2.2-2.x86_64.rpm
4.1.7 - Compiling C++ Code on the Minimal Version of Photon OS
As a minimalist Linux run-time environment, the minimal version of Photon OS lacks the packages that you need to compile the code for a C++ program. For example, without the requisite packages, trying to compile the file containing the following code with the gcc command will generate errors:
#include <stdio.h>
int main()
{
return 0;
}
The errors appear as follows:
gcc test.c
-bash: gcc: command not found
tdnf install gcc -y
gcc test.c
test.c:1:19: fatal error: stdio.h: No such file or directory
compilation terminated.
To enable the minimal version of Photon OS to preprocess, compile, assemble, and link C++ code, you must install the following packages as root with tdnf:
To install the packages, use the following the tdnf command:
tdnf install gcc glibc-devel binutils
4.2 - Package Management in Photon OS with `tdnf`
Photon OS manages packages with an open source, yum-compatible package manager called tdnf, for Tiny Dandified Yum. Tdnf keeps the operating system as small as possible while preserving yum’s robust package-management capabilities.
4.2.1 - Introduction to 'tdnf'
On Photon OS, tdnf is the default package manager for installing new packages. It is a C implementation of the DNF package manager without Python dependencies. DNF is the next upcoming major version of yum.
Tdnf appears in the minimal and full versions of Photon OS. Tdnf reads yum repositories and works like yum. The full version of Photon OS also includes yum, and you can install packages by using yum if you want.
In the minimal version of Photon OS, you can manage packages by using yum, but you must install it first by running the following tdnf command as root:
tdnf install yum
Tdnf implements a subset of the dnf commands as listed in the dnf guide.
4.2.2 - Configuration Files and Repositories
The main configuration files reside in /etc/tdnf/tdnf.conf. The configuration file appears as follows:
cat /etc/tdnf/tdnf.conf
[main]
gpgcheck=1
installonly_limit=3
clean_requirements_on_remove=true
repodir=/etc/yum.repos.d
cachedir=/var/cache/tdnf
The cache files for data and metadata reside in /var/cache/tdnf.
The following repositories appear in /etc/yum.repos.d/ with .repo file extensions:
ls /etc/yum.repos.d/
lightwave.repo
photon-extras.repo
photon-iso.repo
photon-updates.repo
photon.repo
You can list the the repositories by using the tdnf repolist command. Tdnf filters the results with enabled, disabled, and all. Running the command without specifying an argument returns the enabled repositories:
tdnf repolist
repo id             repo name                               status
photon-updates      VMware Photon Linux 2.0(x86_64)Updates  enabled
photon-extras       VMware Photon Extras 2.0(x86_64)        enabled
photon              VMware Photon Linux 2.0(x86_64)         enabled
The photon-iso.repo, however, does not appear in the list of repositories because it is unavailable on the virtual machine from which these examples are taken. The photon-iso.repo is the default repository and it points to /media/cdrom. The photon-iso.repo appears as follows:
cat /etc/yum.repos.d/photon-iso.repo
[photon-iso]
name=VMWare Photon Linux 2.0(x86_64)
baseurl=file:///mnt/cdrom/RPMS
gpgkey=file:///etc/pki/rpm-gpg/VMWARE-RPM-GPG-KEY
gpgcheck=1
enabled=0
skip_if_unavailable=True
The local cache is populated with data from the repository:
ls -l /var/cache/tdnf/photon
total 8
drwxr-xr-x 2 root root 4096 May 18 22:52 repodata
d-wxr----t 3 root root 4096 May  3 22:51 rpms
You can clear the cache to help troubleshoot a problem, but doing so might slow the performance of tdnf until the cache becomes repopulated with data. To clear the cache, use the following command:
tdnf clean all
Cleaning repos: photon photon-extras photon-updates lightwave
Cleaning up everything
The command purges the repository data from the cache:
ls -l /var/cache/tdnf/photon
total 4
d-wxr----t 3 root root 4096 May  3 22:51 rpms
4.2.3 - Adding a New Repository
On Photon OS, you can add a new repository from which tdnf installs packages. To add a new repository, you create a repository configuration file with a .repo extension and place it in /etc/yum.repos.d. The repository can be on either the Internet or a local server containing your in-house applications.
Be careful if you add a repository that is on the Internet. Installing packages from untrusted or unverified sources might put the security, stability, or compatibility of your system at risk. It might also make your system harder to maintain.
On Photon OS, the existing repositories appear in the /etc/yum.repos.d directory:
ls /etc/yum.repos.d/
lightwave.repo
photon-extras.repo
photon-iso.repo
photon-updates.repo
photon.repo
To view the the format and information that a new repository configuration file should contain, see one of the .repo files. The following is an example:
cat /etc/yum.repos.d/lightwave.repo
[lightwave]
name=VMware Lightwave 1.0(x86_64)
baseurl=https://packages.vmware.com/photon/1.0/lightwave
gpgkey=file:///etc/pki/rpm-gpg/VMWARE-RPM-GPG-KEY
gpgcheck=1
enabled=1
skip_if_unavailable=True
The minimal information needed to establish a repository is an ID and human-readable name of the repository and its base URL. The ID, which appears in square brackets, must be one word that is unique amoung the system’s repositories; in the example above, it is [lightwave].
The baseurl is a URL for the repository’s repodata directory. For a repository on a local server that can be accessed directly or mounted as a file system, the base URL can be a file referenced by file://. Example:
baseurl=file:///server/repo/
The gpgcheck setting specifies whether to check the GPG signature. The gpgkey setting furnishes the URL for the repository’s ASCII-armored GPG key file. Tdnf uses the GPG key to verify a package if its key has not been imported into the RPM database.
The enabled setting tells tdnf whether to poll the repository. If enabled is set to 1, tdnf polls it; if it is set to 0, tdnf ignores it.
The skip_if_unavailable setting instructs tdnf to continue running if the repository goes offline.
You can use the skip metadata download settings to skip the download of metadata files for repositories with a lot of packages. When you skip the download of the metadata files, it improves the download time of the packages and the processing time of refreshing the cache.
The following list describes the skip metadata settings:
skip_md_filelists: The skip_md_filelists=1 setting deactivates the download of the complete list of files in all packages. The default value is 0.
skip_md_updateinfo: The skip_md_updateinfo=1 setting deactivates the download of the update info data. The setting improves the download and processing time but affects the output of the updateinfo command. The default value is 0.
Other options and variables can appear in the repository file. The variables that are used with some of the options can reduce future changes to the repository configuration files. There are variables to replace the value of the version of the package and to replace the base architecture. For more information, see the man page for yum.conf on the full version of Photon OS: man yum.conf
The following is an example of how to add a new repository for a local server that tdnf polls for packages:
cat > /etc/yum.repos.d/apps.repo << "EOF"
[localapps]
name=Local In-House Applications(x86_64)
baseurl=file:///appserver/apps
enabled=1
skip_if_unavailable=True
EOF
Because this new repository resides on a local server, make sure the Photon OS machine can connect to it by mounting it.
After establishing a new repository, you must run the following command to update the cached binary metadata for the repositories that tdnf polls:
tdnf makecache
Refreshing metadata for: 'VMware Lightwave 1.0(x86_64)'
Refreshing metadata for: 'VMware Photon Linux 1.0(x86_64)Updates'
Refreshing metadata for: 'VMware Photon Extras 1.0(x86_64)'
Refreshing metadata for: 'Local In-House Applications(x86_64)'
Refreshing metadata for: 'VMware Photon Linux 1.0(x86_64)'
Metadata cache created.
4.2.4 - Configure a Repository
Photon OS comes with a preconfigured repository called photon-iso that resides in \etc\yum.repos.d. If you receive an access error message when working with the photon-iso repository, it is probably because you do not have the Photon OS ISO mounted. Mount the ISO and the run the following command to update the metadata for all known repositories, including photon-iso:
mount /dev/cdrom /media/cdrom
tdnf makecache

Refreshing metadata for: 'VMware Lightwave 1.0(x86_64)'
Refreshing metadata for: 'VMware Photon Linux 1.0(x86_64)Updates'
Refreshing metadata for: 'VMware Photon Extras 1.0(x86_64)'
Refreshing metadata for: 'VMware Photon Linux 1.0(x86_64)'
Metadata cache created.
4.2.5 - Adding the Dev Repository to Get New Packages from the GitHub Dev Branch
To try out new packages or the latest versions of existing packages as they are merged into the dev branch of the Photon OS GitHub site, add the dev repository to your repository list.
Perform th following steps:
- On your Photon OS machine, run the following command as root to create a repository configuration file named
photon-dev.repo, place it in /etc/yum.repos.d, and concatenate the repository information into the file.
cat > /etc/yum.repos.d/photon-dev.repo << "EOF"
    [photon-dev]
    name=VMware Photon Linux Dev(x86_64)
    baseurl=https://dl.bintray.com/vmware/photon_dev_$basearch
    gpgkey=file:///etc/pki/rpm-gpg/VMWARE-RPM-GPG-KEY
    gpgcheck=1
    enabled=1
    skip_if_unavailable=True
    EOF
- After establishing a new repository, run the following command to update the cached binary metadata for the repositories that
tdnf polls:
tdnf makecache
4.2.6 - Standard Syntax for tdnf Commands
The standard syntax for tdnf commands is the same as that for DNF and is as follows:
tdnf [options] <command> [<arguments>...]
You can view help information by using the following commands:
tdnf --help
tdnf -h
4.2.6.1 - tndf Commands
check: Checks for problems in installed and available packages for all enabled repositories. The command has no arguments. You can use --enablerepo and --disablerepo to control the repos used. Supported in Photon OS 2.0 (only).
check-local: This command resolves dependencies by using the local RPMs to help check RPMs for quality assurance before publishing them. To check RPMs with this command, you must create a local directory and place your RPMs in it. The command, which includes no options, takes the path to the local directory containing the RPMs as its argument. The command does not recursively parse directories. It checks the RPMs only in the directory that you specify. For example, after creating a directory named /tmp/myrpms and placing your RPMs in it, you can run the following command to check them:
tdnf check-local /tmp/myrpms
Checking all packages from: /tmp/myrpms
Found 10 packages
Check completed without issues
check-update: This command checks for updates to packages. It takes no arguments. The tdnf list updates command performs the same function. Here is an example of the check update command:
tdnf check-update
rpm-devel.x86_64 	4.11.2-8.ph1 	photon
yum.noarch      	3.4.3-3.ph1 	photon
clean: This command cleans up temporary files, data, and metadata. It takes the argument all. Example:
tdnf clean all
Cleaning repos: photon photon-extras photon-updates lightwave
Cleaning up everything
distro-sync: This command synchronizes the machine’s RPMs with the latest version of all the packages in the repository. The following is an abridged example:
tdnf distro-sync

Upgrading:
zookeeper                             x86_64        3.4.8-2.ph1               3.38 M
yum                                   noarch        3.4.3-3.ph1               4.18 M

Total installed size: 113.01 M

Reinstalling:
zlib-devel                            x86_64        1.2.8-2.ph1             244.25 k
zlib                                  x86_64        1.2.8-2.ph1             103.93 k
yum-metadata-parser                   x86_64        1.1.4-1.ph1              57.10 k

Total installed size: 1.75 G

Obsoleting:
tftp                                  x86_64        5.2-3.ph1                32.99 k

Total installed size: 32.99 k
Is this ok [y/N]:
downgrade: This command downgrades the package that you specify as an argument to the next lower package version. The following is an example:
tdnf downgrade boost
Downgrading:
boost                                 x86_64        1.56.0-2.ph1              8.20 M
Total installed size: 8.20 M
Is this ok [y/N]:y
Downloading:
boost                                  2591470    100%
Testing transaction
Running transaction
Complete!
To downgrade to a version lower than the next one, you must specify it by name, epoch, version, and release, all properly hyphenated. The following is an example:
tdnf downgrade boost-1.56.0-2.ph1
erase: This command removes the package that you specify as an argument.
To remove a package, run the following command:
tdnf erase pkgname
The following is an example:
tdnf erase vim
Removing:
vim                                   x86_64        7.4-4.ph1                 1.94 M
Total installed size: 1.94 M
Is this ok [y/N]:
You can also erase multiple packages:
tdnf erase docker cloud-init
info: This command displays information about packages. It can take the name of a package. Or it can take one of the following arguments: all, available, installed, extras, obsoletes, recent, upgrades. The following are examples:
tdnf info ruby
tdnf info obsoletes
tdnf info upgrades
install: This command takes the name of a package as its argument. It then installs the package and its dependencies.
To install a package, run the following command:
tdnf install pkgname
The following are examples:
tdnf install kubernetes
You can also install multiple packages:
tdnf install python-curses lsof audit gettext chkconfig ntsysv bindutils
	 wget gawk irqbalance lvm2 cifs-utils c-ares distrib-compat
list: This command lists the packages of the package that you specify as the argument. The command can take one of the following arguments: all, available, installed, extras, obsoletes, recent, upgrades.
tdnf list updates
The list of packages might be long. To more easily view it, you can concatenate it into a text file, and then open the text file in a text editor:
tdnf list all > pkgs.txt
vi pkgs.txt
To list enabled repositories, run the following command:
tdnf repolist
makecache: This command updates the cached binary metadata for all known repositories. The following is an example:
tdnf makecache
Refreshing metadata for: 'VMware Lightwave 1.0(x86_64)'
Refreshing metadata for: 'VMware Photon Linux 1.0(x86_64)Updates'
Refreshing metadata for: 'VMware Photon Extras 1.0(x86_64)'
Refreshing metadata for: 'VMware Photon Linux 1.0(x86_64)'
Metadata cache created.
provides: This command finds the packages that provide the package that you supply as an argument. The following is an example:
tdnf provides docker
docker-1.11.0-1.ph1.x86_64 : Docker
Repo     : photon
docker-1.11.0-1.ph1.x86_64 : Docker
Repo     : @System
reinstall: This command reinstalls the packages that you specify. If some packages are unavailable or not installed, the command fails. The following is an example:
tdnf reinstall docker kubernetes

Reinstalling:
kubernetes                            x86_64        1.1.8-1.ph1             152.95 M
docker                                x86_64        1.11.0-1.ph1             57.20 M

Total installed size: 210.15 M
remove: This command removes a package. When removing a package, tdnf by default also removes dependencies that are no longer used if they were was installed by tdnf as a dependency without being explicitly requested by a user. You can modify the dependency removal by changing the clean_requirements_on_remove option in /etc/tdnf/tdnf.conf to false.
tdnf remove packagename
search: This command searches for the attributes of packages. The argument can be the names of packages. The following is an example:
tdnf search docker kubernetes
docker : Docker
docker : Docker
docker-debuginfo : Debug information for package docker
docker : Docker
kubernetes : Kubernetes cluster management
kubernetes : Kubernetes cluster management
kubernetes-debuginfo : Debug information for package kubernetes
kubernetes : Kubernetes cluster management
The argument of the search command can also be a keyword or a combination of keywords and packages:
tdnf search terminal bash
rubygem-terminal-table : Simple, feature rich ascii table generation library
ncurses : Libraries for terminal handling of character screens
mingetty : A minimal getty program for virtual terminals
ncurses : Libraries for terminal handling of character screens
ncurses : Libraries for terminal handling of character screens
bash : Bourne-Again SHell
bash-lang : Additional language files for bash
bash-lang : Additional language files for bash
bash : Bourne-Again SHell
bash-debuginfo : Debug information for package bash
bash : Bourne-Again SHell
bash-lang : Additional language files for bash
upgrade: This command upgrades the package or packages that you specify to an available higher version that tdnf can resolve. If the package is already the latest version, the command returns Nothing to do. The following is an example:
tdnf upgrade boost

Upgrading:
boost                                 x86_64        1.60.0-1.ph1              8.11 M

Total installed size: 8.11 M
Is this ok [y/N]:y

Downloading:
boost                                  2785950    100%
Testing transaction
Running transaction

Complete!
You can also run the upgrade command with the refresh option to update the cached metadata with the latest information from the repositories. The following example refreshes the metadata and then checks for a new version of tdnf but does not find one, so tdnf takes no action:
tdnf upgrade tdnf --refresh
Refreshing metadata for: 'VMware Lightwave 1.0(x86_64)'
Refreshing metadata for: 'VMware Photon Linux 1.0(x86_64)Updates'
Refreshing metadata for: 'VMware Photon Extras 1.0(x86_64)'
Refreshing metadata for: 'VMware Photon Linux 1.0(x86_64)'
Nothing to do.
upgrade-to: This command upgrades to the version of the package that you specify. EThe following is an example:
tdnf upgrade-to ruby2.3
The commands and options of tdnf are a subset of those of dnf. For more help with tdnf commands, see the DNF documentation.
4.2.6.2 - tndf Command Options
You can add the following options to tdnf commands. If the option to override a configuration is unavailable in a command, you can add it to the /etc/tdnf/tdnf.conf configuration file.
OPTION                     DESCRIPTION
--allowerasing             Allow erasing of installed packages to resolve dependencies
--assumeno                 Answer no for all questions
--best                     Try the best available package versions in transactions
--debugsolver              Dump data aiding in dependency solver debugging info.
--disablerepo=<repoid>     Disable specific repositories by an id or a glob.
--enablerepo=<repoid>      Enable specific repositories
-h, --help                 Display help
--refresh                  Set metadata as expired before running command
--nogpgcheck               Skip gpg check on packages
--rpmverbosity=<debug level name>
                           Debug level for rpm
--version                  Print version and exit
-y, --assumeyes            Answer yes to all questions
-q, --quiet                Quiet operation
The following is an example that adds the short form of the assumeyes option to the install command:
tdnf -y install gcc
Upgrading:
gcc 	x86_64	5.3.0-1.ph1 	91.35 M
4.3 - Managing Services with `systemd`
Photon OS manages services with systemd. By using systemd, Photon OS adopts a contemporary Linux standard to bootstrap the user space and concurrently start services. This is an architecture that differs from traditional Linux systems such as SUSE Linux Enterprise Server.
A traditional Linux system contains an initialization system called SysVinit. With SLES 11, for instance, the SysVinit-style init programs control how the system starts up and shuts down. Init implements system runlevels. A SysVinit runlevel defines a state in which a process or service runs.
In contrast to a SysVinit system, systemd defines no such runlevels. Instead, systemd uses a dependency tree of targets to determine which services to start when. Combined with the declarative nature of systemd commands, systemd targets reduce the amount of code needed to run a command, leaving you with code that is easier to maintain and probably faster to execute. For an overview of systemd, see systemd System and Service Manager and the man page for systemd.
On Photon OS, you must manage services with systemd and systemctl, its command-line utility for inspecting and controlling the system, and not the deprecated commands of init.d.
For more information, see the index of all the systemd man pages, including systemctl, at
https://www.freedesktop.org/software/systemd/man/
4.3.1 - Viewing Services
To view a description of all the loaded and active units, run the systemctl command without any options or arguments:
systemctl
To see all the loaded, active, and inactive units and their description, run the following command:
systemctl --all
To see all the unit files and their current status but no description, run thie following command:
systemctl list-unit-files
The grep command filters the services by a search term, a helpful tactic to recall the exact name of a unit file without looking through a long list of names. Example:
systemctl list-unit-files | grep network
org.freedesktop.network1.busname           static
dbus-org.freedesktop.network1.service      enabled
systemd-networkd-wait-online.service       enabled
systemd-networkd.service                   enabled
systemd-networkd.socket                    enabled
network-online.target                      static
network-pre.target                         static
network.target                             static
4.3.2 - Controlling Services
To control services on Photon OS, use systemctl command.
For example, instead of running the /etc/init.d/ssh script to stop and start the OpenSSH server on a init.d-based Linux system, run the following systemctl commands on Photon OS:
systemctl stop sshd
systemctl start sshd
The systemctl tool includes a range of commands and options for inspecting and controlling the state of systemd and the service manager. For more information, see the systemctl man page.
4.3.3 - Creating a Startup Service
Use systemd to create a startup service.
The following example shows you how to create a systemd startup service that changes the maximum transmission unit (MTU) of the default Ethernet connection, eth0.
- Concatenate the following block of code into a file:
cat << EOF >> /lib/systemd/system/eth0.service
	[Unit]
	Description=Network interface initialization
	After=local-fs.target network-online.target network.target
	Wants=local-fs.target network-online.target network.target

	[Service]
	ExecStart=/usr/sbin/ifconfig eth0 mtu 1460 up
	Type=oneshot

	[Install]
	WantedBy=multi-user.target
	EOF
- Set the service to auto-start when the system boots:
cd /lib/systemd/system/multi-user.target.wants/
	ln -s ../eth0.service eth0.service
4.3.4 - Disabling the Photon OS httpd.service
If your application or appliance includes its own HTTP server, you must turn off and disable the HTTP server that comes with Photon OS so that it does not conflict with your own HTTP server.
To stop it and disable it, run the following commands as root:
systemctl stop httpd.service
systemctl disable httpd.service
4.3.5 - Installing Sendmail
Before you install Sendmail, you should set the fully qualified domain name (FQDN) of your Photon OS machine.
By default, Sendmail is not installed with either the minimal or full version of Photon OS. When you install Sendmail, it provides Photon OS with a systemd service file that typically enables Sendmail. If the service is not enabled after installation, you must enable it.
Sendmail resides in the Photon extras repository. You can install it with tdnf after setting the machine’s FQDN.
Procedure
- Check whether the FQDN of the machine is set by running the
hostnamectl status command:
hostnamectl status
       Static hostname: photon-d9ee400e194e
             Icon name: computer-vm
               Chassis: vm
            Machine ID: a53b414142f944319bd0c8df6d811f36
               Boot ID: 1f75baca8cc249f79c3794978bd82977
        Virtualization: vmware
      Operating System: VMware Photon/Linux
                Kernel: Linux 4.4.8
          Architecture: x86-64
Note
In the results above, the FQDN is not set. The Photon OS machine only has a short name. If the FQDN were set, the hostname would be in its full form, typically with a domain name.If the machine does not have an FQDN, set one by running hostnamectl set-hostname new-name, replacing new-name with the FQDN that you want. For example:
hostnamectl set-hostname photon-d9ee400e194e.corp.example.com
The hostnamectl status command now shows that the machine has an FQDN:
root@photon-d9ee400e194e [ ~ ]# hostnamectl status
    Static hostname: photon-d9ee400e194e.corp.example.com
            Icon name: computer-vm
            Chassis: vm
            Machine ID: a53b414142f944319bd0c8df6d811f36
            Boot ID: 1f75baca8cc249f79c3794978bd82977
        Virtualization: vmware
    Operating System: VMware Photon/Linux
                Kernel: Linux 4.4.8
        Architecture: x86-64
Install Sendmail:
Verify if Sendmail is enabled:
systemctl status sendmail
Enable Sendmail if it is disabled and then start it:
systemctl enable sendmail
systemctl start sendmail
4.3.6 - Auditing System Events with auditd
To manage security on Photon OS, the Linux auditing service auditd is enabled and active by default on the full version of Photon OS.
The following command shows the security status:
systemctl status auditd
	* auditd.service - Security Auditing Service
	   Loaded: loaded (/usr/lib/systemd/system/auditd.service; enabled; vendor preset: enabled)
	   Active: active (running) since Fri 2016-04-29 15:08:50 UTC; 1 months 9 days ago
	 Main PID: 250 (auditd)
	   CGroup: /system.slice/auditd.service
	           `-250 /sbin/auditd -n
To help improve security, the auditd service can monitor file changes, system calls, executed commands, authentication events, and network access. After you implement an audit rule to monitor an event, the aureport tool generates reports to display information about the events.
You can use the auditctl utility to set a rule that monitors the sudoers file for changes:
auditctl -w /etc/sudoers -p wa -k sudoers_changes
This rule specifies that the auditd service must watch (-w) the /etc/sudoers file to log permissions changes (-p) to the write access (w) or attributes (a) of the file and to identify them in logs as sudoers_changes. The auditing logs appear in /var/log/audit/audit.log. You can list the auditing rules as follows:
auditctl -l
-w /etc/sudoers -p wa -k sudoers_changes
For more information on the Linux Audit Daemon, see the auditd man page:
man auditd
For more information on setting auditing rules and options, see the auditctl man page:
man auditctl
For more information on viewing reports on audited events, see the aureport man page:
man aureport
4.3.7 - Analyzing systemd Logs with journalctl
The journalctl tool queries the contents of the systemd journal.
The following command displays the messages that systemd generated the last time the machine started:
journalctl -b
The following command reveals the messages for the systemd service unit specified by the -u option:
journalctl -u auditd
In the above example, auditd is the system service unit.
For more information, see the journalctl man page by running the following command on Photon OS:
man journalctl
4.3.8 - Migrating Scripts to systemd
Although systemd maintains compatibility with init.d scripts, as a best practice, you must adapt the scripts that you want to run on Photon OS to systemd to avoid potential problems.
Such a conversion standardizes the scripts, reduces the footprint of your code, makes the scripts easier to read and maintain, and improves their robustness on a systemd system.
4.4 - Configure Wireless Networking
You can configure wireless networking in Photon OS. Connect to an open network or a WPA2 protected network using wpa_cli and configure systemd-networkd to assign an IP address to the network.
Connect Using wpa_cli
When you connect using wpa_cli, you can scan for available networks and associate the network with a network ID.
Perform the following steps:
Ensure that the wpa_supplicant service is running on the WLAN interface:
Systemctl status wpa_supplicant@<wlan-interface>.service
Connect to wpa_cli:
wpa_cli -i wlan0
Scan for available networks:
scan
To see the list of networks, use the following command:
scan_results
Add the network:
add_network
This command returns a network ID.
Associate the network with the network ID.
set_network <network ID> ssid “<ssid-name>”
For a WPA2 network, set the passphrase:
set_network <network ID> psk “<passphrase>”
Enable the network:
enable_network <network ID>
Save the configuration file:
save_config
To exit the wpa_cli, type ‘quit`.
Assign IP Address To Network
Configure systemd-networkd to assign IP address to network. Perform the following steps:
Create a /etc/systemd/network/98-dhcp-wlan.network file with the following contents:
[Match]
Name=wlan*
[Network]
DHCP=yes
IPv6AcceptRA=no
Restart systemd-networkd using:
Systemctl restart systemd-networkd
4.5 - Managing the Network Configuration
The network service, which is enabled by default, starts when the system boots.
4.5.1 - Commands to Manage Network Service
You manage the network service by using systemd commands, such as systemd-networkd, systemd-resolvd, and networkctl.
To check the status of the network service, run the following command:
systemctl status systemd-networkd
Output
* systemd-networkd.service - Network Service
   Loaded: loaded (/usr/lib/systemd/system/systemd-networkd.service; enabled; vendor preset: enabled)
   Active: active (running) since Fri 2016-04-29 15:08:51 UTC; 6 days ago
     Docs: man:systemd-networkd.service(8)
 Main PID: 291 (systemd-network)
   Status: "Processing requests..."
   CGroup: /system.slice/systemd-networkd.service
           `-291 /lib/systemd/systemd-networkd
Because Photon OS relies on systemd to manage services, you must use the systemd suite of commands and not the deprecated init.d commands or other deprecated commands to manage networking.
4.5.2 - Using the Network Configuration Manager
The Network Configuration Manager library that ships with Photon OS 3.0 provides a collection of C, Python, and CLI APIs that simplify common onfiguration tasks for:
- interfaces
- IP addresses (IPv4 and IPv6 addresses)
- routes
- DNS server and domain settings
- DHCP DUID and IAID settings
- NTP server settings
- service management
- object parameters (interfaces and files)
For more information, see:
4.5.3 - Use `ip` and `ss` Commands
Use the ip and ss commands to view a list of network interfaces and information for IP addresses.
Although the ifconfig command and the netstat command work on Photon OS, VMware recommends that you use the ip or ss commands. The ipconfig and netstat commands are deprecated.
For example, to display a list of network interfaces, run the ss command instead of netstat. To display information for IP addresses, run the ip addr command instead of ifconfig -a.
Examples are as follows:
USE THIS IPROUTE COMMAND 	INSTEAD OF THIS NET-TOOL COMMAND
ip addr 					ifconfig -a
ss 							netstat
ip route 					route
ip maddr 					netstat -g
ip link set eth0 up 		ifconfig eth0 up
ip -s neigh					arp -v
ip link set eth0 mtu 9000	ifconfig eth0 mtu 9000
Using the ip route version of a command instead of the net-tools version often provides more complete and accurate information on Photon OS. Examples are as follows:
ip neigh
198.51.100.2 dev eth0 lladdr 00:50:56:e2:02:0f STALE
198.51.100.254 dev eth0 lladdr 00:50:56:e7:13:d9 STALE
198.51.100.1 dev eth0 lladdr 00:50:56:c0:00:08 DELAY

arp -a
? (198.51.100.2) at 00:50:56:e2:02:0f [ether] on eth0
? (198.51.100.254) at 00:50:56:e7:13:d9 [ether] on eth0
? (198.51.100.1) at 00:50:56:c0:00:08 [ether] on eth0
4.5.4 - Configuring Network Interfaces
Network configuration files for systemd-networkd reside in /etc/systemd/network and /usr/lib/systemd/network. Example:
root@photon-rc [ ~ ]# ls /etc/systemd/network/
99-dhcp-en.network
By default, when Photon OS starts, it creates a DHCP network configuration file, or rule, which appears in /etc/systemd/network, the highest priority directory for network configuration files with the lowest priority filename:
cat /etc/systemd/network/99-dhcp-en.network
[Match]
Name=e*

[Network]
DHCP=yes
Network configuration files can also appear in the system network directory, /usr/lib/systemd/network, as the results of the following search illustrate:
root@photon-rc [ ~ ]# updatedb
root@photon-rc [ ~ ]# locate systemd/network
/etc/systemd/network
/etc/systemd/network/99-dhcp-en.network
/usr/lib/systemd/network
/usr/lib/systemd/network/80-container-host0.network
/usr/lib/systemd/network/80-container-ve.network
/usr/lib/systemd/network/99-default.link
root@photon-rc [ ~ ]#
In the above search, the /usr/lib/systemd/network directory contains several network configuration files. Photon OS applies the configuration files in lexicographical order specified by the file names without regard for the network configuration directory in which the file resides unless the file name is the same. Photon OS processes files with identical names by giving precedence to files in the /etc directory over the other directory. Thus, the settings in /etc/systemd/network override those in /usr/lib/systemd/network. Once Photon OS matches an interface in a file, Photon OS ignores the interface if it appears in files processed later in the lexicographical order.
Each .network file contains a matching rule and a configuration that Photon OS applies when a device matches the rule. Set the matching rule and the configuration as sections containing vertical sets of key-value pairs according to the information in systemd network configuration.
To configure Photon OS to handle a networking use case, such as setting a static IP address or adding a name server, create a configuration file with a .network extension and place it in the /etc/systemd/network directory.
After you create a network configuration file with a .network extension, you must run the chmod command to set the new file’s mode bits to 644. Example:
chown systemd-network:systemd-network 10-static-en.network
For Photon OS to apply the new configuration, you must restart the systemd-networkd service by running the following command:
systemctl restart systemd-networkd
For information about network configuration files, their processing order, and their matching rules, sections, and keys, see https://www.freedesktop.org/software/systemd/man/systemd.network.html.
For information about creating virtual network device files (.netdev), see https://www.freedesktop.org/software/systemd/man/systemd.netdev.html.
4.5.5 - Setting a Static IP Address
Before you set a static IP address, obtain the name of your Ethernet link by running the following command:
networkctl
IDX LINK             TYPE               OPERATIONAL SETUP
  1 lo               loopback           carrier     unmanaged
  2 eth0             ether              routable    configured
In the results of the command, you can see the name of an Ethernet link, eth0.
To create a network configuration file that systemd-networkd uses to establish a static IP address for the eth0 network interface, execute the following command as root:
cat > /etc/systemd/network/10-static-en.network << "EOF"

[Match]
Name=eth0

[Network]
Address=198.51.0.2/24
Gateway=198.51.0.1
EOF
Change the new file’s mode bits by running the chmod command:
chmod 644 10-static-en.network
Apply the configuration by running the following command:
systemctl restart systemd-networkd
For more information, see the man page for systemd-networkd: man systemd.network
4.5.6 - Turning Off DHCP
By default, when Photon OS first starts, it creates a DHCP network configuration file or rule, which appears in /etc/systemd/network, the highest priority directory for network configuration files with the lowest priority filename:
cat /etc/systemd/network/99-dhcp-en.network
[Match]
Name=e*

[Network]
DHCP=yes
To turn off DHCP for all Ethernet interfaces, change the value of DHCP from yes to no, save the changes, and then restart the systemd-networkd service:
systemctl restart systemd-networkd
If you create a configuration file with a higher priority filename (e.g. 10-static-en.network), it is not necessary but still recommended to turn off DHCP.
4.5.7 - Adding a DNS Server
Photon OS uses systemd-resolved to resolve domain names, IP addresses, and network names for local applications. The systemd-resolved daemon automatically creates and maintains the /etc/resolv.conf file, into which systemd-resolved places the IP address of the DNS server. You must not modify the /etc/resolv.conf file.
Note: If you want to implement a local resolver like bind instead of systemd-resolved, stop the systemd-resolved service and disable it.
If you open the default /etc/resolv.conf file after you deploy Photon OS, it looks like this:
root@photon-rc [ ~ ]# cat /etc/resolv.conf
# This file is managed by systemd-resolved(8). Do not edit.
#
# Third party programs must not access this file directly, but
# only through the symlink at /etc/resolv.conf. To manage
# resolv.conf(5) in a different way, replace the symlink by a
# static file or a different symlink.

nameserver 198.51.100.2
To add a DNS server, insert a DNS key into the Network section of the static network configuration file, for example, /etc/systemd/network/10-eth0-static.network and set it to the IP address of your DNS server:
[Match]
Name=e*

[Network]
Address=198.51.0.2/24
Gateway=198.51.0.1
DNS=198.51.0.1
Note: To apply the changes made to /etc/systemd/network/*.network files, perform the following:
- Restart
systemd-networkd and systemd-resolved services by running the following commands:systemctl restart systemd-networkdsystemctl restart systemd-resolved
If your machine is working with DHCP, you can add a DNS server by modifying the /etc/systemd/resolved.conf--a method.
For more information, see https://www.freedesktop.org/software/systemd/man/resolved.conf.html.
You can optionally activate the local DNS stub resolver of systemd-resolved by adding dns and resolve to the /etc/nsswitch.conf file. To do so, make a backup copy of the /etc/nsswitch.conf file and then execute the following command as root:
sed -i 's/^hosts.*$/hosts: files resolve dns/' /etc/nsswitch.conf
For more information about the systemd-resolved service, see https://www.freedesktop.org/software/systemd/man/systemd-resolved.service.html.
4.5.8 - Setting Up Networking for Multiple NICs
If your machine contains multiple NICs, it is recommend that you create a .network configuration file for each network interface. The following scenario demonstrates how to set one wired network interface to use a static IP address and another wired network interface to use a dynamic IP address obtained through DHCP.
Note: The following configurations are examples and you must change the IP addresses and other information to match your network and requirements.
First, create the .network file for the static Ethernet connection in /etc/systemd/network. A best practice is to match the exact name of the network interface, which is eth0 in this example. This example file also includes a DNS server for the static IP address. As a result, the configuration sets the UseDNS key to false in the DHCP column so that Photon OS ignores the DHCP server for DNS for this interface.
cat > /etc/systemd/network/10-eth0-static-en.network << "EOF"
[Match]
Name=eth0

[Network]
Address=10.137.20.11/19
Gateway=10.137.23.253
DNS=10.132.71.1

[DHCP]
UseDNS=false
EOF
Second, create the .network file for the second network interface, which is eth1 in this example. This configuration file sets the eth1 interface to an IP address from DHCP and sets DHCP as the source for DNS lookups. Setting the DHCP key to yes acquires an IP address for IPv4 and IPv6. To acquire an IP address for IPv4 only, set the DHCP key to ipv4.
cat > /etc/systemd/network/50-eth1-dhcp-en.network << "EOF"

[Match]
Name=eth1

[Network]
DHCP=yes

[DHCP]
UseDNS=true
EOF
4.5.8.1 - Combining DHCP and Static IP Addresses with IPv4 and IPv6
You can combine DHCP and static IP addresses with both IPv4 and IPv6.
Examples
The following example shows how to use DHCP to allocate both IPv4 and IPv6 addresses:
[Network]
DHCP=yes
The following example shows how to use DHCP to allocate only IPv4 addresses:
[Network]
DHCP=ipv4
The following example shows how to use DHCP to allocate only IPv6 addresses:
[Network]
DHCP=ipv6
The following example shows how to use DHCP for IPv4 addresses and static IP addresses for IPv6 addresses:
[Network]
DHCP=ipv4
Address=fd00::1/48
Gateway=fd00::252
The following example shows how to use DHCP for IPv6 addresses and static IP addresses for IPv4:
[Network]
DHCP=ipv6
Address=10.10.10.1/24
Gateway=10.10.10.253
The following example shows how to use static IP addresses for both IPv4 and IPv6:
[Network]
DHCP=ipv6
Address=10.10.10.1/24
Gateway=10.10.10.253
Address=fd00::1/48
Gateway=fd00::252
4.5.9 - Clearing the Machine ID of a Cloned Instance for DHCP
Photon OS uses the contents of /etc/machine-id to determine the DHCP unique identifier (duid) that is used for DHCP requests. If you use a Photon OS instance as the base system for cloning, to create additional Photon OS instances, you must clear the machine-id with this command:
echo -n > /etc/machine-id
When the value is cleared, systemd regenerates the machine-id and all DHCP requests will contain a unique duid.
4.5.10 - Using Predictable Network Interface Names
When you run Photon OS on a virtual machine or a bare-metal machine, the Ethernet network interface name might shift from one device to another if you add or remove a card and reboot the machine. For example, a device named eth2 might become eth1 after you remove a NIC and restart the machine.
You can prevent interface names from reordering by turning on predictable network interface names. The naming schemes that Photon OS uses can then assign fixed, predictable names to network interfaces even after you add or remove cards or other firmware and the restart the system.
When you enable predictable network interface names, you can use one of the following options to assign persistent names to network interfaces:
- Apply the
slot name policy to set the name of networking devices in the ens format with a statically assigned PCI slot number. - Apply the
mac name policy to set the name of networking devices in the enx format a unique MAC address. - Apply the
path name policy to set the name of networking devices in the enpXsY format derived from a device connector’s physical location.
Though Photon OS supports the onboard name policy to set the name of networking devices from index numbers given by the firmware in the eno format, the policy might result in nonpersistent names.
The option to choose depends on your use case and your unique networking requirements. For example, when you clone virtual machines and require the MAC addresses to be different from one another but the interface name to be the same, consider using ens to keep the slot the same after system reboots.
Alternatively, if the cloning function supports enx, you can use it to set a MAC address which persists after reboots.
Perform the following steps to turn on predictable network interface names:
Make a backup copy of the following file in case you need to restore it later:
cp /boot/grub/grub.cfg /boot/grub/grub.cfg.original
To turn on predictable network interface names, edit /boot/grub/grub.cfg to remove the following string:
net.ifnames=0Item
The string appears near the bottom of the file in the menuentry section:
menuentry "Photon" {
   linux "/boot/"$photon_linux root=$rootpartition net.ifnames=0 $photon_cmdline
   if [ "$photon_initrd" ]; then
        initrd "/boot/"$photon_initrd
   fi
}
# End /boot/grub2/grub.cfg
Edit out net.ifnames=0, but make no other changes to the file, and then save it.
Specify the types of policies that you want to use for predictable interface names by modifying the NamePolicy option in /lib/systemd/network/99-default.link. The file contents are as follows:
cat /lib/systemd/network/99-default.link
[Link]
NamePolicy=kernel database
MACAddressPolicy=persistent
To use the ens or enx option, the slot policy or the mac policy can be added to the space-separated list of policies that follow the NamePolicy option in the default link file, /lib/systemd/network/99-default.link. The order of the policies matters. Photon OS applies the policy listed first before proceeding to the next policy if the first one fails.
For example:
/lib/systemd/network/99-default.link
    [Link]
    NamePolicy=slot mac kernel database
    MACAddressPolicy=persistent
With the name policy specified in the above example, you might still have an Ethernet-style interface name if the two previous policies, slot and mac, fail.
For information on setting name policies, see systemd.link–network device configuration.
4.5.11 - Inspecting the Status of Network Links with `networkctl`
You can inspect information about network connections by using the networkctl command. This can help you configure networking services and troubleshoot networking problems.
You can progressively add options and arguments to the networkctl command to move from general information about network connections to specific information about a network connection.
networkctl Command Without Options
Run the networkctl command without options to default to the list command:
networkctl
IDX LINK             TYPE               OPERATIONAL SETUP
  1 lo               loopback           carrier     unmanaged
  2 eth0             ether              routable    configured
  3 docker0          ether              routable    unmanaged
 11 vethb0aa7a6      ether              degraded    unmanaged
 4 links listed.
networkctl status Command
Run networkctl with the status command to display the following information:
root@photon-rc [ ~ ]# networkctl status
	*      State: routable
	     Address: 198.51.100.131 on eth0
	              172.17.0.1 on docker0
	              fe80::20c:29ff:fe55:3ca6 on eth0
	              fe80::42:f0ff:fef7:bd81 on docker0
	              fe80::4c84:caff:fe76:a23f on vethb0aa7a6
	     Gateway: 198.51.100.2 on eth0
	         DNS: 198.51.100.2
You can see that there are active network links with IP addresses for not only the Ethernet connection but also a Docker container.
networkctl status Command With Network Link Option
You can add a network link, such as the Ethernet connection, as the argument of the status command to show specific information about the link:
	root@photon-rc [ ~ ]# networkctl status eth0
	* 2: eth0
	       Link File: /usr/lib/systemd/network/99-default.link
	    Network File: /etc/systemd/network/99-dhcp-en.network
	            Type: ether
	           State: routable (configured)
	            Path: pci-0000:02:01.0
	          Driver: e1000
	      HW Address: 00:0c:29:55:3c:a6 (VMware, Inc.)
	             MTU: 1500
	         Address: 198.51.100.131
	                  fe80::20c:29ff:fe55:3ca6
	         Gateway: 198.51.100.2
	             DNS: 198.51.100.2
	        CLIENTID: ffb6220feb00020000ab116724f520a0a77337
networkctl status Command With Docker Option
You can add a Docker container as the argument of the status command to show specific information about the container:
networkctl status docker0
	* 3: docker0
	       Link File: /usr/lib/systemd/network/99-default.link
	    Network File: n/a
	            Type: ether
	           State: routable (unmanaged)
	          Driver: bridge
	      HW Address: 02:42:f0:f7:bd:81
	             MTU: 1500
	         Address: 172.17.0.1
	                  fe80::42:f0ff:fef7:bd81
In the example above, the state of the Docker container is unmanaged because Docker handles managing the networking for the containers without using systemd-resolved or systemd-networkd. Docker manages the container connection by using its bridge drive.
For more information about networkctl commands and options, see https://www.freedesktop.org/software/systemd/man/networkctl.html.
4.5.12 - Turning On Network Debugging
You can set systemd-networkd to work in debug mode so that you can analyze log files with debugging information to help troubleshoot networking problems.
You can turn on network debugging by adding a drop-in file in /etc/systemd to customize the default systemd configuration in /usr/lib/systemd.
Procedure
- Run the following command as root to create a directory with the name
systemd-networkd.service.d, including the .d extension.
mkdir -p /etc/systemd/system/systemd-networkd.service.d/
- Run the following command as root to establish a
systemd drop-in unit with a debugging configuration for the network service.
cat > /etc/systemd/system/systemd-networkd.service.d/10-loglevel-debug.conf << "EOF"
[Service]
Environment=SYSTEMD_LOG_LEVEL=debug
EOF
- Reload the
systemctl daemon and restart the systemd-networkd service for the changes to take effect.
systemctl daemon-reload
systemctl restart systemd-networkd
- Verify your changes.
systemd-delta --type=extended
- View the log files by running this command.
journalctl -u systemd-networkd
- After debugging the network connections, turn debugging off by deleting the drop-in file.
rm /etc/systemd/system/systemd-networkd.service.d/10-loglevel-debug.conf
4.5.13 - Mounting a Network File System
To mount a network file system, Photon OS requires nfs-utils. The nfs-utils package contains the daemon, userspace server, and client tools for the kernel Network File System (NFS). The tools include mount.nfs, umount.nfs, and showmount.
The nfs-utils package is installed by default in the full version of Photon OS but not in the minimal version. To install nfs-utils in the minimal version, run the following command as root:
tdnf install nfs-utils
For instructions on how to use nfs-utils to share files over a network, see Photon OS nfs-utils.
4.5.14 - Network Configuration Manager - C API
Photon OS 2.0 provides a C API for the Network Configuration Manager.
About the Network Configuration Manager C API
Use the Network Configuration Manager C API to simplify common network configuration tasks for:
- interfaces
- IP addresses (IPv4 and IPv6 addresses)
- routes
- DNS server and domain settings
- DHCP DUID and IAID settings
- NTP server settings
- service management
- object parameters (interfaces and files)
Header files for all the C APIs are defined in the following location:
https://github.com/ vmware /pmd/tree/master/include
To install the Network Configuration Manager header file, run the following command:
tdnf install netmgmt-devel
n
Once installed, you can reference the header file in the following location:
/usr/include/netmgmt/netmgr.h
Freeing Memory
For all get APIs that take a pointer-to-pointer parameter, the caller has the responsibility to free the memory upon successful response from API by calling free().
Error Codes
All C API calls return 0 for success, or one of the following error codes for failure.
- 4097 - NM_ERR_INVALID_PARAMETER
- 4098 - NM_ERR_NOT_SUPPORTED
- 4099 - NM_ERR_OUT_OF_MEMORY
- 4100 - NM_ERR_VALUE_NOT_FOUND
- 4101 - NM_ERR_VALUE_EXISTS
- 4102 - NM_ERR_INVALID_INTERFACE
- 4103 - NM_ERR_INVALID_ADDRESS
- 4104 - NM_ERR_INVALID_MODE
- 4105 - NM_ERR_BAD_CONFIG_FILE
- 4106 - NM_ERR_WRITE_FAILED
- 4107 - NM_ERR_TIME_OUT
- 4108 - NM_ERR_DHCP_TIME_OUT
Use nm_get_error_info to retrieve information about an error code.
 const char \*
 nm_get_error_info(
     uint32_t nmErrCode
 );``
Interface Configuration APIs
The Photon OS 2.0 network manager C API enables you to manage network interfaces.
Structure Declarations
Link Mode
Description
Link mode. Available settings:
LINK_AUTO - the specified interface is managed and configured by systemd network managerLINK_MANUAL - systemd will not bring up or configure the specified interfaceLINK_MODE_UNKNOWN - the link mode is unknown
Declaration
 typedef enum _NET_LINK_MODE
 {
     LINK_AUTO = 0,
     LINK_MANUAL,
     LINK_MODE_UNKNOWN
 } NET_LINK_MODE;``
Link State
Description
Link state. Available settings:
LINK_DOWN - the link is being administratively down or has no carrier signalLINK_UP - the link is configured up and has carrier signalLINK_STATE_UNKNOWN - link state is unknown
Declaration
 typedef enum _NET_LINK_STATE
 {
     LINK_DOWN = 0,
     LINK_UP,
     LINK_STATE_UNKNOWN,
 } NET_LINK_STATE;
Description
Link information. Includes the following information:
pszInterfaceName - interface namepszMacAddress - interface hardware address specified in a colon-separated format (for example: “00:0c:29:99:a5:7b”)mtu - maximum transmission unit (MTU)mode - link mode (see above)state - link state (see above)
Declaration
 typedef struct _NET_LINK_INFO
 {
     struct _NET_LINK_INFO \*pNext;
     char \*pszInterfaceName;
     char \*pszMacAddress;
     uint32_t mtu;
     NET_LINK_MODE mode;
     NET_LINK_STATE state;
 } NET_LINK_INFO, \*PNET_LINK_INFO;
nm_set_link_mac_addr
Description
Set the MAC address of the interface.
Declaration
uint32_t

nm_set_link_mac_addr(

     const char \*pszInterfaceName,
     const char \*pszMacAddress
 );
Arguments
pszInterfaceName - interface namepszMacAddress - interface hardware address specified in a colon-separated format (for example: “00:0c:29:99:a5:7b”)
Returns
- success: 0
- failure: error code
nm_get_link_mac_addr
Description
Get the MAC address of the interface.
Declaration
uint32_t
 nm_get_link_mac_addr(
     const char \*pszInterfaceName,
     char \*\*ppszMacAddress
 );
Arguments
pszInterfaceName - interface nameppszMacAddress - interface hardware address specified in a colon-separated format (for example: “00:0c:29:99:a5:7b”)
Returns
- success: 0
- failure: error code
nm_set_link_mode
Description
Set the mode of the interface (auto or manual).
Declaration
uint32_t
 nm_set_link_mode(
     const char \*pszInterfaceName,
     NET_LINK_MODE mode
 );
Arguments
pszInterfaceName - interface namemode - link mode. One of the following values:LINK_AUTO - the specified interface is managed and configured by systemd network managerLINK_MANUAL - systemd will not bring up or configure the specified interfaceLINK_MODE_UNKNOWN - the link mode is unknown
Returns
- success: 0
- failure: error code
nm_get_link_mode
Description
Get the mode of the interface (auto or manual).
Declaration
uint32_t
 nm_get_link_mode(
     const char \*pszInterfaceName,
     NET_LINK_MODE \*pLinkMode
 );
Arguments
pszInterfaceName - interface namepLinkMode - link mode. One of the following values:LINK_AUTO - the specified interface is managed and configured by systemd network managerLINK_MANUAL - systemd will not bring up or configure the specified interfaceLINK_MODE_UNKNOWN - the link mode is unknown
Returns
- success: 0
- failure: error code
nm_set_link_mtu
Description
Set the maximum transmission unit (MTU) of the interface.
Declaration
uint32_t
 nm_set_link_mtu(
     const char \*pszInterfaceName,
     uint32_t mtu
 );
Arguments
pszInterfaceName - interface namemtu - maximum transmission unit (MTU)
Returns
- success: 0
- failure: error code
nm_get_link_mtu
Description
Get the maximum transmission unit (MTU) of the interface.
Declaration
nm_get_link_mtu
 uint32_t
 nm_get_link_mtu(
     const char \*pszInterfaceName,
     uint32_t \*pMtu
 );
Arguments
pszInterfaceName - interface namepMtu - maximum transmission unit (MTU)
Returns
- success: 0
- failure: error code
nm_set_link_state
Description
Set the link state of the interface (up or down).
Declaration
 uint32_t
 nm_set_link_state(
     const char \*pszInterfaceName,
     NET_LINK_STATE state
 );
Arguments
pszInterfaceName - interface namestate - link state. One of the following values:LINK_DOWN - the link is being administratively down or has no carrier signal.LINK_UP - the link is configured up and has carrier signal.LINK_STATE_UNKNOWN - the link state is unknown
Returns
- success: 0
- failure: error code
nm_get_link_state
Description
Get the link state of the interface (up or down).
Declaration
uint32_t
 nm_get_link_state(
     const char \*pszInterfaceName,
     NET_LINK_STATE \*pLinkState
 );
Arguments
pszInterfaceName - interface namepLinkState - link state. One of the following values:LINK_DOWN - the link is being administratively down or has no carrier signalLINK_UP - the link is configured up and has carrier signalLINK_STATE_UNKNOWN - the link state is unknown
Returns
- success: 0
- failure: error code
nm_ifup
Description
Set the specified interface state to UP. Additionally, if the interface is configured to have an IP address, it waits for the interface to acquire the IP address, and then updates neighbors of its IP address via the address resolution protocol (ARP) messages.
Declaration
 uint32_t
 nm_ifup(
     const char \*pszInterfaceName
 );
Arguments
pszInterfaceName - interface name
Returns
- success: 0
- failure: error code
nm_ifdown
Description
Set the specified interface state to DOWN.
Declaration
uint32_t
 nm_ifdown(
     const char \*pszInterfaceName
 );
Arguments
pszInterfaceName - interface name
Returns
- success: 0
- failure: error code
nm_get_link_info
Description
Get link information for the interface. The caller is responsible for freeing ppLinkInfo by calling nm_free_link_info.
Declaration
uint32_t
 nm_get_link_info(
     const char \*pszInterfaceName,
     NET_LINK_INFO \*\*ppLinkInfo
 );
Arguments
pszInterfaceName - interface nameppLinkInfo, which includes the following information:- *
pszInterfaceName - interface name - *
pszMacAddress - interface hardware address specified in a colon-separated format (for example: “00:0c:29:99:a5:7b”) mtu - maximum transmission unit (MTU)mode - One of the following values:LINK_AUTO - the specified interface is managed and configured by systemd network managerLINK_MANUAL - systemd will not bring up or configure the specified interfaceLINK_MODE_UNKNOWN - the link mode is unknown
state - One of the following values:LINK_DOWN - the link is being administratively down or has no carrier signalLINK_UP - the link is configured up and has carrier signalLINK_STATE_UNKNOWN - the link state is unknown
Returns
- success: 0
- failure: error code
nm_free_link_info
Description
Frees the NET_LINK_INFO structure returned by a successful nm_get_link_info call.
Declaration
void
 nm_free_link_info(
     NET_LINK_INFO \*pNetLinkInfo
 );
Arguments
pNetLinkInfo, which includes the following information:- *
pszInterfaceName - interface name - *
pszMacAddress - interface hardware address specified in a colon-separated format (for example: “00:0c:29:99:a5:7b”) mtu - maximum transmission unit (MTU)mode - One of the following values:LINK_AUTO - the specified interface is managed and configured by systemd network managerLINK_MANUAL - systemd will not bring up or configure the specified interfaceLINK_MODE_UNKNOWN - the link mode is unknown
state - One of the following values:LINK_DOWN - the link is being administratively down or has no carrier signalLINK_UP - the link is configured up and has carrier signalLINK_STATE_UNKNOWN - the link state is unknown
Returns
- success: 0
- failure: error code
IP Address Configuration APIs
The Photon OS 2.0 network manager C API enables you to manage IP addresses for interfaces that are managed by systemd network manager.
Structure Declarations
IP Address Mode
Description
Defines the IP address mode. One of the following values:
IPV4_ADDR_MODE_NONE - no IPv4 address configured on the interfaceIPV4_ADDR_MODE_STATIC - the interface is configured with a static IPv4 addressIPV4_ADDR_MODE_DHCP - the interface is configured with a DHCP IPv4 address
Declaration
 typedef enum _NET_IPV4_ADDR_MODE
 {
     IPV4_ADDR_MODE_NONE = 0,
     IPV4_ADDR_MODE_STATIC,
     IPV4_ADDR_MODE_DHCP,
     IPV4_ADDR_MODE_MAX
 } NET_IPV4_ADDR_MODE;
Address Type
Description
Defines the type of IP address. One of the following options:
STATIC_IPV4 - static IPv4 addressSTATIC_IPV6 - static IPv6 addressDHCP_IPV4 - DHCP IPv4 addressDHCP_IPV6 - DHCP IPv6 addressAUTO_IPV6 - stateless dynamic IPv6 addressLINK_LOCAL_IPV6 - link local IPv6 address
Declaration
 typedef enum _NET_ADDR_TYPE
 {
     STATIC_IPV4        =  0x00000001,
     STATIC_IPV6        =  0x00000002,
     DHCP_IPV4          =  0x00000010,
     DHCP_IPV6          =  0x00000020,
     AUTO_IPV6          =  0x00000040,
     LINK_LOCAL_IPV6    =  0x00000080,
 } NET_ADDR_TYPE;
IP Addresses
Description
Defines IP addresses.
pszInterfaceName - interface nametype - address typepszIPAddrPrefix - IP address
Declarations
 typedef struct _NET_IP_ADDR
 {
     char \*pszInterfaceName;
     NET_ADDR_TYPE type;
     char \*pszIPAddrPrefix;
 } NET_IP_ADDR, \*PNET_IP_ADDR;
nm_set_ipv4_addr_gateway
Description
Set the IPv4 address and (optionally) the default gateway address for the interface.
Declaration
 uint32_t

 nm_set_ipv4_addr_gateway(

     const char \*pszInterfaceName,
     NET_IPV4_ADDR_MODE mode,
     const char \*pszIPv4AddrPrefix,
     const char \*pszIPv4Gateway
 );
Arguments
pszInterfaceName - interface namemode - IP address mode; one of the following values:IPV4_ADDR_MODE_NONEIPV4_ADDR_MODE_STATICIPV4_ADDR_MODE_DHCP
pszIPv4AddrPrefix - IPv4 address specified in dot-decimal / prefix notation (for example, 10.10.10.101/23). If the prefix is not specified, then a /32 prefix is assumed.pszIPv4Gateway - IPv4 gateway (optional) specified in the dot-decimal format (for example,10.10.20.30).
Returns
- success: 0
- failure: error code
nm_get_ipv4_addr_gateway
Description
Get the IPv4 address and the default gateway address for the interface.
Declaration
uint32_t
 nm_get_ipv4_addr_gateway(
     const char \*pszInterfaceName,
     NET_IPV4_ADDR_MODE \*pMode,
     char \*\*ppszIPv4AddrPrefix,
     char \*\*ppszIPv4Gateway
 );
Arguments
pszInterfaceName - interface namepmode - IP mode; one of the following values:IPV4_ADDR_MODE_NONEIPV4_ADDR_MODE_STATICIPV4_ADDR_MODE_DHCP
ppszIPv4AddrPrefix - IPv4 address returned in dot-decimal / prefix notation (for example, 10.10.10.101/23). If the prefix is not specified, then a /32 prefix is assumed.ppszIPv4Gateway - IPv4 gateway (optional) returned in the dot-decimal format (for example,10.10.10.250).
Returns
- success: 0
- failure: error code
nm_add_static_ipv6_addr
Description
Add an IPv6 address to the specified interface.
Declaration
uint32_t
 nm_add_static_ipv6_addr(
     const char \*pszInterfaceName,
     const char \*pszIPv6AddrPrefix
 );
Arguments
pszInterfaceName - interface namepszIPv6AddrPrefix - IPv6 address specified in the standard colon-separated IPv6 address format followed by the prefix (for example, 2010:a1:b2::25/64). If the not prefix is specified, then a /128 prefix is assumed.
Returns
- success: 0
- failure: error code
nm_delete_static_ipv6_addr
Description
Delete a static IPv6 address from the interface.
Declaration
uint32_t
 nm_delete_static_ipv6_addr(
     const char \*pszInterfaceName,
     const char \*pszIPv6AddrPrefix
 );
Arguments
pszInterfaceName - interface namepszIPv6AddrPrefix - IPv6 address specified in the standard colon-separated IPv6 address format followed by the prefix (for example, 2010:a1:b2::25/64). If the not prefix is specified, then a /128 prefix is assumed.
Returns
- success: 0
- failure: error code
nm_set_ipv6_addr_mode
Description
Set the mode for the interface.
Declaration
uint32_t
 nm_set_ipv6_addr_mode(
     const char \*pszInterfaceName,
     uint32_t enableDhcp,
     uint32_t enableAutoconf
 );
Arguments
pszInterfaceName - interface nameenableDhcp - enable (1) or disable (0) DHCP; enabling configures the interface to acquire a DHCP IPv6 address.enableAutoconf - enable (1) or disable (0) autoconf; enabling configures the interface to acquire a stateless autoconfiguration IPv6 address.
Returns
- success: 0
- failure: error code
nm_get_ipv6_addr_mode
Description
Get the mode for the interface.
Declaration
 uint32_t
 nm_get_ipv6_addr_mode(
     const char \*pszInterfaceName,
     uint32_t \*pDhcpEnabled,
     uint32_t \*pAutoconfEnabled
 );
Arguments
pszInterfaceName - interface namepDhcpEnabled - returns whether IPv6 DHCP is enabled (1) or disabled (0).pAutoconfEnabled - returns whether IPv6 stateless autoconfiguration is enabled (1) or disabled (0).
Returns
- success: 0
- failure: error code
nm_get_ip_addr
Description
Get the IP address for the interface.
Declaration
uint32_t
 nm_get_ip_addr(
     const char \*pszInterfaceName,
     uint32_t addrTypes,
     size_t \*pCount,
     NET_IP_ADDR \*\*\*pppIpAddrList
 );
Arguments
pszInterfaceName - interface nameaddrTypes - type of IP address; one of the following values:STATIC_IPV4STATIC_IPV6DHCP_IPV4DHCP_IPV6AUTO_IPV6LINK_LOCAL_IPV6
pCount - number of IP address structures in the pppIpAddrList array returned by the API call.pppIpAddrList - array of NET_IP_ADDR elements that includes the following:pszInterfaceNametypepszIPAddrPrefix
Returns
- success: 0
- failure: error code
nm_set_ipv6_gateway
Description
Set the default IPv6 gateway for the interface.
Declaration
 uint32_t
 nm_set_ipv6_gateway(
     const char \*pszInterfaceName,
     const char \*pszIPv6Gateway
 );
Arguments
pszInterfaceName - interface namepszIPv6Gateway - IPv6 gateway specified in the standard colon-separated IPv6 address format (for example, 2010:125::100)
Returns
- success: 0
- failure: error code
nm_get_ipv6_gateway
Description
Get the default IPv6 gateway for the interface.
Declaration
 uint32_t
 nm_get_ipv6_gateway(
     const char \*pszInterfaceName,
     char \*\*ppszIPv6Gateway
 );
Arguments
pszInterfaceName - interface nameppszIPv6Gateway - IPv6 gateway specified in the standard colon-separated IPv6 address format (for example, 2010:125::100)
Returns
- success: 0
- failure: error code
Route Configuration APIs
The Photon OS 2.0 network manager C API enables you to manage static IP routes configuration.
Structure Declarations
Route Scope
Description
Defines the scope of a route. One of the following options.
GLOBAL_ROUTE - route to a destination one or more hops awayLINK_ROUTE - route to a destination on the local networkHOST_ROUTE - route to a destination address on the local host
Declaration
 typedef enum _NET_ROUTE_SCOPE
 {
     GLOBAL_ROUTE = 0,
     LINK_ROUTE,
     HOST_ROUTE,
     NET_ROUTE_SCOPE_MAX
 } NET_ROUTE_SCOPE;
IP Route
Description
Defines an IP route. Includes the following information:
pszInterfaceName - interface through which the specified destination network can be reachedpszDestNetwork - destination IP network reached by the specified routepszSourceNetwork - source network for the specified routepszGateway - IP gateway through which the specified destination network can be reachedscope - scope of this route entry; one of the following values: GLOBAL_ROUTE, LINK_ROUTE, or HOST_ROUTE as defined abovemetric - metric of this route, an unsigned integertable - identifier for the route table to which this route belongs.
Declaration
 typedef struct _NET_IP_ROUTE
 {
     char \*pszInterfaceName;
     char \*pszDestNetwork;
     char \*pszSourceNetwork;
     char \*pszGateway;
     NET_ROUTE_SCOPE scope;
     uint32_t metric;
     uint32_t table;
 } NET_IP_ROUTE, \*PNET_IP_ROUTE;
nm_add_static_ip_route
Description
Add a static IP route.
Declaration
uint32_t
 nm_add_static_ip_route(
     NET_IP_ROUTE \*pRoute
 );
Arguments
Returns
- success: 0
- failure: error code
nm_delete_static_ip_route
Description
Delete a static IP route.
Declaration
 uint32_t
 nm_delete_static_ip_route(
     NET_IP_ROUTE \*pRoute
 );
Arguments
Returns
- success: 0
- failure: error code
nm_get_static_ip_routes
Description
Get the static IP routes for an interface.
Declaration
 uint32_t
 nm_get_static_ip_routes(
     const char \*pszInterfaceName,
     size_t \*pCount,
     NET_IP_ROUTE \*\*\*pppRouteList
 );
Arguments
pszInterfaceName - interface namepCount - number of NET_IP_ROUTE elements returned in the pppRouteList array by the API call upon successpppRouteList - array of static IP routes
Returns
- success: 0
- failure: error code
DNS Configuration APIs
The Photon OS 2.0 network manager C API enables you to manage the DNS and Domains configuration.
Structure Declarations
DNS Mode
Description
DNS mode. Any of the following values:
DNS_MODE_INVALID - DNS mode is unknownSTATIC_DNS - DNS servers are statically configuredDHCP_DNS - DNS servers configuration is acquired from DHCP protocol.
Declaration
 typedef enum _NET_DNS_MODE
 {
     DNS_MODE_INVALID = 0,
     STATIC_DNS,
     DHCP_DNS,
     DNS_MODE_MAX,
 } NET_DNS_MODE;
nm_set_dns_servers
Description
Set the DNS servers list for the interface.
Declaration
uint32_t
 nm_set_dns_servers(
     const char \*pszInterfaceName,
     NET_DNS_MODE mode,
     size_t count,
     const char \*\*ppszDnsServers
 );
Arguments
pszInterfaceName - interface name (optional, can be NULL)mode - DNS mode. One of the following values:DNS_MODE_INVALID = 0DNS_MODE_MADHCP_DNSSTATIC_DNS
count - number of NUL terminated DNS server entries passed in the ppszDnsServers array to the API call (for example, 10.10.10.200 or 2020::40)ppszDnsServers - array of DNS servers
Returns
- success: 0
- failure: error code
nm_add_dns_server
Description
Add a server to the DNS servers list associated with an interface.
Declaration
uint32_t
 nm_add_dns_server(
     const char \*pszInterfaceName,
     const char \*pszDnsServer
 );
Arguments
pszInterfaceName - interface name (optional, can be NULL)ppszDnsServer - server to add to the DNS server list
Returns
- success: 0
- failure: error code
nm_delete_dns_server
Description
Delete a server from the DNS servers list associated with an interface.
Declaration
 uint32_t
 nm_delete_dns_server(
     const char \*pszInterfaceName,
     const char \*pszDnsServer
 );
Arguments
pszInterfaceName - interface name (optional, can be NULL)ppszDnsServer - server to remove from the DNS server list
Returns
- success: 0
- failure: error code
nm_get_dns_servers
Description
Get the the DNS servers list for the interface.
Declaration
uint32_t
 nm_get_dns_servers(
     const char \*pszInterfaceName,
     NET_DNS_MODE \*pMode,
     size_t \*pCount,
     char \*\*\*pppszDnsServers
 );
Arguments
pszInterfaceName - interface name (optional, can be NULL)pMode - DNS mode. One of the following values:DNS_MODE_INVALIDDHCP_DNSSTATIC_DNS
pCount - number of NUL terminated DNS server entries in the pppszDnsServers array returned by the API call (for example, 10.10.10.200 or 2020::40)pppszDnsServers - array of DNS servers
Returns
- success: 0
- failure: error code
nm_set_dns_domains
Description
Set the DNS domain list.
Declaration
uint32_t
 nm_set_dns_domains(
     const char \*pszInterfaceName,
     size_t count,
     const char \*\*ppszDnsDomains
 );
Arguments
pszInterfaceName - interface name (optional, can be NULL)count - number of DNS domains specified in the ppszDnsDomains array to the API call (for example, if count = 2, then there are two elements: ppszDnsDomains[0] and ppszDnsDomains[1])ppszDnsDomains - array of DNS domains
Returns
- success: 0
- failure: error code
nm_add_dns_domain
Description
Add a DNS domain to the DNS domain list.
Declaration
uint32_t
 nm_add_dns_domain(
     const char \*pszInterfaceName,
     const char \*pszDnsDomain
 );
Arguments
pszInterfaceName - interface name (optional, can be NULL)pszDnsDomain - DNS domain to add to the list
Returns
- success: 0
- failure: error code
nm_delete_dns_domain
Description
Delete a DNS domain from the DNS domain list.
Declaration
uint32_t
 nm_delete_dns_domain(
     const char \*pszInterfaceName,
     const char \*pszDnsDomain
 );
Arguments
pszInterfaceName - interface name (optional, can be NULL)pszDnsDomain - DNS domain to remove from the list
Returns
- success: 0
- failure: error code
nm_get_dns_domains
Description
Get the list of DNS domains.
Declaration
uint32_t
 nm_get_dns_domains(
     const char \*pszInterfaceName,
     size_t \*pCount,
     char \*\*\*pppszDnsDomains
 );
Arguments
pszInterfaceName - interface name (optional, can be NULL)pCount - number of DNS domains returned in the pppszDnsDomains from the API call (for example, if count = 2, then there are two elements: ppszDnsDomains[0] and ppszDnsDomains[1])pppszDnsDomains - array of DNS domains
Returns
- success: 0
- failure: error code
DHCP Options DUID and IAID Configuration APIs
The Photon OS 2.0 network manager C API enables you to manage DHCP DUID and Interface IAID.
nm_set_iaid
Description
Set the IAID for the interface.
Declaration
uint32_t
 nm_set_iaid(
     const char \*pszInterfaceName,
     uint32_t iaid
 );
Arguments
pszInterfaceName - interface nameiaid - interface association identifier (IAID)
Returns
- success: 0
- failure: error code
nm_get_iaid
Description
Get the IAID for the interface.
Declaration
uint32_t
 nm_get_iaid(
     const char \*pszInterfaceName,
     uint32_t \*pIaid
 );
Arguments
pszInterfaceName - interface namepIaid - interface association identifier (IAID)
Returns
- success: 0
- failure: error code
nm_set_duid
Description
Set the DUID for the interface.
Declaration
uint32_t
 nm_set_duid(
     const char \*pszInterfaceName,
     const char \*pszDuid
 );
Arguments
pszInterfaceName - interface name (optional, specify NULL to set system global DUID configuration)pszDuid - DHCP unique identifier (DUID)
Returns
- success: 0
- failure: error code
nm_get_duid
Description
Get the DUID for the interface.
Declaration
uint32_t
 nm_get_duid(
     const char \*pszInterfaceName,
     char \*\*ppszDuid
 );
Arguments
pszInterfaceName - interface name (optional, specify NULL to query system global DUID configuration)ppszDuid - DHCP unique identifier (DUID)
Returns
- success: 0
- failure: error code
NTP Configuration APIs
The Photon OS 2.0 network manager C API enables you to manage NTP servers configured for the system.
nm_set_ntp_servers
Description
Set the list of NTP servers.
Declaration
 uint32_t
 nm_set_ntp_servers(
     size_t count,
     const char \*\*ppszNtpServers
 );
Arguments
count - number of NTP servers in the ppszNtpServers array passed to the API call.ppszNtpServers - array of NTP servers
Returns
- success: 0
- failure: error code
nm_add_ntp_servers
Description
Add a server to the NTP servers list.
Declaration
 uint32_t
 nm_add_ntp_servers(
     size_t count,
     const char \*\*ppszNtpServers
 );
Arguments
count - number of NTP servers to add (specified in the ppszNtpServers array) passed to the API call.ppszNtpServers - array of NTP servers to add
Returns
- success: 0
- failure: error code
nm_delete_ntp_servers
Description
Delete a server from the NTP servers list.
Declaration
 uint32_t
 nm_delete_ntp_servers(
     size_t count,
     const char \*\*ppszNtpServers
 );
Arguments
count - number of NTP servers to delete (specified in the ppszNtpServers array) passed to the API callppszNtpServers - array of NTP servers to delete
Returns
- success: 0
- failure: error code
nm_get_ntp_servers
Description
Get the NTP servers list.
Declaration
 uint32_t
 nm_get_ntp_servers(
     size_t \*pCount,
     char \*\*\*pppszNtpServers
 );
Arguments
pCount - number of NTP servers in the pppszNtpServers array returned from the API callpppszNtpServers - array of NTP servers
Returns
- success: 0
- failure: error code
Other APIs
nm_set_hostname
Description
Set the host name for the system.
Declaration
 uint32_t
 nm_set_hostname(
     const char \*pszHostname
 );
Arguments
Returns
- success: 0
- failure: error code
nm_get_hostname
Description
Get the host name for the system.
Declaration
 uint32_t
 nm_get_hostname(
     char \*\*ppszHostname
 );
Arguments
Returns
- success: 0
- failure: error code
nm_wait_for_link_up
Description
Wait for the specified interface to come up.
Declaration
 uint32_t
 nm_wait_for_link_up(
     const char \*pszInterfaceName,
     uint32_t timeout
 );
Arguments
pszInterfaceName - interface nametimeout - maximum time (in seconds) to wait (until the link is up) before timing out of the request; specify 0 for no timeout (wait indefinitely)
Returns
- success: 0
- failure: error code
nm_wait_for_ip
Description
Wait for the interface to acquire an IP address of the specified IP address type.
Declaration
 uint32_t
 nm_wait_for_ip(
     const char \*pszInterfaceName,
     uint32_t timeout,
     NET_ADDR_TYPE addrTypes
 );
Arguments
pszInterfaceName - interface nametimeout - maximum time (in seconds) to wait (until the link has an IP address of the specified address type) before timing out of the request; specify 0 for no timeout (wait indefinitely)addrTypes - type of IP address; one of the following values:STATIC_IPV4STATIC_IPV6DHCP_IPV4DHCP_IPV6AUTO_IPV6LINK_LOCAL_IPV6
Returns
- success: 0
- failure: error code
nm_set_network_param
Description
Set the value of a network parameter for an object.
Declaration
uint32_t
 nm_set_network_param(
     const char \*pszObjectName,
     const char \*pszParamName,
     const char \*pszParamValue
 );
Arguments
pszObjectName - an interface name (for example, “eth0”) or a file name (for example, /etc/systemd/resolved.conf)pszParamName - name of a parameter associated with the object; specified in the format SectionName_KeyName (for example, Link_MTUBytes represents the MtuBytes key in [Link] section in https://www.freedesktop.org/software/systemd/man/systemd.network.html)pszParamValue - points to the parameter value to set; you can add (+) or remove (-) a parameter by prepending the parameter name with + or -. For example:
netmgr net_info –set –object eth1 –paramname +Network_Address –paramvalue “10.10.10.1/24”
Returns
- success: 0
- failure: error code
nm_get_network_param
Description
Get the value of a network parameter associated with an object.
Declaration
 uint32_t
 nm_get_network_param(
     const char \*pszObjectName,
     const char \*pszParamName,
     char \*\*ppszParamValue
 );
Arguments
pszObjectName - an interface name (for example, “eth0”) or a file name (for example, /etc/systemd/resolved.conf)pszParamName - name of a parameter associated with the object; returned in the format SectionName_KeyName (for example, Link_MTUBytes represents the MtuBytes key in [Link] section in https://www.freedesktop.org/software/systemd/man/systemd.network.html)ppszParamValue - parameter value
Returns
- success: 0
- failure: error code
Service Management APIs
nm_stop_network_service
Description
Stop the network service.
Declaration
 uint32_t
 nm_stop_network_service();
Returns
- success: 0
- failure: error code
nm_restart_network_service
Description
Restart the network service.
Declaration
 uint32_t
 nm_restart_network_service();
Returns
- success: 0
- failure: error code
nm_stop_dns_service
Description
Stop the DNS service.
Declaration
uint32_t
 nm_stop_dns_service();
Returns
- success: 0
- failure: error code
nm_restart_dns_service
Description
Restart the DNS service.
Declaration
 uint32_t
 nm_restart_dns_service();
Returns
- success: 0
- failure: error code
nm_stop_ntp_service
Description
Stop the NTP service.
Declaration
 uint32_t
 nm_stop_ntp_service();
Returns
- success: 0
- failure: error code
nm_restart_ntp_service
Description
Restart the NTP service.
Declaration
 uint32_t
 nm_restart_ntp_service();
Returns
- success: 0
- failure: error code
4.5.15 - Network Configuration Manager - Python API
Photon OS 2.0 provides a Python API for the Network Configuration Manager.
Setup Instructions
To set up and run the latest version of the Network Manager API for Python:
# tdnf install pmd pmd-python3
# systemctl start pmd
Initialization Steps
# python3
>>> import pmd
>>> net = pmd.server().net
Get Online Help
Get help for all commands.
>>> help(net)
Get help for a specific command.
>>> help(net.add_ntp_servers)
-in function add_ntp_servers:
add_ntp_servers(...) method of  [server.net](http://server.net/) instance
    net.add_ntp_servers(ntpservers = ["20.20.20.20", "25.30.40.70"])
    adds ntp servers. returns success: 0, failure: exception.
(END)
get_system_network_info
Get network information details that are common to the entire system.
Syntax
net.get_system_network_info()
Returns
- details about the system network (DUID, DNS mode, DNS server list, DNS domain list, NTP server list)
Example
>>> system_network_info = netmgmt.get_system_network_info()

>>> print ( system_network_info)

[{DUID: 00:02:11:22:33:44:55:66:77:20, DNS Mode: (null), DNS ServerList: ['10.10.100.100', '20.20.200.10'], DNS domain list: [' [abcd.com](http://abcd.com)'], NTP ServerList: (null)}]
get_err_info
Get information about the specified error number.
Syntax
net.get_err_info(error = <error_number>)
Parameters
Here is the list of error numbers:
- 4097 - invalid parameter
- 4098 - not supported
- 4099 - out of memory
- 4100 - value not found
- 4101 - value exists
- 4102 - invalid interface
- 4103 - invalid mode
- 4104 - bad configuration file
- 4105 - write failed
- 4106 - timout
- 4107 - DCHP timeout
Returns
- success: 0
- failure: exception
Example
>> net.get_err_info(error = 4097)

'invalid parameter'
Interface Configuration
Use these commands to manage the configuration for a network interface.
get_link_info
Get the link info for the specified interface or for all interfaces (if no interface is specified).
Syntax
net.get_link_info(ifname = interface_name)
Parameters
ifname - interface name (optional)
Returns
- success: link info
- failure: exception
get_link_macaddr
Get the MAC address for the specified interface or for all interfaces (if no interface is specified).
Syntax
net.get_link_macaddr(ifname = interface_name)
Parameters
ifname - interface name (optional)
Returns
- success: MAC address
- failure: exception
get_link_mode
Get the link mode for the specified interface (auto or manual), or for all interfaces (if no interface is specified).
Syntax
net.get_link_mode(ifname = interface_name)
Parameters
ifname - interface name (optional)
Returns
- success: link mode (auto, manual, or unknown)
- failure: exception
get_link_mtu
Get the MTU of the specified interface or for all interfaces (if no interface is specified).
Syntax
net.get_link_mtu(ifname = interface_name)
Parameters
ifname - interface name (optional)
Returns
- success: link MTU
- failure: exception
get_link_state
Get the link state of the specified interface or for all interfaces (if no interface is specified).
Syntax
net.get_link_state(ifname = interface_name)
Parameters
ifname - interface name (optional)
Returns
- success: link state (up, down, unknown)
- failure: exception
set_link_down
Bring down the specified interface.
Syntax
net.set_link_down(ifname = interface_name)
Parameters
Returns
- success: 0
- failure: exception
set_link_macaddr
Set the MAC address of the specified interface.
Syntax
net.set_link_macaddr(ifname = interface_name, macaddr = mac_address)
Parameters
ifname - interface namemacaddr = MAC address
Returns
- success: 0
- failure: exception
set_link_mode
Set the mode (auto or manual) of the specifed interface.
Syntax
net.set_link_mode(ifname = interface_name, link_mode = [auto, manual])
Parameters
ifname - interface namelink_mode - auto or manual
Returns
- success: 0
- failure: exception
set_link_mtu
Set the MTU for the specified interface.
Syntax
net.set_link_mtu(ifname = interface_name, mtu = mtu)
Parameters
ifname - interface namemtu - mtu
Returns
- success: 0
- failure: exception
set_link_state
Set the state (up or down) of the specified interface.
Syntax
net.set_link_state(ifname = interface_name, link_state = [down, up])
Parameters
ifname - interface namelink_state - down or up
Returns
- success: 0
- failure: exception
set_link_up
Brings up the specified interface.
Syntax
net.set_link_up(ifname = interface_name)
Parameters
ifname - interface namelink_state - down or up
Returns
- success: 0
- failure: exception
IP Address Configuration
Use these commands to manage IP address configuration for a network interface.
add_static_ipv6_addr
Add a static IPv6 address to the specified interface.
Syntax
net.add_static_ipv6_addr(ifname = interface_name, addr_prefix = ipv6address_prefix)
Parameters
ifname - interface nameaddr_prefix - IPv6 address prefix
Returns
- success: 0
- failure: exception
del_static_ipv6_addr
Delete a static IPv6 address from the specified interface.
Syntax
net.del_static_ipv6_addr(ifname = interface_name, addr_prefix = ipv6address_prefix)
Parameters
ifname - interface nameaddr_prefix - IPv6 address prefix
Returns
- success: 0
- failure: exception
get_ipv4_addr_gateway
Get the IPv4 address with the prefix and gateway for the specified interface.
Syntax
net.get_ipv4_addr_gateway(ifname = interface_name)
Parameters
Returns
- success: IPv4 address with the prefix and gateway
- failure: exception
get_ipv6_addr
Get the list of IPv6 addresses for the specified interface.
Syntax
net.get_ipv6_addr(ifname = interface_name)
Parameters
Returns
- success: IPv6 address list
- failure: exception
get_ipv6_addr_mode
Get the address mode for the specified interface to determine whether DHCPv6, autoconf are enabled or disabled.
Syntax
net.get_ipv6_addr_mode(ifname = interface_name)
Parameters
Returns
- Status for DHCPv6, autoconf (True=enabled, False=disabled)
- failure: exception
get_ipv6_gateway
Get the IPv6 gateway for the specified interface.
Syntax
net.get_ipv6_gateway(ifname = interface_name)
Parameters
Returns
- success: IPv6 gateway
- failure: exception
set_ipv4_addr_gateway
Set the IPv4 address with the prefix and gateway for the specified interface.
Syntax
net.get_ipv4_addr_gateway(ifname = interface_name, addr_mode = [dhcp, static, none], addr_prefix = ipv4addressprefix, gateway = ipv4gateway)
Parameters
ifname - interface nameaddr_mode - address mode - dhcp, static, or noneaddr_prefix - IPv4 address or prefixgateway - IPv4 gateway
Returns
- success: 0
- failure: exception
set_ipv6_addr_mode
Set the address mode for the specified interface.
Syntax
net.set_ipv6_addr_mode(ifname = interface_name, enable_dhcp = [True, False], enable_autoconf = [True, False])
Parameters
ifname - interface nameenable_dhcp - True to enable, False to disableenable_autoconf - True to enable, False to disable
Returns
- success: 0
- failure: exception
set_ipv6_gateway
Set the IPv6 gateway for the specified interface.
Syntax
net.set_ipv6_gateway(ifname = interface_name, gateway = ipv6gateway)
Parameters
ifname - interface namegateway - IPv6 gateway
Returns
- success: 0
- failure: exception
DNS Configuration
Use these commands to manage DNS domains and servers for a network interface.
get_dns_domains
Get the list of DNS domains for the specified interface.
Syntax
net.get_dns_domains(ifname = interface_name)
Parameters
Returns
- success: list of DNS domains
- failure: exception
get_dns_servers
Get the list of DNS servers and the mode for the specified interface.
Syntax
net.get_dns_servers(ifname = interface_name)
Parameters
Returns
- success: list of DNS servers and mode
- failure: exception
set_dns_domains
Set the list of DNS domains for the specified interface.
Syntax
net.set_dns_domains(domains = ["domain1","domain2",...], ifname = interface_name)
Parameters
domains - comma-separated list of one or more domainsifname - interface name
Returns
- success: 0
- failure: exception
set_dns_servers
Set the list of DNS servers for the specified interface.
Syntax
net.set_dns_servers(dns_mode = [dhcp, static], servers = ["server1","server2", ...], ifname = interface_name)
Parameters
dns_mode - dhcp or staticservers - comma-separate list of one or more serversifname - interface name
Returns
- success: 0
- failure: exception
DHCP Options DUID and IAID Configuration
get_link_iaid
Get the IAID for the specified interface.
Syntax
net.get_link_iaid(ifname = interface)
Parameters
Returns
- success: IAID
- failure: exception
set_link_iaid
Set the IAID for the specified interface.
Syntax
net.set_link_iaid(ifname = interface_name, iaid = <iaid>)
Parameters
ifname - interface name- iaid - IAID
Returns
- success: 0
- failure: exception
get_dhcp_duid
Get the DCHP DUID.
Syntax
net.get_dhcp_duid(ifname = interface_name)
Parameters
ifname - interface name (optional)
Returns
- success: DUID
- failure: exception
set_dhcp_duid
Set the DCHP DUID.
Syntax
net.set_dhcp_duid(ifname = interface_name duid = duid)
Parameters
ifname - interface name (optional)duid - DUID to set
Returns
- success: 0
- failure: exception
NTP Servers
Use these commands to manage the NTP servers list.
add_ntp_servers
Add one or more NTP servers to the NTP servers list.
Syntax
net.add_ntp_servers(ntpservers = ["server1", "server2", ...])
Parameters
ntpservers - Comma-separated list of NTP servers to add to the list.
Returns
- success: 0
- failure: exception
del_ntp_servers
Remove one or more NTP servers from the NTP servers list.
Syntax
net.del_ntp_servers(ntpservers = ["server1", "server2", ...])
Parameters
ntpservers - Comma-separated list of NTP servers to remove from the list.
Returns
- success: 0
- failure: exception
get_ntp_servers
Get the NTP servers list.
Syntax
net.get_ntp_servers()
Returns
- success: NTP servers list
- failure: exception
set_ntp_servers
Set the NTP servers list.
Syntax
net.set_ntp_servers(ntpservers = ["server1", "server2", ...])
Parameters
ntpservers - Comma-separated list of NTP servers to set in the list.
Returns
- success: 0
- failure: exception
get_hostname
Get the host name.
Syntax
net.get_hostname()
Returns
- success: host name
- failure: exception
set_hostname
Set the host name.
Syntax
net.set_hostname(hostname)
Parameters
hostname - name to assign to the host
Returns
- success: 0
- failure: exception
wait_for_ip
Wait for the specified interface to acquire a valid IP address of the specified IP address type.
Syntax
net.wait_for_ip(ifname = interface_name, timeout = timeout, addrtypes = [ipv4, ipv6, static_ipv4, static_ipv6, dhcp_ipv4, dhcp_ipv6, auto_ipv6, link_local_ipv6])
Parameters
ifname - interface nametimeout - maximum time (in seconds) to wait (until the link is up) before timing out of the request; specify 0 for no timeout (wait indefinitely)addrtypes - one of the following address types: ipv4, ipv6, static_ipv4, static_ipv6, dhcp_ipv4, dhcp_ipv6, auto_ipv6, or link_local_ipv6
Returns
- success: 0 (when the link has an IP of the specified type)
- failure: exception (for example, timeout expired)
wait_for_link_up
Wait for the specified interface to come up.
Syntax
net.wait_for_link_up(ifname = interface_name, timeout = timeout)
Parameters
ifname - interface nametimeout - maximum time (in seconds) to wait (until the link is up) before timing out of the request; specify 0 for no timeout (wait indefinitely)
Returns
- success: 0 (when link is up)
- failure: exception (for example, timeout expired)
get_network_param
Get the specified network configuration parameter for the specified interface or filename.
Syntax
net.get_network_param(object = IfName or Filename, paramname = SectionName_KeyName)
Parameters
object - an interface name (for example, "eth0") or a file name (for example, /etc/systemd/resolved.conf)paramname - name of a parameter associated with the object; specified in the format SectionName_KeyName (for example, Link_MTUBytes represents the MtuBytes key in [Link] section in https://www.freedesktop.org/software/systemd/man/systemd.network.html)
Returns
- success: 0
- failure: exception
set_network_param
Set the value of a network configuration parameter for the specified interface or filename.
Syntax
net.set_network_param(object = interface_name or filename, paramname = SectionName_KeyName, paramvalue = key_value)
Parameters
object - an interface name (for example, "eth0") or a file name (for example, /etc/systemd/resolved.conf)paramname - name of a parameter associated with the object; specified in the format SectionName_KeyName (for example, Link_MTUBytes represents the MtuBytes key in [Link] section in https://www.freedesktop.org/software/systemd/man/systemd.network.html)
Returns
- success: 0
- failure: exception
4.5.16 -
Photon OS includes the following networking tools:
tcpdump. A networking tool that captures and analyzes packets on a network interface. tcpdump is not available with the minimal version of Photon OS but available in the repository. The minimal version includes the iproute2 tools by default.
You can install tcpdump and its accompanying package libpcap, a C/C++ library for capturing network traffic, by using tdnf:
tdnf install tcpdump
- **netcat**. A tool to send data over network connections with TCP or UDP. This tool is not included in either the minimal or the full version of Photon OS. But since `netcat` furnishes powerful options for analyzing, troubleshooting, and debugging network connections, you might want to install it. To install `netcat', run the following command:

    ```
tdnf install netcat
4.6 - Prioritize eth0 Route Over WLAN
You can prioritise the eth0 route over the WLAN route. Perform the following steps:
Modify the /etc/systemd/network/99-dhcp-en.network file and add the following content:
[DHCP]
RouteMetric=512
Restart systemd-networkd.
4.7 - Cloud-Init on Photon OS
The minimal and full versions of Photon OS include the cloud-init service as a built-in component. Cloud-init is a set of Python scripts that initialize cloud instances of Linux machines. The cloud-init scripts configure SSH keys and run commands to customize the machine without user interaction. The commands can set the root password, create a hostname, configure networking, write files to disk, upgrade packages, run custom scripts, and restart the system.
4.7.1 - Cloud-Init Overview
cloud-init is a multi-distribution package that handles early initialization of a cloud instance.
In-depth documentation for cloud-init is available here:
https://cloudinit.readthedocs.org/en/latest/
Supported installations
Both the full version of and the minimal version of Photon OS support cloud-init.
Supported capabilities
Photon OS supports the following cloud-init capabilities:
- run commands: execute a list of commands with output to console.
- configure ssh keys: add an entry to ~/.ssh/authorized_keys for the configured user.
- install package: install additional packages on first boot.
- configure networking: update /etc/hosts, hostname, etc.
- write files: write arbitrary files to disk.
- add yum repository: add a yum repository to /etc/yum.repos.d.
- create groups and users: add groups and users to the system and set properties for them.
- run yum upgrade: upgrade all packages.
- reboot: reboot or power off when done with cloud-init.
Getting Started
The Amazon Machine Image of Photon OS has an ec2 datasource turned on by default so an ec2 configuration is accepted.
However, for testing, the following methods provide ways to do cloud-init with a standalone instance of Photon OS.
Using a Seed ISO
This will be using the nocloud data source. In order to initialize the system in this way, an ISO file needs to be created with a meta-data file and an user-data file as shown below:
$ { echo instance-id: iid-local01; echo local-hostname: cloudimg; } > meta-data
$ printf "#cloud-config\nhostname: testhost\n" > user-data
$ genisoimage  -output seed.iso -volid cidata -joliet -rock user-data meta-data
Attach the seed.iso generated above to your machine and reboot for the init to take effect.
In this case, the hostname is set to testhost.
Using a Seed Disk File
To init using local disk files, do the following:
mkdir /var/lib/cloud/seed/nocloud
cd /var/lib/cloud/seed/nocloud
$ { echo instance-id: iid-local01; echo local-hostname: cloudimg; } > meta-data
$ printf "#cloud-config\nhostname: testhost\n" > user-data
Reboot the machine and the hostname will be set to testhost.
Frequencies
Cloud-init modules have predetermined frequencies. Based on the frequency setting, multiple runs will yield different results. For the scripts to always run, remove the instances directory before rebooting.
rm -rf /var/lib/cloud/instances
Module Frequency Info
| Name | Frequency |
|---|
| disable_ec2_metadata | Always |
| users_groups | Instance |
| write_files | Instance |
| update_hostname | Always |
| final_message | Always |
| resolv_conf | Instance |
| growpart | Always |
| update_etc_hosts | Always |
| power_state_change | Instance |
| phone_home | Instance |
4.7.2 - Deploy Photon OS With `cloud-init`
You can deploy Photon OS with cloud-init in the following ways:
- As a stand-alone Photon machine
- In Amazon Elastic Compute Cloud, called EC2
- In the Google cloud through the Google Compute Engine, or GCE
- In a VMware Vsphere private cloud
When a cloud instance of Photon OS starts, cloud-init requires a data source. The data source can be an EC2 file for Amazon’s cloud platform, a seed.iso file for a stand-alone instance of Photon OS, or the internal capabilities of a system for managing virtual machines, such as VMware vSphere or vCenter. Cloud-init also includes data sources for OpenStack, Apache CloudStack, and OVF. The data source comprises two parts:
- Metadata
- User data
The metadata gives the cloud service provider instructions on how to implement the Photon OS machine in the cloud infrastructure. Metadata typically includes the instance ID and the local host name.
The user data contains the commands and scripts that Photon OS executes when it starts in the cloud. The user data commonly takes the form of a shell script or a YAML file containing a cloud configuration. The cloud-init overview and cloud-init documentation contains information about the types of data sources and the formats for metadata and user data.
On Photon OS, cloud-init is enabled and running by default. You can use the following command to check the status:
systemctl status cloud-init
The Photon OS directory that contains the local data and other resources for cloud-init is /var/lib/cloud.
Photon OS stores the logs for cloud-init in the /var/log/cloud-init.log file.
The following sections demonstrate how to use cloud-init to customize a stand-alone Photon OS machine, instantiate a Photon OS machine in the Amazon EC2 cloud, and deploy a virtual machine running Photon OS in vSphere. Each section uses a different combination of the available options for the metadata and the user data that make up the data source. Specifications, additional options, and examples appear in the cloud-init documentation.
4.7.3 - Customizing Guest OS using Cloud-Init
A guest operating system is an operating system that runs inside a virtual machine. You can install a guest operating system in a virtual machine and control guest operating system customization for virtual machines created from vApp templates.
When you customize your guest OS you can set up a virtual machine with the operating system that you want.
Procedure
- Perform the following steps before cloning or customizing the guest operating system:
- Ensure that
disable_vmware_customization is set to false in the /etc/cloud/cloud.cfg file. - Set
manage_etc_hosts: true in the /etc/cloud/cloud.cfg file. - Make a backup of the
99-disable-networking-config.cfg file and delete the file from /etc/cloud/cloud.cfg.d folder after backup. - Clone the VM or customize the guest operating system.
- After you clone your VM or customize the guest operating system, perform the following steps:
- Ensure that
disable_vmware_customization is set to true in the /etc/cloud/cloud.cfg file in the newly created VM and the VM from where cloning was initiated. - Remove
manage_etc_hosts: true from the /etc/cloud/cloud.cfg file in the newly created VM and the VM from where cloning was initiated. - Add a copy of the backed up file
99-disable-networking-config.cfg to its original folder /etc/cloud/cloud.cfg.d in the newly created VM and the VM from where cloning was initiated.
Note:
- The
disable_vmware_customization flag in /etc/cloud/cloud.cfg.d file decides which customization workflow to be initiated.
- Setting this to false invokes the Cloud-Init GOS customization workflow.
- Setting this to true invokes the traditional GOSC script based customization workflow.
When the manage_etc_hosts flag is set to true, Cloud-Init can edit the /etc/hosts file with the updated values.
When the flag is set to true Cloud-Init edits the /etc/hosts file, even when there is no cloud config metadata available. Remove this entry once the Cloud-Init GOS customization is done, to stop Cloud-Init from editing /etc/hosts file and set a fallback configuration.
The 99-disable-networking-config.cfg file is packaged as part of Cloud-Init RPM in photon and it prevents Cloud-Init from configuring the network. Delete this file before starting the Cloud-Init customization and then paste the backup of the file in the /etc/cloud/cloud.cfg.d/ folder once the cloud-init workflow is complete. It is important to replace this file after Cloud-Init customization to avoid removal of network configuration in the Cloud-Init instance.
Result
Cloud-Init guest OS customization is now enabled.
4.7.4 - Creating a Stand-Alone Photon Machine With cloud-init
Cloud-init can customize a Photon OS virtual machine by using the nocloud data source. The nocloud data source bundles the cloud-init metadata and user data into an ISO that acts as a seed when you boot the machine. The seed.iso delivers the metadata and the user data without requiring a network connection.
Procedure
Create the metadata file with the following lines in the YAML format and name it meta-data:
 instance-id: iid-local01
    	local-hostname: cloudimg
Create the user data file with the following lines in YAML and name it user-data:
  #cloud-config
  hostname: testhost
  packages:
   - vim
Generate the ISO that will serve as the seed. The ISO must have the volume ID set to cidata. In the following example, the ISO is generated on an Ubuntu 14.04 computer containing the files named meta-data and user-data in the local directory:
genisoimage -output seed.iso -volid cidata -joliet -rock user-data meta-data
The ISO now appears in the current directory:
```
steve@ubuntu:~$ ls
meta-data seed.iso user-data
Optionally, check the ISO that you generated on Ubuntu by transferring the ISO to the root directory of your Photon OS machine and then running the following command:
cloud-init --file seed.iso --debug init
After running the cloud-init command above, check the cloud-init log file:
more /var/log/cloud-init.log
Attach the ISO to the Photon OS virtual machine as a CD-ROM and reboot it so that the changes specified by seed.iso take effect. In this case, cloud-init sets the hostname and adds the vim package.
4.7.5 - Customizing a Photon OS Machine on EC2
You can upload an ami image of Photon OS to Amazon Elastic Compute Cloud (EC2) and customize the Photon OS machine by using cloud-init with an EC2 data source. The Amazon machine image version of Photon OS is available as a free download on Packages URL at the location https://packages.vmware.com/photon/.
The cloud-init service is commonly used on EC2 to configure the cloud instance of a Linux image. On EC2, cloud-init sets the .ssh/authorized_keys file to let you log in with a private key from another computer, that is, a computer besides the workstation that you are already using to connect with the Amazon cloud.
Example
The cloud-config user-data file that appears in the following example contains abridged SSH authorized keys to show you how to set them.
Prerequisites
Procedure
- Upload the Photon OS
.ami image to the Amazon cloud and configure it with cloud-init. The correct virtualization type for Photon OS is hvm.
$ mkdir bundled
	$ tar -zxvf ./photon-ami.tar.gz
	$ ec2-bundle-image -c ec2-certificate.pem -k ec2-privatekey.pem -u <EC2 account id>  --arch x86_64 --image photon-ami.raw --destination ./bundled/
	$ aws s3 mb s3://<bucket-name>
	$ ec2-upload-bundle --manifest ./bundled/photon-ami.manifest.xml --bucket <bucket-name> --access-key <Account Access Key> --secret-key <Account Secret key>
	$ ec2-register <bucket-name>/photon-ami.manifest.xml --name photon-ami --architecture x86_64 --virtualization-type hvm
- Import the cloud-config data. In the following command, the
--user-data-file option instructs cloud-init to import the cloud-config data in user-data.txt. The command assumes you have uploaded the user-data.txt file and created the keypair mykeypair and the security group photon-sg.
$ ec2-run-instances <ami-ID> --instance-type m3.medium -g photon-sg --key mykeypair --user-data-file user-data.txt
Describe the instance to see its ID:
$ ec2-describe-instances
- Run the following command to obtain its public IP address, which you can use to connect to the instance with SSH:
$ aws ec2 describe-instances --instance-ids <instance-id> --query 'Reservations[*].Instances[*].PublicIpAddress' --output=text
$ ec2-describe-images
- Run the following commands to terminate the machine. It is important to shut down the machine because Amazon charges you while the host is running down.
$ ec2-deregister <ami-image-identifier>
$ ec2-terminate-instances <instance-id>
Result
The following are the contents of the user-data.txt file that cloud-init applies to the machine the first time that it boots up in the cloud:
#cloud-config
    hostname: photon-on-01
    groups:
    - cloud-admins
    - cloud-users
    users:
    - default
    - name: photonadmin
       gecos: photon test admin user
       primary-group: cloud-admins
       groups: cloud-users
       lock-passwd: false
       passwd: vmware
    - name: photonuser
       gecos: photon test user
       primary-group: cloud-users
       groups: users
       passwd: vmware
    packages:
    - vim
	ssh_authorized_keys:
	 - ssh-rsa MIIEogIBAAKCAQEAuvHKAjBhpwuomcUTpIzJWRJAe71JyBgAWrwqyN1Mk5N+c9X5
	Ru2fazFA7WxQSD1KyTEvcuf8JzdBfrEJ0v3/nT2x63pvJ8fCl6HRkZtHo8zRu8vY
	KYTZS/sdvM/ruubHfq1ldRpgtYSqbkykoe6PCQIDAQABAoIBAEgveQtjVzHDhLTr
	rmwJmO316ERfkQ/chLaElhi9qwYJG/jqlNIISWFyztqD1b3fxU6m5MOBIujh7Xpg
	... ec3test@example.com
You can view the cloud-init output log file on EC2 at /var/log/cloud-init-output.log.
For more information on using cloud-init user data on EC2, see Running Commands on Your Linux Instance at Launch.
For more information on how to get Photon OS up and running on EC2 and run a containerized application in the Docker engine, see Running Photon OS on Amazon Elastic Cloud Compute.
With Photon OS, you can also build cloud images on Google Compute Engine and other cloud providers. For more information, see Compatible Cloud Images.
4.7.6 - Running a Photon OS Machine on GCE
Photon OS comes in a preconfigured image ready for Google Cloud Engine.
Example
The example in this section shows how to create a Photon OS instance on Google Cloud Engine with and without cloud-init user data.
Prerequisites
- You must have set up a GCE account and are ready to pay Google for its cloud services. The GCE-ready version of Photon OS is licensed as described in the Photon OS LICENSE guide. GCE and other environment-specific Packages are stored in the open using the following URL pattern:
https://packages.vmware.com/photon/<release>/<revision>/gce
For example, the current GA revision of the 4.0 release would be located at the following URL: https://packages.vmware.com/photon/4.0/GA/gce/, and the 3.0 GA version would be located at: https://packages.vmware.com/photon/3.0/GA/gce/.
The GCE-ready image of Photon OS contains packages and scripts that prepare it for the Google cloud to save you time as you implement a compute cluster or develop cloud applications. The GCE-ready version of Photon OS adds the following packages to the [packages installed with the minimal version](https://github.com/vmware/photon/blob/master/common/data/packages_minimal.json):

```
sudo, tar, which, google-daemon, google-startup-scripts,
kubernetes, perl-DBD-SQLite, perl-DBIx-Simple, perl, ntp
- Verify that you have the `gcloud command-line tool`.
    For more information see,  [https://cloud.google.com/compute/docs/gcloud-compute](https://cloud.google.com/compute/docs/gcloud-compute).

### Procedure

1. Use the following commands to create an instance of Photon OS from the Photon GCE image without using cloud-init. In the commands, you must replace `<bucket-name>` with the name of your bucket and the path to the Photon GCE tar file.

    ```
$ gcloud compute instances list
	$ gcloud compute images list
	$ gcloud config list
	$ gsutil mb gs://<bucket-name>
	$ gsutil cp <path-to-photon-gce-image.tar.gz> gs://<bucket-name>/photon-gce.tar.gz
	$ gcloud compute images create photon-gce-image --source-uri gs://<bucket-name>/photon-gce.tar.gz
	$ gcloud compute instances create photon-gce-vm --machine-type "n1-standard-1" --image photon-gce-image
	$ gcloud compute instances describe photon-gce-vm
To create a new instance of a Photon OS machine and configure it with a cloud-init user data file, replace the gcloud compute instances create command in the example above with the following command. Before running this command, you must upload your user-data file to Google’s cloud infrastructure and replace <path-to-userdata-file> with its path and file name.
gcloud compute instances create photon-gce-vm --machine-type "n1-standard-1" --image photon-gce-vm --metadata-from-file=user-data=<path-to-userdata-file>
You can also add a cloud-init user-data file to an existing instance of a Photon OS machine on GCE:
```
gcloud compute instances add-metadata photon-gce-vm --metadata-from-file=user-data=<path-to-userdata-file>
4.8 - Containers
A container is a process that runs on the Photon OS host with its own isolated application, file system, and networking.
Photon OS includes the open source version of Docker. With Docker, Photon OS becomes a Linux run-time host for containers, that is, a Linux cloud container.
The full version of Photon OS includes Kubernetes so you can manage clusters of containers.
4.8.1 - Docker Containers
On Photon OS, the Docker daemon is enabled by default. To view the status of the daemon, run the following command:
systemctl status docker
Docker is loaded and running by default on the full version of Photon OS. On the minimal version, it is loaded but not running by default. To start it, run the following command:
systemctl start docker
To obtain information about Docker, run the following command as root:
docker info
After Docker is enabled and started, you can create a container. For example, run the following docker command as root to create a container running Ubuntu 14.04 with an interactive terminal shell:
docker run -i -t ubuntu:14.04 /bin/bash
Photon OS also enables you to run a docker container that runs Photon OS:
docker run -i -t photon /bin/bash
4.8.2 - Kubernetes
The Kubernetes package provides several services: kube-apiserver, kube-scheduler, kube-controller-manager, kubelet, kube-proxy. These services are managed by systemd. Their configuration resides in a central location: /etc/kubernetes.
For more information, see Running Kubernetes on Photon OS.
4.9 - Changing the Locale
You can change the locale if the default locale does not meet your requirements.
To find the locale, run the the localectl command:
localectl
System Locale: LANG=en_US.UTF-8
VC Keymap: n/a
X11 Layout: n/a
To change the locale, choose the languages that you want from /usr/share/locale/locale.alias, add them to /etc/locale-gen.conf, and then regenerate the locale list by running the following command as root:
locale-gen.sh
Finally, run the following command to set the new locale, replacing the example (en_US.UTF-8) with the locale that you require:
localectl set-locale LANG="de_CH.UTF-8" LC_CTYPE="de_CH.UTF-8"
Changing the keyboard layout
See which keymaps are currently available on your system:
localectl list-keymaps
If the response to that command is the all-too-common Couldn't find any console keymaps, install the key tables files and utilities:
tdnf install kbd
You should now be able to find a keymap matching your keyboard. As an example, here I’m searching for the German keyboard layout (so I’m expecting something with de in the name) used in Switzerland:
localectl list-keymaps | grep de
...
de-latin1
de-latin1-nodeadkeys
de-mobii
de_CH-latin1
de_alt_UTF-8
...
de_CH-latin1 seems to be what we’re looking for, so change your current layout to that keymap:
localectl set-keymap de_CH-latin1
and confirm that the change has been made:
localectl
System Locale: LANG=de_CH.UTF-8
VC Keymap: de_CH-latin1
X11 Layout: n/a
4.10 - Security Policy
This section describes the security policy of Photon OS.
4.10.1 - Default Firewall Settings
The design of Photon OS emphasizes security. On the minimal and full versions of Photon OS, the default security policy turns on the firewall and drops packets from external interfaces and applications. As a result, you might need to add rules to iptables to permit forwarding, allow protocols like HTTP, and open ports. You must configure the firewall for your applications and requirements.
The default iptables on the full version have the following settings:
iptables --list
Chain INPUT (policy DROP)
target prot opt source destination
ACCEPT all -- anywhere anywhere
ACCEPT all -- anywhere anywhere ctstate RELATED,ESTABLISHED
ACCEPT tcp -- anywhere anywhere tcp dpt:ssh
Chain FORWARD (policy DROP)
target prot opt source destination
Chain OUTPUT (policy DROP)
target prot opt source destination
ACCEPT all -- anywhere anywhere
For more information on how to change the settings, see the man page for iptables.
Although the default iptables policy accepts SSH connections, the sshd configuration file on the full version of Photon OS is set to reject SSH connections. See Permitting Root Login with SSH.
If you are unable to ping a Photon OS machine, check the firewall rules. To verify if the rules allow connectivity for the port and protocol, change the iptables commands by using lsof commands to see the processes listening on ports:
lsof -i -P -n
4.10.2 - Default Permissions and umask
The umask on Photon OS is set to 0027.
When you create a new file with the touch command as root, the default on Photon OS is to set the permissions to 0640–which translates to read-write for user, read for group, and no access for others. Here’s an example:
touch newfile.md
stat newfile.md
File: 'newfile.md'
Size: 0 Blocks: 0 IO Block: 4096 regular empty file
Device: 801h/2049d Inode: 316454 Links: 1
Access: (0640/-rw-r-----) Uid: ( 0/ root) Gid: ( 0/ root)
When you create a directory as root, Photon OS sets the permissions to 0750:
mkdir newdir
stat newdir
File: 'newdir'
Size: 4096 Blocks: 8 IO Block: 4096 directory
Device: 801h/2049d Inode: 316455 Links: 2
Access: (0750/drwxr-x---) Uid: ( 0/ root) Gid: ( 0/ root)
Because the mkdir command uses the umask to modify the permissions placed on newly created files or directories, you can see umask at work in the permissions of the new directory. Its default permissions are set at 0750 after the umask subtracts 0027 from the full set of open permissions, 0777.
Similarly, a new file begins as 0666 if you were to set umask to 0000. But because umask is set by default to 0027, a new file’s permissions are set to 0640.
So be aware of the default permissions on the directories and files that you create. Some system services and applications might require permissions other than the default. The systemd network service, for example, requires user-defined configuration files to be set to 644, not the default of 640. Thus, after you create a network configuration file with a .network extension, you must run the chmod command to set the new file’s mode bits to 644. For example:
chmod 644 10-static-en.network
For more information on permissions, see the man pages for stat, umask, and acl.
4.10.3 - Disabling TLS 1.0 to Improve Transport Layer Security
Photon OS includes GnuTLS to help secure the transport layer. GnuTLS is a library that implements the SSL and TLS protocols to secure communications.
On Photon OS, SSL 3.0, which contains a known vulnerability, is disabled by default.
However, TLS 1.0, which also contains known vulnerabilities, is enabled by default.
To turn off TLS 1.0, perform the following steps:
- Create a directory named
/etc/gnutls. - In
/etc/gnutls create a file named default-priorities. - In the
default-priorities file, specify GnuTLS priority strings that remove TLS 1.0 and SSL 3.0 but retain TLS 1.1 and TLS 1.2. - After adding a new
default-priorities file or after modifying it, you must restart all applications, including SSH, with an open TLS session for the changes to take effect.
The following is an example of a default-priorities file that contains GnuTLS priorities to disable TLS 1.0 and SSL 3.0:
cat /etc/gnutls/default-priorities
SYSTEM=NONE:!VERS-SSL3.0:!VERS-TLS1.0:+VERS-TLS1.1:+VERS-TLS1.2:+AES-128-CBC:+RSA:+SHA1:+COMP-NULL
In this example, the priority string imposes system-specific policies. The NONE keyword means that no algorithms, protocols, or compression methods are enabled, so that you can enable specific versions individually later in the string. The priority string then specifies that SSL version 3.0 and TLS version 1.0 be removed, as marked by the exclamation point. The priority string then enables, as marked by the plus sign, versions 1.1 and 1.2 of TLS. The cypher is AES-128-CBC. The key exchange is RSA. The MAC is SHA1. And the compression algorithm is COMP-NULL.
On Photon OS, you can verify the system-specific policies in the default-priorities file as follows:
Concatenate the default-priorities file to check its contents:
root@photon-rc [ ~ ]# cat /etc/gnutls/default-priorities
SYSTEM=NONE:!VERS-SSL3.0:!VERS-TLS1.0:+VERS-TLS1.1:+VERS-TLS1.2:+AES-128-CBC:+RSA:+SHA1:+COMP-NULL
1. Run the following command to check the protocols that are enabled for the system:
```
root@photon-rc [ /etc/gnutls ]# gnutls-cli --priority @SYSTEM -l
Cipher suites for @SYSTEM
TLS_RSA_AES_128_CBC_SHA1 0x00, 0x2f SSL3.0
Certificate types: none
Protocols: VERS-TLS1.1, VERS-TLS1.2
Compression: COMP-NULL
Elliptic curves: none
PK-signatures: none
For information about the GnuTLS priority strings, see https://gnutls.org/manual/html_node/Priority-Strings.html.
For information about the vulnerability in SSL 3.0, see SSL 3.0 Protocol Vulnerability and POODLE Attack.
For information about the vulnerabilities in TLS 1.0, see Guidelines for the Selection, Configuration, and Use of Transport Layer Security (TLS) Implementations.
4.11 - Photon RPM OSTree: a simple guide
4.11.1 - Introduction
RPM-OSTree Overview
OSTree is a tool to manage bootable, immutable, versioned filesystem trees. Unlike traditional package managers like rpm or dpkg that know how to install, uninstall, configure packages, OSTree has no knowledge of the relationship between files. But when you add rpm capabilities on top of OSTree, it becomes RPM-OSTree, meaning a filetree replication system that is also package-aware.
The idea behind it is to use a client/server architecture to keep your Linux installed machines (physical or VM) in sync with the latest bits, in a predictable and reliable manner. To achieve that, OSTree uses a git-like repository that records the changes to any file and replicate them to any subscriber.
A system administrator or an image builder developer takes a base Linux image, prepares the packages and other configuration on a server box, executes a command to compose a filetree that the host machines will download and then incrementally upgrade whenever a new change has been committed.
You may read more about OSTree here.
Why use RPM-OSTree in Photon?
There are several important benefits:
- Reliable, efficient: The filetree replication is simple, reliable and efficient. It will only transfer deltas over the network. If you have deployed two almost identical bootable images on same box (differing just by several files), it will not take twice the space. The new tree will have a set of hardlinks to the old tree and only the different files will have a separate copy stored to disk.
- Atomic: the filetree replication is atomic. At the end of a deployment, you are either booting from one deployment, or the other. There is no “partial deployed bootable image”. If anything bad happens during replication or deployment- power loss, network failure, your machine boots from the old image. There is even a tool option to cleanup old deployed (successfully or not) image.
- Manageable: You are provided simple tools to figure out exactly what packages have been installed, to compare files, configuration and package changes between versions.
- Predictable, repeatable: A big headache for a system administrator is to maintain a farm of computers with different packages, files and configuration installed in different order, that will result in exponential set of test cases. With RPM-OStree, you get identical, predictable installed systems.
As drawbacks, I would mention:
- Some applications configured by user on host may have compatibility issues if they save configuration or download into read only directories like /usr.
- People not used with “read only” file systems will be disappointed that they could no longer use RPM, yum, tdnf to install whatever they want. Think of this as an “enterprise policy”. They may circumvent this by customizing the target directory to a writable directory like /var or using rpm to install packages and record them using a new RPM repository in a writable place.
- Administrators need to be aware about the directories re-mapping specific to OSTree and plan accordingly.
Photon with RPM-OSTree installation profiles
Photon takes advantage of RPM-OSTree and offers several installation choices:
- Photon RPM-OSTree server - used to compose customized Photon OS installations and to prepare updates. I will call it for short ‘server’.
- Photon RPM-OSTree host connected to a default online server repository via http or https, maintained by VMware Photon OS team, where future updates will be published. This will create a minimal installation profile, but with the option to self-upgrade. I will call it for short ‘default host’.
- Photon RPM-OSTree host connected to a custom server repository. It requires a Photon RPM-OSTree Server installed in advance. I will call it for short ‘custom host’.
Terminology
In this section, the term OSTree refers to the general use of this technology, the format of the repository or replication protocol.
The term RPM-OSTree emphasizes the layer that adds RedHat Package Manager compatibility on both ends - at server and at host. However, since Photon OS is an RPM-based Linux, there are places in the documentation and even in the installer menus where OSTree may be used instead of RPM-OSTree when the distinction is not obvious or does not matter in that context.
When ostree and rpm-ostree are encountered, they refer to the usage of the specific Unix commands.
Finally, Photon RPM-OSTree is the application or implementation of the RPM-OStree system into Photon OS, materialized into two options: Photon Server and Photon Host (or client). Server or Host may be used with or without the Photon and/or RPM-OStree qualifier, but it means the same thing.
Sample code
Codes samples used throughout the book are small commands that can be typed at shell command prompt and do not require downloading additional files. As an alternative, one can remote connect via ssh, so cut & paste sample code from outside sources or copy files via scp will work. See the Photon Administration guide to learn how to enable ssh.
The samples assume that the following VMs have been installed - see the steps in the next chapters:
- A default host VM named photon-host-def.
- Two server VMs named photon-srv1 and photon-srv2.
- Two custom host VMs named photon-host-cus1 and photon-host-cus2, connected each to the corresponding server during install.
How to read this book
The RPM OSTree guide is structured to be used both as a sequential read and as a reference documentation.
If you are just interested in deploying a host system and keeping it up to date, then read Installing a Photon RPM-OSTree host against default server repository and Host updating operations.
If you want to install your own server and experiment with customizing packages for your Photon hosts, then read [Installing a Photon RPM-OSTree server](../creating-a-rpm-ostree-
server/) onwards. There are references to the concepts discussed throughout the book, if you need to understand them better.
However, if you want to read page by page, information is presented from simple to complex, although as with any technical book, we occasionally run into the chicken and egg problem - forward references to concepts that have yet to be explained later. In other cases, concepts are introduced and presented in great detail that may be seem hard to follow at first, but I promise they will make sense in the later pages when you get to use them.
RPM OSTree in Photon OS 3.0
This book is relevant to RPM OSTree in Photon OS 3.0.
Version 3.0 supports the following features:
- Upgrade
- Rollback
- Remote, compose, and rebase server
- Installation and uninstallation of packages with URL
- Installation and uninstallation of packages from default repos
- Automatic updates
4.11.2 - Installing a host against default server repository
RPM-OSTree Host default server repo installation option in Photon 3.0 will setup a profile similar to Photon Minimal, with the added benefit of being able to self-upgrade.
Who is this for?
The RPM-OSTree ‘default host’ is the easiest way to deploy a Photon RPM-OSTree host from ISO/cdrom, without the need to deploy and maintain an RPM-OSTree server. It is targeted at the user who relies on VMware Photon OS team to keep his or her system up-to-date, configured to get its updates from the official Photon 3.0 OSTree repository.
This is also the fastest way to install a host, as we’ve included in the ISO/cdrom an identical copy of the Photon 3.0 “starter” RPM-OSTree repository that is published online by VMware Photon OS team. So rather than pulling from the online repository, the installer pulls the repo from cdrom, which saves bandwidth and also reduces to zero the chances of failing due to a networking problem. After successful installation, any updates are going to be pulled from the official online repository, when Photon OS team will make them available.
Note: It is also possible to install an RPM-OSTree host against the official online repo via PXE boot, without the benefit of fast, local pull from cdrom. This will be covered in the PXE boot/kickstart chapter, as it requires additional configuration.
Installing the ISO
User will first download Photon OS ISO file that contains the installer, which is able to deploy any of the supported Photon installation profiles.
There are some steps common to all Photon installation profiles, starting with adding a VM in VMware Fusion, Workstation or ESXi, selecting the OS family, then customizing for disk size, CPU, memory size, network interface etc. (or leaving the defaults) and selecting the ISO image as cdrom. The installer will launch, that will go through disk partitioning and accepting the license agreement screens, followed by selecting an installation profile.
These steps are described at the page linked below, so I won’t repeat them, just that instead of setting up a Photon Minimal profile, we will install a Photon OSTree host:
Running Project Photon on Fusion.
Select the Photon OSTree Host option.

Continue with setting up a host name like photon1-def and a root password, re-confirm.
Then, select “Default OSTree Server” and continue.


When installation is over, the VM will reboot and will show in grub VMWare Photon/Linux 3.0_minimal (ostree), which will reassure that it’s booting from an OSTree image!

Boot, login and you are ready to use it.
To upgrade your host, see Host updating operations.
4.11.3 - Concepts in Action
Now that we have a fresh installed host (either as [[default|Photon-RPM-OSTree:-2-Installing-a-host-against-default-server-repository]] or [[custom|Photon-RPM-OSTree:-7-Installing-a-host-against-a-custom-server-repository]]), I can explain better the OStree concepts and see them in action.
Querying the deployed filetrees
The first thing to do is to run a command that tells us what is installed on the machine and when. Since it’s a fresh install from the CD, there is only one bootable filetree image deployed.
root@photon-host [ ~ ]# rpm-ostree status
* ostree://photon:photon/3.0/x86_64/minimal
Version: 3.0_minimal (2019-08-29T11:20:19Z)
Commit: a31a843985e314a9e70bcf09afe8d59f7351817d9fb743c2b6dab84f20833650
Bootable filetree version
3.0_minimal is not the Linux Photon OS release version, nor daily build, but rather a human readable, self-incrementing version associated with every commit that brings file/package updates. Think of this as version 0. The following versions are going to be 3.0_minimal.1, 3.0_minimal.2, 3.0_minimal.3 and so on.
Commit ID
The ID listed is actually the first 5 bytes (10 hex digits) of the commit hash. If you want to see the verbose mode, use the -v option.
root@photon-host [ ~ ]# rpm-ostree status -v
State: idle
AutomaticUpdates: disabled
Deployments:
* ostree://photon:photon/3.0/x86_64/minimal
Version: 3.0_minimal (2019-08-29T11:20:19Z)
Commit: a31a843985e314a9e70bcf09afe8d59f7351817d9fb743c2b6dab84f20833650
`- photon (2019-08-29T11:18:53Z)
Staged: no
StateRoot: photon
RPM OStree Options
To see the list of options available with the rpm-ostree command, use the -h option.
root@photon-host [ ~ ]# rpm-ostree -h
Usage:
rpm-ostree [OPTION?] COMMAND
Builtin Commands:
compose Commands to compose a tree
cleanup Clear cached/pending data
db Commands to query the RPM database
deploy Deploy a specific commit
rebase Switch to a different tree
rollback Revert to the previously booted tree
status Get the version of the booted system
upgrade Perform a system upgrade
reload Reload configuration
usroverlay Apply a transient overlayfs to /usr
cancel Cancel an active transaction
initramfs Enable or disable local initramfs regeneration
install Overlay additional packages
uninstall Remove overlayed additional packages
override Manage base package overrides
reset Remove all mutations
refresh-md Generate rpm repo metadata
kargs Query or modify kernel arguments
Help Options:
-h, --help Show help options
Application Options:
--version Print version information and exit
OSname
The OS Name identifies the operating system installed. All bootable filetrees for the same OS will share the /var directory, in other words applications installed in one booted image into this directory will be available in all other images.
If a new set of images are created for a different OS, they will receive a fresh copy of /var that is not shared with the previous OS images for the initial OS. In other words, if a machine is dual boot for different operating systems, they will not share each other’s /var content, however they will still merge 3-way /etc.
Refspec
The Refspec is a branch inside the repo, expressed in a hierarchical way. In this case, it’s the default branch that will receive package updates for the Photon OS 1.0 Minimal installation profile on Intel platforms. There could be other branches in the future, for example photon/3.0/x86_64/full that will match the Full installation profile (full set of packages installed).
Think of Refspec as the head of the minimal branch (just like in git) at the origin repo. On the replicated, local repo at the host, minimal is a file that contains the latest commit ID known for that branch.
root@photon-host [ ~ ]# cat /ostree/repo/refs/remotes/photon/photon/3.0/x86_64/minimal
a31a843985e314a9e70bcf09afe8d59f7351817d9fb743c2b6dab84f20833650
Why are there two ‘photon’ directory levels in the remotes path? The photon: prefix in the Refspec listed by rpm-ostree status corresponds to the first photon directory in the remotes path and is actually the name given to the remote that the host is connected to, which points to an http or https URL. We’ll talk about remotes later, but for now think of it as a namespace qualifier. The second photon is part of the Refspec path itself.
Deployments
We’ve used so far rpm-ostree. The same information can be obtained running an ostree command:
root@photon-host [ ~ ]# ostree admin status
* photon a31a843985e314a9e70bcf09afe8d59f7351817d9fb743c2b6dab84f20833650.0
Version: 3.0_minimal
origin refspec: photon:photon/3.0/x86_64/minimal
But where is this information stored? As you may have guessed, the local repo stores the heads of the deployed trees - the most recent commitment ID, just like Git does:
root@photon-host [ ~ ]# cat /ostree/repo/refs/heads/ostree/0/1/0
a31a843985e314a9e70bcf09afe8d59f7351817d9fb743c2b6dab84f20833650
This also where this command that lists the references (local heads and remotes) takes its data from:
root@photon-host [ ~ ]# ostree refs
ostree/0/1/0
photon:photon/3.0/x86_64/minimal
Based on that, it could find the root of the deployment that it boots from. The actual filetree is deployed right here:
root@photon-host [ ~ ]# ls -l /ostree/deploy/photon/deploy/a31a843985e314a9e70bcf09afe8d59f7351817d9fb743c2b6dab84f20833650.0
total 36
lrwxrwxrwx 2 root root 7 Sep 4 04:58 bin -> usr/bin
drwxr-xr-x 2 root root 4096 Jan 1 1970 boot
drwxr-xr-x 2 root root 4096 Jan 1 1970 dev
drwxr-xr-x 34 root root 4096 Sep 4 05:00 etc
lrwxrwxrwx 2 root root 8 Sep 4 04:58 home -> var/home
lrwxrwxrwx 3 root root 7 Sep 4 04:58 lib -> usr/lib
lrwxrwxrwx 3 root root 7 Sep 4 04:58 lib64 -> usr/lib
lrwxrwxrwx 2 root root 9 Sep 4 04:58 media -> run/media
lrwxrwxrwx 2 root root 7 Sep 4 04:58 mnt -> var/mnt
lrwxrwxrwx 2 root root 7 Sep 4 04:58 opt -> var/opt
lrwxrwxrwx 2 root root 14 Sep 4 04:58 ostree -> sysroot/ostree
drwxr-xr-x 2 root root 4096 Jan 1 1970 proc
lrwxrwxrwx 2 root root 12 Sep 4 04:58 root -> var/roothome
drwxr-xr-x 2 root root 4096 Jan 1 1970 run
lrwxrwxrwx 2 root root 8 Sep 4 04:58 sbin -> usr/sbin
lrwxrwxrwx 2 root root 7 Sep 4 04:58 srv -> var/srv
drwxr-xr-x 2 root root 4096 Jan 1 1970 sys
drwxr-xr-x 2 root root 4096 Jan 1 1970 sysroot
lrwxrwxrwx 2 root root 11 Sep 4 04:58 tmp -> sysroot/tmp
drwxr-xr-x 10 root root 4096 Jan 1 1970 usr
drwxr-xr-x 8 root root 4096 Sep 4 04:59 var
So how is a deployment linked to a specific branch, originating from a remote repo? Well, there is a file next to the deployed filetree root directory with the same name and .origin suffix, that contains exactly this info:
root@photon-host [ ~ ]# cat /ostree/deploy/photon/deploy/a31a843985e314a9e70bcf09afe8d59f7351817d9fb743c2b6dab84
f20833650.0.origin
[origin]
refspec=photon:photon/3.0/x86_64/minimal
Fast forwarding a bit, if there is a new deployment due to an upgrade or rebase, a new filetree will be added at the same level, and a new .origin file will tie it to the remote branch it originated from.
The photon directory in the path is the actual OSname. Multiple deployments of same OS will share a writable /var folder.
root@photon-host [ ~ ]# ls -l /ostree/deploy/photon/var/
total 52
drwxr-xr-x 4 root root 4096 Sep 4 05:00 cache
drwxr-xr-x 2 root root 4096 Sep 4 05:00 home
drwxr-xr-x 14 root root 4096 Sep 4 05:00 lib
drwxr-xr-x 2 root root 4096 Sep 4 05:00 local
lrwxrwxrwx 1 root root 11 Sep 4 04:59 lock -> ../run/lock
drwxr-xr-x 4 root root 4096 Sep 4 05:00 log
drwxr-xr-x 2 root root 4096 Sep 4 05:00 mail
drwxr-xr-x 2 root root 4096 Sep 4 05:00 mnt
drwxr-xr-x 4 root root 4096 Sep 4 05:00 opt
drwx------ 3 root root 4096 Sep 4 05:25 roothome
lrwxrwxrwx 1 root root 6 Sep 4 04:59 run -> ../run
drwxr-xr-x 2 root root 4096 Sep 4 05:00 spool
drwxr-xr-x 2 root root 4096 Sep 4 05:00 srv
drwxrwxrwt 5 root root 4096 Sep 4 05:34 tmp
drwxr-xr-x 11 root root 4096 Sep 4 05:00 usrlocal
4.11.4 - Querying For Commit File and Package Metadata
There are several ostree and rpm-ostree commands that list file or package data based on either the Commit ID, or Refspec. If Refspec is passed as a parameter, it’s the same as passing the most recent commit ID (head) for that branch.
Commit history
For a host that is freshly installed, there is only one commit in the history for the only branch.
root@photon-host [ ~ ]# ostree log photon/3.0/x86_64/minimal
commit a31a843985e314a9e70bcf09afe8d59f7351817d9fb743c2b6dab84f20833650
ContentChecksum: e91261daf8d60074f334a7ebf81d3b930c3fc88c765f994f79ab2445296f03c5
Date: 2019-08-29 11:20:19 +0000
Version: 3.0_minimal
This commit has no parent; if there was an older commit, it would have been listed too. We can get the same listing (either nicely formatted or raw variant data) by passing the Commit ID. Just the first several hex digits will suffice to identify the commit ID. We can either request to be displayed in a pretty format, or raw - the actual C struct.
root@photon-host [ ~ ]# ostree log a31a
commit a31a843985e314a9e70bcf09afe8d59f7351817d9fb743c2b6dab84f20833650
ContentChecksum: e91261daf8d60074f334a7ebf81d3b930c3fc88c765f994f79ab2445296f03c5
Date: 2019-08-29 11:20:19 +0000
Version: 3.0_minimal
root@photon-host [ ~ ]# ostree log a31a --raw
commit a31a843985e314a9e70bcf09afe8d59f7351817d9fb743c2b6dab84f20833650
({'rpmostree.inputhash': <'a3e8f3f6ef6e93c2ed6ce9edd1e9e80c93a36ecda0fed0d78f607e6ec3179d04'>, 'rpmostree.rpmmd-repos': <[{'id': <'photon'>, 'timestamp': <uint64 1567077533>}]>, 'version': <'3.0_minimal'>, 'rpmostree.rpmdb.pkglist': <[('Linux-PAM', '0', '1.3.0', '1.ph3', 'x86_64'), ('attr', '0', '2.4.48', '1.ph3', 'x86_64'), ('autogen-libopts', '0', '5.18.16', '1.ph3', 'x86_64'), ('bash', '0', '4.4.18', '1.ph3', 'x86_64'), ('bc', '0', '1.07.1', '1.ph3', 'x86_64'), ('binutils', '0', '2.31.1', '6.ph3', 'x86_64'), ('bridge-utils', '0', '1.6', '1.ph3', 'x86_64'), ('bubblewrap', '0', '0.3.0', '2.ph3', 'x86_64'), ('bzip2', '0', '1.0.6', '10.ph3', 'x86_64'), ('bzip2-libs', '0', '1.0.6', '10.ph3', 'x86_64'), ('ca-certificates', '0', '20190521', '1.ph3', 'x86_64'), ('ca-certificates-pki', '0', '20190521', '1.ph3', 'x86_64'), ('coreutils', '0', '8.30', '1.ph3', 'x86_64'), ('cpio', '0', '2.12', '4.ph3', 'x86_64'), ('cracklib', '0', '2.9.6', '8.ph3', 'x86_64'), ('cracklib-dicts', '0', '2.9.6', '8.ph3', 'x86_64'), ('curl', '0', '7.61.1', '4.ph3', 'x86_64'), ('curl-libs', '0', '7.61.1', '4.ph3', 'x86_64'), ('dbus', '0', '1.13.6', '1.ph3', 'x86_64'), ('device-mapper', '0', '2.02.181', '1.ph3', 'x86_64'), ('device-mapper-libs', '0', '2.02.181', '1.ph3', 'x86_64'), ('docker', '0', '18.06.2', '3.ph3', 'x86_64'), ('dracut', '0', '048', '1.ph3', 'x86_64'), ('dracut-tools', '0', '048', '1.ph3', 'x86_64'), ('e2fsprogs-libs', '0', '1.44.3', '2.ph3', 'x86_64'), ('elfutils', '0', '0.176', '1.ph3', 'x86_64'), ('elfutils-libelf', '0', '0.176', '1.ph3', 'x86_64'), ('expat', '0', '2.2.6', '2.ph3', 'x86_64'), ('expat-libs', '0', '2.2.6', '2.ph3', 'x86_64'), ('file', '0', '5.34', '1.ph3', 'x86_64'), ('file-libs', '0', '5.34', '1.ph3', 'x86_64'), ('filesystem', '0', '1.1', '4.ph3', 'x86_64'), ('findutils', '0', '4.6.0', '5.ph3', 'x86_64'), ('flex', '0', '2.6.4', '2.ph3', 'x86_64'), ('fuse', '0', '2.9.7', '5.ph3', 'x86_64'), ('gc', '0', '8.0.0', '1.ph3', 'x86_64'), ('glib', '0', '2.58.0', '4.ph3', 'x86_64'), ('glib-networking', '0', '2.59.1', '2.ph3', 'x86_64'), ('glibc', '0', '2.28', '4.ph3', 'x86_64'), ('glibc-iconv', '0', '2.28', '4.ph3', 'x86_64'), ('gmp', '0', '6.1.2', '2.ph3', 'x86_64'), ('gnupg', '0', '2.2.17', '1.ph3', 'x86_64'), ('gnutls', '0', '3.6.3', '3.ph3', 'x86_64'), ('gobject-introspection', '0', '1.58.0', '2.ph3', 'x86_64'), ('gpgme', '0', '1.11.1', '2.ph3', 'x86_64'), ('grep', '0', '3.1', '1.ph3', 'x86_64'), ('grub2', '0', '2.02', '13.ph3', 'x86_64'), ('grub2-efi', '0', '2.02', '13.ph3', 'x86_64'), ('grub2-pc', '0', '2.02', '13.ph3', 'x86_64'), ('guile', '0', '2.0.13', '2.ph3', 'x86_64'), ('gzip', '0', '1.9', '1.ph3', 'x86_64'), ('iana-etc', '0', '2.30', '2.ph3', 'noarch'), ('icu', '0', '61.1', '1.ph3', 'x86_64'), ('iproute2', '0', '4.18.0', '2.ph3', 'x86_64'), ('iptables', '0', '1.8.3', '1.ph3', 'x86_64'), ('js', '0', '1.8.5', '2.ph3', 'x86_64'), ('json-c', '0', '0.13.1', '1.ph3', 'x86_64'), ('json-glib', '0', '1.4.4', '1.ph3', 'x86_64'), ('kmod', '0', '25', '1.ph3', 'x86_64'), ('krb5', '0', '1.17', '1.ph3', 'x86_64'), ('libapparmor', '0', '2.13', '7.ph3', 'x86_64'), ('libarchive', '0', '3.3.3', '3.ph3', 'x86_64'), ('libassuan', '0', '2.5.1', '1.ph3', 'x86_64'), ('libcap', '0', '2.25', '8.ph3', 'x86_64'), ('libdb', '0', '5.3.28', '2.ph3', 'x86_64'), ('libffi', '0', '3.2.1', '6.ph3', 'x86_64'), ('libgcc', '0', '7.3.0', '4.ph3', 'x86_64'), ('libgcrypt', '0', '1.8.3', '2.ph3', 'x86_64'), ('libgomp', '0', '7.3.0', '4.ph3', 'x86_64'), ('libgpg-error', '0', '1.32', '1.ph3', 'x86_64'), ('libgsystem', '0', '2015.2', '2.ph3', 'x86_64'), ('libksba', '0', '1.3.5', '1.ph3', 'x86_64'), ('libltdl', '0', '2.4.6', '3.ph3', 'x86_64'), ('libmodulemd', '0', '2.4.0', '1.ph3', 'x86_64'), ('libpsl', '0', '0.20.2', '1.ph3', 'x86_64'), ('librepo', '0', '1.10.2', '1.ph3', 'x86_64'), ('libseccomp', '0', '2.4.0', '1.ph3', 'x86_64'), ('libselinux', '0', '2.8', '1.ph3', 'x86_64'), ('libsepol', '0', '2.8', '1.ph3', 'x86_64'), ('libsolv', '0', '0.6.35', '1.ph3', 'x86_64'), ('libsoup', '0', '2.64.0', '2.ph3', 'x86_64'), ('libssh2', '0', '1.9.0', '1.ph3', 'x86_64'), ('libstdc++', '0', '7.3.0', '4.ph3', 'x86_64'), ('libtasn1', '0', '4.13', '1.ph3', 'x86_64'), ('libtool', '0', '2.4.6', '3.ph3', 'x86_64'), ('libunistring', '0', '0.9.10', '1.ph3', 'x86_64'), ('libxml2', '0', '2.9.9', '1.ph3', 'x86_64'), ('libyaml', '0', '0.2.1', '2.ph3', 'x86_64'), ('linux', '0', '4.19.65', '3.ph3', 'x86_64'), ('m4', '0', '1.4.18', '2.ph3', 'x86_64'), ('mpfr', '0', '4.0.1', '1.ph3', 'x86_64'), ('ncurses', '0', '6.1', '1.ph3', 'x86_64'), ('ncurses-libs', '0', '6.1', '1.ph3', 'x86_64'), ('ncurses-terminfo', '0', '6.1', '1.ph3', 'x86_64'), ('net-tools', '0', '1.60', '11.ph3', 'x86_64'), ('nettle', '0', '3.4', '1.ph3', 'x86_64'), ('npth', '0', '1.6', '1.ph3', 'x86_64'), ('nspr', '0', '4.21', '1.ph3', 'x86_64'), ('nss-altfiles', '0', '2.23.0', '1.ph3', 'x86_64'), ('nss-libs', '0', '3.44', '2.ph3', 'x86_64'), ('openssh', '0', '7.8p1', '5.ph3', 'x86_64'), ('openssh-clients', '0', '7.8p1', '5.ph3', 'x86_64'), ('openssh-server', '0', '7.8p1', '5.ph3', 'x86_64'), ('openssl', '0', '1.0.2s', '1.ph3', 'x86_64'), ('ostree', '0', '2019.2', '1.ph3', 'x86_64'), ('ostree-grub2', '0', '2019.2', '1.ph3', 'x86_64'), ('ostree-libs', '0', '2019.2', '1.ph3', 'x86_64'), ('pcre', '0', '8.42', '1.ph3', 'x86_64'), ('pcre-libs', '0', '8.42', '1.ph3', 'x86_64'), ('photon-release', '0', '3.0', '3.ph3', 'noarch'), ('photon-repos', '0', '3.0', '3.ph3', 'noarch'), ('pinentry', '0', '1.1.0', '1.ph3', 'x86_64'), ('pkg-config', '0', '0.29.2', '2.ph3', 'x86_64'), ('polkit', '0', '0.113', '5.ph3', 'x86_64'), ('popt', '0', '1.16', '5.ph3', 'x86_64'), ('procps-ng', '0', '3.3.15', '1.ph3', 'x86_64'), ('python3', '0', '3.7.3', '2.ph3', 'x86_64'), ('python3-libs', '0', '3.7.3', '2.ph3', 'x86_64'), ('readline', '0', '7.0', '2.ph3', 'x86_64'), ('rpm-libs', '0', '4.14.2', '4.ph3', 'x86_64'), ('rpm-ostree', '0', '2019.3', '1.ph3', 'x86_64'), ('sed', '0', '4.5', '1.ph3', 'x86_64'), ('shadow', '0', '4.6', '3.ph3', 'x86_64'), ('shadow-tools', '0', '4.6', '3.ph3', 'x86_64'), ('sqlite-libs', '0', '3.27.2', '3.ph3', 'x86_64'), ('systemd', '0', '239', '13.ph3', 'x86_64'), ('util-linux', '0', '2.32', '1.ph3', 'x86_64'), ('util-linux-libs', '0', '2.32', '1.ph3', 'x86_64'), ('vim', '0', '8.1.0388', '4.ph3', 'x86_64'), ('which', '0', '2.21', '5.ph3', 'x86_64'), ('xz', '0', '5.2.4', '1.ph3', 'x86_64'), ('xz-libs', '0', '5.2.4', '1.ph3', 'x86_64'), ('zchunk', '0', '1.1.1', '1.ph3', 'x86_64'), ('zchunk-libs', '0', '1.1.1', '1.ph3', 'x86_64'), ('zlib', '0', '1.2.11', '1.ph3', 'x86_64')]>}, @ay [], @a(say) [], '', '', uint64 1567077619, [byte 0x1e, 0x0a, 0x85, 0x20, 0xa8, 0xe0, 0x18, 0x6a, 0x88, 0x15, 0xc0, 0xd9, 0xb0, 0xab, 0xc9, 0x98, 0x94, 0xa1, 0xfb, 0x0a, 0x48, 0xdf, 0xa0, 0x73, 0x32, 0x02, 0x9a, 0xdf, 0x49, 0xed, 0x13, 0x8d], [byte 0x44, 0x6a, 0x0e, 0xf1, 0x1b, 0x7c, 0xc1, 0x67, 0xf3, 0xb6, 0x03, 0xe5, 0x85, 0xc7, 0xee, 0xee, 0xb6, 0x75, 0xfa, 0xa4, 0x12, 0xd5, 0xec, 0x73, 0xf6, 0x29, 0x88, 0xeb, 0x0b, 0x6c, 0x54, 0x88])
Listing file mappings
This command lists the file relations between the original source Linux Photon filetree and the deployed filetree. The normal columns include file type type (regular file, directory, link), permissions in chmod octal format, userID, groupID, file size, file name.
root@photon-host [ ~ ]# ostree ls photon/3.0/x86_64/minimal
d00755 0 0 0 /
l00777 0 0 0 /bin -> usr/bin
l00777 0 0 0 /home -> var/home
l00777 0 0 0 /lib -> usr/lib
l00777 0 0 0 /lib64 -> usr/lib
l00777 0 0 0 /media -> run/media
l00777 0 0 0 /mnt -> var/mnt
l00777 0 0 0 /opt -> var/opt
l00777 0 0 0 /ostree -> sysroot/ostree
l00777 0 0 0 /root -> var/roothome
l00777 0 0 0 /sbin -> usr/sbin
l00777 0 0 0 /srv -> var/srv
l00777 0 0 0 /tmp -> sysroot/tmp
d00755 0 0 0 /boot
d00755 0 0 0 /dev
d00755 0 0 0 /proc
d00755 0 0 0 /run
d00755 0 0 0 /sys
d00755 0 0 0 /sysroot
d00755 0 0 0 /usr
d00755 0 0 0 /var
Extra columns can be added like checksum (-C) and extended attributes (-X).
root@photon-host [ /usr/share/man/man1 ]# ostree ls photon/3.0/x86_64/minimal -C
d00755 0 0 0 1e0a8520a8e0186a8815c0d9b0abc99894a1fb0a48dfa07332029adf49ed138d 446a0ef11b7cc167f3b603e585c7eeeeb675faa412d5ec73f62988eb0b6c5488 /
l00777 0 0 0 389846c2702216e1367c8dfb68326a6b93ccf5703c89c93979052a9bf359608e /bin -> usr/bin
l00777 0 0 0 4344c10bf4931483f918496534f12ed9b50dc6a2cead35e3cd9dd898d6ac9414 /home -> var/home
l00777 0 0 0 f11902ca9d69a80df33918534a3e443251fd0aa7f94b76301e1f55e52aed29dd /lib -> usr/lib
l00777 0 0 0 f11902ca9d69a80df33918534a3e443251fd0aa7f94b76301e1f55e52aed29dd /lib64 -> usr/lib
l00777 0 0 0 75317a3df11447c470ffdd63dde045450ca97dfb2a97a0f3f6a21a5da66f737c /media -> run/media
l00777 0 0 0 97c55dbe24e8f3aecfd3f3e5b3f44646fccbb39799807d37a217e9c871da108b /mnt -> var/mnt
l00777 0 0 0 46b1abbd27a846a9257a8d8c9fc4b384ac0888bdb8ac0d6a2d5de72715bd5092 /opt -> var/opt
l00777 0 0 0 d37269e3f46023fd0275212473e07011894cdf4148cbf3fb5758a7e9471dad8e /ostree -> sysroot/ostree
l00777 0 0 0 6f800e74eed172661278d1e1f09e389a6504dcd3358618e1c1618f91f9d33601 /root -> var/roothome
l00777 0 0 0 e0bead7be9323b06bea05cb9b66eb151839989e3a4e5d1a93e09a36919e91818 /sbin -> usr/sbin
l00777 0 0 0 5d4250bba1ed300f793fa9769474351ee5cebd71e8339078af7ebfbe6256d9b5 /srv -> var/srv
l00777 0 0 0 364fbd62f91ca1e06eb7dbd50c93de8976f2cea633658e2dbe803ce6f7490c09 /tmp -> sysroot/tmp
d00755 0 0 0 6e340b9cffb37a989ca544e6bb780a2c78901d3fb33738768511a30617afa01d 446a0ef11b7cc167f3b603e585c7eeeeb675faa412d5ec73f62988eb0b6c5488 /boot
d00755 0 0 0 6e340b9cffb37a989ca544e6bb780a2c78901d3fb33738768511a30617afa01d 446a0ef11b7cc167f3b603e585c7eeeeb675faa412d5ec73f62988eb0b6c5488 /dev
d00755 0 0 0 6e340b9cffb37a989ca544e6bb780a2c78901d3fb33738768511a30617afa01d 446a0ef11b7cc167f3b603e585c7eeeeb675faa412d5ec73f62988eb0b6c5488 /proc
d00755 0 0 0 6e340b9cffb37a989ca544e6bb780a2c78901d3fb33738768511a30617afa01d 446a0ef11b7cc167f3b603e585c7eeeeb675faa412d5ec73f62988eb0b6c5488 /run
d00755 0 0 0 6e340b9cffb37a989ca544e6bb780a2c78901d3fb33738768511a30617afa01d 446a0ef11b7cc167f3b603e585c7eeeeb675faa412d5ec73f62988eb0b6c5488 /sys
d00755 0 0 0 6e340b9cffb37a989ca544e6bb780a2c78901d3fb33738768511a30617afa01d 446a0ef11b7cc167f3b603e585c7eeeeb675faa412d5ec73f62988eb0b6c5488 /sysroot
d00755 0 0 0 ef1c0980e0d77f64e7f250a3e48f0b24e9285fc0716b80520dac6f98c148324a 446a0ef11b7cc167f3b603e585c7eeeeb675faa412d5ec73f62988eb0b6c5488 /usr
d00755 0 0 0 a3a987e053ea5a116f1e75a31cd7557fc6e57a3ae09e64171d7fea17ef71ec3e 446a0ef11b7cc167f3b603e585c7eeeeb675faa412d5ec73f62988eb0b6c5488 /var
By default, only the top folders are listed, but -R will list recursively. Instead of listing over 10,000 files, let’s filter to just all files that contain ‘rpm-ostree’, ‘rpmostree’ or ‘RpmOstree’, that must belong to rpm-ostree package itself.
root@photon-host [ /usr/share/rpm-ostree ]# ostree ls photon/3.0/x86_64/minimal -R | grep -e '[Rr]pm-\?[Oo]stree'
-00755 0 0 749000 /usr/bin/rpm-ostree
d00755 0 0 0 /usr/bin/rpm-ostree-host
-00644 0 0 1069 /usr/bin/rpm-ostree-host/function.inc
-00755 0 0 10507 /usr/bin/rpm-ostree-host/mk-ostree-host.sh
-00644 0 0 209 /usr/etc/rpm-ostreed.conf
-00644 0 0 1530 /usr/etc/dbus-1/system.d/org.projectatomic.rpmostree1.conf
l00777 0 0 0 /usr/lib/librpmostree-1.so.1 -> librpmostree-1.so.1.0.0
-00755 0 0 5278496 /usr/lib/librpmostree-1.so.1.0.0
-00644 0 0 2312 /usr/lib/girepository-1.0/RpmOstree-1.0.typelib
-00755 0 0 22 /usr/lib/kernel/install.d/00-rpmostree-skip.install
d00755 0 0 0 /usr/lib/rpm-ostree
-00755 0 0 1640704 /usr/lib/rpm-ostree/libdnf.so.2
-00644 0 0 622 /usr/lib/rpm-ostree/rpm-ostree-0-integration.conf
d00755 0 0 0 /usr/lib/sysimage/rpm-ostree-base-db
-00644 0 0 544768 /usr/lib/sysimage/rpm-ostree-base-db/Basenames
-00644 0 0 8192 /usr/lib/sysimage/rpm-ostree-base-db/Conflictname
-00644 0 0 110592 /usr/lib/sysimage/rpm-ostree-base-db/Dirnames
-00644 0 0 8192 /usr/lib/sysimage/rpm-ostree-base-db/Enhancename
-00644 0 0 8192 /usr/lib/sysimage/rpm-ostree-base-db/Filetriggername
-00644 0 0 8192 /usr/lib/sysimage/rpm-ostree-base-db/Group
-00644 0 0 12288 /usr/lib/sysimage/rpm-ostree-base-db/Installtid
-00644 0 0 8192 /usr/lib/sysimage/rpm-ostree-base-db/Name
-00644 0 0 8192 /usr/lib/sysimage/rpm-ostree-base-db/Obsoletename
-00644 0 0 2625536 /usr/lib/sysimage/rpm-ostree-base-db/Packages
-00644 0 0 86016 /usr/lib/sysimage/rpm-ostree-base-db/Providename
-00644 0 0 8192 /usr/lib/sysimage/rpm-ostree-base-db/Recommendname
-00644 0 0 69632 /usr/lib/sysimage/rpm-ostree-base-db/Requirename
-00644 0 0 20480 /usr/lib/sysimage/rpm-ostree-base-db/Sha1header
-00644 0 0 16384 /usr/lib/sysimage/rpm-ostree-base-db/Sigmd5
-00644 0 0 8192 /usr/lib/sysimage/rpm-ostree-base-db/Suggestname
-00644 0 0 8192 /usr/lib/sysimage/rpm-ostree-base-db/Supplementname
-00644 0 0 8192 /usr/lib/sysimage/rpm-ostree-base-db/Transfiletriggername
-00644 0 0 8192 /usr/lib/sysimage/rpm-ostree-base-db/Triggername
-00644 0 0 263 /usr/lib/systemd/system/rpm-ostree-bootstatus.service
-00644 0 0 257 /usr/lib/systemd/system/rpm-ostreed-automatic.service
-00644 0 0 227 /usr/lib/systemd/system/rpm-ostreed-automatic.timer
-00644 0 0 272 /usr/lib/systemd/system/rpm-ostreed.service
-00644 0 0 102 /usr/lib/systemd/system-preset/40-rpm-ostree-auto.preset
-00644 0 0 622 /usr/lib/tmpfiles.d/rpm-ostree-0-integration.conf
-00644 0 0 1082 /usr/lib/tmpfiles.d/rpm-ostree-1-autovar.conf
-00755 0 0 53 /usr/libexec/rpm-ostreed
-00644 0 0 3049 /usr/share/bash-completion/completions/rpm-ostree
-00644 0 0 15997 /usr/share/dbus-1/interfaces/org.projectatomic.rpmostree1.xml
-00644 0 0 133 /usr/share/dbus-1/system-services/org.projectatomic.rpmostree1.service
-00644 0 0 6160 /usr/share/polkit-1/actions/org.projectatomic.rpmostree1.policy
d00755 0 0 0 /usr/share/rpm-ostree
-00644 0 0 1169 /usr/share/rpm-ostree/treefile.json
atomic is really an alias for rpm-ostree command. The last file treefile.json is not installed by the rpm-ostree package, it is actually downloaded from the server, as we will see in the next chapter. For now, let us notice “osname” : “photon”, “ref” : “photon/1.0/x86_64/minimal”, “automatic_version_prefix” : “1.0_minimal”, that matches what we have known so far, and also the “documentation” : false setting, that explains why there are no manual files installed for rpm-ostree, and in fact for any package.
root@photon-host [ /usr/share/rpm-ostree ]# ls -l /usr/share/man/man1
total 0
Listing configuration changes
To diff the current /etc configuration versus default /etc (from the base image), this command will show the Modified, Added and Deleted files:
root@photon-host [ ~ ]# ostree admin config-diff
M ssh/sshd_config
M machine-id
M fstab
M hosts
M mtab
M shadow
A ssh/ssh_host_rsa_key
A ssh/ssh_host_rsa_key.pub
A ssh/ssh_host_dsa_key
A ssh/ssh_host_dsa_key.pub
A ssh/ssh_host_ecdsa_key
A ssh/ssh_host_ecdsa_key.pub
A ssh/ssh_host_ed25519_key
A ssh/ssh_host_ed25519_key.pub
A udev/hwdb.bin
A resolv.conf
A hostname
A localtime
A .pwd.lock
A .updated
Listing packages
The following is the rpm-ostree command that lists all the packages for that branch, extracted from RPM database.
root@photon-host [ ~ ]# rpm-ostree db list photon/3.0/x86_64/minimal
ostree commit: photon/3.0/x86_64/minimal (a31a843985e314a9e70bcf09afe8d59f7351817d9fb743c2b6dab84f20833650)
Linux-PAM-1.3.0-1.ph3.x86_64
attr-2.4.48-1.ph3.x86_64
autogen-libopts-5.18.16-1.ph3.x86_64
bash-4.4.18-1.ph3.x86_64
bc-1.07.1-1.ph3.x86_64
binutils-2.31.1-6.ph3.x86_64
bridge-utils-1.6-1.ph3.x86_64
bubblewrap-0.3.0-2.ph3.x86_64
bzip2-1.0.6-10.ph3.x86_64
bzip2-libs-1.0.6-10.ph3.x86_64
ca-certificates-20190521-1.ph3.x86_64
ca-certificates-pki-20190521-1.ph3.x86_64
coreutils-8.30-1.ph3.x86_64
cpio-2.12-4.ph3.x86_64
cracklib-2.9.6-8.ph3.x86_64
cracklib-dicts-2.9.6-8.ph3.x86_64
curl-7.61.1-4.ph3.x86_64
curl-libs-7.61.1-4.ph3.x86_64
dbus-1.13.6-1.ph3.x86_64
device-mapper-2.02.181-1.ph3.x86_64
device-mapper-libs-2.02.181-1.ph3.x86_64
docker-18.06.2-3.ph3.x86_64
dracut-048-1.ph3.x86_64
dracut-tools-048-1.ph3.x86_64
e2fsprogs-libs-1.44.3-2.ph3.x86_64
elfutils-0.176-1.ph3.x86_64
elfutils-libelf-0.176-1.ph3.x86_64
expat-2.2.6-2.ph3.x86_64
expat-libs-2.2.6-2.ph3.x86_64
file-5.34-1.ph3.x86_64
file-libs-5.34-1.ph3.x86_64
filesystem-1.1-4.ph3.x86_64
findutils-4.6.0-5.ph3.x86_64
flex-2.6.4-2.ph3.x86_64
fuse-2.9.7-5.ph3.x86_64
gc-8.0.0-1.ph3.x86_64
glib-2.58.0-4.ph3.x86_64
glib-networking-2.59.1-2.ph3.x86_64
glibc-2.28-4.ph3.x86_64
glibc-iconv-2.28-4.ph3.x86_64
gmp-6.1.2-2.ph3.x86_64
gnupg-2.2.17-1.ph3.x86_64
gnutls-3.6.3-3.ph3.x86_64
gobject-introspection-1.58.0-2.ph3.x86_64
gpgme-1.11.1-2.ph3.x86_64
grep-3.1-1.ph3.x86_64
grub2-2.02-13.ph3.x86_64
grub2-efi-2.02-13.ph3.x86_64
grub2-pc-2.02-13.ph3.x86_64
guile-2.0.13-2.ph3.x86_64
gzip-1.9-1.ph3.x86_64
iana-etc-2.30-2.ph3.noarch
icu-61.1-1.ph3.x86_64
iproute2-4.18.0-2.ph3.x86_64
iptables-1.8.3-1.ph3.x86_64
js-1.8.5-2.ph3.x86_64
json-c-0.13.1-1.ph3.x86_64
json-glib-1.4.4-1.ph3.x86_64
kmod-25-1.ph3.x86_64
krb5-1.17-1.ph3.x86_64
libapparmor-2.13-7.ph3.x86_64
libarchive-3.3.3-3.ph3.x86_64
libassuan-2.5.1-1.ph3.x86_64
libcap-2.25-8.ph3.x86_64
libdb-5.3.28-2.ph3.x86_64
libffi-3.2.1-6.ph3.x86_64
libgcc-7.3.0-4.ph3.x86_64
libgcrypt-1.8.3-2.ph3.x86_64
libgomp-7.3.0-4.ph3.x86_64
libgpg-error-1.32-1.ph3.x86_64
libgsystem-2015.2-2.ph3.x86_64
libksba-1.3.5-1.ph3.x86_64
libltdl-2.4.6-3.ph3.x86_64
libmodulemd-2.4.0-1.ph3.x86_64
libpsl-0.20.2-1.ph3.x86_64
librepo-1.10.2-1.ph3.x86_64
libseccomp-2.4.0-1.ph3.x86_64
libselinux-2.8-1.ph3.x86_64
libsepol-2.8-1.ph3.x86_64
libsolv-0.6.35-1.ph3.x86_64
libsoup-2.64.0-2.ph3.x86_64
libssh2-1.9.0-1.ph3.x86_64
libstdc++-7.3.0-4.ph3.x86_64
libtasn1-4.13-1.ph3.x86_64
libtool-2.4.6-3.ph3.x86_64
libunistring-0.9.10-1.ph3.x86_64
libxml2-2.9.9-1.ph3.x86_64
libyaml-0.2.1-2.ph3.x86_64
linux-4.19.65-3.ph3.x86_64
m4-1.4.18-2.ph3.x86_64
mpfr-4.0.1-1.ph3.x86_64
ncurses-6.1-1.ph3.x86_64
ncurses-libs-6.1-1.ph3.x86_64
ncurses-terminfo-6.1-1.ph3.x86_64
net-tools-1.60-11.ph3.x86_64
nettle-3.4-1.ph3.x86_64
npth-1.6-1.ph3.x86_64
nspr-4.21-1.ph3.x86_64
nss-altfiles-2.23.0-1.ph3.x86_64
nss-libs-3.44-2.ph3.x86_64
openssh-7.8p1-5.ph3.x86_64
openssh-clients-7.8p1-5.ph3.x86_64
openssh-server-7.8p1-5.ph3.x86_64
openssl-1.0.2s-1.ph3.x86_64
ostree-2019.2-1.ph3.x86_64
ostree-grub2-2019.2-1.ph3.x86_64
ostree-libs-2019.2-1.ph3.x86_64
pcre-8.42-1.ph3.x86_64
pcre-libs-8.42-1.ph3.x86_64
photon-release-3.0-3.ph3.noarch
photon-repos-3.0-3.ph3.noarch
pinentry-1.1.0-1.ph3.x86_64
pkg-config-0.29.2-2.ph3.x86_64
polkit-0.113-5.ph3.x86_64
popt-1.16-5.ph3.x86_64
procps-ng-3.3.15-1.ph3.x86_64
python3-3.7.3-2.ph3.x86_64
python3-libs-3.7.3-2.ph3.x86_64
readline-7.0-2.ph3.x86_64
rpm-libs-4.14.2-4.ph3.x86_64
rpm-ostree-2019.3-1.ph3.x86_64
sed-4.5-1.ph3.x86_64
shadow-4.6-3.ph3.x86_64
shadow-tools-4.6-3.ph3.x86_64
sqlite-libs-3.27.2-3.ph3.x86_64
systemd-239-13.ph3.x86_64
util-linux-2.32-1.ph3.x86_64
util-linux-libs-2.32-1.ph3.x86_64
vim-8.1.0388-4.ph3.x86_64
which-2.21-5.ph3.x86_64
xz-5.2.4-1.ph3.x86_64
xz-libs-5.2.4-1.ph3.x86_64
zchunk-1.1.1-1.ph3.x86_64
zchunk-libs-1.1.1-1.ph3.x86_64
zlib-1.2.11-1.ph3.x86_64
Querying for package details
We are able to use the query option of rpm to make sure any package have been installed properly. The files list should match the previous file mappings in 4.2, so let’s check package rpm-ostree. As we’ve seen, manual files listed here are actually missing, they were not installed.
root@photon-host [ /usr/share/man/man1 ]# rpm -ql rpm-ostree
/usr/bin/atomic
/usr/bin/rpm-ostree
/usr/lib/girepository-1.0/RpmOstree-1.0.typelib
/usr/lib/librpmostree-1.so.1
/usr/lib/librpmostree-1.so.1.0.0
/usr/lib/rpm-ostree
/usr/lib/rpm-ostree/tmpfiles-ostree-integration.conf
/usr/share/man/man1/atomic.1.gz
/usr/share/man/man1/rpm-ostree.1.gz
Why am I unable to install, upgrade or uninstall packages?
The OSTree host installer needs the server URL or the server repository.
When you perform the installation using the repo, the install packages are located under the layer package. When you install with the URL, the packages are located under the local packages.
You can use the rpm-ostree uninstall command to uninstall only the layered and local packages but not the base packages. To modify the base packages, you can use the rpm-ostree override command.
When you run rpm-ostree upgrade, the command will only upgrade packages based on the commit available in the server.
4.11.5 - Host Updating Operations
Upgrade overview
If you’ve used yum, dnf (and now tdnf for Photon) in RPM systems or apt-get in Debian based Unix, you understand what “install” is for packages and the subtle difference between “update” and “upgrade”.
OSTree and RPM-OSTree don’t distinguish between them and the term “upgrade” has a slightly different meaning - to bring the system in sync with the remote repo, to the top of the Refspec (branch), just like in Git, by pulling the latest changes.
In fact, ostree and rpm-ostree commands support a single “upgrade” verb for a file image tree and a package list in the same refspec (branch). rpm-ostree upgrade will install a package if it doesn’t exist, will not touch it if it has same version in the new image, will upgrade it if the version number is higher and it may actually downgrade it, if the package has been downgraded in the new image. I wish this operation had a different name, to avoid any confusion.
The reverse operation of an upgrade is a “rollback” and fortunately it’s not named “downgrade” because it may upgrade packages in the last case describe above.
As we’ll see in a future chapter, a jump to a different Refspec (branch) is also supported and it’s named “rebase”.
Incremental upgrade
To check if there are any updates available, one would execute:
root@photon-host-def [ ~ ]# rpm-ostree upgrade
Updating from: photon:photon/3.0/x86_64/minimal
No upgrade available.
It is good idea to check periodically for updates.
To check if there are any new updates without actually applying them, we will pass the –check-diff flag, that would list the different packages as added, modified or deleted - if such operations were to happen.
root@photon-host [ ~ ]# rpm-ostree upgrade --check-diff
Updating from: photon:photon/3.0/x86_64/minimal
8 metadata, 13 content objects fetched; 1026 KiB transferred in 0 seconds
+gawk-4.1.3-2.ph1.x86_64
+sudo-1.8.15-3.ph1.x86_64
+wget-1.17.1-2.ph1.x86_64
We like what we see and now let’s upgrade for real. This command will deploy a new bootable filetree.
root@photon-host [ ~ ]# rpm-ostree upgrade
Receiving metadata objects: 134/(estimating) 14.1 MB/s 14.1 MB... done
Checking out tree c8f2b11... done
Enabled rpm-md repositories: repo photon-updates photon photon-extras
rpm-md repo 'repo' (cached); generated: 2019-09-18T05:26:00Z
rpm-md repo 'photon-updates' (cached); generated: 2019-09-11T00:02:44Z
rpm-md repo 'photon' (cached); generated: 2019-02-06T08:56:24Z
rpm-md repo 'photon-extras' (cached); generated: 2018-11-02T18:09:56Z
Importing rpm-md... done
Resolving dependencies... done
Checking out packages... done
Running pre scripts... done
Running post scripts... done
Writing rpmdb... done
Writing OSTree commit... done
Staging deployment... done
Freed: 20.7 MB (pkgcache branches: 0)
zlib 1.2.11-1.ph3 -> 1.2.11-2.ph3
Downgraded:
ostree 2019.2-15.ph3 -> 2019.2-2.ph3
ostree-grub2 2019.2-15.ph3 -> 2019.2-2.ph3
ostree-libs 2019.2-15.ph3 -> 2019.2-2.ph3
Removed:
chkconfig-1.9-1.ph3.x86_64
elasticsearch-6.7.0-2.ph3.x86_64
kibana-6.7.0-2.ph3.x86_64
logstash-6.7.0-2.ph3.x86_64
newt-0.52.20-1.ph3.x86_64
nodejs-10.15.2-1.ph3.x86_64
openjdk8-1.8.0.212-2.ph3.x86_64
openjre8-1.8.0.212-2.ph3.x86_64
ruby-2.5.3-2.ph3.x86_64
slang-2.3.2-1.ph3.x86_64
Added:
nss-3.44-2.ph3.x86_64
xmlsec1-1.2.26-2.ph3.x86_64
Run "systemctl reboot" to start a reboot
By looking at the commit history, notice that the new commit has the original commit as parent.
root@photon-host [ ~ ]# ostree log photon/3.0/x86_64/minimal
commit c8f2b116b067d7695f9033bf2a99505198269354e157c0f2d5b78266cb874239
ContentChecksum: 9bc2079ad70df6dc9373752b254711f3413ae8a07628016c7de7f7d3fa505a6f
Date: 2019-09-18 08:22:15 +0000
Version: 3.0_minimal.2
(no subject)
commit 28dc49ecb4604c0bc349e4445adc659491a1874c01198e6253a261f4d59708b7
ContentChecksum: c3650c76e2bb0e9b6b063cda2dd55939c965c54fd0b0f5ce2cfb7e801403e610
Date: 2019-09-16 09:51:33 +0000
Version: 3.0_minimal.1
Notice that now we have a new reference, that corresponds to the newly deployed image.
root@photon-host [ ~ ]# ostree refs
rpmostree/pkg/createrepo__c/0.11.1-2.ph3.x86__64
rpmostree/pkg/wget/1.20.3-1.ph3.x86__64
photon-1:photon/3.0/x86_64/minimal
rpmostree/base/0
rpmostree/base/1
ostree/0/0/0
ostree/0/0/1
ostree/0/0/2
rpmostree/pkg/rpm/4.14.2-4.ph3.x86__64
Let us look at the status. The new filetree version .1 has the expected Commit ID and a newer timestamp, that is actually the server date/time when the image has been generated, not the time/date when it was downloaded or installed at the host. The old image has a star next to it, showing that’s the image the system is booted currently into.
root@photon-host [ ~ ]# rpm-ostree status
State: idle
AutomaticUpdates: disabled
Deployments:
ostree://photon-1:photon/3.0/x86_64/minimal
Version: 3.0_minimal.2 (2019-09-18T08:22:15Z)
BaseCommit: c8f2b116b067d7695f9033bf2a99505198269354e157c0f2d5b78266cb874239
Diff: 1 upgraded, 3 downgraded, 10 removed, 2 added
LayeredPackages: createrepo_c rpm wget
* ostree://photon-1:photon/3.0/x86_64/minimal
Version: 3.0_minimal.1 (2019-09-16T09:51:33Z)
BaseCommit: 28dc49ecb4604c0bc349e4445adc659491a1874c01198e6253a261f4d59708b7
LayeredPackages: createrepo_c rpm wget
ostree://photon:photon/3.0/x86_64/minimal
Version: 3.0_minimal.1 (2019-09-16T09:51:33Z)
BaseCommit: 28dc49ecb4604c0bc349e4445adc659491a1874c01198e6253a261f4d59708b7
LayeredPackages: createrepo_c rpm wget
Now let’s type ‘reboot’. Grub will list the new filetree as the first image, marked with a star, as the default bootable image. If the keyboard is not touched and order is not changed, grub will timeout and will boot into that image.
Let’s look again at the status. It’s identical, just that the star is next to the newer image, to show it’s the current image it has booted from.
root@photon-host [ ~ ]# rpm-ostree status
State: idle
AutomaticUpdates: disabled
Deployments:
* ostree://photon-1:photon/3.0/x86_64/minimal
Version: 3.0_minimal.2 (2019-09-18T08:22:15Z)
BaseCommit: c8f2b116b067d7695f9033bf2a99505198269354e157c0f2d5b78266cb874239
LayeredPackages: createrepo_c rpm wget
ostree://photon-1:photon/3.0/x86_64/minimal
Version: 3.0_minimal.1 (2019-09-16T09:51:33Z)
BaseCommit: 28dc49ecb4604c0bc349e4445adc659491a1874c01198e6253a261f4d59708b7
LayeredPackages: createrepo_c rpm wget
Also, the current deployment directory is based on the new commit:
root@photon-host-def [ ~ ]# ostree admin config-diff --print-current-dir
/ostree/deploy/photon/deploy/63fd7a46dac6c169ee997039c229dd1d626f9b13eaf47b7a183f7a449eb4076f.0
A fresh upgrade for a new version will delete the older, original image and bring a new one, that will become the new default image. The previous ‘default’ image will move down one position as the backup image.
Listing file differences
Now we can look at what files have been Added, Modified, Deleted due to the addition of those three packages and switching of the boot directories, by comparing the two commits.
root@photon-host-def [ ~ ]# ostree diff 63fd 37e2
M /usr/etc/ld.so.cache
M /usr/lib/sysimage/rpm-ostree-base-db/Basenames
M /usr/lib/sysimage/rpm-ostree-base-db/Conflictname
M /usr/lib/sysimage/rpm-ostree-base-db/Dirnames
M /usr/lib/sysimage/rpm-ostree-base-db/Enhancename
M /usr/lib/sysimage/rpm-ostree-base-db/Filetriggername
M /usr/lib/sysimage/rpm-ostree-base-db/Group
M /usr/lib/sysimage/rpm-ostree-base-db/Installtid
M /usr/lib/sysimage/rpm-ostree-base-db/Name
M /usr/lib/sysimage/rpm-ostree-base-db/Obsoletename
M /usr/lib/sysimage/rpm-ostree-base-db/Packages
M /usr/lib/sysimage/rpm-ostree-base-db/Providename
M /usr/lib/sysimage/rpm-ostree-base-db/Recommendname
M /usr/lib/sysimage/rpm-ostree-base-db/Requirename
M /usr/lib/sysimage/rpm-ostree-base-db/Sha1header
M /usr/lib/sysimage/rpm-ostree-base-db/Sigmd5
M /usr/lib/sysimage/rpm-ostree-base-db/Suggestname
M /usr/lib/sysimage/rpm-ostree-base-db/Supplementname
M /usr/lib/sysimage/rpm-ostree-base-db/Transfiletriggername
M /usr/lib/sysimage/rpm-ostree-base-db/Triggername
M /usr/share/rpm/Basenames
M /usr/share/rpm/Conflictname
M /usr/share/rpm/Dirnames
M /usr/share/rpm/Enhancename
M /usr/share/rpm/Filetriggername
M /usr/share/rpm/Group
M /usr/share/rpm/Installtid
M /usr/share/rpm/Name
M /usr/share/rpm/Obsoletename
M /usr/share/rpm/Packages
M /usr/share/rpm/Providename
M /usr/share/rpm/Recommendname
M /usr/share/rpm/Requirename
M /usr/share/rpm/Sha1header
M /usr/share/rpm/Sigmd5
M /usr/share/rpm/Suggestname
M /usr/share/rpm/Supplementname
M /usr/share/rpm/Transfiletriggername
M /usr/share/rpm/Triggername
M /usr/share/rpm-ostree/treefile.json
D /usr/bin/certutil
D /usr/bin/nss-config
D /usr/bin/pk12util
D /usr/bin/xmlsec1
D /usr/lib/libfreebl3.chk
D /usr/lib/libfreebl3.so
D /usr/lib/libfreeblpriv3.chk
D /usr/lib/libgtest1.so
D /usr/lib/libgtestutil.so
D /usr/lib/libnssckbi.so
D /usr/lib/libnssdbm3.chk
D /usr/lib/libnssdbm3.so
D /usr/lib/libnsssysinit.so
D /usr/lib/libsmime3.so
D /usr/lib/libsoftokn3.chk
D /usr/lib/libssl3.so
D /usr/lib/libxmlsec1-nss.so
D /usr/lib/libxmlsec1-nss.so.1
D /usr/lib/libxmlsec1-nss.so.1.2.26
D /usr/lib/libxmlsec1-openssl.so
D /usr/lib/libxmlsec1-openssl.so.1
D /usr/lib/libxmlsec1-openssl.so.1.2.26
D /usr/lib/libxmlsec1.so
D /usr/lib/libxmlsec1.so.1
D /usr/lib/libxmlsec1.so.1.2.26
Listing package differences
We can also look at package differences, as you expect, using the right tool for the job.
root@photon-host-def [ ~ ]# rpm-ostree db diff 63fd 37e2
ostree diff commit old: rollback deployment (63fd7a46dac6c169ee997039c229dd1d626f9b13eaf47b7a183f7a449eb4076f)
ostree diff commit new: booted deployment (37e2ecfa34eb808962fdfed28623bbc457184bcd6bb788b79143d33e3569084f)
Removed:
nss-3.44-2.ph3.x86_64
xmlsec1-1.2.26-2.ph3.x86_64
Rollback
If we want to go back to the previous image, we can rollback. The order of the images will be changed, so the old filetree will become the default bootable image. If -r option is passed, the rollback will continue with a reboot.
root@photon-host-def [ ~ ]# rpm-ostree rollback
Moving 'e663b2872efa01d80e4c34c823431472beb653373af32de83c7d2480316b8a6a.0' to be first deployment
Transaction complete; bootconfig swap: yes; deployment count change: 0
Upgraded:
ostree 2019.2-2.ph3 -> 2019.2-15.ph3
ostree-grub2 2019.2-2.ph3 -> 2019.2-15.ph3
ostree-libs 2019.2-2.ph3 -> 2019.2-15.ph3
zlib 1.2.11-2.ph3 -> 1.2.11-1.ph3
Removed:
nss-3.44-2.ph3.x86_64
xmlsec1-1.2.26-2.ph3.x86_64
Added:
chkconfig-1.9-1.ph3.x86_64
elasticsearch-6.7.0-2.ph3.x86_64
kibana-6.7.0-2.ph3.x86_64
logstash-6.7.0-2.ph3.x86_64
newt-0.52.20-1.ph3.x86_64
nodejs-10.15.2-1.ph3.x86_64
openjdk8-1.8.0.212-2.ph3.x86_64
openjre8-1.8.0.212-2.ph3.x86_64
ruby-2.5.3-2.ph3.x86_64
slang-2.3.2-1.ph3.x86_64
Run "systemctl reboot" to start a reboot
In fact, we can repeat the rollback operation as many times as we want before reboot. On each execution, it’s going to change the order. It will not delete any image.
However, an upgrade will keep the current default image and will eliminate the other image, whichever that is. So if Photon installation rolled back to an older build, an upgrade will keep that, eliminate the newer version and will replace it with an even newer version at the next upgrade.
The boot order moved back to original:
root@photon-host-def [ ~ ]# rpm-ostree status
State: idle
AutomaticUpdates: disabled
Deployments:
* ostree://photon-2:photon/3.0/x86_64/minimal
Version: 3.0_minimal.3 (2019-09-18T12:48:03Z)
Commit: cf357c0f376decb3bae42326737db7e36bcf3568ab901c33dc57800c3718f07b
ostree://photon:photon/3.0/x86_64/minimal
Version: 3.0_minimal (2019-08-29T11:20:19Z)
Commit: a31a843985e314a9e70bcf09afe8d59f7351817d9fb743c2b6dab84f20833650
The current bootable image path moved also back to the original value:
root@photon-host-def [ ~ ]# ostree admin config-diff --print-current-dir
/ostree/deploy/photon/deploy/47899767bdd4276266383fce13c4a26a51ca0304ae754609283d75f7d8aad36e.0
Installing Packages
You can add more packages onto the system that are not part of the commit composed on the server.
rpm-ostree install <packages>
Example:
rpm-ostree install https://kojipkgs.fedoraproject.org//packages/wget/1.19.5/5.fc29/x86_64/wget-1.19.5-5.fc29.x86_64.rpm
Uninstalling Packages
To remove layered packages installed from a repository, use
rpm-ostree uninstall <pkg>
To remove layered packages installed from a local package, you must specify the full NEVRA of the package.
For example:
rpm-ostree uninstall ltrace-0.7.91-16.fc22.x86_64
To uninstall a package that is a part of the base layer, use
rpm-ostree override remove <pkg>
For example:
rpm-ostree override remove firefox
Deleting a deployed filetree
It is possible to delete a deployed tree. You won’t need to do that normally, as upgrading to a new image will delete the old one, but if for some reason deploying failed (loss of power, networking issues), you’ll want to delete the partially deployed image.
The only supported index is 1. (If multiple bootable images will be supported in the future, a larger than one, zero-based index of the image to delete will be supported).
You cannot delete the default bootable filetree, so passing 0 will result in an error.
root@photon-host-def [ ~ ]# ostree admin undeploy -v 1
OT: Using bootloader: OstreeBootloaderGrub2
Transaction complete; bootconfig swap: yes deployment count change: -1
Deleted deployment a31a843985e314a9e70bcf09afe8d59f7351817d9fb743c2b6dab84f20833650
root@photon-host-cus1 [ ~ ]# ostree admin undeploy -v 0
OT: Deployment cf357c0f376decb3bae42326737db7e36bcf3568ab901c33dc57800c3718f07b.0 unlocked=0
error: Cannot undeploy currently booted deployment 0
Now, we can see that the newer image is gone, the deployment directory for commit a31a has been removed.
root@photon-host-def [ ~ ]# rpm-ostree status
State: idle
AutomaticUpdates: disabled
Deployments:
* ostree://photon-2:photon/3.0/x86_64/minimal
Version: 3.0_minimal.3 (2019-09-18T12:48:03Z)
Commit: cf357c0f376decb3bae42326737db7e36bcf3568ab901c33dc57800c3718f07b
root@photon-host-cus1 [ ~ ]# ls /ostree/deploy/photon/deploy/
cf357c0f376decb3bae42326737db7e36bcf3568ab901c33dc57800c3718f07b.0
cf357c0f376decb3bae42326737db7e36bcf3568ab901c33dc57800c3718f07b.0.origin
However the commit is still there in the OSTree repo.
root@photon-host-def [ ~ ]# ostree log cf35
commit cf357c0f376decb3bae42326737db7e36bcf3568ab901c33dc57800c3718f07b
ContentChecksum: c24d108c7b7451374b474456a47f512e648833040bfbd4f43d862456bd6d5a18
Date: 2019-09-18 12:48:03 +0000
Version: 3.0_minimal.3
But there is nothing to rollback to.
root@photon-host-def [ ~ ]# rpm-ostree rollback
error: Found 1 deployments, at least 2 required for rollback
If we were to upgrade again, it would bring these packages back, but let’s just check the differeneces.
root@photon-host-def [ ~ ]# rpm-ostree upgrade --check-diff
Updating from: photon:photon/3.0/x86_64/minimal
+gawk-4.1.0-2.ph1.x86_64
+sudo-1.8.11p1-4.ph1.x86_64
+wget-1.15-1.ph1.x86_64
Version skipping upgrade
Let’s assume that after a while, VMware releases version 2 that removes sudo and adds bison and tar. Now, an upgrade will skip version 1 and go directly to 2. Let’s first look at what packages are pulled (notice sudo missing, as expected), then upgrade with reboot option.
root@photon-host-def [ ~ ]# rpm-ostree upgrade --check-diff
Updating from: photon:photon/3.0/x86_64/minimal
7 metadata, 13 content objects fetched; 1287 KiB transferred in 0 seconds
+bison-3.0.2-2.ph1.x86_64
+gawk-4.1.0-2.ph1.x86_64
+tar-1.27.1-1.ph1.x86_64
+wget-1.15-1.ph1.x86_64
root@photon-host-def [ ~ ]# rpm-ostree upgrade -r
Updating from: photon:photon/3.0/x86_64/minimal
107 metadata, 512 content objects fetched; 13064 KiB transferred in 1 seconds
Copying /etc changes: 5 modified, 0 removed, 16 added
Transaction complete; bootconfig swap: yes deployment count change: 1
Freed objects: 19.3 MB
After reboot, let’s check the booting filetrees, the current dir for the current filetree and look at commit differences:
root@photon-host-def [ ~ ]# rpm-ostree status
State: idle
AutomaticUpdates: disabled
Deployments:
* ostree://photon-1:photon/3.0/x86_64/minimal
Version: 3.0_minimal.1 (2019-09-16T09:51:33Z)
BaseCommit: 28dc49ecb4604c0bc349e4445adc659491a1874c01198e6253a261f4d59708b7
LayeredPackages: createrepo_c rpm wget
ostree://photon:photon/3.0/x86_64/minimal
Version: 3.0_minimal.1 (2019-09-16T09:51:33Z)
BaseCommit: 28dc49ecb4604c0bc349e4445adc659491a1874c01198e6253a261f4d59708b7
LayeredPackages: createrepo_c rpm wget
root@photon-host-cus1 [ ~ ]# ostree admin config-diff --print-current-dir
/ostree/deploy/photon/deploy/e663b2872efa01d80e4c34c823431472beb653373af32de83c7d2480316b8a6a.0
root@photon-host-cus1 [ ~ ]# rpm-ostree db diff 8b4b e663
ostree diff commit old: rollback deployment (8b4b9d4ec033d1eb816711bfdda595d1013fecbe5cd340f6a619cdc9d83a3bf2)
ostree diff commit new: booted deployment (e663b2872efa01d80e4c34c823431472beb653373af32de83c7d2480316b8a6a)
root@photon-host-cus1 [ ~ ]# rpm-ostree db diff 82bc 092e
error: Refspec '82bc' not found
Interesting fact: The metadata for commit 82bc has been removed from the local repo.
Tracking parent commits
OSTree will display limited commit history - maximum 2 levels, so if you want to traverse the history even though it may not find a commitment by its ID, you can refer to its parent using ‘^’ suffix, grandfather via ‘^^’ and so on. We know that 82bc is the parent of 092e:
root@photon-host-def [ ~ ]# rpm-ostree db diff 092e^ 092e
error: No such metadata object 82bca728eadb7292d568404484ad6889c3f6303600ca8c743a4336e0a10b3817.commit
error: Refspec '82cb' not found
root@photon-host-def [ ~ ]# rpm-ostree db diff 092e^^ 092e
error: No such metadata object 82bca728eadb7292d568404484ad6889c3f6303600ca8c743a4336e0a10b3817.commit
So commit 092e knows who its parent is, but its metadata is no longer in the local repo, so it cannot traverse further to its parent to find an existing grandfather.
Resetting a branch to a previous commit
We can reset the head of a branch in a local repo to a previous commit, for example corresponding to version 0 (3.0_minimal).
root@photon-host-def [ ~ ]# ostree reset photon:photon/3.0/x86_64/minimal cf35
Now if we look again at the branch commit history, the head is at version 0.
root@photon-host-def [ ~ ]# ostree log photon/3.0/x86_64/minimal
commit cf357c0f376decb3bae42326737db7e36bcf3568ab901c33dc57800c3718f07b
ContentChecksum: c24d108c7b7451374b474456a47f512e648833040bfbd4f43d862456bd6d5a18
Date: 2019-09-18 12:48:03 +0000
Version: 3.0_minimal
4.11.6 - Creating a Server
Photon OS 3.0 includes a rpm-ostree-repo package that can be installed on a VM.
This package provides an automated script that creates a repo tree that acts as a server.
Run the following commands to create a server:
tdnf install rpm-ostree-repo
A script is created, which provides options to create a server.
Script to create a Photon OSTree repo
Usage:
/usr/bin/rpm-ostree-server/mkostreerepo -r=<repo path>
/usr/bin/rpm-ostree-server/mkostreerepo -r=<repo path> -p=<json treefile>
/usr/bin/rpm-ostree-server/mkostreerepo -c -r=<repo path> -p=<json treefile>
-r|--repopath <Provide repo path>
-p|--jsonfile <Provide Json file>
-c|--customrepo <Provide custom repo file inside repo path directory>
Note
- Use PATH=$PATH:/usr/bin/rpm-ostree-server and then use mkostreerepo from any directory for ease of use.
- mkostreerepo is used to create the fresh tree for ostree.
- mkostreerepo is also used to update a new commit to the existing tree.
- You can also use custom repo as to create/append the tree.
Run the following command to initiate the script, choose different help options to create a server.
mkostreerepo
Manually Composing your OSTree repo
Use the following commands to initialize a new repo and to compose it.
root [ ~ ]# cd /srv/rpm-ostree
root [ /srv/rpm-ostree ]# ostree --repo=repo init --mode=archive-z2
root [ /srv/rpm-ostree ]# rpm-ostree compose tree --repo=repo photon-base.json
You can now deploy a host. For more information, see File oriented server operations and Package oriented server operations to learn create your own customized file tree.
4.11.7 - Installing a Photon RPM-OStree host against a custom server repository
Organizations that maintain their own OSTree servers create custom image trees suited to their needs from which hosts can be deployed and upgraded. One single server may make available several branches to install, for example “base”, “minimal” and “full”. Or, if you think in terms of Windows OS SKUs - “Home”, “Professional” or “Enterprise” edition.
So in fact there are two pieces of information the OSTree host installer needs - the server URL and the branch ref. Also, there are two ways to pass this info - manually via keyboard, when prompted and automated, by reading from a config file.
Manual install of a custom host
For Photon 1.0 or 1.0 Revision 2, installing a Photon RPM-OSTree host that will pull from a server repository of your choice is very similar to the way we installed the host against the default server repo in Chapter 2.
We will follow the same steps, selecting “Photon OSTree Host”, and after assigning a host name like photon-host and a root password, this time we will click on “Custom RPM-OSTree Server”.

An additional screen will ask for the URL of server repo - just enter the IP address or fully qualified domain name of the server installed in the previous step.

Once this is done and the installation finished, reboot and you are ready to use it.
You may verify - just like in Chapter 3.1 - that you can get an rpm-ostree status. The value for the CommitID should be identical to the host that installed from default repo, if the server has been installed fresh, from the same ISO.
Automated install of a custom host via kickstart
Photon 3.0 supports automated install that will not interact with the user, in other words installer will display its progress, but will not prompt for any keys to be clicked, and will boot at the end of installation.
If not familiar with the way kickstart works, visit Kickstart Support in Photon OS. The kickstart json config for OSTree is similar to minimal or full, except for these settings that should sound familiar:
...
"type": "ostree_host",
"ostree_repo_url": "http://192.168.218.249",
"ostree_repo_ref": "photon/3.0/x86_64/minimal",
...
Or, for default installation
....
"type": "ostree_host",
"default_repo": true,
....
If the server is a future version of Photon OS, say Photon OS 4.0, and the administrator composed trees for the included json files, the ostree_repo_ref will take either value: photon/4.0/x86_64/base, photon/4.0/x86_64/minimal, or photon/4.0/x86_64/full.
In most situations, kickstart file is accessed via http from PXE boot. That enables booting from network and end to end install of hosts from pre-defined server URL and branch without assistance from user.
4.11.8 - Automatic Updates
Automatic updates are disabled by default.
To verify this, run the status command.
root@photon-host-def [ ~ ]# rpm-ostree status
State: idle
AutomaticUpdates: disabled
Deployments:
* ostree://photon-1:photon/3.0/x86_64/minimal
Version: 3.0_minimal.1 (2019-09-16T09:51:33Z)
BaseCommit: 28dc49ecb4604c0bc349e4445adc659491a1874c01198e6253a261f4d59708b7
LayeredPackages: createrepo_c rpm wget
Enable Automatic Updates
- Run the following command:
$ systemctl restart rpm-ostreed
To enable automatic background updates, edit the /etc/rpm-ostreed.conf, and include the below lines in the Daemon section:
[Daemon]
AutomaticUpdatePolicy=stage
#IdleExitTimeout=60
Run the following commands:
$ systemctl reload rpm-ostreed
$ systemctl enable rpm-ostree-automatic.timer --now
$ systemctl restart rpm-ostree-automatic
Verify that the automatic update feature has been enabled:
$ rpm-ostree status -v
State: idle
AutomaticUpdates: stage; rpm-ostreed-automatic.timer: last run 16min ago
On the server machine, perform another commit on the base tree.
Automatic updates are now enabled and will automatically update the host system.
4.11.9 - File Oriented Server Operations
In this section, we will checkout a filetree into a writable directory structure on disk, make several file changes and commit the changes back into the repository. Then we will download this commit and apply at the host. As you may have guessed, this chapter is mostly about OSTree - the base technology. I’ve not mentioned anything about packages, although it is quite possible to install packages (afler all, packages are made of files, right?) and commit without the help of rpm-ostree, but it’s too much of a headache and not worth the effort, since rpm-ostree does it simpler and better.
When would you want to do that? When you want for all your hosts to get an application or configuration customization that is not encapsulated as part of a package upgrade.
Starting a fresh OSTree repo
If you want to start fresh with your own branch and/or versioning scheme, you can delete the OSTree repo created during the Photon 3.0 RPM-OSTree server install and re-create it empty.
root [ /srv/rpm-ostree ]# rm -rf repo/*
root [ /srv/rpm-ostree ]# ostree --repo=repo init --mode=archive-z2
root [ /srv/rpm-ostree ]# ls repo
config objects refs state tmp uncompressed-objects-cache
root [ /srv/rpm-ostree ]# cat repo/config
[core]
repo_version=1
mode=archive-z2
A newer ostree feature, available in Photon OS 2.0 and higher, allows the OSTree server admin to create server summary metadata, that includes among other things the list of available branches and the list of static deltas, so they could be discovered by hosts. To create a summary, run this command after you committed for your branches:
root [ /srv/rpm-ostree ]# ostree summary -u "This is BigData's OSTree server, it has three branches"
We will find out later how the hosts query for branches list.
4.11.10 - Package Oriented Server Operations
Now that we have a Photon RPM-OSTree server up and running (if not, see how to install), we will learn how to provide the desired set of packages as input and instruct rpm-ostree to compose a filetree, that will result in creation (or update) of an OSTree repo.
The simplest way to explain is to take a look at the files installed by the Photon RPM-OSTree server during setup.
root [ ~ ]# cd /srv/rpm-ostree/
root [ /srv/rpm-ostree ]# ls -l
total 16
lrwxrwxrwx 1 root root 31 Aug 28 19:06 lightwave-ostree.repo -> /etc/yum.repos.d/lightwave.repo
-rw-r--r-- 1 root root 7356 Aug 28 19:06 ostree-httpd.conf
-rw-r--r-- 1 root root 1085 Aug 28 19:06 photon-base.json
lrwxrwxrwx 1 root root 35 Aug 28 19:06 photon-extras-ostree.repo -> /etc/yum.repos.d/photon-extras.repo
lrwxrwxrwx 1 root root 32 Aug 28 19:06 photon-iso-ostree.repo -> /etc/yum.repos.d/photon-iso.repo
lrwxrwxrwx 1 root root 28 Aug 28 19:06 photon-ostree.repo -> /etc/yum.repos.d/photon.repo
lrwxrwxrwx 1 root root 36 Aug 28 19:06 photon-updates-ostree.repo -> /etc/yum.repos.d/photon-updates.repo
drwxr-xr-x 7 root root 4096 Aug 20 22:27 repo
JSON configuration file
How can we tell rpm-ostree what packages we want to include, where to get them from and how to compose the filetree? There is JSON file for that. Let’s take a look at photon-base.json used by the Photon OS team.
root [ /srv/rpm-ostree ]# cat photon-base.json
{
"comment": "Photon Minimal OSTree",
"osname": "photon",
"ref": "photon/3.0/x86_64/minimal",
"automatic_version_prefix": "3.0_minimal",
"repos": ["photon"],
"selinux": false,
"initramfs-args": ["--no-hostonly"],
"bootstrap_packages": ["filesystem"],
"documentation": false,
"packages": ["glibc", "zlib", "binutils", "gmp", "mpfr", "libgcc", "libstdc++","libgomp",
"pkg-config", "ncurses", "bash", "bzip2", "cracklib", "cracklib-dicts", "shadow",
"procps-ng", "iana-etc", "readline", "coreutils", "bc", "libtool", "net-tools",
"findutils", "xz", "grub2", "grub2-pc", "grub2-efi", "iproute2", "util-linux", "linux",
"attr", "libcap", "kmod", "expat", "dbus", "file",
"sed", "grep", "cpio", "gzip",
"openssl", "ca-certificates", "curl",
"systemd",
"openssh", "iptables",
"photon-release",
"vim", "photon-repos",
"docker", "bridge-utils",
"dracut", "dracut-tools", "rpm-ostree", "nss-altfiles", "which"]
}
There are some mandatory settings, some optional. I’m only going to explain the most important ones for our use case.
osname and ref should be familiar, they have been explained in previous sections OSname and Refspec. Basicaly, we are asking rpm-ostree to compose a tree for photon OS and photon/3.0/x86_64/minimal branch.
For more information, see the OS Tree Documentation.
Package addition, removal, upgrade
packages is the list of packages that are to be added, in this case, in the “minimal” installation profile, on top of the packages already included by default. This is not quite the identical set of RPMS you get when you select the minimal profile in the ISO installer, but it’s pretty close and that’s why it’s been named the same.
Let’s add to the list three new packages: gawk, sudo and wget using vim photon-base.json
!!!Warning: do not remove any packages from the default list, even an “innocent” one, as it may bring the system to an unstable condition. During my testing, I’ve removed “which”; it turns out it was used to figure out the grub booting roots: on reboot, the system was left hanging at grub prompt.
RPMS repository
But where are these packages located? RPM-OStree uses the same standard RPMS repositories, that yum installs from.
root [ /srv/rpm-ostree ]# ls /etc/yum.repos.d/
photon-debuginfo.repo photon-extras.repo photon-iso.repo photon-updates.repo photon.repo
Going back to our JSON file, repos is a multi-value setting that tells RPM-OSTree in what RPMS repositories to look for packages. In this case, it looks in the current directory for a “photon” repo configuration file, that is a .repo file starting with a [photon] section. There is such a file: photon-ostree.repo, that is in fact a link to photon.repo in /etc/yum.repos.d directory.
root [ /srv/rpm-ostree ]# cat /etc/yum.repos.d/photon.repo
[photon]
name=VMware Photon Linux 3.0(x86_64)
baseurl=https://dl.bintray.com/vmware/photon_release_$releasever_$basearch
gpgkey=file:///etc/pki/rpm-gpg/VMWARE-RPM-GPG-KEY
gpgcheck=1
enabled=1
skip_if_unavailable=True
In this case, rpm-ostree is instructed to download its packages in RPM format from the bintray URL, that is the location of an online RPMS repo maintained by the WMware Photon OS team. To make sure those packages are genuine, signed by VMware, the signature is checked against the official VMware public key.
So what’s in an RPMS repository? If we point the browser to https://packages.vmware.com/photon/3.0/photon_updates_3.0_x86_64, we can see there are three top directories:
- noarch - where all packages that don’t depend on the architecture reside. Those may contain scripts, platform neutral source files, configuration.
- x86_64 - platform dependent packages for Intel 32 and 64 bits CPUs.
- repodata - internal repo management data, like a catalog of all packages, and for every package its name, id, version, architecture and full path file/directory list. There is also a compressed XML file containing the history of changelogs extracted from github, as packages in RPM format were built by Photon OS team members from sources.
Fortunately, in order to compose a tree, you don’t need to download the packages from the online repository (which is time consuming - in the order of minutes), unless there are some new ones or updated versions of them, added by the Photon team after shipping 1.0 version or the 1.0 Refresh. A copy of the starter RPMS repository (as of 1.0 shipping date) has been included on the CD-ROM and you can access it.
root [ /srv/rpm-ostree ]# mount /dev/cdrom
root [ /srv/rpm-ostree ]# ls /mnt/cdrom/RPMS
noarch repodata x86_64
All you have to do now is to replace the "repos": ["photon"] entry by "repos": ["photon-iso"], which will point to the RPMS repo on CD-ROM, rather than the online repo. This way, composing saves time, bandwidth and reduces to zero the risk of failure because of a networking issue.
root [ /srv/rpm-ostree ]# cat /etc/yum.repos.d/photon-iso.repo
[photon-iso]
name=VMWare Photon Linux ISO 3.0(x86_64)
baseurl=file:///mnt/cdrom/RPMS
gpgkey=file:///etc/pki/rpm-gpg/VMWARE-RPM-GPG-KEY
gpgcheck=1
enabled=0
skip_if_unavailable=True
There are already in current directory links created to all repositories in /etc/yum.repos.d, so they are found when tree compose command is invoked. You may add any other repo to the list and include packages found in that repo to be part of the image.
Composing a tree
After so much preparation, we can execute a tree compose. We have only added 3 new packages and changed the RPMS repo source. Assuming that the JSON file is editted, run the following:
root [ /srv/rpm-ostree ]# rpm-ostree compose tree --repo=repo photon-base.json
Previous commit: 2940e10c4d90ce6da572cbaeeff7b511cab4a64c280bd5969333dd2fca57cfa8
Downloading metadata [=========================================================================] 100%
Transaction: 117 packages
Linux-PAM-1.1.8-2.ph3.x86_64
attr-2.4.47-1.ph3.x86_64
...
gawk-4.1.0-2.ph3.x86_64
...
sudo-1.8.11p1-4.ph3.x86_64
...
wget-1.15-1.ph3.x86_64
which-2.20-1.ph3.x86_64
xz-5.0.5-2.ph3.x86_64
zlib-1.2.8-2.ph3.x86_64
Installing packages [==========================================================================] 100%
Writing '/var/tmp/rpm-ostree.TVO089/rootfs.tmp/usr/share/rpm-ostree/treefile.json'
Preparing kernel
Creating empty machine-id
Executing: /usr/bin/dracut -v --tmpdir=/tmp -f /var/tmp/initramfs.img 4.0.9 --no-hostonly
...
*** Including module: bash ***
*** Including module: kernel-modules ***
*** Including module: resume ***
*** Including module: rootfs-block ***
*** Including module: terminfo ***
*** Including module: udev-rules ***
Skipping udev rule: 91-permissions.rules
Skipping udev rule: 80-drivers-modprobe.rules
*** Including module: ostree ***
*** Including module: systemd ***
*** Including module: usrmount ***
*** Including module: base ***
/etc/os-release: line 1: Photon: command not found
*** Including module: fs-lib ***
*** Including module: shutdown ***
*** Including modules done ***
*** Installing kernel module dependencies and firmware ***
*** Installing kernel module dependencies and firmware done ***
*** Resolving executable dependencies ***
*** Resolving executable dependencies done***
*** Stripping files ***
*** Stripping files done ***
*** Store current command line parameters ***
*** Creating image file ***
*** Creating image file done ***
Image: /var/tmp/initramfs.img: 11M
========================================================================
Version: dracut-041-1.ph3
Arguments: -v --tmpdir '/tmp' -f --no-hostonly
dracut modules:
bash
kernel-modules
resume
rootfs-block
terminfo
udev-rules
ostree
systemd
usrmount
base
fs-lib
shutdown
========================================================================
drwxr-xr-x 12 root root 0 Sep 1 00:52 .
crw-r--r-- 1 root root 5, 1 Sep 1 00:52 dev/console
crw-r--r-- 1 root root 1, 11 Sep 1 00:52 dev/kmsg
... (long list of files removed)
========================================================================
Initializing rootfs
Migrating /etc/passwd to /usr/lib/
Migrating /etc/group to /usr/lib/
Moving /usr to target
Linking /usr/local -> ../var/usrlocal
Moving /etc to /usr/etc
Placing RPM db in /usr/share/rpm
Ignoring non-directory/non-symlink '/var/tmp/rpm-ostree.TVO089/rootfs.tmp/var/lib/nss_db/Makefile'
Ignoring non-directory/non-symlink '/var/tmp/rpm-ostree.TVO089/rootfs.tmp/var/cache/ldconfig/aux-cache'
Ignoring non-directory/non-symlink '/var/tmp/rpm-ostree.TVO089/rootfs.tmp/var/log/btmp'
Ignoring non-directory/non-symlink '/var/tmp/rpm-ostree.TVO089/rootfs.tmp/var/log/lastlog'
Ignoring non-directory/non-symlink '/var/tmp/rpm-ostree.TVO089/rootfs.tmp/var/log/wtmp'
Moving /boot
Using boot location: both
Copying toplevel compat symlinks
Adding tmpfiles-ostree-integration.conf
Committing '/var/tmp/rpm-ostree.TVO089/rootfs.tmp' ...
photon/1.0/x86_64/minimal => c505f4bddb4381e8b5213682465f1e5bb150a18228aa207d763cea45c6a81bbe
I’ve cut a big part of logging, but as you can see, the new filetree adds to the top of the previous (initial) commit 2940e10c4d and produces a new commit c505f4bddb. Our packages gawk-4.1.0-2.ph3.x86_64, sudo-1.8.11p1-4.ph3.x86_64 and wget-1.15-1.ph3.x86_64 have been added.
During compose, rpm-ostree checks out the file tree into its uncompressed form, applies the package changes, places the updated RPM repo into /usr/share/rpm and calls ostree to commit its changes back into the OSTree repo. If we were to look at the temp directory during this time:
root [ /srv/rpm-ostree ]# ls /var/tmp/rpm-ostree.TVO089/rootfs.tmp
bin dev lib media opt proc run srv sysroot usr
boot home lib64 mnt ostree root sbin sys tmp var
If we repeat the command, and there is no change in the JSON file settings and no change in metadata, rpm-ostree will figure out that nothing has changed and stop. You can force however to redo the whole composition.
root [ /srv/rpm-ostree ]# rpm-ostree compose tree --repo=repo photon-base.json
Previous commit: c505f4bddb4381e8b5213682465f1e5bb150a18228aa207d763cea45c6a81bbe
Downloading metadata [=========================================================================] 100%
No apparent changes since previous commit; use --force-nocache to override
This takes several minutes. Then why is the RPM-OSTree server installing so fast, in 45 seconds on my SSD? The server doesn’t compose the tree, it uses a pre-created OSTree repo that is stored on the CD-ROM. It comes of course at the expense of larger CD-ROM size. This OSTree repo is created from the same set of RPMS on the CD-ROM, so if you compose fresh, you will get the same exact tree, with same commit ID for the “minimal” ref.
Automatic version prefix
If you recall the filetree version explained earlier, this is where it comes into play. When a tree is composed from scratch, the first version (0) associated to the initial commit is going to get that human readable value. Any subsequent compose operation will auto-increment to .1, .2, .3 and so on.
It’s a good idea to start a versionning scheme of your own, so that your customized Photon builds that may get different packages of your choice don’t get the same version numbers as the official Photon team builds, coming from VMware’s bintray OSTree repository. There is no conflict, it’s just confusing to have same name for different commits coming from different repos,
So if you work for a company named Big Data Inc., you may want to switch to a new versioning scheme "automatic_version_prefix": "1.0_bigdata".
Installing package updates
If you want to provide hosts with the package updates that VMware periodically releases, all that you need to do is to add the photon-updates.repo to the list of repos in photon-base.json and then re-compose the usual way.
"repos": ["photon", "photon-updates"],
Even though you may have not modified the “packages” section in the json file, the newer versions of existing packages will be included in the new image and then downloaded by the host the usual way. Note that upgrading a package shows differently than adding (+) or removing (-). You may still see packages added (or removed) though because they are new dependencies (or no longer dependencies) for the newer versions of other packages, as libssh2 in the example below.
root [ ~ ]# rpm-ostree upgrade --check-diff
Updating from: photon:photon/3.0/x86_64/minimal
8 metadata, 13 content objects fetched; 1002 KiB transferred in 0 seconds
!bridge-utils-1.5-2.ph3.x86_64
=bridge-utils-1.5-3.ph3.x86_64
!bzip2-1.0.6-5.ph3.x86_64
=bzip2-1.0.6-6.ph3.x86_64
!curl-7.47.1-2.ph3.x86_64
=curl-7.51.0-2.ph3.x86_64
!docker-1.11.0-5.ph3.x86_64
=docker-1.12.1-1.ph3.x86_64
...
+libssh2-1.8.0-1.ph3.x86_64
...
root [ ~ ]# rpm-ostree upgrade
Updating from: photon:photon/1.0/x86_64/minimal
258 metadata, 1165 content objects fetched; 76893 KiB transferred in 8 seconds
Copying /etc changes: 6 modified, 0 removed, 14 added
Transaction complete; bootconfig swap: yes deployment count change: 1
Changed:
bridge-utils 1.5-2.ph3 -> 1.5-3.ph3
bzip2 1.0.6-5.ph3 -> 1.0.6-6.ph3
curl 7.47.1-2.ph3 -> 7.51.0-2.ph3
docker 1.11.0-5.ph3 -> 1.12.1-1.ph3
...
Added:
libssh2-1.8.0-1.ph3.x86_64
Upgrade prepared for next boot; run "systemctl reboot" to start a reboot
Now if we want to see what packages have been updated and what issues have been fixed, just run at the host the command that we learned about in chapter 5.4.
root [ ~ ]# rpm-ostree db diff 56ef 396e
ostree diff commit old: 56e (56ef687f1319604b7900a232715718d26ca407de7e1dc89251b206f8e255dcb4)
ostree diff commit new: 396 (396e1116ad94692b8c105edaee4fa12447ec3d8f73c7b3ade4e955163d517497)
Upgraded:
bridge-utils-1.5-3.ph3.x86_64
* Mon Sep 12 2016 Alexey Makhalov <amakhalov@vmware.com> 1.5-3
- Update patch to fix-2.
bzip2-1.0.6-6.ph3.x86_64
* Fri Oct 21 2016 Kumar Kaushik <kaushikk@vmware.com> 1.0.6-6
- Fixing security bug CVE-2016-3189.
curl-7.51.0-2.ph3.x86_64
* Wed Nov 30 2016 Xiaolin Li <xiaolinl@vmware.com> 7.51.0-2
- Enable sftp support.
* Wed Nov 02 2016 Anish Swaminathan <anishs@vmware.com> 7.51.0-1
- Upgrade curl to 7.51.0
* Thu Oct 27 2016 Anish Swaminathan <anishs@vmware.com> 7.47.1-4
- Patch for CVE-2016-5421
* Mon Sep 19 2016 Xiaolin Li <xiaolinl@vmware.com> 7.47.1-3
- Applied CVE-2016-7167.patch.
docker-1.12.1-1.ph3.x86_64
* Wed Sep 21 2016 Xiaolin Li <xiaolinl@vmware.com> 1.12.1-1
- Upgraded to version 1.12.1
* Mon Aug 22 2016 Alexey Makhalov <amakhalov@vmware.com> 1.12.0-2
- Added bash completion file
* Tue Aug 09 2016 Anish Swaminathan <anishs@vmware.com> 1.12.0-1
- Upgraded to version 1.12.0
* Tue Jun 28 2016 Anish Swaminathan <anishs@vmware.com> 1.11.2-1
- Upgraded to version 1.11.2
...
Added:
libssh2-1.8.0-1.ph3.x86_64
Composing for a different branch
RPM-OSTree makes it very easy to create and update new branches, by composing using json config files that include the Refspec as the new branch name, the list of packages and the other settings we are now familiar with. Photon OS 2.0 RPM-OSTRee Server installer adds two extra files photon-minimal.json and photon-full.json in addition to photon-base.json, that correspond almost identically to the minimal and full profiles installed via tdnf. It also makes ‘photon-base’ a smaller set of starter branch.
Of course, you can create your own config files for your branches with desired lists of packages. You may compose on top of the existing tree, or you can start fresh your own OSTRee repo, using your own customized versioning.
4.11.11 - Remotes
In Chapter 3 we talked about the Refspec that contains a photon: prefix, that is the name of a remote. When a Photon host is installed, a remote is added - which contains the URL for an OSTree repository that is the origin of the commits we are going to pull from and deploy filetrees, in our case the Photon RPM-OSTree server we installed the host from. This remote is named photon, which may be confusing, because it’s also the OS name and part of the Refspec (branch) path.
Listing remotes
A host repo can be configured to switch between multiple remotes to pull from, however only one remote is the “active” one at a time. We can list the remotes created so far, which brings back the expected result.
root@photon-host-def [ ~ ]# ostree remote list
photon
photon-1
We can inquiry about the URL for that remote name, which for the default host is the expected Photon OS online OSTree repo.
root@photon-host-def [ ~ ]# ostree remote show-url photon
https://<host-name>:8080/repo
But where is this information stored? The repo’s config file has it.
root@photon-host-def [ ~ ]# cat /ostree/repo/config
[core]
repo_version=1
mode=bare
[remote "photon"]
url=http:<Server-IP-Address:port>/repo
gpg-verify=false
If same command is executed on the custom host we’ve installed, it’s going to reveal the URL of the Photon RPM-OSTree server connected to during setup.
root@photon-host-cus [ ~ ]# ostree remote show-url photon
http://10.197.103.175:8000/repo
GPG signature verification
You may wonder what is the purpose of gpg-verify=false in the config file, associated with the specific remote. This will instruct any host update to skip the signing verification for the updates that come from server, resulted from tree composed locally at the server, as they are not signed. Without this, host updating will fail.
There is a whole chapter about signing, importing keys and so on that I will not get into, but the idea is that signing adds an extra layer of security, by validating that everything you download comes from the trusted publisher and has not been altered. That is the case for all Photon OS artifacts downloaded from VMware official site. All OVAs and packages, either from the online RPMS repositories or included in the ISO file - are signed by VMware. We’ve seen a similar setting gpgcheck=1 in the RPMS repo configuration files that tdnf uses to validate or not the signature for all packages downloaded to be installed.
Switching repositories
Since mapping name/url is stored in the repo’s config file, in principle you can re-assign a different URL, connecting the host to a different server. The next upgrade will get the latest commit chain from the new server.
If we edit photon-host-def’s repo config and replace the bintray URL by photon-srv1’s IP address, all original packages in the original 3.0_minimal version will be preserved, but any new package change (addition, removal, upgrade) added after that (in 3.0_minimal.1, 3.0_minimal.2) will be reverted and all new commits from photon-srv1 (that may have same version) will be applied. This is because the two repos are identical copies, so they have the same original commit ID as a common ancestor, but they diverge from there.
If the old and new repo have nothing in common (no common ancestor commit), this will undo even the original commit, so all commits from the new tree will be applied.
A better solution would be to add a new remote that will identify where the commits come from.
Adding and removing remotes
A cleaner way to switch repositories is to add remotes that point to different servers. Let us add another server that we will refer to as photon2, along with (optional) the refspecs for branches that it provides (we will see later that in the newer OSTree versions, we don’t need to know the branch names, they could be queried at run-time).
root@photon-host-cus [ ~ ]# ostree remote add --repo=/ostree/repo -v --no-gpg-verify photon2 http://10.197.103.204:8080 photon/3.0/x86_64/minimal photon/3.0/x86_64/full
root@photon-host-cus [ ~ ]# ostree remote list
photon
photon2
root@photon-host-cus [ ~ ]# ostree remote show-url photon2
http://10.118.101.86
Where is this information stored? There is an extra config file created per each remote:
root@photon-host-cus [ ~ ]# cat /etc/ostree/remotes.d/photon2.conf
[remote "photon2"]
url=http://10.118.101.86
branches=photon/3.0/x86_64/minimal;photon/2.0/x86_64/full;
gpg-verify=false
You may have guessed what is the effect of --no-gpg-verify option.
Obviously, remotes could also be deleted.
root@photon-host-cus [ ~ ]# ostree remote delete photon2
root@photon-host-cus [ ~ ]# ostree remote list
photon
List available branches
If a host has been deployed from a specific branch and would like to switch to a different one, maybe from a different server, how would it know what branches are available? In git, you would run git remote show origin or git remote -a (although last command would not show all branches, unless you ran git fetch first).
Fortunately, in Photon OS 3.0 and higher, the hosts are able to query the server, if summary metadata has been generated, as we’ve seen in Creating summary metadata. This command lists all branches available for remote photon2.
root@photon-host-cus [ ~ ]# ostree remote refs photon2
photon2:photon/3.0/x86_64/base
photon2:photon/3.0/x86_64/full
photon2:photon/3.0/x86_64/minimal
Switching branches (rebasing)
If you have an installed Photon 1.0 or 1.0 Rev2 that you want to carry to 3.0, you need to rebase it.
See Rebasing a host from Photon 1.0 to 3.0.
4.11.12 - Running container applications between bootable images
In this chapter, we want to test a docker application and make sure that all the settings and downloads done in one bootable filetree are going to be saved into writable folders and be available in the other image, in other words after reboot from the other image, everything is available exactly the same way.
We are going to do this twice: first, to verify an existing bootable image installed in parallel and then create a new one.
Downloading a docker container appliance
Photon OS comes with docker package installed and configured, but we expect that the docker daemon is inactive (not started). Configuration file /usr/lib/systemd/system/docker.service is read-only (remember /usr is bound as read-only).
root@sample-host-def [ ~ ]# systemctl status docker
* docker.service - Docker Daemon
Loaded: loaded (/usr/lib/systemd/system/docker.service; disabled)
Active: inactive (dead)
root@sample-host-def [ ~ ]# cat /usr/lib/systemd/system/docker.service
[Unit]
Description=Docker Application Container Engine
Documentation=https://docs.docker.com
After=network-online.target
Wants=network-online.target
[Service]
Type=notify
# the default is not to use systemd for cgroups because the delegate issues still
# exists and systemd currently does not support the cgroup feature set required
# for containers run by docker
ExecStart=/usr/bin/dockerd
ExecReload=/bin/kill -s HUP $MAINPID
# Having non-zero Limit*s causes performance problems due to accounting overhead
# in the kernel. We recommend using cgroups to do container-local accounting.
LimitNOFILE=infinity
LimitNPROC=infinity
LimitCORE=infinity
# Uncomment TasksMax if your systemd version supports it.
# Only systemd 226 and above support this version.
#TasksMax=infinity
TimeoutStartSec=0
# set delegate yes so that systemd does not reset the cgroups of docker containers
Delegate=yes
# kill only the docker process, not all processes in the cgroup
KillMode=process
# restart the docker process if it exits prematurely
Restart=on-failure
StartLimitBurst=3
StartLimitInterval=60s
[Install]
WantedBy=multi-user.target
Now let’s enable docker daemon to start at boot time - this will create a symbolic link into writable folder /etc/systemd/system/multi-user.target.wants to its systemd configuration, as with all other systemd controlled services.
root@sample-host-def [ ~ ]# systemctl enable docker
Created symlink /etc/systemd/system/multi-user.target.wants/docker.service -> /lib/systemd/system/docker.service.
root@sample-host-def [ ~ ]# ls -l /etc/systemd/system/multi-user.target.wants
total 0
lrwxrwxrwx 1 root root 34 Sep 10 10:48 docker.service -> /lib/systemd/system/docker.service
lrwxrwxrwx 1 root root 36 Sep 4 04:59 iptables.service -> /lib/systemd/system/iptables.service
lrwxrwxrwx 1 root root 35 Sep 4 04:59 machines.target -> /lib/systemd/system/machines.target
lrwxrwxrwx 1 root root 36 Sep 4 04:59 remote-fs.target -> /lib/systemd/system/remote-fs.target
lrwxrwxrwx 1 root root 39 Sep 4 04:59 sshd-keygen.service -> /lib/systemd/system/sshd-keygen.service
lrwxrwxrwx 1 root root 32 Sep 4 04:59 sshd.service -> /lib/systemd/system/sshd.service
lrwxrwxrwx 1 root root 44 Sep 4 04:59 systemd-networkd.service -> /lib/systemd/system/systemd-networkd.service
lrwxrwxrwx 1 root root 44 Sep 4 04:59 systemd-resolved.service -> /lib/systemd/system/systemd-resolved.service
To verify that the symbolic link points to a file in a read-only directory, try to make a change in this file using vim and save. you’ll get an error: “/usr/lib/systemd/system/docker.service” E166: Can’t open linked file for writing".
Finally, let’s start the daemon, check again that is active.
root@sample-host-def [ ~ ]# systemctl start docker
root@sample-host-def [ ~ ]# systemctl status -l docker
* docker.service - Docker Application Container Engine
Loaded: loaded (/lib/systemd/system/docker.service; enabled; vendor preset: disabled)
Active: active (running) since Tue 2019-09-10 10:54:32 UTC; 14s ago
Docs: https://docs.docker.com
Main PID: 2553 (dockerd)
Tasks: 35 (limit: 4711)
Memory: 148.2M
CGroup: /system.slice/docker.service
|-2553 /usr/bin/dockerd
`-2566 docker-containerd --config /var/run/docker/containerd/containerd.toml
Sep 10 10:54:31 photon-76718dd2fa33 dockerd[2553]: time="2019-09-10T10:54:31.421759662Z" level=info msg="pickfirstBalancer: HandleSubConnStateChange: 0xc420312f90, CONNECTING" module=grpc
Sep 10 10:54:31 photon-76718dd2fa33 dockerd[2553]: time="2019-09-10T10:54:31.421935355Z" level=info msg="pickfirstBalancer: HandleSubConnStateChange: 0xc420312f90, READY" module=grpc
Sep 10 10:54:31 photon-76718dd2fa33 dockerd[2553]: time="2019-09-10T10:54:31.421980614Z" level=info msg="Loading containers: start."
Sep 10 10:54:31 photon-76718dd2fa33 dockerd[2553]: time="2019-09-10T10:54:31.886520281Z" level=info msg="Default bridge
(docker0) is assigned with an IP address 172.17.0.0/16. Daemon option --bip can be used to set a preferred IP address"
Sep 10 10:54:32 photon-76718dd2fa33 dockerd[2553]: time="2019-09-10T10:54:32.027763113Z" level=info msg="Loading containers: done."
Sep 10 10:54:32 photon-76718dd2fa33 dockerd[2553]: time="2019-09-10T10:54:32.468277184Z" level=info msg="Docker daemon"
commit=6d37f41 graphdriver(s)=overlay2 version=18.06.2-ce
Sep 10 10:54:32 photon-76718dd2fa33 dockerd[2553]: time="2019-09-10T10:54:32.468441587Z" level=info msg="Daemon has completed initialization"
Sep 10 10:54:32 photon-76718dd2fa33 dockerd[2553]: time="2019-09-10T10:54:32.684925824Z" level=warning msg="Could not register builder git source: failed to find git binary: exec: \"git\": executable file not found in $PATH"
Sep 10 10:54:32 photon-76718dd2fa33 dockerd[2553]: time="2019-09-10T10:54:32.691070166Z" level=info msg="API listen on /var/run/docker.sock"
Sep 10 10:54:32 photon-76718dd2fa33 systemd[1]: Started Docker Application Container Engine.
We’ll ask docker to run Ubuntu Linux in a container. Since it’s not present locally, it’s going to be downloaded first from the official docker repository https://hub.docker.com/_/ubuntu/.
root@sample-host-def [ ~ ]# docker ps -a
CONTAINER ID IMAGE COMMAND CREATED STATUS PORTS NAMES
root@sample-host-def [ ~ ]# docker run -it ubuntu
Unable to find image 'ubuntu:latest' locally
latest: Pulling from library/ubuntu
35c102085707: Pull complete
251f5509d51d: Pull complete
8e829fe70a46: Pull complete
6001e1789921: Pull complete
Digest: sha256:d1d454df0f579c6be4d8161d227462d69e163a8ff9d20a847533989cf0c94d90
Status: Downloaded newer image for ubuntu:latest
When downloading is complete, it comes to Ubuntu root prompt with assigned host name 7029a64e7aa3, that is actually the Container ID. Let’s verify it’s indeed the expected OS.
root@sample-host-def [ ~ ]# docker run -it ubuntu
Unable to find image 'ubuntu:latest' locally
latest: Pulling from library/ubuntu
d3a1f33e8a5a: Pull complete
c22013c84729: Pull complete
d74508fb6632: Pull complete
91e54dfb1179: Already exists
library/ubuntu:latest: The image you are pulling has been verified. Important: image verification is a tech preview feature and should not be relied on to provide security.
Digest: sha256:fde8a8814702c18bb1f39b3bd91a2f82a8e428b1b4e39d1963c5d14418da8fba
Status: Downloaded newer image for ubuntu:latest
root@7029a64e7aa3:/# cat /etc/os-release
NAME="Ubuntu"
VERSION="18.04.3 LTS (Bionic Beaver)"
ID=ubuntu
ID_LIKE=debian
PRETTY_NAME="Ubuntu 18.04.3 LTS"
VERSION_ID="18.04"
HOME_URL="https://www.ubuntu.com/"
SUPPORT_URL="https://help.ubuntu.com/"
BUG_REPORT_URL="https://bugs.launchpad.net/ubuntu/"
PRIVACY_POLICY_URL="https://www.ubuntu.com/legal/terms-and-policies/privacy-policy"
VERSION_CODENAME=bionic
UBUNTU_CODENAME=bionic
root@7029a64e7aa3:/#
Now let’s write a file into Ubuntu home directory
echo "Ubuntu file" >> /home/myfile
root@7029a64e7aa3:/home# cat /home/myfile
Ubuntu file
We’ll exit back to the Photon prompt and if it’s stopped, we will re-start it.
root@7029a64e7aa3:/# exit
exit
root@sample-host-def [ ~ ]# docker ps -a
CONTAINER ID IMAGE COMMAND CREATED STATUS PORTS NAMES
7029a64e7aa3 ubuntu "/bin/bash" 6 minutes ago Exited (0) 11 seconds ago gifted_dijkstra
root@photon-host-cus1 [ ~ ]# docker start 7029a64e7aa3
7029a64e7aa3
root@photon-host-cus1 [ ~ ]# docker ps -a
CONTAINER ID IMAGE COMMAND CREATED STATUS PORTS NAMES
7029a64e7aa3 ubuntu "/bin/bash" 7 minutes ago Up 21 seconds gifted_dijkstra
Rebooting into an existing image
Now let’s reboot the machine and select the other image. First, we’ll verify that the docker daemon is automaically started.
root@photon-host-cus1 [ ~ ]# systemctl status docker
* docker.service - Docker Application Container Engine
Loaded: loaded (/lib/systemd/system/docker.service; enabled; vendor preset: disabled)
Active: active (running) since Tue 2019-09-10 10:54:32 UTC; 13min ago
Docs: https://docs.docker.com
Main PID: 2553 (dockerd)
Tasks: 55 (limit: 4711)
Memory: 261.3M
CGroup: /system.slice/docker.service
|-2553 /usr/bin/dockerd
...
Next, is the Ubuntu OS container still there?
root@photon-host-cus1 [ ~ ]# docker ps -a
CONTAINER ID IMAGE COMMAND CREATED STATUS PORTS NAMES
7029a64e7aa3 ubuntu "/bin/bash" 9 minutes ago Up 2 minutes gifted_dijkstra
It is, so let’s start it, attach and verify that our file is persisted, then add another line to it and save, exit.
root@photon-host-cus1 [ ~ ]# docker start -i 7029a64e7aa3
root@7029a64e7aa3:/# cat /home/myfile
Ubuntu file
root@7029a64e7aa3:/# echo "booted into existing image" >> /home/myfile
root@7029a64e7aa3:/# exit
exit
Reboot into a newly created image
Let’s upgrade and replace the .0 image by a .3 build that contains git and also perl_YAML (because it is a dependency of git).
root@photon-host-cus1 [ ~ ]# rpm-ostree status
TIMESTAMP (UTC) VERSION ID OSNAME REFSPEC
* 2015-09-04 00:36:37 3.0_tp2_minimal.2 092e21d292 photon photon:photon/tp2/x86_64/minimal
2015-08-20 22:27:43 3.0_tp2_minimal 2940e10c4d photon photon:photon/tp2/x86_64/minimal
root@photon-host-cus1 [ ~ ]# rpm-ostree upgrade
Updating from: photon:photon/tp2/x86_64/minimal
43 metadata, 209 content objects fetched; 19992 KiB transferred in 0 seconds
Copying /etc changes: 5 modified, 0 removed, 19 added
Transaction complete; bootconfig swap: yes deployment count change: 0
Freed objects: 16.2 MB
Added:
git-2.1.2-1.ph3tp2.x86_64
perl-YAML-1.14-1.ph3tp2.noarch
Upgrade prepared for next boot; run "systemctl reboot" to start a reboot
root@photon-host-cus1 [ ~ ]# rpm-ostree status
TIMESTAMP (UTC) VERSION ID OSNAME REFSPEC
2015-09-06 18:12:08 3.0_tp2_minimal.3 d16aebd803 photon photon:photon/tp2/x86_64/minimal
* 2015-09-04 00:36:37 3.0_tp2_minimal.2 092e21d292 photon photon:photon/tp2/x86_64/minimal
After reboot from 3.0_tp2_minimal.3 build, let’s check that the 3-way /etc merge succeeded as expected. The docker.service slink is still there, and docker demon restarted at boot.
root@photon-host-cus1 [ ~ ]# ls -l /etc/systemd/system/multi-user.target.wants/docker.service
lrwxrwxrwx 1 root root 38 Sep 6 12:50 /etc/systemd/system/multi-user.target.wants/docker.service -> /usr/lib/systemd/system/docker.service
root@photon-host-cus1 [ ~ ]# systemctl status docker
* docker.service - Docker Daemon
Loaded: loaded (/usr/lib/systemd/system/docker.service; enabled)
Active: active (running) since Sun 2015-09-06 12:56:33 UTC; 1min 27s ago
Main PID: 292 (docker)
CGroup: /system.slice/docker.service
`-292 /bin/docker -d -s overlay
...
Let’s revisit the Ubuntu container. Is the container still there? is myfile persisted?
root@photon-host-cus1 [ ~ ]# docker ps -a
CONTAINER ID IMAGE COMMAND CREATED STATUS PORTS NAMES
7029a64e7aa3 ubuntu "/bin/bash" 5 days ago Exited (0) 5 days ago gifted_dijkstra
55825c961f95 ubuntu "/bin/bash" 5 days ago Exited (127) 5 days ago distracted_shannon
root@photon-host-cus1 [ ~ ]# docker start 57dcac5d0490
root@57dcac5d0490:/# cat /home/myfile
Ubuntu file
booted into existing image
root@57dcac5d0490:/# echo "booted into new image" >> /home/myfile
4.11.13 - Install or rebase to Photon OS 3.0
Photon OS 3.0 provides full RPM-OSTree functionality, it lets the user drive it, rather than provide a pre-defined solution as part of the installation.
The number of packages included in the RPMS repo in Photon OS 3.0 increased significantly, compared to 1.0. To keep the ISO at reasonable size, Photon OS 2.0 no longer includes the compressed ostree.repo file, that helped optimize both the server and host install in 1.0 or 1.0 Rev2. That decision affected the OSTree features we ship out of the box. Customer could achieve the same results by several additional simple steps, that will be explained in this chapter. In addition, there is a new way to create a host raw image at server.
Composing your own RPM-OSTree Server
You can compose your own RPM-OSTRee server in the following two ways:
By Manually executing the below command:
root [ /srv/rpm-ostree ]# ostree --repo=repo init --mode=archive-z2
root [ /srv/rpm-ostree ]# rpm-ostree compose tree --repo=repo photon-base.json
By installing rpm-ostree-repo package . This provides the script to create the repo tree which act as server by executing a single command.
Installing an RPM-OSTree host
Automated host install is supported, as explained in Chapter 7.2 Automated install of a custom host via kickstart.
Rebasing a host from Photon 1.0 to 3.0
If kickstart sounds too complicated and we still want to go the UI way there is a workaround that requires an extra step. Also, if you have an installed Photon 1.0 or 1.0 Rev2 that you want to carry to 3.0, you need to rebase it. Notice that I didn’t say “upgrade”.
Basically the OSTree repo will switch to a different branch on a different server, following the new server’s branch versioning scheme. The net result is that the lots of packages will get changed to newer versions from newer OSTree repo, that has been composed from a newer Photon OS 3.0 RPMS repo. Again, I didn’t say “upgraded”, neither the rebase command output, that lists “changed” packages. Some obsolete packages will be removed, new packages will be added, either because they didn’t exist in 2.0 repo, or because the new config file includes them.
The OS name is the same (Photon), so the content in /var and /etc will be transferred over.
To install fresh, deploy a Photon 1.0 Rev2 host default, as described in Chapter 2. Of course, if you already have an existing Photon OS 1.0 host that you want to move to 2.0, skip this step.
Edit /ostree/repo/config and substitute the url, providing the IP address for the Photon OS 2.0 RPM-OSTree server installed above. This was explained in Chapter 10.
ostree should confirm that is the updated server IP for the “photon” remote.
root@ostree-host [ ~ ]# ostree remote show-url photon
http://10.197.103.175:8000/repo
Rebase your host to the new 2.0 server and Refspec.
root@ostree-host [ ~ ]# ostree remote add photon-2 http://10.197.103.204:8000/repo --no-gpg-verify
root@ostree-host [ ~ ]# rpm-ostree rebase photon-2:photon/3.0/x86_64/minimal
Rebasing to photon-2:photon/3.0/x86_64/minimal
⠉ Receiving objects: 99% (1541/1549) 478.3 kB/s 107.1 MB
Receiving objects: 99% (1541/1549) 478.3 kB/s 107.1 MB... done
Staging deployment... done
Upgraded:
docker 18.06.2-3.ph3 -> 18.06.2-4.ph3
gmp 6.1.2-2.ph3 -> 6.1.2-3.ph3
gobject-introspection 1.58.0-2.ph3 -> 1.58.0-3.ph3
gzip 1.9-1.ph3 -> 1.9-2.ph3
linux 4.19.65-3.ph3 -> 4.19.69-1.ph3
mpfr 4.0.1-1.ph3 -> 4.0.1-2.ph3
ostree 2019.2-1.ph3 -> 2019.2-2.ph3
ostree-grub2 2019.2-1.ph3 -> 2019.2-2.ph3
ostree-libs 2019.2-1.ph3 -> 2019.2-2.ph3
zlib 1.2.11-1.ph3 -> 1.2.11-2.ph3
Added:
efibootmgr-15-1.ph3.x86_64
efivar-36-1.ph3.x86_64
tar-1.30-3.ph3.x86_64
Run "systemctl reboot" to start a reboot
Check the status
root@ostree-host [ ~ ]# rpm-ostree status
State: idle
AutomaticUpdates: disabled
Deployments:
* ostree://photon-1:photon/3.0/x86_64/minimal
Version: 3.0_minimal.2 (2019-09-18T08:22:15Z)
BaseCommit: c8f2b116b067d7695f9033bf2a99505198269354e157c0f2d5b78266cb874239
LayeredPackages: createrepo_c rpm wget
ostree://photon:photon/1.0/x86_64/minimal
Version: 1.0_minimal.1 (2017-01-11T02:18:42)
BaseCommit: 28dc49ecb4604c0bc349e4445adc659491a1874c01198e6253a261f4d59708b7
LayeredPackages: createrepo_c rpm wget
You may now reboot to the new Photon OS 3.0 image.
Creating a host raw image
It is now possible to run at server a script that is part of RPM-OStree package, to create a host raw mage.
5 - User Guide
The Photon OS User Guide provides information about how to use Photon OS as a developer.
The User Guide covers the basics of setting up a Network PXE Boot Server, working with Kickstart and Kubernetes, mounting remote file systems, and installing and using Lightwave.
Product version: 3.0
This documentation applies to all 3.0.x releases.
Intended Audiences
This information is intended for Photon OS developers who use Photon OS.
5.1 - Setting Up Network PXE Boot
Photon OS supports the Preboot Execution Environment, or PXE, over a network connection. This document describes how to set up a PXE boot server to install Photon OS.
Server Setup
To set up a PXE server, you will need to have the following:
- A DHCP server to allow hosts to get an IP address.
- A TFTP server, which is a file transfer protocol similar to FTP with no authentication.
- Optionally, an HTTP server. The HTTP server will serve the RPMs yum repo, or you can use the official Photon OS repo on Bintray. Also, this HTTP server can be used if you want to provide a kickstart config for unattended installation.
The instructions to set up the servers assume you have an Ubuntu 14.04 machine with a static IP address of 172.16.78.134.
DHCP Setup
sudo apt-get install isc-dhcp-server
- Edit the Ethernet interface in
/etc/default/isc-dhcp-server to INTERFACES="eth0" - Edit the DHCP configuration in
/etc/dhcp/dhcpd.conf to allow machines to boot and get an IP address via DHCP in the range 172.16.78.230 - 172.16.78.250, for example:
subnet 172.16.78.0 netmask 255.255.255.0 {
range 172.16.78.230 172.16.78.250;
option subnet-mask 255.255.255.0;
option routers 172.16.78.134;
option broadcast-address 172.16.78.255;
filename "pxelinux.0";
next-server 172.16.78.134;
}
sudo service isc-dhcp-server restart
TFTP Setup
sudo apt-get install tftpd-hpa
- Enable the boot service and restart the service:
sudo update-inetd --enable BOOT
sudo service tftpd-hpa restart
Optional: HTTP server setup
This step is only needed if you are planning to serve the ks (kickstart) config file through this server; refer to Kickstart support for details.
- Serving your local yum repo.
You can install apache http web server
sudo apt-get install apache2
Mount the Photon iso to get the RPMS repo and sample ks config file.
mkdir /mnt/photon-iso
sudo mount <photon_iso> /mnt/photon-iso/
Copy the RPMS repo.
cp -r /mnt/photon-iso/RPMS /var/www/html/
To support ks, you can copy the sample config file from the iso and edit it; refer to Kickstart support for details.
cp /mnt/photon-iso/isolinux/sample_ks.cfg /var/www/html/my_ks.cfg
PXE boot files setup
- Mount photon.iso to get Linux and initrd images:
mkdir /mnt/photon-iso
sudo mount <photon_iso> /mnt/photon-iso/
- Setting the PXE boot files:
wget https://www.kernel.org/pub/linux/utils/boot/syslinux/syslinux-6.03.tar.gz
tar -xvf syslinux-6.03.tar.gz
pushd /var/lib/tftpboot
cp -r /mnt/photon-iso/isolinux/* .
cp ~/syslinux-6.03/bios/com32/elflink/ldlinux/ldlinux.c32 .
cp ~/syslinux-6.03/bios/com32/lib/libcom32.c32 .
cp ~/syslinux-6.03/bios/com32/libutil/libutil.c32 .
cp ~/syslinux-6.03/bios/com32/menu/vesamenu.c32 .
cp ~/syslinux-6.03/bios/core/pxelinux.0 .
mkdir pxelinux.cfg
mv isolinux.cfg pxelinux.cfg/default
- Update repo param to point to http yum repo; you may pass official photon bintray repo.
sed -i "s/append/append repo=http:\/\/172.16.78.134\/RPMS/g" menu.cfg
popd
5.2 - Kickstart Support in Photon OS
Photon OS works with kickstart for unattended, automated installations. The kickstart configuration file can either reside in the CD-ROM attached to the host or be served through an HTTP server.
Kickstart Capabilities
Photon OS supports the following configurations with kickstart:
- Setting the hostname
- Setting the password
- Setting the disk to install
- Selecting whether to install the full or the minimal version of Photon OS
- Applying a post-installation script
- Adding public keys to allow the root account to log in through SSH
Permitted JSON Fields
The following is a list of allowed JSON fields and their descriptions:
| Field | Description |
|---|
| hostname | The host name as string. You can also specify the name in printf format. The hostname must not start with a number or "-" and must be less than 64 characters. Example: "photon-$((RANDOM%4096))" |
| password: crypted: true/false text: password text | crypted: true:
This indicates that the "text" field is already encrypted. In this case, the specified password is used as is for the root user. crypted: false:
This indicates that the "text" field is plain text. It is then encrypted and used to create the root user's password. text: Plain text or encrypted password. |
| disk | Indicates the install disk. Example: /dev/sda |
| partitions | An array of partition definitions. To create GPT partitions Example: [ {"mountpoint": "/", "size": 0, "filesystem": "ext4"}, {"mountpoint": "/boot", "size": 128, "filesystem": "ext4"}, {"mountpoint": "/root", "size": 128, "filesystem": "ext4"}, {"size": 128, "filesystem": "swap"} ] To create LVM partitions Example: [ {"mountpoint": "/", "size": 0, "filesystem": "ext4", "lvm":{"vg_name":"vg1", "lv_name":"rootfs"}}, {"mountpoint": "/boot", "size": 128, "filesystem": "ext4"}, {"mountpoint": "/root", "size": 128, "filesystem": "ext4","lvm":{"vg_name":"vg1", "lv_name":"root"}}, {"size": 128, "filesystem": "swap","lvm":{"vg_name":"vg2", "lv_name":"swap"}}
] Note: Mounting '/boot' partition as lvm is not supported. |
| packagelist_file | Indicates the name of the file that contains the list of packages to install. Example: { "packagelist_file": "packages_minimal.json" } |
| additional_packages | Specify an array of additional packages. |
| install_linux_esx | Specify a boolean value to use linux esx instead of generic linux. |
| postinstall | Specify an array of bash commands to execute after install. See the example for partitions. Example:
{ "postinstall": [
"#!/bin/sh",
"echo \"Hello World\" > /etc/postinstall" ] } |
| public_key | Optional. The public key that you require to install for password-less logins. This key is created in authorized_keys in the .ssh directory. |
| additional_files | Optional. Contains a list of pairs {source file (or directory), destination file
(or directory)} to copy to the target system. Source file
(directory) will be looked up in "search_path" list. Example: { "additional_files": [
{"resizefs.sh": "/usr/local/bin/resizefs.sh"},
{"resizefs.service": "/lib/systemd/system/resizefs.service"}]} |
| additional_rpms_path | Optional. Provide a path containing additional RPMS that are to be bundled into
the image. |
| arch | Optional. Target system architecture. Should be set if target architecture is
different from the host, for instance x86_64 machine building RPi
image.
Acceptable values are: "x86_64", "aarch64"
Default value: autodetected host architecture Example: { "arch": "aarch64" } |
| bootmode | Optional. Sets the boot type to support: EFI, BIOS or both. Acceptable values are: bios, efi, dualboot bios Adds special partition (very first) for first stage grub. efi Adds ESP (Efi Special Partition), format is as FAT and copy there EFI binaries including grub.efi dualboot Adds two extra partitions for "bios" and "efi" modes. This target will support both modes that can be switched in bios settings without extra actions in the OS. Default value: "dualboot" for x86_64 and "efi" for aarch64 Example: { "bootmode": "bios" } |
| eject_cdrom | Optional. Ejects cdrom after installation completed if set to true. Boolean: true or false Default value: true Example: { "eject_cdrom": false } |
| live | Optional. Should be set to flase if target system is not being run on
host machine. When it set to false, installer will not add EFI boot
entries, and will not generate unique machine-id. Default value: false if "disk" is /dev/loop and true otherwise. Example: { "live": false } |
| log_level | Optional. Set installer logging level. Acceptable values are: error, warning, info, debug Default value: info Example: { "log_level": "debug" } |
| ostree | Optional. Atomic flavour of Photon OS. default_repo (required) Define the type of repo data used for installing the OS
There are two type: 1. Default Repo(comes with ISO) 2. Custom Repo (Remote server) Boolean: true or false where true : Default Repo is selected false: Custom Repo is selected Default value: true
Example: { "ostree": {"default_repo": true}} repo_url (Required, Only If Custom Repo is selected)
Supported Value: Valid "repo" URL of remote server where repo data exists repo_ref (Required, Only If Custom Repo is selected)
Supported Value: Valid "ref" path which was mentioned for
creation of Base Tree on remote server Example: { "ostree": {
"default_repo": false,
"repo_url": "http://:/repo",
"repo_ref": "photon/3.0/x86_64/minimal"
}
} |
| packages | Optional if packagelist_file set. Contains list of packages to install. Example: { "packages": ["minimal", "linux", "initramfs"] } |
| partition_type | Optional. Set partition table type. Supported values are: gpt, msdos. Default value: gpt Example: { "partition_type": "msdos" } |
| network | Optional. Used to configure network on a live/installed system. type required String; must be one of dhcp/static/vlan. Indicates how the network is being configured. hostname optional; when type == dhcp String; DHCP client hostname ip_addr required; when type == static IP String; IP address to be configured netmask required; when type == static IP String; Netmask to be configured gateway required; when type == static IP String; Gateway IP address to be configured nameserver required; when type == static IP String; Name server IP address to be configured vlan_id required; when type == vlan ID String. (1-4094); VLAN ID number expressed as string |
| postinstallscripts | Optional. Contains list of scripts to run on the target after installation.
Scripts will be looked up in "search_path" list. Example: { "postinstallscripts": ["rpi3-custom-patch.sh"] } |
| search_path | Optional. List of directories to search for additional files and scripts. Example: { "search_path": ["/home/user", "/tmp"] } |
| shadow_password | Optional. Contains encrypted root password.
Short form of: { "password": {
"crypted": true,
"text": "encrypted password here"} } |
| ui | Optional. Installer will show progress status in the UI, if it set to true.
Or logging output will be printed to console - default behavior. Boolean: true or false Default value: false Example: { "ui": true } |
Sample Configuration File
Here is a sample kickstart configuration file:
{
"hostname": "photon-machine",
"password":
{
"crypted": false,
"text": "changeme"
},
"disk": "/dev/sda",
"partitions": [
{"mountpoint": "/", "size": 0, "filesystem": "ext4"},
{"mountpoint": "/boot", "size": 128, "filesystem": "ext4"},
{"mountpoint": "/root", "size": 128, "filesystem": "ext4"},
{"size": 128, "filesystem": "swap"}
],
"packagelist_file": "packages_minimal.json",
"additional_packages": ["vim"],
"postinstall": [
"#!/bin/sh",
"echo \"Hello World\" > /etc/postinstall"
],
"public_key": "<ssh-key-here>",
"install_linux_esx": false,
"network": {
"type": "dhcp"
}
}
##Installing Root Partition as LVM
In the kickstart file modify the partitions field to mount root partition as LVM.
For example:
"disk": "/dev/sda"
"partitions":[
{"mountpoint": "/", "size": 0, "filesystem": "ext4", "lvm":{"vg_name":"vg1", "lv_name":"rootfs"}},
{"mountpoint": "/boot", "size": 128, "filesystem": "ext4"},
{"mountpoint": "/root", "size": 128, "filesystem": "ext4","lvm":{"vg_name":"vg1", "lv_name":"root"}},
{"size": 128, "filesystem": "swap","lvm":{"vg_name":"vg2", "lv_name":"swap"}}
]
Note:
- vg_name : Volume Group Name
- lv_name : Logical Volume Name
In above example rootfs, root are logical volumes in the volume group vg1 and swap is logical volume in volume group vg2, physical volumes are part of disk /dev/sda.
Multiple disks are also supported. For example:
"disk": "/dev/sda"
"partitions":[
{"mountpoint": "/", "size": 0, "filesystem": "ext4", "lvm":{"vg_name":"vg1", "lv_name":"rootfs"}},
{"mountpoint": "/boot", "size": 128, "filesystem": "ext4"},
{"disk": "/dev/sdb", "mountpoint": "/root", "size": 128, "filesystem": "ext4","lvm":{"vg_name":"vg1", "lv_name":"root"}},
{"size": 128, "filesystem": "swap","lvm":{"vg_name":"vg1", "lv_name":"swap"}}
]
If disk name is not specified, the physical volumes will be part of the default disk: dev/sda.
In above example rootfs,root and swap are logical volumes in volume group vg1, physical volumes are in the disk /dev/sdb and partitions are present in /dev/sda.
Note: Mounting /boot partition as LVM is not supported.
Unattended Installation Through Kickstart
For an unattended installation, you pass the ks=<config_file> parameter to the kernel command. To pass the config file, there are two options: by providing it on the ISO or by serving it from an HTTP server.
The syntax to pass the config-file to the kernel through the ISO takes the following form:
ks=cdrom:/<config_file_path>
Here is an example:
ks=cdrom:/isolinux/my_ks.cfg
The syntax to serve the config-file to the kernel from an HTTP server (NOTE: DO NOT use https:// here) takes the following form:
ks=http://<server>/<config_file_path>
Building an ISO with a Kickstart Config File
Here’s an example of how to add a kickstart config file to the Photon OS ISO by mounting the ISO on an Ubuntu machine and then rebuilding the ISO. The following example assumes you can adapt the sample kickstart configuration file that comes with the Photon OS ISO to your needs. You can obtain the Photon OS ISO for free from Bintray at the following URL:
https://packages.vmware.com/photon
Once you have the ISO, mount it.
mkdir /tmp/photon-iso
sudo mount photon.iso /tmp/photon-iso
Then copy the content of the ISO to a writable directory and push it into the directory stack:
mkdir /tmp/photon-ks-iso
cp -r /tmp/photon-iso/* /tmp/photon-ks-iso/
pushd /tmp/photon-ks-iso/
Next, copy the sample kickstart configuration file that comes with the Photon OS ISO and modify it to suit your needs. In the ISO, the sample kickstart config file appears in the isolinux directory and is named sample_ks.cfg. The name of the directory and the name of the file might be in all uppercase letters.
cp isolinux/sample_ks.cfg isolinux/my_ks.cfg
nano isolinux/my_ks.cfg
With a copy of the sample kickstart config file open in nano, make the changes that you want.
Now add a new item to the installation menu by modifying isolinux/menu.cfg:
cat >> isolinux/menu.cfg << EOF
label my_unattended
menu label ^My Unattended Install
menu default
kernel vmlinuz
append initrd=initrd.img root=/dev/ram0 loglevel=3 photon.media=cdrom
EOF
Finally, rebuild the ISO so that it includes your kickstart config file:
mkisofs -R -l -L -D -b isolinux/isolinux.bin -c isolinux/boot.cat \
-no-emul-boot -boot-load-size 4 -boot-info-table -V "PHOTON_$(date +%Y%m%d)" \
. > <new_iso_path>.iso
popd
5.3 - Packer Examples for Photon OS
Packer is an open source tool that enables you to create identical machine images for multiple platforms.
VMware maintains a GitHub project that includes examples for creating Photon OS machine images using Packer.
Vagrant Boxes
vmware/photon-packer-templates
This project provides examples to automate the creation of Photon OS machine images as Vagrant boxes using Packer and the Packer Plugins for VMware (vmware-iso) and Virtualbox (virtualbox).
The Vagrant boxes included in the project can be run on the following providers:
- VMware Fusion (
vmware_desktop) - VMware Workstation Pro (
vmware_desktop) - VirtualBox (
virtualbox)
This project is also used to generate the offical vmware/photon Vagrant boxes.
All examples are authored in the HashiCorp Configuration Language (“HCL2”).
5.4 - Kubernetes on Photon OS
You can use Kubernetes with Photon OS. The instructions in this section present a manual configuration that gets one worker node running to help you understand the underlying packages, services, ports, and so forth.
The Kubernetes package provides several services: kube-apiserver, kube-scheduler, kube-controller-manager, kubelet, kube-proxy. These services are managed by systemd. Their configuration resides in a central location: /etc/kubernetes.
5.4.1 - Prerequisites
You need two or more machines with the 3.0 general availability or later version of Photon OS installed.
5.4.2 - Running Kubernetes on Photon OS
The procedure describes how to break the services up between the hosts.
The first host, photon-master, is the Kubernetes master. This host runs the kube-apiserver, kube-controller-manager, and kube-scheduler. In addition, the master also runs etcd. Although etcd is not needed on the master if etcd runs on a different host, this guide assumes that etcd and the Kubernetes master run on the same host. The remaining host, photon-node, is the node and runs kubelet, proxy, and docker.
5.4.2.1 - System Information
Hosts:
photon-master = 192.168.121.9
photon-node = 192.168.121.65
5.4.2.2 - Prepare the Hosts
The following packages should already be installed on the full version of Photon OS, but you might have to install them on the minimal version of Photon OS. If the tdnf command returns “Nothing to do,” the package is already installed.
- Install Kubernetes on all hosts–both
photon-master and photon-node.
tdnf install kubernetes
- Install iptables on photon-master and photon-node:
tdnf install iptables
- Open the tcp port 8080 (api service) on the photon-master in the firewall
iptables -A INPUT -p tcp --dport 8080 -j ACCEPT
- Open the tcp port 10250 (api service) on the photon-node in the firewall
iptables -A INPUT -p tcp --dport 10250 -j ACCEPT
- Install Docker on photon-node:
tdnf install docker
- Add master and node to /etc/hosts on all machines (not needed if the hostnames are already in DNS). Make sure that communication works between photon-master and photon-node by using a utility such as ping.
echo "192.168.121.9 photon-master
192.168.121.65 photon-node" >> /etc/hosts
- Edit /etc/kubernetes/config, which will be the same on all the hosts (master and node), so that it contains the following lines:
# Comma separated list of nodes in the etcd cluster
KUBE_MASTER="--master=http://photon-master:8080"
# logging to stderr routes it to the systemd journal
KUBE_LOGTOSTDERR="--logtostderr=true"
# journal message level, 0 is debug
KUBE_LOG_LEVEL="--v=0"
# Should this cluster be allowed to run privileged docker containers
KUBE_ALLOW_PRIV="--allow_privileged=false"
5.4.2.3 - Configure Kubernetes Services on the Master
Perform the following steps to configure Kubernetes services on the master:
Edit /etc/kubernetes/apiserver to appear as such. The service_cluster_ip_range IP addresses must be an unused block of addresses, not used anywhere else. They do not need to be routed or assigned to anything.
# The address on the local server to listen to.
KUBE_API_ADDRESS="--address=0.0.0.0"
# Comma separated list of nodes in the etcd cluster
KUBE_ETCD_SERVERS="--etcd-servers=http://127.0.0.1:4001"
# Address range to use for services
KUBE_SERVICE_ADDRESSES="--service-cluster-ip-range=10.254.0.0/16"
# Add your own
KUBE_API_ARGS=""
Start the appropriate services on master:
for SERVICES in etcd kube-apiserver kube-controller-manager kube-scheduler; do
systemctl restart $SERVICES
systemctl enable $SERVICES
systemctl status $SERVICES
done
To add the other node, create the following node.json file on the Kubernetes master node:
{
"apiVersion": "v1",
"kind": "Node",
"metadata": {
"name": "photon-node",
"labels":{ "name": "photon-node-label"}
},
"spec": {
"externalID": "photon-node"
}
}
Create a node object internally in your Kubernetes cluster by running the following command:
$ kubectl create -f ./node.json
$ kubectl get nodes
NAME LABELS STATUS
photon-node name=photon-node-label Unknown
Note: The above example only creates a representation for the node photon-node internally. It does not provision the actual photon-node. Also, it is assumed that photon-node (as specified in name) can be resolved and is reachable from the Kubernetes master node.
5.4.2.4 - Configure the Kubernetes services on Node
Perform the following steps to configure the kubelet on the node:
Edit /etc/kubernetes/kubelet to appear like this:
###
# Kubernetes kubelet (node) config
# The address for the info server to serve on (set to 0.0.0.0 or "" for all interfaces)
KUBELET_ADDRESS="--address=0.0.0.0"
# You may leave this blank to use the actual hostname
KUBELET_HOSTNAME="--hostname_override=photon-node"
# location of the api-server
KUBELET_API_SERVER="--kubeconfig=/etc/kubernetes/kubeconfig"
# Add your own
#KUBELET_ARGS=""
Edit /etc/kubernetes/kubeconfig to appear like this:
clusters:
- cluster:
server: http://photon-master:8080
Start the appropriate services on the node (photon-node):
for SERVICES in kube-proxy kubelet docker; do
systemctl restart $SERVICES
systemctl enable $SERVICES
systemctl status $SERVICES
done
Check to make sure that the cluster can now see the photon-node on photon-master and that its status changes to Ready.
kubectl get nodes
NAME LABELS STATUS
photon-node name=photon-node-label Ready
If the node status is NotReady, verify that the firewall rules are permissive for Kubernetes.
- Deletion of nodes: To delete photon-node from your Kubernetes cluster, one should run the following on photon-master (please do not do it, it is just for information):
kubectl delete -f ./node.json
Result
You should have a functional cluster. You can now launch a test pod. For an introduction to working with Kubernetes, see Kubernetes documentation.
5.5 - Photon NFS Utilities for Mounting Remote File Systems
This document describes how to mount a remote file system on Photon OS by using nfs-utils, a commonly used package that contains tools to work with the Network File System protocol (NFS).
Check a Remote Server
showmount -e nfs-servername or ip
Example:
showmount -e eastern-filer.eng.vmware.com
showmount -e 10.109.87.129
Mount a Remote File System in Photon Full
The nfs-utils package is installed by default in the full version of Photon OS. Here is how to mount a directory through NFS on Photon OS:
mount -t nfs nfs-ServernameOrIp:/exportfolder /mnt/folder
Example:
mount -t nfs eastern-filer.eng.vmware.com:/export/filer /mnt/filer
mount -t nfs 10.109.87.129:/export /mnt/export
Mount a Remote File System in Photon Minimal
The nfs-utils package is not installed in the minimal version of Photon OS. You install it by running the following command:
tdnf install nfs-utils
For more information on installing packages with the tdnf command, see the Photon OS Administration Guide.
Once nfs-utils is installed, you can mount a file system by running the following commands, replacing the placeholders with the path of the directory that you want to mount:
mount nfs
mount -t nfs nfs-ServernameOrIp:/exportfolder /mnt/folder
6 - Command-Line Reference
The Photon OS Command-Line Reference provides information about the command-line interfaces available in Photon OS.
Product version: 3.0
This documentation applies to all 3.0.x releases.
Intended Audiences
This information is intended for Photon OS administrators and users.
6.1 - Command-line Interfaces
Photon OS includes the following command-line utilities:
6.1.1 - Photon Management Daemon Command-line Interface (pmd-cli)
Photon OS provides the Photon Management Daemon command line interface (pmd-cli).
Setup Steps
The pmd-cli utility is included with your Photon OS distribution. To make sure that you have the latest version, you can run:
tdnf install pmd-cli
Syntax
pmd-cli [connection_auth_options] <component> <command> [command_options]
Passed-in parameter values can be enclosed in single (') or double-quotes (") as long as you use matching characters to denote the beginning and end of the value. Unless a parameter value contains special characters or spaces, you can also omit quotes altogether.
Connection / Authorization Options
Local Connections
For local connections, you omit the connection and authorization options:
pmd-cli <component> <cmd> <options>
Permissions for the currently logged-in user apply when executing commands. This is the same as specifying –servername localhost.
Remote Connections
For connecting to a remote server (a server other than the local server), you specify two connection / authorization options:
--servername: name of the server--user: username of a user account on the server
Note: For authentication, you can specify the username (–user <username>) on the command line, but never the password. For security reasons, the system must prompt you for the password.
What follows are three options for remote connections.
System User
pmd-cli --servername <server> --user <username>
Lightwave User
Before using this method, the pmd server must be joined or should be part of embedded Lightwave.
pmd-cli --servername <server> --user <username> --domain <lightwave_domain>
Kerberos spn
Before using this method, the client must run kinit successfully.
pmd-cli --servername <server> --spn <service_principal_name>
Component
<component> is one of the following values:
Firewall Management
The Photon Management Daemon provides CLI commands to help you get information about the firewall.
Syntax
pmd-cli [connection_auth_options] firewall <command> [command_options]
firewall help
Get help for firewall CLI commands.
pmd-cli firewall help
firewall rules
Get a list of the current persistent firewall rules.
pmd-cli firewall rules [command-options]
This command returns information about each firewall rule, such as the chain to which it belongs, the policy to enforce, the table to manipulate, and so on.
Add a new firewall rule.
pmd-cli firewall rules --chain <chain_name> --add <rule_specification>
Example:
pmd-cli firewall rules --chain INPUT --add "-p tcp -m tcp --dport 21 -j ACCEPT"
Note: To confirm that the firewall rule was added, run iptables -S. Running pmd-cli firewall rules lists only persistent rules.
Delete a new firewall rule.
pmd-cli firewall rules --chain <chain_name> --delete <rule_specification>
Note: To confirm that the firewall rule was removed, run iptables -S. Running pmd-cli firewall rules lists only persistent rules.
Make firewall rule changes peristent (add –persist flag)
pmd-cli firewall rules --chain <chain_name> --add <rule_specification> --persist
firewall version
Get the version number of the fwmgmt component on the server.
pmd-cli firewall version
Network Management
The Photon Management Daemon provides CLI commands to help you manage network interfaces.
Syntax
pmd-cli [connection_auth_options] net <command> [command_options]
Many of these commands require the interface name (–interface <ifname>). Command options are described below.
net link_info
Get the mac address, mtu, link state, and link mode for the specified interface.
pmd-cli net link_info --get --interface <ifname>
Set the MAC address, mode (manual or auto), link state (up or down), link mode (manual or auto), and MTU for the specified interface.
pmd-cli net link_info --set --interface <ifname> --macaddr <mac_address> --mode <manual|auto> --state <up|down> --mtu <mtu>
net ip4_address
Get the IPv4 address for the specified interface.
pmd-cli net ip4_address --get --interface <ifname>
Set the IPv4 address (dot-decimal/prefix notation), mode (dhcp, static, or none), and (optionally) the default gateway for the specified interface.
pmd-cli net ip4_address --set --interface <ifname> --mode <dhcp|static|none> --addr <IPv4Address/prefix> --gateway <gateway_address>
net ip6_address
Get IPv6 address(es) for the specified interface.
pmd-cli net ip6_address --get --interface <ifname>
Add one or more IPv6 addresses (comma-separated list in colon-separated/prefix notation) to the specified interface.
pmd-cli net ip6_address --add --interface <ifname> --addrlist <IPv6Addr1/prefix,IPv6Addr2/prefix,...>
Delete one or more IPv6 addresses (comma-separated list in colon-separated/prefix notation) from the specified interface.
pmd-cli net ip6_address --del --interface <ifname> --addrlist <IPv6Addr1/prefix,IPv6Addr2/prefix,...>
Set the DHCP mode (1=enable, 0=disable) and autoconfigure settings (1=enable, 0=disable) for the specified interface.
pmd-cli net ip6_address --set --interface <ifname> --dhcp <1|0> --autoconf <1|0>
net ip_route
Get the static IP route for the specified interface.
pmd-cli net ip_route --get --interface <ifname>
Add the static IP route (gateway IP, destination network, and metric) to the specified interface.
pmd-cli net ip_route --add --interface <ifname> --gateway <GatewayIP> --destination <DestinationNetwork/prefix> --metric <N>
Delete the specified static IP route from the specified interface.
pmd-cli net ip_route --del --interface <ifname> --destination <DestinationNetwork/prefix>
net dns_servers
Get the list of DNS servers.
pmd-cli net dns_servers --get
Set the DNS mode (dhcp or static) for one or more DNS servers (comma-separated list).
pmd-cli net dns_servers --set --mode <dhcp|static> --servers <server1,server2,...>
Add a DNS server to the list of DNS servers.
pmd-cli net dns_servers --add --servers <server>
Remove the specified DNS server from the list of DNS servers.
pmd-cli net dns_servers --del --servers <server>
net dns_domains
Get the list of DNS domains.
pmd-cli net dns_domains --get
Set the list of DNS domains (one or more DNS domains in a comma-separated list).
pmd-cli net dns_domains --set --domains <domain1,domain2,...>
Add a DNS domain to the list of DNS domains.
pmd-cli net dns_domains --add --domains <domain1>
Delete a DNS domain from the list of DNS domains.
pmd-cli net dns_domains --del --domains <domain1>
net dhcp_duid
Get the DHCP DUID (optionally interface-specific DUID) for the system.
pmd-cli net dhcp_duid --get
Set the DHCP DUID for the system, optionally per-interface if the interface is specified.
pmd-cli net dhcp_duid --set --duid <duid>
net if_iaid
Get the IAID for the specified interface.
pmd-cli net if_iaid --get --interface <ifname>
Set the IAID for the specified interface.
pmd-cli net if_iaid --set --interface <ifname> --iaid <iaid>
net ntp_servers
Get the NTP servers list.
pmd-cli net ntp_servers --get
Set the NTP servers list.
pmd-cli net ntp_servers --set --servers <server1,server2,...>
Add the specified server to the NTP servers list.
pmd-cli net ntp_servers --add --servers <server>
Delete the specified server from the NTP servers list.
pmd-cli net ntp_servers --del --servers <server>
net hostname
Get the system hostname.
pmd-cli net hostname --get
Set the system hostname.
pmd-cli net hostname --set --name <hostname>
net wait_for_link
Wait for the specified network interface to be up and usable (it can send and receive packets).
pmd-cli net wait_for_link --interface <ifname> --timeout <timeout>
The timeout (in seconds) specifies the maximum time to wait. Specify 0 for no timeout (wait indefinitely).
Note: You might need to use net wait_for_ip to wait until you can send and receive IP packets.
net wait_for_ip
Wait for the specified interface to acquire a valid IP address for the specified address type.
pmd-cli net wait_for_ip --interface <ifname> --timeout <timeout> --addrtype <ipv4,ipv6,static_ipv4,static_ipv6,dhcp_ipv4,dhcp_ipv6,auto_ipv6,link_local_ipv6>
The timeout (in seconds) specifies the maximum time to wait. Specify 0 for no timeout (wait indefinitely).
net error_info
Get error information about the specified error code.
pmd-cli net error_info --errcode <error_code>
Here is a list of error codes:
- 4097 - invalid parameter
- 4098 - not supported
- 4099 - out of memory
- 4100 - value not found
- 4101 - value exists
- 4102 - invalid interface
- 4103 - invalid mode
- 4104 - bad configuration file
- 4105 - write failed
- 4106 - timout
- 4107 - DCHP timeout
net net_info
Get the specified network configuration parameter for the specified object.
pmd-cli net net_info --get --object <ifname or filename> --paramname <param_name>
Note: The object can be an interface name (for example, "eth0") or a file name (for example, /etc/systemd/resolved.conf).
Set the value of the specified network configuration parameter for the specified object (interface or file).
pmd-cli net net_info --set --object <ifname or filename> --paramname <param_name> --paramvalue <param_value>
Note : You can add (+) or remove (-) a parameter by prepending the parameter name with + or -.
Package Management
The Photon Management Daemon provides CLI commands to help you manage packages and repositories.
Syntax
pmd-cli [connection options] pkg <command> [command options]
If a command allows for multiple package names, simply specify on the command line, separated by spaces.
pmd-cli pkg info <package_name_1> <package_name_2> <package_name_3> ...
pkg help
Get help text for pkg CLI commands.
pmd-cli pkg help
pkg count
Get the total number of packages in all repos (including installed).
pmd-cli pkg count
pkg distro-sync
Synchronize installed packages to the latest available versions. If no packages are specified, then all available packages are synchronized.
pmd-cli pkg distro-sync
pkg downgrade
Downgrade the specified package(s). If no packages are specified, then all available packages are downgraded.
pmd-cli pkg downgrade <package_name>
pkg erase
Remove the specified package(s).
pmd-cli pkg erase <package_name>
pkg info
Get general information about the specified package(s), such as name, version, release, repository, install size, and so on.
pmd-cli pkg info <package_name>
If no packages are specified, then this command returns information about all packages.
## pkg install
Install the specified package(s). Update the package if an update is available.
pmd-cli pkg install <package_name>
pkg list
Get a list of packages or groups of packages.
pmd-cli pkg list
You can filter by group: all, available, installed, extras, obsoletes, recent, and upgrades.
pmd-cli pkg list upgrades
You can also filter by wildcards.
pmd-cli pkg list ph\*
pkg reinstall
Reinstall the specified package(s).
pmd-cli pkg reinstall <package_name>
pkg repolist
Get a list of the configured software repositories.
pmd-cli pkg repolist
This command returns a list of the configured software repositories, including the repository ID, repitory name, and status.
pkg update
Update the specified package(s).
pmd-cli pkg update <package_name>
If no parameters are specified, then all available packages are updated.
pkg updateinfo
Get the update information on all enabled repositories (status = enabled). If this command returns nothing, then the update information may not exist on the server.
pmd-cli pkg updateinfo
User Management
The Photon Management Daemon provides CLI commands to help you manage users and user groups.
Syntax
pmd-cli [connection options] usr <command> [command options]
usr help
Display help text for user commands.
pmd-cli usr users
usr users
Get a list of users. This command returns information about each user, including their user name, user ID, user group (if applicable), home directory, and default shell.
pmd-cli usr users
usr useradd
Add a new user. Specify the username.
pmd-cli usr useradd <username>
The system assigns a user ID, home directory, and default shell to the new user. The user group is unspecified.
usr userdel
Delete the specified user.
pmd-cli usr userdel <username>
usr userid
Get the user ID of the specified user (by name). Used to determine whether the specified user exists.
pmd-cli usr userid <username>
usr groups
Get a list of user groups. This command returns the following information about each user group: user group name and user group ID.
pmd-cli usr groups
usr groupadd
Add a new user group.
pmd-cli usr groupadd <user_group_name>
The system assigns a group ID to the new user group.
usr groupdel
Delete the specified user group.
pmd-cli usr groupdel <user_group_name>
usr groupid
Get the group ID for the specified user group (by name). Used to determine whether the specified user group exists.
pmd-cli usr groupid <user_group_name>
usr version
Get the version of the usermgmt component at the server.
pmd-cli usr version
6.1.2 - Photon Network Manager Command-line Interface (netmgr)
For locally logged-on users, Photon OS provides a command line interface to manage network configuration of the system.
Setup Steps
The netmgr tool is included with your Photon OS distribution. To make sure that you have the latest version, you can run:
tdnf install netmgmt
Syntax
The CLI is built on set, get, add, delete command model and uses the option-name - option-value model of specifying command parameters.
netmgr <network object> <--get | --set | --add | --del> <command options>
Passed-in parameter values can be enclosed in single (') or double-quotes (") as long as you use matching characters to denote the beginning and end of the value. Unless a parameter value contains special characters or spaces, you can also omit quotes altogether.
network object
<network object> is one of the following values:
link_infoip4_addressip6_addressip_routedns_serversdns_domainsdhcp_duidif_iaidntp_servershostnamewait_for_linkwait_for_iperror_infonet_info
Network Manager CLI
link_info
Get the mac address, MTU, link state, and link mode for the (optionally) specified interface.
netmgr link_info --get --interface <ifname>
Set the MAC address, link state (up or down), link mode (manual or auto), or MTU for the specified interface.
netmgr link_info --set --interface <ifname> --macaddr <mac_address>
netmgr link_info --set --interface <ifname> --mode <manual|auto>
netmgr link_info --set --interface <ifname> --state <up|down>
netmgr link_info --set --interface <ifname> --mtu <mtu>
ip4_address
Get the IPv4 address for the specified interface.
netmgr ip4_address --get --interface <ifname>
Set the IPv4 address (dot-decimal/prefix notation), mode (dhcp, static, or none), and (optionally) the default gateway for the specified interface.
netmgr ip4_address --set --interface <ifname> --mode <dhcp|static|none> --addr <ipv4_address/prefix> --gateway <gateway_address>
ip6_address
Get IPv6 addresses for the specified interface.
netmgr ip6_address --get --interface <ifname>
Add one or more IPv6 addresses (comma-separated list in colon-separated/prefix notation) to the specified interface.
netmgr ip6_address --add --interface <ifname> --addrlist <ipv6_addr1/prefix,ipv6_addr2/prefix,...>
Delete one or more IPv6 addresses (comma-separated list in colon-separated/prefix notation) from the specified interface.
netmgr ip6_address --del --interface <ifname> --addrlist <ipv6_addr1/prefix,ipv6_addr2/prefix,...>
Set the IPv6 DHCP mode (1=enable, 0=disable) and IPv6 auto-configuration settings (1=enable, 0=disable) for the specified interface.
netmgr ip6_address --set --interface <ifname> --dhcp <1|0> --autoconf <1|0>
ip_route
Get the static IP route for the specified interface.
netmgr ip_route --get --interface <ifname>
Add the static IP route (gateway IP, destination network, and metric) to the specified interface.
netmgr ip_route --add --interface <ifname> --gateway <gateway_address> --destination <destination_network/prefix> --metric <N>
Delete the specified static IP route from the specified interface.
netmgr ip_route --del --interface <ifname> --destination <destination_network/prefix>
dns_servers
Get the list of DNS servers.
netmgr dns_servers --get
Set the DNS mode (DHCP or static) for one or more DNS servers (comma-separated list).
netmgr dns_servers --set --mode <dhcp|static> --servers <server1,server2,...>
Add a DNS server to the list of DNS servers.
netmgr dns_servers --add --servers <server>
Remove the specified DNS server from the list of DNS servers.
netmgr dns_servers --del --servers <server>
dns_domains
Get the list of DNS domains.
netmgr dns_domains --get
Set the list of DNS domains (one or more DNS domains in a comma-separated list).
netmgr dns_domains --set --domains <domain1,domain2,...>
Add a DNS domain to the list of DNS domains.
netmgr dns_domains --add --domains <domain>
Delete a DNS domain from the list of DNS domains.
netmgr dns_domains --del --domains <domain>
dhcp_duid
Get the DHCP DUID (optionally interface-specific DUID) for the system.
netmgr dhcp_duid --get
Set the DHCP DUID for the system, optionally per-interface if the interface is specified.
netmgr dhcp_duid --set --duid <duid>
if_iaid
Get the IAID for the specified interface.
netmgr if_iaid --get --interface <ifname>
Set the IAID for the specified interface.
netmgr if_iaid --set --interface <ifname> --iaid <iaid>
ntp_servers
Get the NTP servers list.
netmgr ntp_servers --get
Set the NTP servers list.
netmgr ntp_servers --set --servers <server1,server2,...>
Add the specified server to the NTP servers list.
netmgr ntp_servers --add --servers <server>
Delete the specified server from the NTP servers list.
netmgr ntp_servers --del --servers <server>
hostname
Get the system hostname.
netmgr hostname --get
Set the system hostname.
netmgr hostname --set --name <hostname>
wait_for_link
Wait for the specified network interface to be up and usable (it can send and receive packets).
netmgr wait_for_link --interface <ifname> --timeout <timeout>
The timeout (in seconds) specifies the maximum time to wait. Specify 0 for no timeout (wait indefinitely).
Note: You might need to use wait_for_ip to wait until you can send and receive IP packets.
wait_for_ip
Wait for the specified interface to acquire a valid IP address for the specified address type.
netmgr wait_for_ip --interface <ifname> --timeout <timeout> --addrtype <ipv4,ipv6,static_ipv4,static_ipv6,dhcp_ipv4,dhcp_ipv6,auto_ipv6,link_local_ipv6>
The timeout (in seconds) specifies the maximum time to wait. Specify 0 for no timeout (wait indefinitely).
error_info
Get error information about the specified error code.
netmgr error_info --errcode <error_code>
Here is a list of error codes:
- 4097 - invalid parameter
- 4098 - not supported
- 4099 - out of memory
- 4100 - value not found
- 4101 - value exists
- 4102 - invalid interface
- 4103 - invalid mode
- 4104 - bad configuration file
- 4105 - write failed
- 4106 - timeout
- 4107 - DCHP timeout
net_info
Get the specified network configuration parameter for the specified object.
netmgr net_info --get --object <ifname or filename> --paramname <param_name>
Note: The object can be an interface name (for example, "eth0") or a file name (for example, /etc/systemd/resolved.conf).
Set the value of the specified network configuration parameter for the specified object (interface or file).
netmgr net_info --set --object <ifname or filename> --paramname <param_name> --paramvalue <param_value>
Note : You can add (+) or remove (-) a parameter by prepending the parameter name with + or -.
For example, in order to add static IPv4 address “10.10.10.1/24” to eth0 interface, the following command adds this Address to the Network section of the eth0 network configuration file.
netmgr net_info --set --object eth0 --paramname +Network_Address --paramvalue "10.10.10.1/24"
7 - Troubleshooting Guide
The Photon OS Troubleshooting Guide provides solutions for common problems that you might encounter while using Photon OS.
Product version: 3.0
This documentation applies to all 3.0.x releases.
Intended Audiences
This information is intended for Photon OS administrators who install and set up Photon OS.
7.1 - Introduction
The Troubleshooting Guide covers the basics of troubleshooting systemd, packages, network interfaces, services such as SSH and Sendmail, the file system, and the Linux kernel. The guide also includes information about the tools that you can use for troubleshooting with examples, how to access the logs, and best practices.
7.1.1 - Systemd and TDNF
By using systemd, Photon OS adopts a contemporary Linux standard to bootstrap the user space and concurrently start services, an architecture that differs from traditional Linux systems such as SUSE Linux Enterprise Server 11.
A traditional Linux system contains an initialization system called SysVinit. With SLES 11, for instance, SysVinit-style init programs control how the system starts up and shuts down. Init implements system runlevels. A SysVinit runlevel defines a state in which a process or service runs. In contrast to a SysVinit system, systemd defines no such runlevels. Instead, systemd uses a dependency tree of targets to determine which services to start when.
Because the systemd commands differ from those of an init.d-based Linux system, a section later in this guide illustrates how to troubleshoot by using systemctl commands instead of init.d-style commands.
Tdnf keeps the operating system as small as possible while preserving yum’s robust package-management capabilities. On Photon OS, tdnf is the default package manager for installing new packages. Since troubleshooting with tdnf differs from using yum, a later section of this guide describes how to solve problems with packages and repositories by using tdnf commands.
7.1.2 - The Root Account and the `sudo` and `su` Commands
The Troubleshooting Guide assumes that you are logged in to Photon OS with the root account and running commands as root. The sudo program comes with the full version of Photon OS. On the minimal version, you must install sudo with tdnf if you want to use it. As an alternative to installing sudo on the minimal version, you can switch users as needed with the su command to run commands that require root privileges.
7.1.3 - Checking the Version and Build Number
To check the version and build number of Photon OS, concatenate /etc/photon-release.
Example:
cat /etc/photon-release
VMware Photon Linux 1.0
PHOTON_BUILD_NUMBER=a6f0f63
The build number in the results maps to the commit number on the VMware Photon OS GitHub commits page.
7.1.4 - General Best Practices
When troubleshooting, it is recommended that you follow some general best practices:
Take a snapshot. Before you do anything to a virtual machine running Photon OS, take a snapshot of the VM so that you can restore it if need be.
Make a backup copy. Before you change a configuration file, make a copy of the original file. For example: cp /etc/tdnf/tdnf.conf /etc/tdnf/tdnf.conf.orig
Collect logs. Save the log files associated with a Photon OS problem. Include not only the log files on the guest but also the vmware.log file on the host. The vmware.log file is in the host’s directory that contains the VM.
Know what is in your toolbox. View the man page for a tool before you use it so that you know what your options are. The options can help focus the command’s output on the problem you’re trying to solve.
Understand the system. The more you know about the operating system and how it works, the better you can troubleshoot.
7.1.5 - Photon OS Logs
On Photon OS, all the system logs except the installation logs and the cloud-init logs are written into the systemd journal. The journalctl command queries the contents of the systemd journal.
The installation log files and the cloud-init log files reside in /var/log. If Photon OS is running on a virtual machine in a VMware hypervisor, the log file for the VMware tools, vmware-vmsvc.log, also resides in /var/log.
##Journalctl
Journalctl is a utility to query and display logs from journald and systemd’s logging service. Since journald stores log data in a binary format instead of a plain text format, journalctl is the standard way of reading log messages processed by journald.
Journald is a service provided by systemd. To see the staus of the daemon, run the following commands:
# systemctl status systemd-journald
● systemd-journald.service - Journal Service
Loaded: loaded (/lib/systemd/system/systemd-journald.service; static; vendor preset: enabled)
Active: active (running) since Tue 2020-04-07 14:33:41 CST; 2 days ago
Docs: man:systemd-journald.service(8)
man:journald.conf(5)
Main PID: 943 (systemd-journal)
Status: "Processing requests..."
Tasks: 1 (limit: 4915)
Memory: 18.0M
CGroup: /system.slice/systemd-journald.service
└─943 /lib/systemd/systemd-journald
Apr 07 14:33:41 photon-4a0e7f2307d4 systemd-journald[943]: Journal started
Apr 07 14:33:41 photon-4a0e7f2307d4 systemd-journald[943]: Runtime journal (/run/log/journal/b8cebc61a6cb446a968ee1d4c5bbbbd5) is 8.0M, max 1.5G, 1.5G free.
Apr 07 14:33:41 photon-4a0e7f2307d4 systemd-journald[943]: Time spent on flushing to /var is 88.263ms for 1455 entries.
Apr 07 14:33:41 photon-4a0e7f2307d4 systemd-journald[943]: System journal (/var/log/journal/b8cebc61a6cb446a968ee1d4c5bbbbd5) is 40.0M, max 4.0G, 3.9G free.
root@photon-4a0e7f2307d4 [ ~ ]#
The following command are related to journalctl:
journalctl : This command displays all the logs after the system has booted up. journalctl splits the results into pages, similar to the less command in Linux. You can navigate using the arrow keys, the Page Up, Page Down keys or the Space bar. To quit navigation, press the q key.journalctl -b : This command displays the logs for the current boot.
The following commands pull logs based on a time range:
journalctl --since "1 hour ago" : This command displays the journal logs from the past 1 hour.journalctl --since "2 days ago" : This command displays the logs generated in the past 2 days.journalctl --since "2020-03-25 00:00:00" --until "2020-04-09 00:00:00" : This command displays the logs generated between the mentioned time frame.
To traverse for logs in the reverse order, run the following command:
journalctl -r : This command displays the logs in reverse order.
Note: If you add -r at the end of a command, the logs are displayed in the reverse order. For example: journalctl -u unit.service -r
To pull logs related to a particular daemon, run the following command:
journalctl -u unit.service : This command displays logs for a specific service. mention the name of the service instead of unit. This command helps when a service is not behaving properly or when there are crash/core dumps.
To see Journal logs by their priority, run the following command:
journalctl -p "emerg".."crit : This command displays logs emerg to critical. For example: core dumps.
Journalctl can print log messages to the console as they are added, like the Linux tail command. Add the -f switch to follow a specific service or daemon.
journalctl -u unit.service -f
To list the boots of the system, run the following command:
journalctl --list-boots
You can maintain the journalctl logs manually, by running the following vacuum commands:
journalctl --vacuum-time=2d : This command retains the logs from the last 2 days.journalctl --vacuum-size=500M : This command helps retain logs with a maximum size of 500 MB.
You can configure Journald using the conf file located at /etc/systemd/journald.conf. Run the following command to configure the file:
# cat /etc/systemd/journald.conf
# This file is part of systemd.
#
# systemd is free software; you can redistribute it and/or modify it
# under the terms of the GNU Lesser General Public License as published by
# the Free Software Foundation; either version 2.1 of the License, or
# (at your option) any later version.
#
# Entries in this file show the compile time defaults.
# You can change settings by editing this file.
# Defaults can be restored by simply deleting this file.
#
# See journald.conf(5) for details.
[Journal]
#Storage=auto
#Compress=yes
#Seal=yes
#SplitMode=uid
#SyncIntervalSec=5m
#RateLimitIntervalSec=30s
#RateLimitBurst=10000
#SystemMaxUse=
#SystemKeepFree=
#SystemMaxFileSize=
#SystemMaxFiles=100
#RuntimeMaxUse=
#RuntimeKeepFree=
#RuntimeMaxFileSize=
#RuntimeMaxFiles=100
#MaxRetentionSec=
#MaxFileSec=1month
#ForwardToSyslog=no
#ForwardToKMsg=no
#ForwardToConsole=no
#ForwardToWall=yes
#TTYPath=/dev/console
#MaxLevelStore=debug
#MaxLevelSyslog=debug
#MaxLevelKMsg=notice
#MaxLevelConsole=info
#MaxLevelWall=emerg
#LineMax=48K
root@photon-4a0e7f2307d4 [ ~ ]#
By default rotate is disable in Photon. Once the changes are made to the conf file, for the changes to take effect you must restart the systemd-journald by running the systemctl restart systemd-journald command.
##Cloud-init Logs
Cloud-init is the industry standard multi-distribution method for cross-platform cloud instance initialisation.
If there are with the Cloud-init behaviour, we can debug them by looking at the logs. Run the following command to look at Cloud-init logs:
journalctl -u cloud-init
For better understanding/debugging, You can also look at logs from the following locations:
- /var/log/cloud-init.log : This log contains information from each stage of Cloud-init.
- /var/log/cloud-init-output.log : This log contains errors, warnings, etc..
##Syslog
Syslog is the general standard for logging system and program messages in the Linux environment.
Photon provides the following two packages to support syslog:
- syslog-ng : syslog-ng is syslog with some advanced next gen features. It supports TLS encryption, TCP for transport with other existing features. Configurations can be added to the /etc/syslog-ng/syslog-ng.conf file.
- rsyslog : The official RSYSLOG website defines the utility as “the rocket-fast system for log processing”. rsyslog supports some advanced features like relp, imfile, omfile, gnutls protocols. Configurations can be added to the /etc/rsyslog.conf file. You can configure the required TLS certificates by editing the conf file.
##Logs for RPMS on Photon
Logs for a particular RPM can be checked in the following ways:
- If the RPM provides a daemon, we can see the status of daemon by running
systemctl command and check logs using journactl -u <service name> command. - For additional logs, check if a conf file is provided by the RPM by running the
rpm -ql <rpm name> | grep conf command and find the file path of the log file. You can also check the /var/log folder.
7.1.6 - Troubleshooting Progression
If you encounter a problem running an application or appliance on Photon OS and you suspect it involves the operating system, you can troubleshoot by proceeding as follows.
Check the services running on Photon OS:
systemctl status
Check your application log files for errors. For VMware applications, see Location of Log Files for VMware Products.)
Check the service controller or service monitor for your application or appliance.
Check the network interfaces and other aspects of the network service with systemd-network commands.
Check the operating system log files:
journalctl
Next, run the following commands to view all services according to the order in which they were started:
systemd-analyze critical-chain
Use the troubleshooting tool that you think is most likely to help with the issue at hand. For example, use strace to identify the location of the failure.
7.2 - Solutions to Common Problems
This section describes solutions to problems that you might encounter:
7.2.1 - Boot in Emergency Mode
If you encounter problems during normal boot, you can boot in Emergency Mode.
Perform the following steps to boot in Emergency Mode:
Restart the Photon OS machine or the virtual machine running Photon OS.
When the Photon OS splash screen appears, as it restarts, type the letter e quickly.
Append emergency to the kernel command line.
Press F10 to proceed with the boot.
At the command prompt, provide the root password to log in to Emergency Mode.
By default, / is mounted as read-only.
To make modifications, run the following command to remount with write access:
mount -o remount,rw /
7.2.2 - Resetting a Lost Root Password
Perform the following steps to rest a lost password:
Restart the Photon OS machine or the virtual machine running Photon OS.
When the Photon OS splash screen appears as it restarts, type the letter e to go to the GNU GRUB edit menu quickly. Because Photon OS reboots so quickly, you won’t have much time to type e. Remember that in vSphere and Workstation, you might have to give the console focus by clicking in its window before it will register input from the keyboard.
Second, in the GNU GRUB edit menu, go to the end of the line that starts with linux, add a space, and then add the following code exactly as it appears below:
rw init=/bin/bash
After you add this code, the GNU GRUB edit menu should look exactly like this:

Now type F10.
At the command prompt, type passwd and then type (and re-enter) a new root password that conforms to the password complexity rules of Photon OS. Remember the password.
Next, type the following command:
umount /
Finally, type the following command. You must include the -f option to force a reboot; otherwise, the kernel enters a state of panic.
reboot -f
This sequence of commands should look like this:

After the Photon OS machine reboots, log in with the new root password.
Resetting the failed logon count
Resetting the root password will not reset the failed logon count, if you’ve had to many failed attempts, you may not be able to logon after resetting the password.
You will know if this is the case, if you see Account locked due to X failed logins at the photon console.
To reset the count, before you unmount the filesystem, run the following…
/sbin/pam_tally2 --reset --user root
7.2.3 - Fixing Permissions on Network Config Files
When you create a new network configuration file as root user, the network service might be unable to process it until you set the file mode bits to 644.
If you query the journal with journalctl -u systemd-networkd, you might see the following error message along with an indication that the network service did not start:
`could not load configuration files. permission denied`
The permissions on the network files might cause this problem. Without the correct permissions, networkd-systemd cannot parse and apply the settings, and the network configuration that you created will not be loaded.
After you create a network configuration file with a .network extension, you must run the chmod command to set the new file’s mode bits to 644. Example:
`chmod 644 10-static-en.network`
For Photon OS to apply the new configuration, you must restart the systemd-networkd service by running the following command:
`systemctl restart systemd-networkd`
7.2.4 - Permitting Root Login with SSH
The full version of Photon OS prevents root login with SSH by default. To permit root login over SSH, open /etc/ssh/sshd_config with the vim text editor and set PermitRootLogin to yes.
Vim is the default text editor available in both the full and minimal versions of Photon OS. The full version also contains Nano. After you modify the SSH daemon’s configuration file, you must restart the sshd daemon for the changes to take effect. Example:
vim /etc/ssh/sshd_config
# override default of no subsystems
Subsystem sftp /usr/libexec/sftp-server
# Example of overriding settings on a per-user basis
#Match User anoncvs
# X11Forwarding no
# AllowTcpForwarding no
# PermitTTY no
# ForceCommand cvs server
PermitRootLogin yes
UsePAM yes
Save your changes in vim and then restart the sshd daemon:
systemctl restart sshd
You can then connect to the Photon OS machine with the root account over SSH:
steve@ubuntu:~$ ssh root@198.51.100.131
7.2.5 - Fixing Sendmail
If Sendmail is not behaving as expected or hangs during installation, it might be because FQDN is not set.
Perform the following steps:
Set an FQDN for your Photon OS machine.
Run the following commands in the order below:
echo $(hostname -f) > /etc/mail/local-host-names
cat > /etc/mail/aliases << "EOF"
postmaster: root
MAILER-DAEMON: root
EOF
/bin/newaliases
cd /etc/mail
m4 m4/cf.m4 sendmail.mc > sendmail.cf
chmod 700 /var/spool/clientmqueue
chown smmsp:smmsp /var/spool/clientmqueue
7.3 - Photon OS General Troubleshooting
The section includes general troubleshooting instruction for Photon OS.
7.3.1 - Photon Code
Photon is an RPM based Linux distribution similar to variants like CentOS and Fedora. With RPM based distributions granular updates as opposed to updating the whole OS image is possible.
##SPEC File
The “Recipe” for creating an RPM package is a spec file. The Photon code base’s SPECS folder hast the following directory structure:
SourceRoot
SPECS
linux
patch1
patch2
linux.spec
##To Check if a Package is Signed
Run the following commands to check if the package is signed:
#check if a package is signed
rpm -q linux --qf '%{NAME}-%{VERSION}-%{RELEASE} %{SIGPGP:pgpsig} %{SIGGPG:pgpsig}\n'
linux-4.19.79-2.ph3 RSA/SHA1, Thu 31 Oct 2019 10:05:05 AM UTC, Key ID c0b5e0ab66fd4949 (none)
#or
rpm -qi linux | grep "Signature"
Signature : RSA/SHA1, Thu 31 Oct 2019 10:05:05 AM UTC, Key ID c0b5e0ab66fd4949
#Last 8 chars of Key ID: 66fd4949
#See if it matches the version of any of the gpg keys installed.
rpm -qa | grep gpg-pubkey | xargs -n1 rpm -q --queryformat "%{NAME} %{VERSION} %{PACKAGER}\n"
gpg-pubkey 66fd4949 VMware, Inc. -- Linux Packaging Key -- linux-packages@vmware.com
gpg-pubkey 3e1ba8d5 Google Cloud Packages RPM Signing Key gc-team@google.com
##To Check if Your Image Has Vulnerabilities
Use the security scanners to find security issues. Alternatively The tdnf updateinfo info command displays all the applicable security updates the host needs.
##To Check if a CVE is Fixed
The Photon team fix the vulnerabilities and then publish the advisories to (https://github.com/vmware/photon/wiki/Security-Advisories).
##To Check if Security Updates are Available
Use the tdnf updateinfo info, tdnf update --security or tdnf update ---sec-severity <level> commands to check if security updates are available. For example:
#check if there are any security updates
root@photon-9a8c05dd97e9 [ ~ ]# tdnf updateinfo
70 Security notice(s)
#check if there are security updates for libssh2. note this is relative to what is installed in local
root@photon-9a8c05dd97e9 [ ~ ]# tdnf updateinfo list libssh2
patch:PHSA-2020-3.0-0047 Security libssh2-1.9.0-2.ph3.x86_64.rpm
patch:PHSA-2019-3.0-0025 Security libssh2-1.9.0-1.ph3.x86_64.rpm
patch:PHSA-2019-3.0-0009 Security libssh2-1.8.2-1.ph3.x86_64.rpm
patch:PHSA-2019-3.0-0008 Security libssh2-1.8.0-2.ph3.x86_64.rpm
#show details of all the libssh2 updates
root@photon-9a8c05dd97e9 [ ~ ]# tdnf updateinfo info libssh2
Name : libssh2-1.9.0-2.ph3.x86_64.rpm
Update ID : patch:PHSA-2020-3.0-0047
Type : Security
Updated : Wed Jan 15 10:48:25 2020
Needs Reboot: 0
Description : Security fixes for {'CVE-2019-17498'}
Name : libssh2-1.9.0-1.ph3.x86_64.rpm
Update ID : patch:PHSA-2019-3.0-0025
Type : Security
Updated : Sat Aug 17 16:14:35 2019
Needs Reboot: 0
Description : Security fixes for {'CVE-2019-13115'}
Name : libssh2-1.8.2-1.ph3.x86_64.rpm
Update ID : patch:PHSA-2019-3.0-0009
Type : Security
Updated : Sat Apr 13 03:34:22 2019
Needs Reboot: 0
Description : Security fixes for {'CVE-2019-3859', 'CVE-2019-3862', 'CVE-2019-3861', 'CVE-2019-3857', 'CVE-2019-3858', 'CVE-2019-3863', 'CVE-2019-3860', 'CVE-2019-3856'}
Name : libssh2-1.8.0-2.ph3.x86_64.rpm
Update ID : patch:PHSA-2019-3.0-0008
Type : Security
Updated : Fri Mar 29 16:04:18 2019
Needs Reboot: 0
Description : Security fixes for {'CVE-2019-3855'}
#install all security updates >= score 9.0 (CVSS_v3.0_Severity)
root@photon-9a8c05dd97e9 [ ~ ]# tdnf update --sec-severity 9.0
Upgrading:
apache-tomcat noarch 8.5.50-1.ph3 photon-updates 9.00M 9440211
bash x86_64 4.4.18-2.ph3 photon-updates 3.16M 3315720
bzip2 x86_64 1.0.8-1.ph3 photon-updates 124.99k 127990
bzip2-libs x86_64 1.0.8-1.ph3 photon-updates 74.31k 76096
file x86_64 5.34-2.ph3 photon-updates 43.02k 44056
file-libs x86_64 5.34-2.ph3 photon-updates 5.21M 5458536
git x86_64 2.23.1-2.ph3 photon-updates 24.34M 25519969
glib x86_64 2.58.0-4.ph3 photon-updates 3.11M 3265152
libseccomp x86_64 2.4.0-2.ph3 photon-updates 315.79k 323368
libssh2 x86_64 1.9.0-2.ph3 photon-updates 238.41k 244136
linux-esx x86_64 4.19.97-2.ph3 photon-updates 12.68M 13299655
Total installed size: 58.28M 61114889
7.3.2 - Package Management
TDNF is the default package manager for Photon OS. The standard syntax for tdnf commands is the same as that for DNF and YUM. TDNF reads YUM repositories from /etc/yum.repos.d/.
To find the main configuration file and see its contents, run the following command:
cat /etc/tdnf/tdnf.conf
[main]
gpgcheck=1
installonly_limit=3
clean_requirements_on_remove=true
repodir=/etc/yum.repos.d
cachedir=/var/cache/tdnf
Repositories have a .repo file extension, The following repositories are available in /etc/yum.repos.d/ :
ls /etc/yum.repos.d/
lightwave.repo
photon-extras.repo
photon-iso.repo
photon-updates.repo
photon.repo
Use the tdnf repolist command to list the repositories. Tdnf filters the results by their status enabled, disabled, and all. Running the tdnf repolist command without arguments displays the enabled repositories.
#tdnf repolist
repo id repo name status
photon-extras VMware Photon Extras 3.0(x86_64) enabled
photon-debuginfo VMware Photon Linux debuginfo 3.0(x86_64)enabled
photon VMware Photon Linux 3.0(x86_64) enabled
photon-updates VMware Photon Linux 3.0(x86_64) Updates enabled
root@photon-75829bfd01d0 [ ~ ]#
The following repositories are important for Photon:
- photon-updates : This repo contains RPM updates for CVE/version and updates/others fixes.
- photon-debuginfo : This repo contains information about RPMs with debug symbols.
- photon : This repo generally contains the RPM versions packaged with the released ISO.
To check the local cache data from the repository, run the following command:
# ls -l /var/cache/tdnf/photon
total 12
-r--r----- 1 root root 0 Apr 3 22:34 lastrefresh
drwxr-x--- 2 root root 4096 Apr 3 22:34 repodata
drwxr-x--- 4 root root 4096 Feb 4 14:31 rpms
drwxr-x--- 2 root root 4096 Apr 3 22:34 solvcache
##Usage
The tdnf command can be used in the following ways:
#tdnf repolist --refresh : This command is used to refresh the repolist. Generally there is a cache of the repo data stored in the local VM.
#tdnf install <rpm name> : This command is used to install a RPM. This command installs the latest version of the RPM.
#tdnf install <pkg-name>-<verison>-<release>.<photon-release> : This command is used to install a particular RPM version. For example, run # tdnf install systemd-239-11.ph3.
#tdnf list systemd : This command is used to list the available RPM versions in the repository.
#tdnf makecache : This command updates the cached binary metadata for all known repositories.
tdnf clean all : This command cleans up temporary files, data, and metadata. It takes the argument all.
#tdnf list systemd
Refreshing metadata for: 'VMware Photon Linux 3.0(x86_64)'
systemd.x86_64 239-15.ph3 @System
systemd.x86_64 239-11.ph3 photon-updates
systemd.x86_64 239-12.ph3 photon-updates
systemd.x86_64 239-13.ph3 photon-updates
systemd.x86_64 239-14.ph3 photon-updates
systemd.x86_64 239-15.ph3 photon-updates
systemd.x86_64 239-17.ph3 photon-updates
systemd.x86_64 239-18.ph3 photon-updates
systemd.x86_64 239-19.ph3 photon-updates
systemd.x86_64 239-10.ph3 photon
systemd.x86_64 239-10.ph3 photon
root@photon-4a0e7f2307d4 [ /WS/photon-dev/photon ]#
Here, @System indicates that the particular RPM is installed in the VM.
To upgrade/downgrade RPMs run the following commands:
#tdnf upgrade <pkg-name>
#tdnf downgrade <pkg-name>
After upgrade/downgrade the dependent packages must be manually upgraded/downgraded as well. Use the #tdnf remove <pkg-name> command to remove packages and # tdnf clean all to clear cached packages, metadata, dbcache, plugins and expire-cache.
#RPM
RPM is an open source package management system capable of building software from source into easily distributable packages. It is used for installing, updating and uninstalling packaged software.
RPM can also be used to query detailed information about the packaged software and to check if a particular package is installed or not.
You can do the following operation using the RPM binaries:
- Install/Upgrade/Downgrade/Remove RPMs from a virtual machine.
- Check the version of the packages installed.
- Check the package contents.
- Check the dependencies of a package.
- Find the source package of a file.
To find the package that contains a particular binary, run rpm -q —whatprovides <binary/file path> command.
##Usage
The rpm command can be used in the following ways:
rpm -ivh <rpm file path> : This command installs the RPM in a virtual machine.rpm -Uvh <rpm file path> : This command is used to upgrade/downgrade the RPM.rpm -e <rpm file path> : This command uninstalls the RPM from the virtual machine.rpm -qp <rpm file path> --provides : This displays the libraries provided by the RPM.rpm -qp <rpm file path> --requires : This displays the binaries/libraries required to install a particular rpm.rpm -qa : This displays a list of all installed packages.rpm -ql <package file.rpm> : This command lists all files in the package file.
7.3.3 - Network Configuration
systemd-networkd is a system daemon that manages network configurations. It detects and configures network devices as they appear. It can also create virtual network devices.
##Configuration Examples
All configurations are stored as foo.network in the /etc/systemd/network/, /lib/systemd/network/ and /run/systemd/network/ folder. Use the networkctl list command to list all the devices on the system.
After making changes to a configuration file, restart the systemd-networkd.service if version is < 245, for other version run the following commands:
root@photon [ /home/sus ]# networkctl reload
root@photon [ /home/sus ]# networkctl reconfigure eth0
Note:
- The options mentioned in the configuration files are case sensitive.
- Set
DHCP=yes to accept IPv4 and IPv6 DHCP requests. - Set
DHCP=ipv4 to accept IPv4 DHCP requests. - Set LinkLocalAddressing=no to disable IPv6. Please do not disable IPv6 via sysctl. When
LinkLocalAddressing=no in the .network file, the kernel drops addresses starting with fe80, for example fe80::20c:29ff:fe4c:7eca. If IPv6LL address is not available networkd will not start IPv6 configurations.
To link network configurations using DHCPv4 (IPv6 disabled), run the following command:
/etc/systemd/network/20-eth0.network
[Match]
Name=eth0
[Network]
LinkLocalAddressing=no
DHCP=ipv4
To link network configurations using DHCPv6, run the following command:
/etc/systemd/network/20-eth0.network
[Match]
Name=eth0
[Network]
IPv6AcceptRA=yes
DHCP=ipv6
To link network configurations using a static IP address, run the following command:
/etc/systemd/network/20-wired.network
[Match]
Name=enp1s0
[Network]
Address=10.1.10.9/24
Gateway=10.1.10.1
DNS=10.1.10.1
Here Address= can be used more than once to configure multiple IPv4 or IPv6 addresses.
A .link file can be used to rename an interface. For example, set a predictable interface name for a Ethernet adapter based on its MAC address by running the following command:
/etc/systemd/network/10-test0.link
[Match]
MACAddress=12:34:56:78:90:ab
[Link]
Description=my custom name
Name=test123
##Configuration Files
Configuration files are located in /usr/lib/systemd/network/ folder, the volatile runtime network directory in /run/systemd/network/ folder and the local administration network directory in /etc/systemd/network/ folder. Configuration files in /etc/systemd/network/ folder have the highest priority.
There are three types of configuration files and they use a format similar to systemd unit files.
.network : These files apply a network configuration to a matching device.
.netdev : These files are used to create a virtual network device for a matching environment.
.link : When a network device appears, udev looks for the first matching .link file.
These link files follow the following rules:
Only if all conditions in the [Match] section are matched, the profile will be activated.
An empty [Match] section means the profile can apply to any case (can be compared to the * wild card)
All configuration files are collectively sorted and processed in lexical order, regardless of the directory it resides in.
Files with identical names replace each other.
##Dupliate Matches
If we have multiple configuration files matching an interface, the first (in lexical order) network file matching a given device is applied. All other files are ignored even if they match. The following is an example of matching configuration files:
builder@localhost [ ~ ]$ cat /etc/systemd/network/10-eth0.network
[Match]
Name=eth0
[Network]
DHCP=yes
builder@localhost [ ~ ]$ cat /etc/systemd/network/99-dhcp-en.network
[Match]
Name=e*
[Network]
DHCP=yes
IPv6AcceptRA=no
##Network Files
These files are used to set network configuration variables for servers and containers.
.network files have the following sections:
###[Match]
| Parameter | Description | Accepted Values |
|---|
Name= | Matches device names. For example: en*. By using ! prefix the list can be inverted. | Device names separated by a white space, logical negation (!). |
MACAddress= | Matches MAC addresses. For example: MACAddress=01:23:45:67:89:ab 00-11-22-33-44-55 AABB.CCDD.EEFF | MAC addresses with full colon-, hyphen- or dot-delimited hexadecimal separated by a white space. |
Host= | Matches the host name or the machine ID of the host. | Hostname string or Machine ID |
Virtualization= | Checks whether the system is running in a virtual environment. Virtualization=false will only match your host machine, while Virtualization=true matches containers or VMs. It is also possible to check for a specific virtualization type or implementation. | boolean, logical negation (!), type (vm, container), implementation (qemu, kvm, zvm, vmware, microsoft, oracle, xen, bochs, uml, bhyve, qnx, openvz, lxc, lxc-libvirt, systemd-nspawn, docker, podman, rkt, wsl, acrn) |
###[Link]
MACAddress= : Used to spoof MAC address.MTUBytes= : Setting a larger MTU value (For example: when using jumbo frames) can significantly speed up your network transfers.Multicast : Enables the use of multicast on interface(s).
###[Network]
| Parameter | Description | Accepted Values | Default Value |
|---|
DHCP= | Controls DHCPv4 and/or DHCPv6 client support. | Boolean, ipv4, ipv6 | false |
DHCPServer= | If enabled, a DHCPv4 server will be started. | Boolean | false |
MulticastDNS= | Enables multicast DNS support. When set to resolve, only resolution is enabled. | Boolean, resolve | false |
DNSSEC= | Controls the DNSSEC DNS validation support on the link. When set to allow-downgrade, compatibility with non-DNSSEC capable networks is increased, by automatically turning off DNSSEC. | Boolean, allow-downgrade | false |
DNS= | Configures static DNS addresses. can be specified more than once. | inet_pton | |
Domains= | Indicates domains which must be resolved using the DNS servers. | domain name, optionally prefixed with a ~ | |
IPForward= | If enabled, incoming packets on any network interface will be forwarded to any other interfaces according to the routing table. | Boolean, ipv4, ipv6 | false |
IPMasquerade= | If enabled, packets forwarded from the network interface appear as if they are coming from the local host. | Boolean | false |
IPv6PrivacyExtensions= | Configures use of stateless temporary addresses that change over time. When set to prefer-public, the privacy extensions are enabled, but prefers public addresses over temporary addresses. When set to kernel, the kernel’s default setting will be left in place. | Boolean, prefer-public, kernel | false |
###[Address]
Address= option is mandatory unless DHCP is used.
###[Route]
Gateway= option is mandatory unless DHCP is used.Destination= option defines the destination prefix of the route, possibly followed by a slash and the prefix length.
If Destination is not present in [Route] section it is treated as a default route.
Note: You can add the Address= and Gateway= keys in the [Network] section as a short-hand, if the [Address] section contains only an Address key and [Route] section contains only a Gateway key.
###DHCP
| Parameter | Description | Accepted Values | Default Value |
|---|
UseDNS= | Defines the DHCP server to be used. | Boolean | true |
Anonymize= | When set to true, the options sent to the DHCP server will follow RFC7844 (Anonymity Profiles for DHCP Clients) to minimize disclosure of identifying information. | Boolean | false |
UseDomains= | Defines the DHCP server to be used as the DNS search domain. If set to route, the domain name received from the DHCP server will be used for routing DNS queries only and not for searching. This option can sometimes fix local name resolving when using systemd-resolved. | Boolean, route | false |
###[DHCPServer]
The following is an example of a DHCP server configuration which works well with hostapd to create a wireless hotspot. IPMasquerade adds the firewall rules for NAT and IPForward enables packet forwarding.
/etc/systemd/network/wlan0.network
[Match]
Name=wlan0
[Network]
Address=10.1.1.1/24
DHCPServer=true
IPMasquerade=true
IPForward=true
[DHCPServer]
PoolOffset=100
PoolSize=20
EmitDNS=yes
DNS=9.9.9.9
##Netdev Files
These files create virtual network devices. They have the following two sections:
###[Match]
Host= : The host name.Virtualization= : Checks if it is running in a virtual environment.
###[NetDev]
Name= : The interface’s name. This is a mandatory field.Kind= : For example: bridge, bond, vlan, veth, sit, etc. This is a mandatory field.
##Link Files
These files are an alternative to custom udev rules and will be applied by udev as the device appears. They have the following two sections:
###[Match]
MACAddress= : The MAC address.Host= : The host name.Virtualization= : Checks if it is running in a virtual environment.Type= : the device type. For example: vlan.
###[Link]
MACAddressPolicy= : Persistent or random addresses.MACAddress= : The MAC address.
Note: The system /usr/lib/systemd/network/99-default.link file is sufficient for most cases.
##Debugging Systemd-networkd
The log can be generated by creating a drop-in config. For example:
# /etc/systemd/system/systemd-networkd.service.d/override.conf
[Service]
Environment=SYSTEMD_LOG_LEVEL=debug
7.3.4 - Cloud-init
Cloud-init is mixture of Python and Shell scripts that initialize cloud instances of Linux machines.
Cloud-init performs boot time configuration of a system.
We can configure users, hostname, host network, write files to disk, manage packages, run custom scripts and so on.
##DataSources
Datasource is the source of configuration data for cloud-init that is typically given by a user (For example: userdata) or obtained from the cloud that created the configuration drive (For example: metadata).
Userdata includes files, YAML configuration files and shell scripts.
Metadata includes server name, instance id, display name and other cloud specific details.
Currently there are two datasources used in Photon OS, it’s usage is described in the following sections:
- DataSourceOVF - Used for GuestOS customization in vSphere.
- VMwareGuestInfo - Used to read meta, user, and vendor data from VMware vSphere’s GuestInfo interface and initialize the system.
###DataSourceOVF
The OVF (Open Virtualization Format) Datasource provides a datasource for reading data from an OVF transport ISO.
The vmtoolsd service extracts the customization spec cab file from the OVF and calls either cloud-init or the GuestOS customization scripts.
The disable_vmware_customization flag in /etc/cloud/cloud.cfg file determines if GOSC scripts or cloud-init is used.
disable_vmware_customization: false : Cloud-init is used for Guest OS customizationdisable_vmware_customization: true : GuestOS customization scripts is used for Guest OS customization
Note:
The default value for disable_vmware_customization is set to true in the /etc/cloud/cloud.cfg file
###VMwareGuestInfo
VMwareGuestInfo data source is configured by setting guestinfo properties on a VM. This can be set by performing one of the following:
- Using the vmware-rpctool provided by open-vmtools.
- Modifying the vmx file to set the guestinfo properties.
##Debugging Cloud-init Failures
Cloud-init has four services which are started in the following sequence:
- cloud-init-local - This service locates local data sources and applies networking configurations provided n the metadata (If there is no metadata it applies Fallback). Use
$ systemctl status cloud-init-local command to check its status. - cloud-init - This service processes any user-data that is found and runs the cloud_init_modules in /etc/cloud/cloud.cfg. Use
$ systemctl status cloud-init command to check its status. - cloud-config - This service runs the cloud_config_modules in /etc/cloud/cloud.cfg file. Use
$ systemctl status cloud-config command to check its status. - cloud-final - This service runs any script that a user is accustomed to running after logging into a system (For example: package installations, configs, user-scripts) and runs cloud_final_modules in /etc/cloud/cloud.cfg file. Use
$ systemctl status cloud-final command to check its status.
Cloud-init logs are available in the /var/log/cloud-init.log file. Logs for GuestOS customization using DataSourceOVF are available in the /var/log/vmware-imc/toolsDeployPkg.log and /var/log/cloud-init.log files.
To analyze the cloud-init boot time performance, run the following commands:
$ cloud-init analyze blame - The blame command prints in descending order, the units that took the longest to run. This output is useful for observe where cloud-init is spending its time during execution.$ cloud-init analyze show - The show command prints a list of units, the time they started and how long they took to complete. It also prints a summary of total time per boot.$ cloud-init analyze dump - The dump command dumps the cloud-init logs for the analyze modules and displays a list of dictionaries that can be consumed for other reporting needs.$ cloud-init status - To know the overall status of clouf-init.
Cloud-init doesn’t configure the network if /etc/cloud/cloud.cfg.d/99-disable-networking-config.cfg file is present and has the following content:
- network:Item
- config: disabled
Take a backup of /etc/cloud/cloud.cfg.d/99-disable-networking-config.cfg file and remove it from it’s location.
Reconfigure the machine using metadata, userdata and vendordata.
Once the configurations are done copy the backup file to the same location.
Cloud-init will push it’s fallback configuration when service is restarted or rebooted and there is no local datasource to configure. To avoid this /etc/cloud/cloud.cfg.d/99-disable-networking-config.cfg file is required.
##Run Cloud-init Manually
To run cloud-init manually, run the following commands:
/usr/bin/cloud-init -d init (-d for debug)
/usr/bin/cloud-init -d modules (run all modules)
/usr/bin/cloud-init --file <config-yaml-file-path> init (if you want to run cloud-init with a configuration yaml file)
When cloud-init is running, to force it to run with all configs engaged run the following command:
rm -rf /var/lib/cloud/*
For more information about cloud-init, see
https://cloudinit.readthedocs.io/en/latest/index.htmlhttps://cloudinit.readthedocs.io/en/latest/index.html
For more information about cloud-init CLI, see
https://cloudinit.readthedocs.io/en/latest/topics/cli.htmlhttps://cloudinit.readthedocs.io/en/latest/topics/cli.html
Note:Include the cloud-init log tarball and the vmtoolsd logs when you raise an issue.
- Collect cloud-init log tarball by running the
cloud-init collect-logs command. - Collect the vmtoolsd logs from /var/log/vmware-imc/toolsDeployPkg.log file.
- Attach the collected logs to the issue ticket.
7.3.5 - Open-vm-tools/Vmtoolsd
Vmtoolsd is a systemd service, using which we can set guestinfo properties metadata, userdata and vendordata etc., which in turn are consumed by cloud-init.
VMwareGuestInfo Datasource uses this guestinfo properties and applies them to the system.
vmware-rpctool is a utility provided by open-vm-tools to set metadata, userdata and vendordata.
vmware-rpctool provides info.set and info.get options to set and get the guestinfo properties respectively.
##Debugging
To check the status of the vmtoolsd service (vmtoolsd is dependant on vgauthd), run the following commands:
$ systemctl status vmtoolsd vgauthd
$ journalctl -u vmtoolsd
$ journalctl -u vgauthd
To set and get metadata, userdata and vendordata, run the following commands:
$ /usr/bin/vmware-rpctool 'info-get guestinfo.metadata'
$ /usr/bin/vmware-rpctool 'info-get guestinfo.userdata'
$ /usr/bin/vmware-rpctool 'info-get guestinfo.vendordata'
A YAML file can be used as input to the rpctool using following commands:
vmware-rpctool "info-set guestinfo.userdata.encoding base64"
vmware-rpctool "info-set guestinfo.metadata.encoding base64"
vmware-rpctool "info-set guestinfo.metadata ${metadata file contents}"
vmware-rpctool "info-set guestinfo.userdata ${userdata file contents}"
Note:Include the cloud-init log tarball and the vmtoolsd logs when you raise an issue.
- Collect cloud-init log tarball by running the
cloud-init collect-logs command. - Collect the vmtoolsd logs from /var/log/vmware-imc/toolsDeployPkg.log file.
- Attach the logs collected to the issue ticket.
7.4 - Troubleshooting Tools
Photon OS includes tools that help troubleshoot problems. These tools are installed by default on the full version of Photon OS. On the minimal version of Photon OS, you might have to install a tool before you can use it.
There is a man page on Photon OS for all the tools covered in this section. The man pages provide more information about each tool’s commands, options, and output. To view a tool’s man page, on the Photon OS command line, type man and then the name of the tool. Example:
man strace
7.4.1 - Common Tools
The following are some tools that you can use to troubleshoot:
Note: Some of the examples in this section are marked as abridged with ellipsis (...).
top
The top tool monitors system resources, workloads, and performance. It can unmask problems caused by processes or applications overconsuming CPUs, time, or RAM.
To view a textual display of resource consumption, run the top command:
top
Use can use ’top’ to kill a runaway or stalled process by typing k followed by its process ID (PID).

If the percent of CPU utilization is consistently high with little idle time, there might be a runaway process overconsuming CPUs. Restarting the service might solve the problem.
To troubleshoot an unknown issue, run Top in the background in batch mode to write its output to a file and collect data about performance:
top d 120 b >> top120second.output
For a list of options that filter top output and other information, see the man page for top.
ps
The ps tool shows the processes running on the machine. The ps tool derives flexibility and power from its options, all of which are covered in the tool’s Photon OS man page:
man ps
You can use the following options of ps for troubleshooting:
Show processes by user:
ps aux
Show processes and child processes by user:
ps auxf
Show processes containing the string ssh:
ps aux | grep ssh
Show processes and the command and options with which they were started:
ps auxww
Example abridged output:
ps auxww
USER PID %CPU %MEM VSZ RSS TTY STAT START TIME COMMAND
root 1 0.0 0.9 32724 3300 ? Ss 07:51 0:32 /lib/systemd/systemd --switched-root --system --deserialize 22
netstat
The netstat command can identify bottlenecks causing performance issues. It lists network connections, listening sockets, port information, and interface statistics for different protocols. Examples:
netstat --statistics
netstat --listening
find
Use the find command to troubleshoot a Photon OS machine that has stopped working. The following command lists the files in the root directory that have changed in the past day:
find / -mtime -1
See the find manual. Take note of the security considerations listed in the find manual if you are using find to troubleshoot an appliance running on Photon OS.
locate
The locate command is a fast way to find files and directories you onlay have a keyword. This command is similar to find and part of the same findutils package preinstalled on the full version of Photon OS by default. It finds file names in the file names database.
Before you can use locate accurately, update its database:
updatedb
Then run locate to quickly find a file, such as any file name containing .network, which can be helpful to see all the system’s .network configuration files. The following is an abridged example:
locate .network
/etc/dbus-1/system.d/org.freedesktop.network1.conf
/etc/systemd/network/10-dhcp-en.network
/usr/lib/systemd/network/80-container-host0.network
/usr/lib/systemd/network/80-container-ve.network
/usr/lib/systemd/system/busnames.target.wants/org.freedesktop.network1.busname
/usr/lib/systemd/system/dbus-org.freedesktop.network1.service
/usr/lib/systemd/system/org.freedesktop.network1.busnname
/usr/share/dbus-1/system-services/org.freedesktop.network1.service
The locate command is also a quick way to see whether a troubleshooting tool is installed on Photon OS. Examples:
locate strace
/usr/bin/strace
/usr/bin/strace-graph
/usr/bin/strace-log-merge
/usr/share/man/man1/strace.1.gz
/usr/share/vim/vim74/syntax/strace.vim
locate traceroute
In this example, the strace tool is installed but traceroute is not.
You can install traceroute from the Photon OS repository:
tdnf install traceroute
df
The df command reports the disk space available on the file system. Running out of disk space can lead an application to fail and a quick check of the available space makes sense as an early troubleshooting step:
df -h
The -h option prints out the available and used space in human-readable sizes. After checking the space, you should also check the number of available inodes. Too few available inodes can lead to difficult-to-diagnose problems:
df -i
md5sum
The md5sum tool calculates 128-bit RSA Data Security, Inc. MD5 Message Digest Algorithm hashes (a message digest, or digital signature, of a file) to uniquely identify a file and verify its integrity after file transfers, downloads, or disk errors when the security of the file is not in question.
md5sum can help troubleshooting installation issues by verifying that the version of Photon OS being installed matches the version on the Bintray download page. If, for instance, bytes were dropped during the download, the checksums will not match. Try downloading it again.
sha256sum
The sha256sum tool calculates the authenticity of a file to prevent tampering when security is a concern. Photon OS also includes shasum, sha1sum, sha384sum, and sha512sum. See the man pages for md3sum, sha256sum, and the other SHA utilities.
strace
The strace utility follows system calls and signals as they are executed so that you can see what an application, command, or process is doing. strace can trace failed commands, identify where a process obtains its configuration, monitor file activity, and find the location of a crash.
By tracing system calls, strace can help troubleshoot a broad range of problems, including issues with input-output, memory, interprocess communication, network usage, and application performance.
For troubleshooting a problem that gives off few or no clues, the following command displays every system call:
strace ls -al
With strace commands, you can route the output to a file to make it easier to analyze:
strace -o output.txt ls -al
strace can reveal the files that an application tries to open with the -eopen option. This combination can help troubleshoot an application that is failing because it is missing files or being denied access to a file it needs. If, for example, you see “No such file or directory” in the results of strace -eopen, something might be wrong:
strace -eopen sshd
open("/usr/lib/x86_64/libpam.so.0", O_RDONLY|O_CLOEXEC) = -1 ENOENT (No such file or directory)
open("/usr/lib/libpam.so.0", O_RDONLY|O_CLOEXEC) = 3
The results above indicate that the first file is missing because it is found in the next line. In other cases, the application might be unable to open one of its configuration files or it might be reading the wrong one. If the results say “permission denied” for one of the files, check the permissions of the file with ls -l or stat.
When troubleshooting with strace, you can include the process ID in its commands. Here’s an example of how to find a process ID:
ps -ef | grep apache
You can then use strace to examine the file a process is working with:
strace -e trace=file -p 1719
A similar command can trace network traffic:
strace -p 812 -e trace=network
If an application is crashing, use strace to trace the application and then analyze what happens right before the application crashes.
You can also trace the child processes that an application spawns with the fork system call, and you can do so with systemctl commands that start a process to identify why an application crashes immediately or fails to start:
strace -f -o output.txt systemctl start httpd
Example: If journalctl is showing that networkd is failing, you can run strace to troubleshoot:
strace -o output.txt systemctl restart systemd-networkd
Then grep inside the results for something, such as exit or error:
grep exit output.txt
If the results indicate systemd-resolved is going wrong, you can then strace it:
strace -f -o output.txt systemctl restart systemd-resolved
file
The file command determines the file type, which can help troubleshoot problems when an application mistakes one type of file for another, leading it to errors. Example:
file /usr/sbin/sshd
/usr/sbin/sshd: ELF 64-bit LSB shared object, x86-64, version 1 (SYSV), dynamically linked, interpreter /lib64/ld-linux-x86-64.so.2, for GNU/Linux 2.6.32, stripped
stat
The stat command can help troubleshoot problems with files or the file system by showing the last date it was modified and other information. Example:
stat /dev/sda1
File: '/dev/sda1'
Size: 0 Blocks: 0 IO Block: 4096 block special file
Device: 6h/6d Inode: 6614 Links: 1 Device type: 8,1
Access: (0660/brw-rw----) Uid: ( 0/ root) Gid: ( 8/ disk)
Access: 2016-09-02 12:23:56.135999936 +0000
Modify: 2016-09-02 12:23:52.879999981 +0000
Change: 2016-09-02 12:23:52.879999981 +0000
Birth: -
On Photon OS, stat is handy to show permissions for a file or directory in both their absolute octal notation and their read-write-execute abbreviation; truncated example:
chmod 777 tester.md
stat tester.md
File: 'tester.md'
Size: 0 Blocks: 0 IO Block: 4096 regular empty file
Device: 801h/2049d Inode: 316385 Links: 1
Access: (0777/-rwxrwxrwx) Uid: ( 0/ root) Gid: ( 0/ root)
watch
The watch utility runs a command at regular intervals so you can observe how its output changes over time. watch can help dynamically monitor network links, routes, and other information when you are troubleshooting networking or performance issues. Examples:
watch -n0 --differences ss
watch -n1 --differences ip route
The following is an example with a screenshot of the output. This command monitors the traffic on your network links. The highlighted numbers are updated every second so you can see the traffic fluctuating:
watch -n1 --differences ip -s link show up

vmstat and fdisk
The vmstat tool displays statistics about virtual memory, processes, block input-output, disks, and CPU activity. This tool can help diagnose performance problems, especially system bottlenecks.
Its output on a Photon OS virtual machine running in VMware Workstation 12 Pro without a heavy load looks like this:
vmstat
procs -----------memory---------- ---swap-- -----io---- -system-- ------cpu-----
r b swpd free buff cache si so bi bo in cs us sy id wa st
0 0 0 5980 72084 172488 0 0 27 44 106 294 1 0 98 1 0
These codes are explained in the vmstat man page.
- If `r`, the number of runnable processes, is higher than 10, the machine is under stress; consider intervening to reduce the number of processes or to distribute some of the processes to other machines. In other words, the machine has a bottleneck in executing processes.
- If `cs`, the number of context switches per second, is really high, there may be too many jobs running on the machine.
- If `in`, the number of interrupts per second, is relatively high, there might be a bottleneck for network or disk IO.
You can investigate disk IO further by using vmstat’s -d option to report disk statistics. The following is an abridged example on a machine with little load:
vmstat -d
disk- ------------reads------------ ------------writes----------- -----IO------
total merged sectors ms total merged sectors ms cur sec
ram0 0 0 0 0 0 0 0 0 0 0
ram1 0 0 0 0 0 0 0 0 0 0
loop0 0 0 0 0 0 0 0 0 0 0
loop1 0 0 0 0 0 0 0 0 0 0
sr0 0 0 0 0 0 0 0 0 0 0
sda 22744 676 470604 12908 72888 24949 805224 127692 0 130
The -D option summarizes disk statistics:
vmstat -D
26 disks
2 partitions
22744 total reads
676 merged reads
470604 read sectors
12908 milli reading
73040 writes
25001 merged writes
806872 written sectors
127808 milli writing
0 inprogress IO
130 milli spent IO
You can also get statistics about a partition. First, run the fdisk -l command to list the machine’s devices. Then run vmstat -p with the name of a device to view its stats:
fdisk -l
Disk /dev/ram0: 4 MiB, 4194304 bytes, 8192 sectors
Units: sectors of 1 * 512 = 512 bytes
Sector size (logical/physical): 512 bytes / 4096 bytes
I/O size (minimum/optimal): 4096 bytes / 4096 bytes
...
Device Start End Sectors Size Type
/dev/sda1 2048 16771071 16769024 8G Linux filesystem
/dev/sda2 16771072 16777182 6111 3M BIOS boot
vmstat -p /dev/sda1
sda1 reads read sectors writes requested writes
22579 473306 78510 866088
See the vmstat man page for more options.
lsof
The lsof command lists open files. The tool’s definition of an open file includes directories, libraries, streams, domain sockets, and Internet sockets. THis enables it to identify the files a process is using. Because a Linux system like Photon OS uses files to do its work, you can run lsof as root to see how the system is using them and to see how an application works.
If you cannot unmount a disk because it is in use, you can run lsof to identify the files on the disk that are being used.
The following is an example that shows the processes that are using the root directory:
lsof /root
COMMAND PID USER FD TYPE DEVICE SIZE/OFF NODE NAME
bash 879 root cwd DIR 8,1 4096 262159 /root
bash 1265 root cwd DIR 8,1 4096 262159 /root
sftp-serv 1326 root cwd DIR 8,1 4096 262159 /root
gdb 1351 root cwd DIR 8,1 4096 262159 /root
bash 1395 root cwd DIR 8,1 4096 262159 /root
lsof 1730 root cwd DIR 8,1 4096 262159 /root
You can do the same with an application or virtual appliance by running lsof with the user name or process ID of the app. The following example lists the open files used by the Apache HTTP Server:
lsof -u apache
Running the command with the -i option lists all the open network and Internet files, which can help troubleshoot network problems:
lsof -i
See the Unix socket addresses of a user like zookeeper:
lsof -u zookeeper -U
The following example shows the processes running on Ports 1 through 80:
lsof -i TCP:1-80
COMMAND PID USER FD TYPE DEVICE SIZE/OFF NODE NAME
httpd 403 root 3u IPv6 10733 0t0 TCP *:http (LISTEN)
httpd 407 apache 3u IPv6 10733 0t0 TCP *:http (LISTEN)
httpd 408 apache 3u IPv6 10733 0t0 TCP *:http (LISTEN)
httpd 409 apache 3u IPv6 10733 0t0 TCP *:http (LISTEN)
sshd 820 root 3u IPv4 11336 0t0 TCP *:ssh (LISTEN)
sshd 820 root 4u IPv6 11343 0t0 TCP *:ssh (LISTEN)
sshd 1258 root 3u IPv4 48040 0t0 TCP 198.51.100.143:ssh->198.51.100.1:49759 (ESTABLISHED)
sshd 1319 root 3u IPv4 50866 0t0 TCP 198.51.100.143:ssh->198.51.100.1:51054 (ESTABLISHED)
sshd 1388 root 3u IPv4 56438 0t0 TCP 198.51.100.143:ssh->198.51.100.1:60335 (ESTABLISHED)
You can also inspect the files opened by a process ID. The following example queries the files open by the systemd network service:
lsof -p 1917
COMMAND PID USER FD TYPE DEVICE SIZE/OFF NODE NAME
systemd-n 1917 systemd-network cwd DIR 8,1 4096 2 /
systemd-n 1917 systemd-network txt REG 8,1 887896 272389 /usr/lib/systemd/systemd-networkd
systemd-n 1917 systemd-network mem REG 8,1 270680 262267 /usr/lib/libnss_files-2.22.so
systemd-n 1917 systemd-network 0r CHR 1,3 0t0 5959 /dev/null
systemd-n 1917 systemd-network 1u unix 0x0000000000000000 0t0 45734 type=STREAM
systemd-n 1917 systemd-network 3u netlink 0t0 6867 ROUTE
systemd-n 1917 systemd-network 4u unix 0x0000000000000000 0t0 45744 type=DGRAM
systemd-n 1917 systemd-network 9u netlink 0t0 45754 KOBJECT_UEVENT
systemd-n 1917 systemd-network 12u a_inode 0,11 0 5955 [timerfd]
systemd-n 1917 systemd-network 13u IPv4 104292 0t0 UDP 198.51.100.143:bootpc
fuser
The fuser command identifies the process IDs of processes using files or sockets. The term process is, in this case, synonymous with user. To identify the process ID of a process using a socket, run fuser with its namespace option and specify tcp or udp and the name of the process or port. Examples:
fuser -n tcp ssh
ssh/tcp: 940 1308
fuser -n tcp http
http/tcp: 592 594 595 596
fuser -n tcp 80
80/tcp: 592 594 595 596
ldd
By revealing the shared libraries that a program depends on, ldd can help troubleshoot an application that is missing a library or finding the wrong one.
For example, if you get a “file not found” output, check the path to the library.
ldd /usr/sbin/sshd
linux-vdso.so.1 (0x00007ffc0e3e3000)
libpam.so.0 => (file not found)
libcrypto.so.1.0.0 => /usr/lib/libcrypto.so.1.0.0 (0x00007f624e570000)
You can also use the objdump command to show dependencies for a program’s object files; example:
objdump -p /usr/sbin/sshd | grep NEEDED
gdb
The gdb tool is the GNU debugger. It lets you see inside a program while it executes or when it crashes so that you can catch errors as they occur. The gdb tool is typically used to debug programs written in C and C++. On Photon OS, gdb can help you determine why an application crashed. See the man page for gdb for instructions on how to run it.
For an extensive example on how to use gdb to troubleshoot Photon OS running on a VM when you cannot login to Photon OS, see the section on troubleshooting boot and logon problems.
7.4.2 - Troubleshooting Tools Installed by Default
The following troubleshooting tools are included in the full version of Photon OS:
grep. Searches files for patterns.ping. Tests network connectivity.strings. Displays the characters in a file to identify its contents.lsmod. Lists loaded modules.ipcs. Shows data about the inter-process communication (IPC) resources to which a process has read access. This data includes shared memory segments, message queues, and semaphore arrays.nm. Lists symbols from object files.diff. Compares files side by side. This tool is useful to compare configuration files of two versions when one version works and the other does not.
7.4.3 - Installing Tools from Repositories
You can install several troubleshooting tools from the Photon OS repositories by using the default package management system, tdnf.
If a tool you require is not installed, search the repositories to see if it is available.
For example, the traceroute tool is not installed by default. You can search for it in the repositories as follows:
tdnf search traceroute
traceroute : Traces the route taken by packets over an IPv4/IPv6 network
The results of the above command show that traceroute exists in the repository. You install it with tdnf:
tdnf install traceroute
The following tools are not installed by default but are in the repository and can be installed with tdnf:
net-tools. Networking tools.
ltrace. Tool for intercepting and recording dynamic library calls. It can identify the function an application was calling when it crashed, making it useful for debugging.
nfs-utils. Client tools for the kernel Network File System, or NFS, including showmount. These are installed by default in the full version of Photon OS but not in the minimal version.
pcstat. A tool that inspects which pages of a file or files are being cached by the Linux kernel.
sysstat and sar. Utilities to monitor system performance and usage activity. Installing sysstat also installs sar.
systemtap and crash. The systemtap utility is a programmable instrumentation system for diagnosing problems of performance or function. Installing systemtap also installs crash, which is a kernel crash analysis utility for live systems and dump files.
dstat. Tool for viewing and analyzing statistics about system resources.
The dstat tool can help troubleshoot system performance. The tool shows live, running list of statistics about system resources:
dstat
You did not select any stats, using -cdngy by default.
----total-cpu-usage---- -dsk/total- -net/total- ---paging-- ---system--
usr sys idl wai hiq siq| read writ| recv send| in out | int csw
1 0 98 1 0 0|4036B 42k| 0 0 | 0 0 | 95 276
1 0 98 1 0 0| 0 64k| 60B 940B| 0 0 | 142 320
1 1 98 0 0 0| 0 52k| 60B 476B| 0 0 | 149 385
7.4.4 - Linux Troubleshooting Tools
The following Linux troubleshoot tools are neither installed on Photon OS by default nor available in the Photon OS repositories:
- iostat
- telnet (use SSH instead)
- Iprm
- hdparm
- syslog (use journalctl instead)
- ddd
- ksysmoops
- xev
- GUI tools (because Photon OS has no GUI)
7.5 - Systemd
Photon OS manages services with systemd and systemctl, its command-line utility for inspecting and controlling the system. It does not use the deprecated commands of init.d.
Basic system administration commands on Photon OS differ from those on operating systems that use SysVinit. Since Photon OS uses systemd instead of SysVinit, you must use systemd commands to manage services.
For example, instead of running the /etc/init.d/ssh script to stop and start the OpenSSH server on a init.d-based Linux system, you control the service by running the following systemctl commands on Photon OS:
systemctl stop sshd
systemctl start sshd
For an overview of systemd, see systemd System and Service Manager and the man page for systemd. The systemd man pages are listed at https://www.freedesktop.org/software/systemd/man/.
7.5.1 - Enabling `systemd` Debug Shell During Boot
To diagnose systemd related boot issues, you can enable early shell access during boot.
Perform the following steps to enable early shell access:
Restart the Photon OS machine or the virtual machine running Photon OS.
When the Photon OS splash screen appears, as it restarts, type the letter e quickly.
Append systemd.debug-shell=1 to the kernel command line.
Optionally, to change logging level to debug, you can append systemd.log_level=debug.
Press F10 to proceed with the boot.
Press Alt+Ctrl+F9 to switch to tty9 to access the debug shell.
7.5.2 - Troubleshooting Services With 'systemctl`
To view a description of all the active, loaded units, execute the systemctl command without any options or arguments:
systemctl
To see all the loaded, active, and inactive units and their description, run this command:
systemctl --all
To see all the unit files and their current status but no description, run this command:
systemctl list-unit-files
The grep command filters the services by a search term, a helpful tactic to recall the exact name of a unit file without looking through a long list of names. Example:
systemctl list-unit-files | grep network
org.freedesktop.network1.busname static
dbus-org.freedesktop.network1.service enabled
systemd-networkd-wait-online.service enabled
systemd-networkd.service enabled
systemd-networkd.socket enabled
network-online.target static
network-pre.target static
network.target
For example, to list all the services that you can manage on Photon OS, you run the following command instead of ls /etc/rc.d/init.d/:
systemctl list-unit-files --type=service
Similarly, to check whether the sshd service is enabled, on Photon OS you run the following command instead of chkconfig sshd:
systemctl is-enabled sshd
The chkconfig --list command that shows which services are enabled for which runlevel on a SysVinit computer becomes substantially different on Photon OS because there are no runlevels, only targets:
ls /etc/systemd/system/*.wants
You can also display similar information with the following command:
systemctl list-unit-files --type=service
The following is list of some of the systemd commands that take the place of SysVinit commands on Photon OS:
USE THIS SYSTEMD COMMAND INSTEAD OF THIS SYSVINIT COMMAND
systemctl start sshd service sshd start
systemctl stop sshd service sshd stop
systemctl restart sshd service sshd restart
systemctl reload sshd service sshd reload
systemctl condrestart sshd service sshd condrestart
systemctl status sshd service sshd status
systemctl enable sshd chkconfig sshd on
systemctl disable sshd chkconfig sshd off
systemctl daemon-reload chkconfig sshd --add
7.5.3 - Analyzing System Logs with `journalctl`
The journalctl tool queries the contents of the systemd journal. On Photon OS, all the system logs except the installation log and the cloud-init log are written into the systemd journal.
When you run the journalctl command without any parameters, it displays all the contents of the journal, beginning with the oldest entry.
To display the output in reverse order with new entries first, include the -r option in the command:
journalctl -r
The journalctl command includes many options to filter its output. For help troubleshooting systemd, two journalctl queries are particularly useful:
Showing the log entries for the last boot.
The following command displays the messages that systemd generated during the last time the machine started:
journalctl -b
Showing the log entries for a systemd service unit.Item
The following command reveals the messages for only the systemd service unit specified by the -u option, which in the following example is the auditing service:
journalctl -u auditd
You can look at the messages for systemd itself or for the network service:
journalctl -u systemd
journalctl -u systemd-networkd
Example:
root@photon-1a0375a0392e [ ~ ]# journalctl -u systemd-networkd
-- Logs begin at Tue 2016-08-23 14:35:50 UTC, end at Tue 2016-08-23 23:45:44 UTC. --
Aug 23 14:35:52 photon-1a0375a0392e systemd[1]: Starting Network Service...
Aug 23 14:35:52 photon-1a0375a0392e systemd-networkd[458]: Enumeration completed
Aug 23 14:35:52 photon-1a0375a0392e systemd[1]: Started Network Service.
Aug 23 14:35:52 photon-1a0375a0392e systemd-networkd[458]: eth0: Gained carrier
Aug 23 14:35:53 photon-1a0375a0392e systemd-networkd[458]: eth0: DHCPv4 address 198.51.100.1
Aug 23 14:35:54 photon-1a0375a0392e systemd-networkd[458]: eth0: Gained IPv6LL
Aug 23 14:35:54 photon-1a0375a0392e systemd-networkd[458]: eth0: Configured
For more information, see journalctl or the journalctl man page by running this command: man journalctl
7.5.4 - Inspecting Services with `systemd-analyze`
The systemd-analyze command reveals performance statistics for boot times, traces system services, and verifies unit files. It can help troubleshoot slow system boots and incorrect unit files. See the man page for a list of options.
Examples:
systemd-analyze blame
systemd-analyze dump
7.5.5 - Inspecting Services with `systemd-analyze`systemd
systemd is a suite of basic building blocks for a Linux system. It provides a system and service manager that runs as Process ID 1 and starts the rest of the system.
To manage the services run the following commands:
systemctl or systemctl list-units : This command lists the running units.systemctl --failed : This command lists failed units.systemctl list-unit-files : This command lists all the installed unit files. The unit files are usually present in /usr/lib/systemd/system/ and /etc/systemd/system/.systemctl status pid : This command displays the cgroup slice, memory and parent for a PID.systemctl start unit : This command starts a unit immediately.systemctl stop unit : This command stops a unit.systemctl restart unit : This command restarts a unit.systemctl reload unit : This command asks a unit to reload its configuration.systemctl status unit : This command displays the status of a unit.systemctl enable unit : This command enables a unit to run on startup.systemctl enable --now unit : This command enables a unit to run on startup and start immediately.systemctl disable unit : This command disables a unit and removes it from the startup program.systemctl mask unit : This command masks a unit to make it impossible to start.systemctl unmask unit : This command unmasks a unit.
To get an overview of the system boot-up time, run the following command:
systemd-analyze
To view a list of all running units, sorted by the time they took to initialize (highest time on top), run the following command:
systemd-analyze blame
7.6 - Network Troubleshooting
Use the systemd suite of commands and not deprecated init.d commands or other deprecated commands, to manage networking.
For information about tcpdump and netcat, see Installing the Packages for tcpdump and netcat with tdnf
7.6.1 - Managing the Network Configuration
The network service, which is enabled by default, starts when the system boots. You manage the network service by using systemd commands, such as systemd-networkd, systemd-resolvd, and networkctl.
You can check the status of the network service by running the following command:
systemctl status systemd-networkd
The following is a result of the command:
* systemd-networkd.service - Network Service
Loaded: loaded (/usr/lib/systemd/system/systemd-networkd.service; enabled; vendor preset: enabled)
Active: active (running) since Fri 2016-04-29 15:08:51 UTC; 6 days ago
Docs: man:systemd-networkd.service(8)
Main PID: 291 (systemd-network)
Status: "Processing requests..."
CGroup: /system.slice/systemd-networkd.service
`-291 /lib/systemd/systemd-networkd
7.6.2 - Inspecting IP Addresses
VMware recommends that you use the ip or ss commands as the ifconfig and netstat commands are deprecated.
To display a list of network interfaces, run the ss command. Similarly, to display information for IP addresses, run the ip addr command.
Examples:
USE THIS IPROUTE COMMAND INSTEAD OF THIS NET-TOOL COMMAND
ip addr ifconfig -a
ss netstat
ip route route
ip maddr netstat -g
ip link set eth0 up ifconfig eth0 up
ip -s neigh arp -v
ip link set eth0 mtu 9000 ifconfig eth0 mtu 9000
Use the ip route version of a command instead of the net-tools to get accurate information:
ip neigh
198.51.100.2 dev eth0 lladdr 00:50:56:e2:02:0f STALE
198.51.100.254 dev eth0 lladdr 00:50:56:e7:13:d9 STALE
198.51.100.1 dev eth0 lladdr 00:50:56:c0:00:08 DELAY
arp -a
? (198.51.100.2) at 00:50:56:e2:02:0f [ether] on eth0
? (198.51.100.254) at 00:50:56:e7:13:d9 [ether] on eth0
? (198.51.100.1) at 00:50:56:c0:00:08 [ether] on eth0
Important: If you modify an IPv6 configuration or add an IPv6 interface, you must restart systemd-networkd. Traditional methods of using ifconfig commands will be inadequate to register the changes. Run the following command instead:
systemctl restart systemd-networkd
7.6.3 - Inspecting the Status of Network Links with `networkctl`
The networkctl command displays information about network connections that helps you configure networking services and troubleshoot networking problems.
You can progressively add options and arguments to the networkctl command to move from general information about network connections to specific information about a network connection.
Running networkctl without options defaults to the list command:
networkctl
IDX LINK TYPE OPERATIONAL SETUP
1 lo loopback carrier unmanaged
2 eth0 ether routable configured
3 docker0 ether routable unmanaged
11 vethb0aa7a6 ether degraded unmanaged
4 links listed.
Run the networkctl with the status command to display active network links with IP addresses for not only the Ethernet connection, but also the Docker container.
root@photon-rc [ ~ ]# networkctl status
* State: routable
Address: 198.51.100.131 on eth0
172.17.0.1 on docker0
fe80::20c:29ff:fe55:3ca6 on eth0
fe80::42:f0ff:fef7:bd81 on docker0
fe80::4c84:caff:fe76:a23f on vethb0aa7a6
Gateway: 198.51.100.2 on eth0
DNS: 198.51.100.2
You can add a network link, such as the Ethernet connection, as the argument of the status command to show specific information about the link:
root@photon-rc [ ~ ]# networkctl status eth0
* 2: eth0
Link File: /usr/lib/systemd/network/99-default.link
Network File: /etc/systemd/network/10-dhcp-en.network
Type: ether
State: routable (configured)
Path: pci-0000:02:01.0
Driver: e1000
HW Address: 00:0c:29:55:3c:a6 (VMware, Inc.)
MTU: 1500
Address: 198.51.100.131
fe80::20c:29ff:fe55:3ca6
Gateway: 198.51.100.2
DNS: 198.51.100.2
CLIENTID: ffb6220feb00020000ab116724f520a0a77337
You can add a Docker container as follows:
networkctl status docker0
* 3: docker0
Link File: /usr/lib/systemd/network/99-default.link
Network File: n/a
Type: ether
State: routable (unmanaged)
Driver: bridge
HW Address: 02:42:f0:f7:bd:81
MTU: 1500
Address: 172.17.0.1
fe80::42:f0ff:fef7:bd81
In the example above, the output indicates that state of the Docker container is unmanaged. Docker uses the bridge drive to handle managing the networking for the containers and not systemd-resolved or systemd-networkd.
For more information about networkctl commands and options, see https://www.freedesktop.org/software/systemd/man/networkctl.html.
7.6.4 - Network Debugging
You can set systemd-networkd to work in debug mode so that you can analyze log files with debugging information to help troubleshoot networking problems.
The following procedure turns on network debugging by adding a drop-in file in /etc/systemd to customize the default systemd configuration in /usr/lib/systemd.
Run the following command as root to create a directory with this exact name, including the .d extension:
mkdir -p /etc/systemd/system/systemd-networkd.service.d/
Run the following command as root to establish a systemd drop-in unit with a debugging configuration for the network service:
cat > /etc/systemd/system/systemd-networkd.service.d/10-loglevel-debug.conf << "EOF"
[Service]
Environment=SYSTEMD_LOG_LEVEL=debug
EOF
Reload the systemctl daemon and restart the systemd-networkd service for the changes to take effect:
systemctl daemon-reload
systemctl restart systemd-networkd
Verify that your changes took effect:
`systemd-delta --type=extended`
View the log files by running this command:
`journalctl -u systemd-networkd`
After debugging the network connections, turn debugging off by deleting the drop-in file:
rm /etc/systemd/system/systemd-networkd.service.d/10-loglevel-debug.conf
7.6.5 - Checking Firewall Rules
The design of Photon OS emphasizes security. On the minimal and full versions of Photon OS, the default security policy turns on the firewall and drops packets from external interfaces and applications. As a result, you might need to add rules to iptables to permit forwarding, allow protocols like HTTP, and open ports. In other words, you must configure the firewall for your applications and requirements.
The default iptables settings on the full version look like this:
iptables --list
Chain INPUT (policy DROP)
target prot opt source destination
ACCEPT all -- anywhere anywhere
ACCEPT all -- anywhere anywhere ctstate RELATED,ESTABLISHED
ACCEPT tcp -- anywhere anywhere tcp dpt:ssh
Chain FORWARD (policy DROP)
target prot opt source destination
Chain OUTPUT (policy DROP)
target prot opt source destination
ACCEPT all -- anywhere anywhere
To find out how to adjust the settings, see the man page for iptables.
Although the default iptables policy accepts SSH connections, the sshd configuration file on the full version of Photon OS is set to reject SSH connections. See Permitting Root Login with SSH.
If you are unable to ping a Photon OS machine, check the firewall rules. Verify if the rules allow connectivity for the port and protocol.
You can supplement the iptables commands by using lsof to, for instance, see the processes listening on ports:
lsof -i -P -n
7.6.6 - Inspect Network Settings with `netmgr`
If you are running a VMware appliance on Photon OS and the VAMI module has problems or if there are networking issues, you can use the Photon OS netmgr utility to inspect the networking settings. Make sure that the IP addresses for the DNS server and other infrastructure are correct. Use tcpdump to analyze the issues.
The error code that you get from netmgr is a standard Unix error code. Enter it into a search engine to obtain more information on the error.
7.7 - File System Troubleshooting
Photon OS includes commands to check and troubleshoot file systems.
7.7.1 - Checking Disk Space
One of the first simple steps to take while troubleshooting is to check how much disk space is available by running the df command:
df -h
7.7.2 - Adding a Disk and Partitioning It
If the df command shows that the file system is indeed nearing capacity, you can add a new disk on the fly and partition it to increase capacity.
Add a new disk.
For example, you can add a new disk to a virtual machine by using the VMware vSphere Client. After adding a new disk, check for the new disk by using fdisk. In the following example, the new disk is named /dev/sdb:
fdisk -l
Device Start End Sectors Size Type
/dev/sda1 2048 16771071 16769024 8G Linux filesystem
/dev/sda2 16771072 16777182 6111 3M BIOS boot
Disk /dev/sdb: 1 GiB, 1073741824 bytes, 2097152 sectors
Units: sectors of 1 * 512 = 512 bytes
Sector size (logical/physical): 512 bytes / 512 bytes
I/O size (minimum/optimal): 512 bytes / 512 bytes
Partition it with the parted wizard.
The command to partition the disk on Photon OS is as follows:
parted /dev/sdb
Use the parted wizard to create it as follows:
mklabel gpt
mkpart ext3 1 1024
Create a file system on the partition:
mkfs -t ext3 /dev/sdb1
Make a directory where you will mount the new file system:
mkdir /newdata
Open /etc/fstab and add the new file system with the options that you require:
#system mnt-pt type options dump fsck
/dev/sda1 / ext4 defaults,barrier,noatime,noacl,data=ord$
/dev/cdrom /mnt/cdrom iso9660 ro,noauto 0 0
/dev/sdb1 /newdata ext3 defaults 0 0
Mount it using the following command:
`mount /newdata`
Verify the results:
df -h
Filesystem Size Used Avail Use% Mounted on
/dev/root 7.8G 4.4G 3.1G 59% /
devtmpfs 172M 0 172M 0% /dev
tmpfs 173M 0 173M 0% /dev/shm
tmpfs 173M 664K 172M 1% /run
tmpfs 173M 0 173M 0% /sys/fs/cgroup
tmpfs 173M 36K 173M 1% /tmp
tmpfs 35M 0 35M 0% /run/user/0
/dev/sdb1 945M 1.3M 895M 1% /newdata
7.7.3 - Expanding Disk Partition
If you require more space, you can expand the last partition of your disk after resizing the disk.
The commands in this section assume sda as disk device.
After the disk is resized in the virtual machine, use the following command to enable the system to recognize the new disk ending boundary without rebooting:
echo 1 > /sys/class/block/sda/device/rescan
Install the parted package to resize the disk partition by running the following command to install it:
`tdnf install parted`.
# parted /dev/sda
GNU Parted 3.2
Using /dev/sda
Welcome to GNU Parted! Type 'help' to view a list of commands.
List all partitions available to fix the GPT and check the last partition number:
(parted) print
Warning: Not all of the space available to /dev/sda appears to be used, you can
fix the GPT to use all of the space (an extra 4194304 blocks) or continue with
the current setting?
Fix/Ignore?
Press `f` to fix the GPT layout.
Model: VMware Virtual disk (scsi)
Disk /dev/sda: 34.4GB
Sector size (logical/physical): 512B/512B
Partition Table: gpt
Disk Flags:
Number Start End Size File system Name Flags
1 1049kB 3146kB 2097kB bios_grub
2 3146kB 8590MB 8587MB ext4
In this case we have the partition `2` as last, then we extend the partition to 100% of the remaining size:
(parted) resizepart 2 100%
1. Expand the filesystem to the new size:
```
resize2fs /dev/sda2
resize2fs 1.42.13 (17-May-2015)
Filesystem at /dev/sda2 is mounted on /; on-line resizing required
old_desc_blocks = 1, new_desc_blocks = 2
The filesystem on /dev/sda2 is now 8387835 (4k) blocks long.
```
The new space is already available in the system:
df -h
Filesystem Size Used Avail Use% Mounted on
/dev/root 32G 412M 30G 2% /
devtmpfs 1001M 0 1001M 0% /dev
tmpfs 1003M 0 1003M 0% /dev/shm
tmpfs 1003M 252K 1003M 1% /run
tmpfs 1003M 0 1003M 0% /sys/fs/cgroup
tmpfs 1003M 0 1003M 0% /tmp
tmpfs 201M 0 201M 0% /run/user/0
7.7.4 - List Disk Partitions with `fdisk`
The fdisk command manipulates the disk partition table. You can, for example, use fdisk to list the disk partitions so that you can identify the root Linux file system.
The following example shows /dev/sda1 to be the root Linux partition:
fdisk -l
Disk /dev/ram0: 4 MiB, 4194304 bytes, 8192 sectors
Units: sectors of 1 * 512 = 512 bytes
Sector size (logical/physical): 512 bytes / 4096 bytes
I/O size (minimum/optimal): 4096 bytes / 4096 bytes
...
Disk /dev/sda: 8 GiB, 8589934592 bytes, 16777216 sectors
Units: sectors of 1 * 512 = 512 bytes
Sector size (logical/physical): 512 bytes / 512 bytes
I/O size (minimum/optimal): 512 bytes / 512 bytes
Disklabel type: gpt
Disk identifier: 3CFA568B-2C89-4290-8B52-548732A3972D
Device Start End Sectors Size Type
/dev/sda1 2048 16771071 16769024 8G Linux filesystem
/dev/sda2 16771072 16777182 6111 3M BIOS boot
7.7.5 - File System Consistency Check Tool
You can manually check the file system by using the file system consistency check tool, fsck, after you unmount the file system.
The Photon OS file system includes btrfs and ext4. The default root file system is ext4, which you can see by looking at the file system configuration file, /etc/fstab:
```
cat /etc/fstab
#system mnt-pt type options dump fsck
/dev/sda1 / ext4 defaults,barrier,noatime,noacl,data=ordered 1 1
/dev/cdrom /mnt/cdrom iso9660 ro,noauto 0 0
```
The 1 in the fifth column, under fsck, indicates that fsck checks the file system when the system boots.
You can also perform a read-only check without unmounting it:
```
fsck -nf /dev/sda1
fsck from util-linux 2.27.1
e2fsck 1.42.13 (17-May-2015)
Warning! /dev/sda1 is mounted.
Warning: skipping journal recovery because doing a read-only filesystem check.
Pass 1: Checking inodes, blocks, and sizes
Pass 2: Checking directory structure
Pass 3: Checking directory connectivity
Pass 4: Checking reference counts
Pass 5: Checking group summary information
Free blocks count wrong (1439651, counted=1423942).
Fix? no
Free inodes count wrong (428404, counted=428397).
Fix? no
/dev/sda1: 95884/524288 files (0.3% non-contiguous), 656477/2096128 blocks
```
The inodes count might be wrong because the file system is mounted and in use.
To fix errors, you must first unmount the file system and then run fsck again:
```
umount /dev/sda1
umount: /: target is busy
```
You can find information about processes that use the device by using lsof or fuser.
```
lsof | grep ^jbd2/sd
jbd2/sda1 99 root cwd DIR 8,1 4096 2 /
jbd2/sda1 99 root rtd DIR 8,1 4096 2 /
jbd2/sda1 99 root txt unknown /proc/99/exe
```
The above example indicates that file system is in use.
7.7.6 - Fixing File System Errors When fsck Fails
Sometimes when fsck runs during startup, it encounters an error that prevents the system from fully booting until you fix the issue by running fsck manually. This error might occur when Photon OS is the operating system for a VM running an appliance.
If fsck fails when the computer boots and an error message says to run fsck manually, you can troubleshoot by restarting the VM, altering the GRUB edit menu to enter emergency mode before Photon OS fully boots, and running fsck.
Perform the following steps:
Take a snapshot of the virtual machine.
Restart the virtual machine running Photon OS.
When the Photon OS splash screen appears as it restarts, type the letter e quickly to go to the GNU GRUB edit menu.
Note: You must type e quickly as Photon OS reboots quickly. Also, in VMware vSphere or VMware Workstation Pro, you might have to give the console focus by clicking in its window before it will register input from the keyboard.
In the GNU GRUB edit menu, go to the end of the line that starts with linux, add a space, and then add the following code exactly as it appears below:
systemd.unit=emergency.target
Type F10.
In the bash shell, run one of the following commands to fix the file system errors, depending on whether sda1 or sda2 represents the root file system:
e2fsck -y /dev/sda1
or
e2fsck -y /dev/sda2
Restart the virtual machine.
7.8 - Troubleshooting Packages
On Photon OS, tdnf is the default package manager. The standard syntax for tdnf commands is the same as that for DNF and Yum:
tdnf [options] <command> [<arguments>...]
The main configuration files reside in /etc/tdnf/tdnf.conf. The repositories appear in /etc/yum.repos.d/ with .repo file extensions. For more information, see the Photon OS Administration Guide.
The cache files for data and metadata reside in /var/cache/tdnf. The local cache is populated with data from the repository:
ls -l /var/cache/tdnf/photon
total 8
drwxr-xr-x 2 root root 4096 May 18 22:52 repodata
d-wxr----t 3 root root 4096 May 3 22:51 rpms
You can clear the cache to help troubleshoot a problem, but doing so might slow the performance of tdnf until the cache becomes repopulated with data. Cleaning the cache can remove stale information. Clear the cache as follows:
tdnf clean all
Cleaning repos: photon photon-extras photon-updates lightwave
Cleaning up everything
Some tdnf commands can help you troubleshoot problems with packages:
makecache
This command updates the cached binary metadata for all known repositories. You can run it after you clean the cache to make sure you are working with the latest repository data as you troubleshoot.
Example:
tdnf makecache
Refreshing metadata for: 'VMware Lightwave 1.0(x86_64)'
Refreshing metadata for: 'VMware Photon Linux 1.0(x86_64)Updates'
Refreshing metadata for: 'VMware Photon Extras 1.0(x86_64)'
Refreshing metadata for: 'VMware Photon Linux 1.0(x86_64)'
Metadata cache created.
tdnf check-local
This command resolves dependencies by using the local RPMs to help check RPMs for quality assurance before publishing them. To check RPMs with this command, you must create a local directory and place your RPMs in it. The command, which includes no options, takes the path to the local directory containing the RPMs as its argument. The command does not, however, recursively parse directories; it checks the RPMs only in the directory that you specify.
For example, after creating a directory named /tmp/myrpms and placing your RPMs in it, you can run the following command to check them:
tdnf check-local /tmp/myrpms
Checking all packages from: /tmp/myrpms
Found 10 packages
Check completed without issues
tdnf provides
This command finds the packages that provide the package that you supply as an argument. If you are used to a package name for another system, you can use tdnf provides to find the corresponding name of the package on Photon OS.
Example:
tdnf provides docker
docker-1.11.0-1.ph1.x86_64 : Docker
Repo : photon
docker-1.11.0-1.ph1.x86_64 : Docker
Repo : @System
For a file, you must provide the full path. Example:
tdnf provides /usr/include/stdio.h
glibc-devel-2.22-8.ph1.x86_64 : Header files for glibc
Repo : photon
glibc-devel-2.22-8.ph1.x86_64 : Header files for glibc
Repo : @System
The following example shows you how to find the package that provides a pluggable authentication module, which you might need to find if the system is mishandling passwords.
tdnf provides /etc/pam.d/system-account
shadow-4.2.1-7.ph1.x86_64 : Programs for handling passwords in a secure way
Repo : photon
shadow-4.2.1-8.ph1.x86_64 : Programs for handling passwords in a secure way
Repo : photon-updates
For more commands see the Photon OS Administration Guide.
If a package that is installed is not working, try re-installing it.
Example:
```
tdnf reinstall shadow
Reinstalling:
shadow x86_64 4.2.1-7.ph1 3.85 M
```
7.9 - Kernel Problems and Boot and Login Errors
Photon OS includes commands to troubleshoot kernel problems and boot and login errors.
7.9.1 - Kernel Overview
You can use dmesg command to troubleshooting kernel errors. The dmesg command prints messages from the kernel ring buffer.
The following command, for example, presents kernel messages in a human-readable format:
dmesg --human --kernel
To examine kernel messages as you perform actions, such as reproducing a problem, in another terminal, you can run the command with the --follow option, which waits for new messages and prints them as they occur:
dmesg --human --kernel --follow
The kernel buffer is limited in memory size. As a result, the kernel cyclically overwrites the end of the information in the buffer from which dmesg pulls information. The systemd journal, however, saves the information from the buffer to a log file so that you can access older information.
To view it, run the following command:
journalctl -k
If required, you can check the modules that are loaded on your Photon OS machine by running the lsmod command. For example:
lsmod
Module Size Used by
vmw_vsock_vmci_transport 28672 1
vsock 36864 2 vmw_vsock_vmci_transport
coretemp 16384 0
hwmon 16384 1 coretemp
crc32c_intel 24576 0
hid_generic 16384 0
usbhid 28672 0
hid 106496 2 hid_generic,usbhid
xt_conntrack 16384 1
iptable_nat 16384 0
nf_conntrack_ipv4 16384 2
nf_defrag_ipv4 16384 1 nf_conntrack_ipv4
nf_nat_ipv4 16384 1 iptable_nat
nf_nat 24576 1 nf_nat_ipv4
iptable_filter 16384 1
ip_tables 24576 2 iptable_filter,iptable_nat
7.9.2 - Boot Process Overview
When a Photon OS machine boots, the BIOS initializes the hardware and uses a boot loader to start the kernel. After the kernel starts, systemd takes over and boots the rest of the operating system.
The BIOS checks the memory and initializes the keyboard, the screen, and other peripherals. When the BIOS finds the first hard disk, the boot loader–GNU GRUB 2.02–takes over. From the hard disk, GNU GRUB loads the master boot record (MBR) and initializes the root partition of the random-access memory by using initrd. The device manager, udev, provides initrd with the drivers it needs to access the device containing the root file system. Here’s what the GNU GRUB edit menu looks like in Photon OS with its default commands to load the boot record and initialize the RAM disk:

At this point, the Linux kernel in Photon OS, which is kernel version 4.4.8, takes control. Systemd kicks in, initializes services in parallel, mounts the rest of the file system, and checks the file system for errors.
7.9.3 - Blank Screen on Reboot
If the Photon OS kernel enters a state of panic during a reboot and all you see is a blank screen, note the name of the virtual machine running Photon OS and then power off the VM.
In the host, open the vmware.log file for the VM. When a kernel panics, the guest VM prints the entire kernel log in vmware.log in the host directory containing the VM. This log file contains the output of the dmesg command from the guest, and you can analyze it to help identify the cause of the boot problem.
Example
After searching for Guest: in the following abridged vmware.log, this line appears, identifying the root cause of the reboot problem:
```
2016-08-30T16:02:43.220-07:00| vcpu-0| I125: Guest:
<0>[1.125804] Kernel panic - not syncing:
VFS: Unable to mount root fs on unknown-block(0,0)
```
Further inspection finds the following lines:
2016-08-30T16:02:43.217-07:00| vcpu-0| I125: Guest:
<4>[ 1.125782] VFS: Cannot open root device "sdc1" or unknown-block(0,0): error -6
2016-08-30T16:02:43.217-07:00| vcpu-0| I125: Guest:
<4>[ 1.125783] Please append a correct "root=" boot option;
here are the available partitions:
2016-08-30T16:02:43.217-07:00| vcpu-0| I125: Guest:
<4>[ 1.125785] 0100 4096 ram0 (driver?)
...
0800 8388608 sda driver: sd
2016-08-30T16:02:43.220-07:00| vcpu-0| I125: Guest:
<4>[ 1.125802] 0801 8384512 sda1 611e2d9a-a3da-4ac7-9eb9-8d09cb151a93
2016-08-30T16:02:43.220-07:00| vcpu-0| I125: Guest:
<4>[ 1.125803] 0802 3055 sda2 8159e59c-b382-40b9-9070-3c5586f3c7d6
In this unlikely case, the GRUB configuration points to a root device named sdc1 instead of the correct root device, sda1. You can resolve the problem by restoring the GRUB GNU edit screen and the GRUB configuration file (/boot/grub/grub.cfg) to their original configurations.
7.9.4 - Investigating Unexpected Behavior
If you rebooted to address unexpected behavior before the reboot or if you encountered unexpected behavior during the reboot but have reached the shell, you must analyze what happened since the previous boot.
Run the following command to check the logs:
journalctl
Run the following command to look at what happened since the penultimate reboot:
journalctl --boot=-1
Look at the log from the reboot:
journalctl -b
If required, examine the logs for the kernel:
journalctl -k
Check which kernel is in use:
uname -r
As example for Photon OS 1.0, the kernel version in the full version is 4.4.8. The kernel version of in the OVA version is 4.4.8-esx. With the ESX version of the kernel, some services might not start.
Run this command to check the overall status of services:
systemctl status
If a service is in red, check it:
systemctl status service-name
Start it if required:
systemctl start service-name
If looking at the journal and checking the status of services does not resolve your error, run the following systemd-analyze commands to examine the boot time and the speed with which services start.
systemd-analyze time
systemd-analyze blame
systemd-analyze critical-chain
Note: The output of these commands might be misleading because one service might just be waiting for another service to finish initializing.
7.9.5 - Investigating the Guest Kernel
If a VM running Photon OS and an application or virtual appliance is behaving preventing you from logging in to the machine, you can troubleshoot by extracting the kernel logs from the guest’s memory and analyzing them with gdb.
This advanced troubleshooting method works when you are running Photon OS as the operating system for an application or appliance on VMware Workstation, Fusion, or ESXi. The procedure in this section assumes that the virtual machine running Photon OS is functioning normally.
The process to use this troubleshooting method varies by environment. The examples in this section assume that the troublesome Photon OS virtual machine is running in VMware Workstation 12 Pro on a Microsoft Windows 8 Enterprise host. The examples also use an additional, fully functional Photon OS virtual machine running in Workstation.
You can use other hosts, hypervisors, and operating systems–but you will have to adapt the example process below to them. Directory paths, file names, and other aspects might be different on other systems.
Prerequisites
Verify that you have the following resources:
- Root access to a Linux machine other than the one you are troubleshooting. It can be another Photon OS machine, Ubuntu, or another Linux variant.
- The
vmss2core utility from VMware. It is installed by default in VMware Workstation and some other VMware products. If your system doesn’t already contain it, you can download it for free from https://labs.vmware.com/flings/vmss2core. - A local copy of the Photon OS ISO of the exact same version and release number as the Photon OS machine that you are troubleshooting.
Procedure Overview
The process to apply this troubleshooting method is as follows:
- On a local computer, you open a file on the Photon OS ISO that contains Linux debugging information. Then you suspend the troublesome Photon OS VM and extract the kernel memory logs from the VMware hypervisor running Photon OS.
- Next, you use the vmss2core tool to convert the memory logs into core dump files. The vmss2core utility converts VMware checkpoint state files into formats that third-party debugging tools understand. It can handle both suspend (.vmss) and snapshot (.vmsn) checkpoint state files (hereafter referred to as a vmss file) as well as monolithic and non-monolithic (separate .vmem file) encapsulation of checkpoint state data. See Debugging Virtual Machines with the Checkpoint to Core Tool.
- Finally, you prepare to run the gdb tool by using the debug info file from the ISO to create a
.gdbinit file, which you can then analyze with the gdb shell on your local Linux machine.
All three components must be in the same directory on a Linux machine.
Procedure
Obtain a local copy of the Photon OS ISO of the exact same version and release number as the Photon OS machine that you are troubleshooting and mount the ISO on a Linux machine (or open it on a Windows machine):
mount /mnt/cdrom
Locate the following file. (If you opened the Photon OS ISO on a Windows computer, copy the following file to the root folder of a Linux machine.)
/RPMS/x86_64/linux-debuginfo-4.4.8-6.ph1.x86_64.rpm
On a Linux machine, run the following rpm2cpio command to convert the RPM file to a cpio file and to extract the contents of the RPM to the current directory:
rpm2cpio /mnt/cdrom/RPMS/x86_64/linux-debuginfo-4.4.8-6.ph1.x86_64.rpm | cpio -idmv
From the extracted files, copy the following file to your current directory:
cp usr/lib/debug/lib/modules/4.4.8/vmlinux-4.4.8.debug
Run the following command to download the dmesg functions that will help extract the kernel log from the coredump:
wget https://www.kernel.org/doc/Documentation/kdump/gdbmacros.txt
wget https://github.com/vmware/photon/blob/master/tools/scripts/gdbmacros-for-linux.txt
Move the file as follows:
mv gdbmacros-for-linux.txt .gdbinit
Switch to your host machine so you can get the kernel memory files from the VM. Suspend the troublesome VM and locate the .vmss and .vmem files in the virtual machine’s directory on the host.
Example:
C:\Users\tester\Documents\Virtual Machines\VMware Photon 64-bit (7)>dir
Volume in drive C is Windows
Directory of C:\Users\tester\Documents\Virtual Machines\VMware Photon 64-bit
(7)
09/20/2016 12:22 PM <DIR> .
09/20/2016 12:22 PM <DIR> ..
09/19/2016 03:39 PM 402,653,184 VMware Photon 64-bit (7)-f6b070cd.vmem
09/20/2016 12:11 PM 5,586,907 VMware Photon 64-bit (7)-f6b070cd.vmss
09/20/2016 12:11 PM 1,561,001,984 VMware Photon 64-bit (7)-s001.vmdk
...
09/20/2016 12:11 PM 300,430 vmware.log
...
Now that you have located the .vmss and .vmem files, convert them to one or more core dump files by using the vmss2core tool that comes with Workstation. Here is an example of how to run the command. Be careful with your pathing, escaping, file names, and so forth–all of which might be different from this example on your Windows machine.
C:\Users\shoenisch\Documents\Virtual Machines\VMware Photon 64-bit (7)>C:\"Program Files (x86)\VMware\VMware Workstation"\vmss2core.exe "VMware Photon 64-bit (7)-f6b070cd.vmss" "VMware Photon 64-bit (7)-f6b070cd.vmem"
The result of this command is one or more files with a `.core` extension plus a digit. Truncated example:
C:\Users\tester\Documents\Virtual Machines\VMware Photon 64-bit (7)>dir
Directory of C:\Users\tester\Documents\Virtual Machines\VMware Photon 64-bit(7)
09/20/2016 12:22 PM 729,706,496 vmss.core0
Copy the .core file or files to the your current directory on the Linux machine where you so that you can analyze it with gdb.
Run the following gdb command to enter the gdb shell attached to the memory core dump file. You might have to change the name of the vmss.core file in the example to match your .core file:
gdb vmlinux-4.4.8.debug vmss.core0
GNU gdb (GDB) 7.8.2
Copyright (C) 2014 Free Software Foundation, Inc.
License GPLv3+: GNU GPL version 3 or later <http://gnu.org/licenses/gpl.html>
This is free software: you are free to change and redistribute it.
There is NO WARRANTY, to the extent permitted by law. ...
Type "show configuration" for configuration details.
For bug reporting instructions, please see:
<http://www.gnu.org/software/gdb/bugs/>.
Find the GDB manual and other documentation resources online at: <http://www.gnu.org/software/gdb/documentation/>.
For help, type "help".
Type "apropos word" to search for commands related to "word"...
Reading symbols from vmlinux-4.4.8.debug...done.
warning: core file may not match specified executable file.
[New LWP 12345]
Core was generated by `GuestVM'.
Program terminated with signal SIGSEGV, Segmentation fault.
#0 0xffffffff813df39a in insb (count=0, addr=0xffffc90000144000, port=<optimized out>)
at arch/x86/include/asm/io.h:316
316 arch/x86/include/asm/io.h: No such file or directory.
(gdb)
Result
In the results above, the (gdb) of the last line is the prompt of the gdb shell. You can now analyze the core dump by using commands like bt, to perform a backtrace, and dmesg, to view the Photon OS kernel log and see Photon OS kernel error messages.
7.9.6 - Kernel Log Replication with VProbes
Replicating the Photon OS kernel logs on the VMware ESXi host is an advanced but powerful method of troubleshooting a kernel problem.
Replication Method
This method is applicable when the virtual machine running Photon OS is hanging or inaccessible because, for instance, the hard disk has failed.
As a prerequisite, you must have preemptively enabled the VMware VProbes facility on the VM before an error rendered it inaccessible. You must also create a VProbes script on the ESXi host, but you can do that after the error.
The method is useful in analyzing kernel issues when testing an application or appliance that is running on Photon OS.
There are two similar ways in which you can replicate the Photon OS kernel logs on ESXi by using VProbes.
The first modifies the VProbes script so that it works only for the VM that you set. It uses a hard-coded address.
The second uses an abstraction instead of a hard-coded address so that the same VProbes script can be used for any VM on an ESXi host that you have enabled for VProbe and copied its kernel symbol table (kallsyms) to ESXi.
For more information on VMware VProbes, see Archived VProbe Toolkit and the VProbes Programming Reference.
Using VProbes Script with a Hard-Coded Address
Perform the following steps to set a VProbe for an individual VM:
Power off the VM so that you can turn on the VProbe facility.
Edit the .vmx configuration file for the VM. The file resides in the directory that contains the VM in the ESXi data store. Add the following line of code to the .vmx file and then power the VM on:
vprobe.enable = "TRUE"
When you edit the .vmx file to add the above line of code, you must first turn off the VM–otherwise, your changes will not persist.
Obtain the kernel log_store function address by connecting to the VM with SSH and running the following commands as root.
Photon OS uses the kptr_restrict setting to place restrictions on the kernel addresses exposed through /proc and other interfaces. This setting hides exposed kernel pointers to prevent attackers from exploiting kernel write vulnerabilities. When you are done using VProbes, you should return kptr_restrict to the original setting of 2 by rebooting.)
echo 0 > /proc/sys/kernel/kptr_restrict
grep log_store /proc/kallsyms
The output of the grep command will look similar to the following string. The first set of characters (without the t) is the log_store function address:
ffffffff810bb680 t log_store
Connect to the ESXi host with SSH so that you can create a VProbes script.
Below is the template for the script. log_store in the first line is a placeholder for the VM’s log_store function address:
GUEST:ENTER:log_store {
string dst;
getgueststr(dst, getguest(RSP+16) & 0xff, getguest(RSP+8));
printf("%s\n", dst);
}
On the ESXi host, create a new file, add the template to it, and then change log_store to the function address that was the output from the grep command on the VM.
Add a 0x prefix to the function address. In this example, the modified template looks like this:
GUEST:ENTER:0xffffffff810bb680 {
string dst;
getgueststr(dst, getguest(RSP+16) & 0xff, getguest(RSP+8));
printf("%s\n", dst);
}
Save your VProbes script as console.emt in the /tmp directory. (The file extension for VProbe scripts is .emt.)
While still connected to the ESXi host with SSH, run the following command to obtain the ID of the virtual machine that you want to troubleshoot:
vim-cmd vmsvc/getallvms
This command lists all the VMs running on the ESXi host. Find the VM you want to troubleshoot in the list and make a note of its ID.
Run the following command to print all the kernel messages from Photon OS in your SSH console; replace <VM ID> with the ID of your VM:
vprobe -m <VM ID> /tmp/console.emt
When you’re done, type Ctrl-C to stop the loop.
A Reusable VProbe Script Using the kallsyms File
Perform the following steps to create one VProbe script and use for all the VMs on your ESXi host.
Power off the VM and turn on the VProbe facility on each VM that you want to be able to analyze.
Add vprobe.enable = "TRUE" to the VM’s .vmx configuration file. See the instructions above.
Power on the VM, connect to it with SSH, and run the following command as root:
`echo 0 > /proc/sys/kernel/kptr_restrict`
Connect to the ESXi host with SSH to create the following VProbes script and save it as /tmp/console.emt:
GUEST:ENTER:log_store {
string dst;
getgueststr(dst, getguest(RSP+16) & 0xff, getguest(RSP+8));
printf("%s\n", dst);
}
From the ESXi host, run the following command to copy the VM’s kallysms file to the tmp directory on the ESXi host:
`scp root@<vm ip address>:/proc/kallsyms /tmp`
While still connected to the ESXi host with SSH, run the following command to obtain the ID of the virtual machine that you want to troubleshoot:
`vim-cmd vmsvc/getallvms`
This command lists all the VMs running on the ESXi host. Find the VM you want to troubleshoot in the list and make a note of its ID.
Run the following command to print all the kernel messages from Photon OS in your SSH console.
Replace <VM ID> with the ID of your VM. When you’re done, type Ctrl-C to stop the loop.
vprobe -m <VM ID> -k /tmp/kallysyms /tmp/console.emt
You can use a directory other than tmp if you want.
7.9.7 - Linux Kernel
The Linux kernel is the main component of Photon OS and is the core interface between a computer’s hardware and its processes. It communicates between the two, managing resources as efficiently as possible.
##Kernel Flavours and Versions
The following list contains the different Linux kernel flavours available:
linux - A generic kernel designed to run everywhere and support everything.linux-esx - Optimized to run only on VMware hypervisor (ESXi, WS, Fusion). It has minimal set of device drivers to support VMware virtual devices. uname -r displays Linux . For additional features switch to the generic flavour.linux-secure - Security hardened variant of the generic kernel. uname -r displays -secure suffix.linux-rt - This is a Photon Real Time kernel. uname -r displays -rt suffix.linux-aws - Optimized for AWS hypervisor kernel. uname -r displays -aws suffix.
To see the version of kernel installed, run the following command:
# rpm -qa | grep -e "^linux\(\|-esx\|-secure\|rt\|aws\)-[[:digit:]]"
linux-4.9.111-1.ph2.x86_64
linux-esx-4.9.111-1.ph2.x86_64
To see the version of the Kernel that is running currently, run the following command:
# uname -r
4.9.107-1.ph2-esx
From the output, you can see that the kernel running currently doesn’t match the installer. This happens when linux-* rpms were updated but was not restarted. Restart is required.
##Configuration
To find the configurations of the installed Kernel, check the /boot directory by running the following command:
# ls /boot/config-*
config-4.9.111-1.ph2 config-4.9.111-1.ph2-esx
To get a copy of the kernel configuration (Not all flavours support this feature), run the zcat /proc/config.gz command.
##Boot Parameters and initrd
Several kernel flavors can be installed on the system, but only one is used during boot.
/boot/photon.cfg symlink points to the kernel which is used for boot.
# ls -l /boot/photon.cfg
lrwxrwxrwx 1 root root 23 Jun 12 2018 /boot/photon.cfg -> linux-4.9.111-1.ph2.cfg
Its contents can be checked by running the following command:
# cat /boot/photon.cfg
# GRUB Environment Block
photon_cmdline=init=/lib/systemd/systemd ro loglevel=3 quiet no-vmw-sta
photon_linux=vmlinuz-4.9.111-1.ph2
photon_initrd=initrd.img-4.9.111-1.ph2
Where:
photon_cmdline - Kernel parameters. This list will be extended by values from /boot/systemd.cfg file and the values are hardcoded to /boot/grub2/grub.cfg file (For example: root=).photon_linux - Kernel image to boot.photon_initrd - Initrd to use at boot.
Parameters of the kernel loading currently can be found by running the /proc/cmdline command:
# cat /proc/cmdline
BOOT_IMAGE=/boot/vmlinuz-4.9.107-1.ph2-esx root=PARTUUID=29194d05-4a6e-4e0c-b1f4-5020e5e8472c net.ifnames=0 init=/lib/systemd/systemd ro loglevel=3 quiet no-vmw-sta
##Dmesg
To view message buffer of the kernel run the dmesg command.
##Sysctl State
To view a list of all active units run the systemctl list-units command.
##Kernel Statistics
The kernel statitics can be found by running the following commands:
##Kernel Modules
To view the kernel log buffer run the journalctl -k command.
To view a list of available kernel modules run the lsmod command.
To view detailed information about all connected PCI buses run the lspci command.
7.10 - Performance Issues
Performance issues can be difficult to troubleshoot because so many variables play a role in overall system performance. Interpreting performance data often depends on the context and the situation. To better identify and isolate variables and to gain insight into performance data, you can use the troubleshooting tools on Photon OS to diagnose the system.
7.10.1 - General Performance Guidelines
If you have no indication what the cause of a performance degradation might be, start by getting a high-level picture of the system’s state. Then look for signs in the data that might point to a cause.
Use the following guidelines to gain insight into performance data:
Start with the systemd journal.
The top tool can unmask problems caused by processes or applications overconsuming CPUs, time, or RAM. If the percent of CPU utilization is consistently high with little idle time, for example, there might be a runaway process. Restart it.
The netstat --statistics command can identify bottlenecks causing performance issues. It lists interface statistics for different protocols.
If top and netstat reveal no errors, run the strace ls -al to view every system call.
The watch command can help dynamically monitor a command to help troubleshoot performance issues:
watch -n0 --differences <command>
You can also combine watch with the vmstat command to dig deeper into statistics about virtual memory, processes, block input-output, disks, and CPU activity. Are there any bottlenecks?
You can use the dstat utility to see the live, running list of statistics about system resources.
The systemd-analyze reveals performance statistics for boot time and can help troubleshoot slow system boots and incorrect unit files.
The additional tools that you select depend on the clues that your initial investigation reveals. The following tools can also help troubleshoot performance: sysstat, sar, systemtap, and crash.
7.10.2 - Throughput Performance
Throughtput performance over TCP might be reduced.
This might occur because timestamps are enabled by default and the parameter net.ipv4.tcp_timestamps has a value of 1.
Setting a value of 1 or 2 for this parameter may impact performance. Setting a value of 0 or 2 for this parameter might cause a security vulnerability.
8 - Security Advisories
Security Advisories can be found at: https://github.com/vmware/photon/wiki/Security-Advisories