SAF CLI
The MITRE Security Automation Framework (SAF) Command Line Interface (CLI) brings together applications, techniques, libraries, and tools developed by MITRE and the security community to streamline security automation for systems and DevOps pipelines.
In this context the SAF CLI is used for the following tasks:
- Creating and applying manual attestations to InSpec results.
- Converting InSpec results to a STIG checklist(CKL) format.
- Converting STIG XCCDF files to InSpec profiles to stub out a new profile.
Prerequisites
- Windows, Linux, and MAC are supported.
Installation
Download the package for your OS for a release here.
For a full list of installation options, see Installation.
Usage
Creating and applying manual attestations
Manual attestation is helpful in scenarios where a control can’t be automated for some reason(no API, policy based, etc) but you would still like to include an evaluation of these controls with your automated reports.
The example covered will work with InSpec results but this process can be applied to any report from various supported security tools in the SAF ecosystem.
Creating a manual attestation file
An attestation file can be created using SAF CLI or by just manually creating a file.
Using SAF CLI to create a file
# Provide your report.json as input and in this example we are using yml as the format but json is also supported
saf attest create -i .\vSphere_ESXi_8.0.1_GA_21495797_ootb_04-12-2023-09-05.json -o .\attestation-example.yml -t yml

# You can search for controls by entering a partial STIG ID
Enter a control ID, search for a control, or enter 'q' to exit: esxi-80-00000
        ESXI-80-000005: The ESXi host must enforce the limit of three consecutive invalid logon attempts by a user.
        ESXI-80-000006: The ESXi host must display the Standard Mandatory DOD Notice and Consent Banner before granting access to the system via the Direct Console User Interface (DCUI).
        ESXI-80-000008: The ESXi host must enable lockdown mode.
# For the control you want to attest to you must enter the control ID exactly since this is case sensitive. You will then be prompted to fill out some questions.
Enter a control ID, search for a control, or enter 'q' to exit: ESXI-80-000006
Attestation explanation: The banner is displayed
Frequency (1d/3d/1wk/2wk/1m/3m/6m/1y/1.5y/custom): 1y
Enter status ((p)assed/(f)ailed): passed
Updated By: RL
Enter a control ID, search for a control, or enter 'q' to exit: q
This results in a yaml file that looks like the following:
- control_id: ESXI-80-000006
  explanation: The banner is displayed
  frequency: 1y
  status: passed
  updated: 2023-05-17T13:32:32.945Z
  updated_by: RL
Now that you know the format it may be easier to just add all of the controls needing manual attestation to the attestation file directly.
Applying an attestation file to a result file
The next step is to apply the attestation file to our original report to then create a new one that includes our manual attestations.
# Provide the original report followed by the attestation file created then for the output provide a name for a new report
saf attest apply -i .\vSphere_ESXi_8.0.1_GA_21495797_ootb_04-12-2023-09-05.json .\attestation-example.yml -o .\My_new_report_with_attestations.json
If we examine the new report we will see this on the control we provided an attestation for:
{
  "code_desc": "Manually verified status provided through attestation",
  "status": "passed",
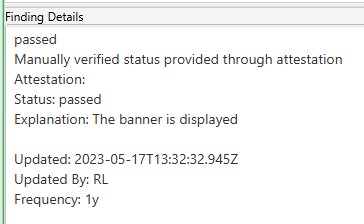
  "message": "Attestation:\nStatus: passed\nExplanation: The banner is displayed\n\nUpdated: 2023-05-17T13:32:32.945Z\nUpdated By: RL\nFrequency: 1y",
  "start_time": "2023-05-17T13:49:06.601Z"
}
Now when we convert this to a CKL file this information will be carried forward.
Converting InSpec results to CKL
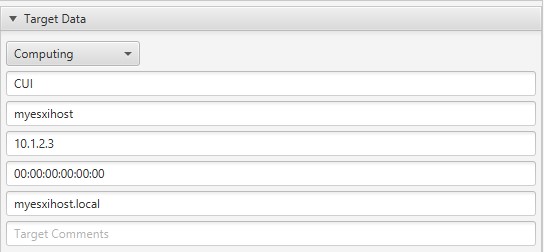
saf convert hdf2ckl -i .\My_new_report_with_attestations.json -o my_new_ckl.ckl --hostname myesxihost --fqdn myesxihost.local --ip 10.1.2.3 --mac 00:00:00:00:00:00
After importing into STIG viewer you can see the manual attestation on the ESXI-80-000006 in the finding details.
The host info provided is also populated in the target data.
Converting XCCDF to InSpec
When starting a new profile for a STIG it would not be feasible to manually populate all of a STIGs metadata (title,check,fix,discussion,ids,severity,etc) into the control files.
SAF CLI offers a command to take an XCCDF xml file from a STIG as an input and output a stubbed out InSpec profile that includes all of this data where you then only need to add your tests for each control.
# The -T argument sets which ID to use as the control ID for InSpec. In this case we prefer STIG IDs as they are easier to reference. Other options are rule(Rule ID) and group(Vul ID)
saf generate xccdf_benchmark2inspec_stub -T version -i .\U_VMware_vSphere_8_ESXi_STIG_Readiness_Guide_V1R1-xccdf.xml -o my_esxi_profile
This will give us a profile with this folder structure:
my_esxi_profile
├── controls
│   ├── ESXI-80-000005.rb
│   └── ESXI-80-000006.rb
│   └── ...
├── libraries
└── inspec.yml
Control file example:
control 'ESXI-80-000005' do
  title 'The ESXi host must enforce the limit of three consecutive invalid logon attempts by a user.'
  desc 'By limiting the number of failed logon attempts, the risk of unauthorized access via user password guessing, otherwise known as brute forcing, is reduced. Once the configured number of attempts is reached, the account is locked by the ESXi host.'
  desc 'check', 'From the vSphere Client, go to Hosts and Clusters.

Select the ESXi Host >> Configure >> System >> Advanced System Settings.

Select the "Security.AccountLockFailures" value and verify it is set to "3".

or

From a PowerCLI command prompt while connected to the ESXi host, run the following command:

Get-VMHost | Get-AdvancedSetting -Name Security.AccountLockFailures

If the "Security.AccountLockFailures" setting is set to a value other than "3", this is a finding.'
  desc 'fix', 'From the vSphere Client, go to Hosts and Clusters.

Select the ESXi Host >> Configure >> System >> Advanced System Settings.

Click "Edit". Select the "Security.AccountLockFailures" value and configure it to "3".

or

From a PowerCLI command prompt while connected to the ESXi host, run the following command:

Get-VMHost | Get-AdvancedSetting -Name Security.AccountLockFailures | Set-AdvancedSetting -Value 3'
  impact 0.5
  tag check_id: 'N/A'
  tag severity: 'medium'
  tag gid: 'V-ESXI-80-000005'
  tag rid: 'SV-ESXI-80-000005'
  tag stig_id: 'ESXI-80-000005'
  tag gtitle: 'SRG-OS-000021-VMM-000050'
  tag documentable: nil
  tag cci: ['CCI-000044']
  tag nist: ['AC-7 a']
end
References
For the more information, see the SAF CLI Documentation.